Table of Contents
- Benefits of Reporting for Support
- Methods for Reporting
- Analyze support trends and track team and agent performance in the Reports Module
- Identify the busiest times of the day
- Identify the type of customers that are sending you messages
- Identify the most used Channel for inbound conversations
- Identify the average response and resolution time as a team
- Evaluate the performance of each agent
- Identify potential anomalies for resolved conversations
- Identify potential anomalies for outbound conversations
- Export historical data to a CSV file from the Workspace Settings
- Send real-time data to a Google Sheet or an external data warehouse using Workflows
- Analyze support trends and track team and agent performance in the Reports Module
How to Analyze Reports for Support

- Benefits of Reporting for Support
- Methods for Reporting
- Analyze support trends and track team and agent performance in the Reports Module
- Identify the busiest times of the day
- Identify the type of customers that are sending you messages
- Identify the most used Channel for inbound conversations
- Identify the average response and resolution time as a team
- Evaluate the performance of each agent
- Identify potential anomalies for resolved conversations
- Identify potential anomalies for outbound conversations
- Export historical data to a CSV file from the Workspace Settings
- Send real-time data to a Google Sheet or an external data warehouse using Workflows
- Analyze support trends and track team and agent performance in the Reports Module
The Reports module provides insight on trends and team performance on the platform. Use it to generate reports for long-term support trend analysis and track the performance of your support team as a whole or agents individually.
Benefits of Reporting for Support
Use support reports to:
- Generate and analyze reports with metrics relevant for the management team’s long-term planning.
- Generate and analyze reports with metrics to keep track on team and agents’ performance.
Methods for Reporting
- Analyze support trends and track team and agent performance in the Reports Module.
- Export historical data to a CSV file from the Workspace Settings.
- Send real-time data to a Google Sheet or an external data warehouse using Workflows.
Analyze support trends and track team and agent performance in the Reports Module
Method Objectives
- Identify the busiest times of the day.
- Identify the type of customers that are sending you messages.
- Identify the most used Channel for inbound conversations.
- Identify the average response and resolution time as a team.
- Evaluate the performance for each agent.
- Identify potential anomalies for resolved conversations.
- Identify potential anomalies for outbound conversations.
How-To
Identify the busiest times of the day
Use the Conversation Opened Heatmap to observe peak periods for open conversations within a selected period. This helps support managers identify the busiest times within a day for agents, the purpose of scheduling agents or justifying hiring needs.
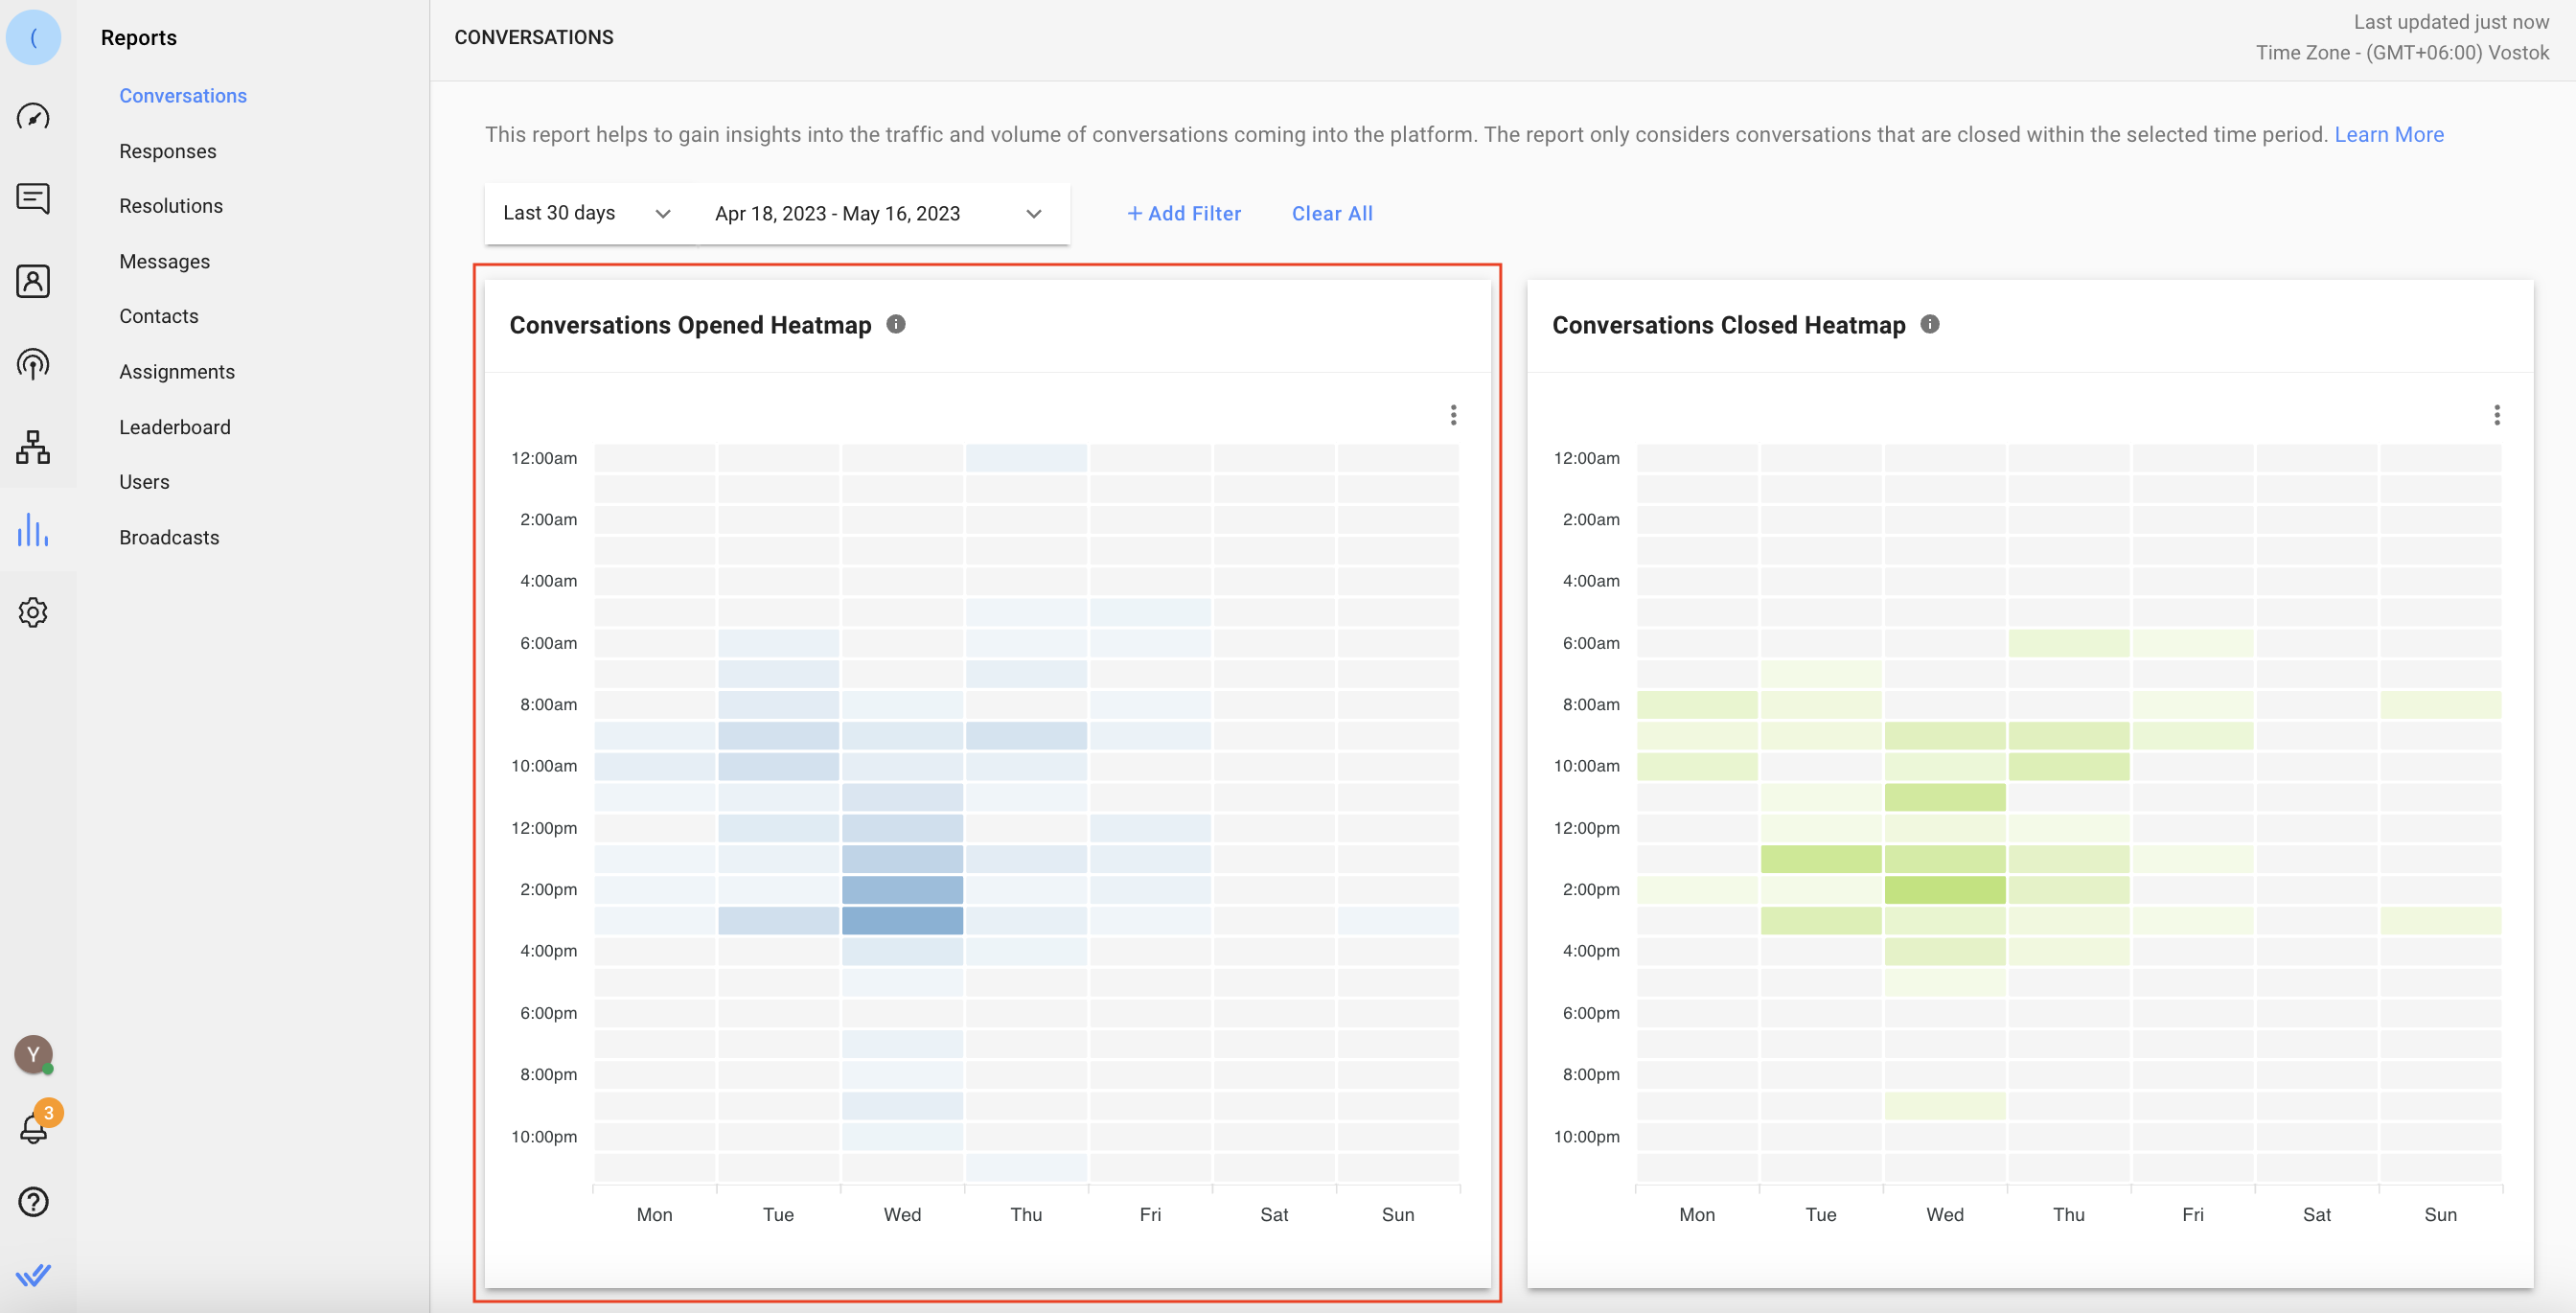
Go to Reports module > Conversations > Conversations Opened Heatmap.
Identify the type of customers that are sending you messages
Use the Conversations Opened by Contact Type to identify if the conversations were opened by new or returning Contacts. If the opened conversations are mostly from new Contacts, this could mean your business is getting inquiries from new customers. If the opened conversations are mostly from returning Contacts, this could mean they are returning customers messaging your business to complain about a service or product.
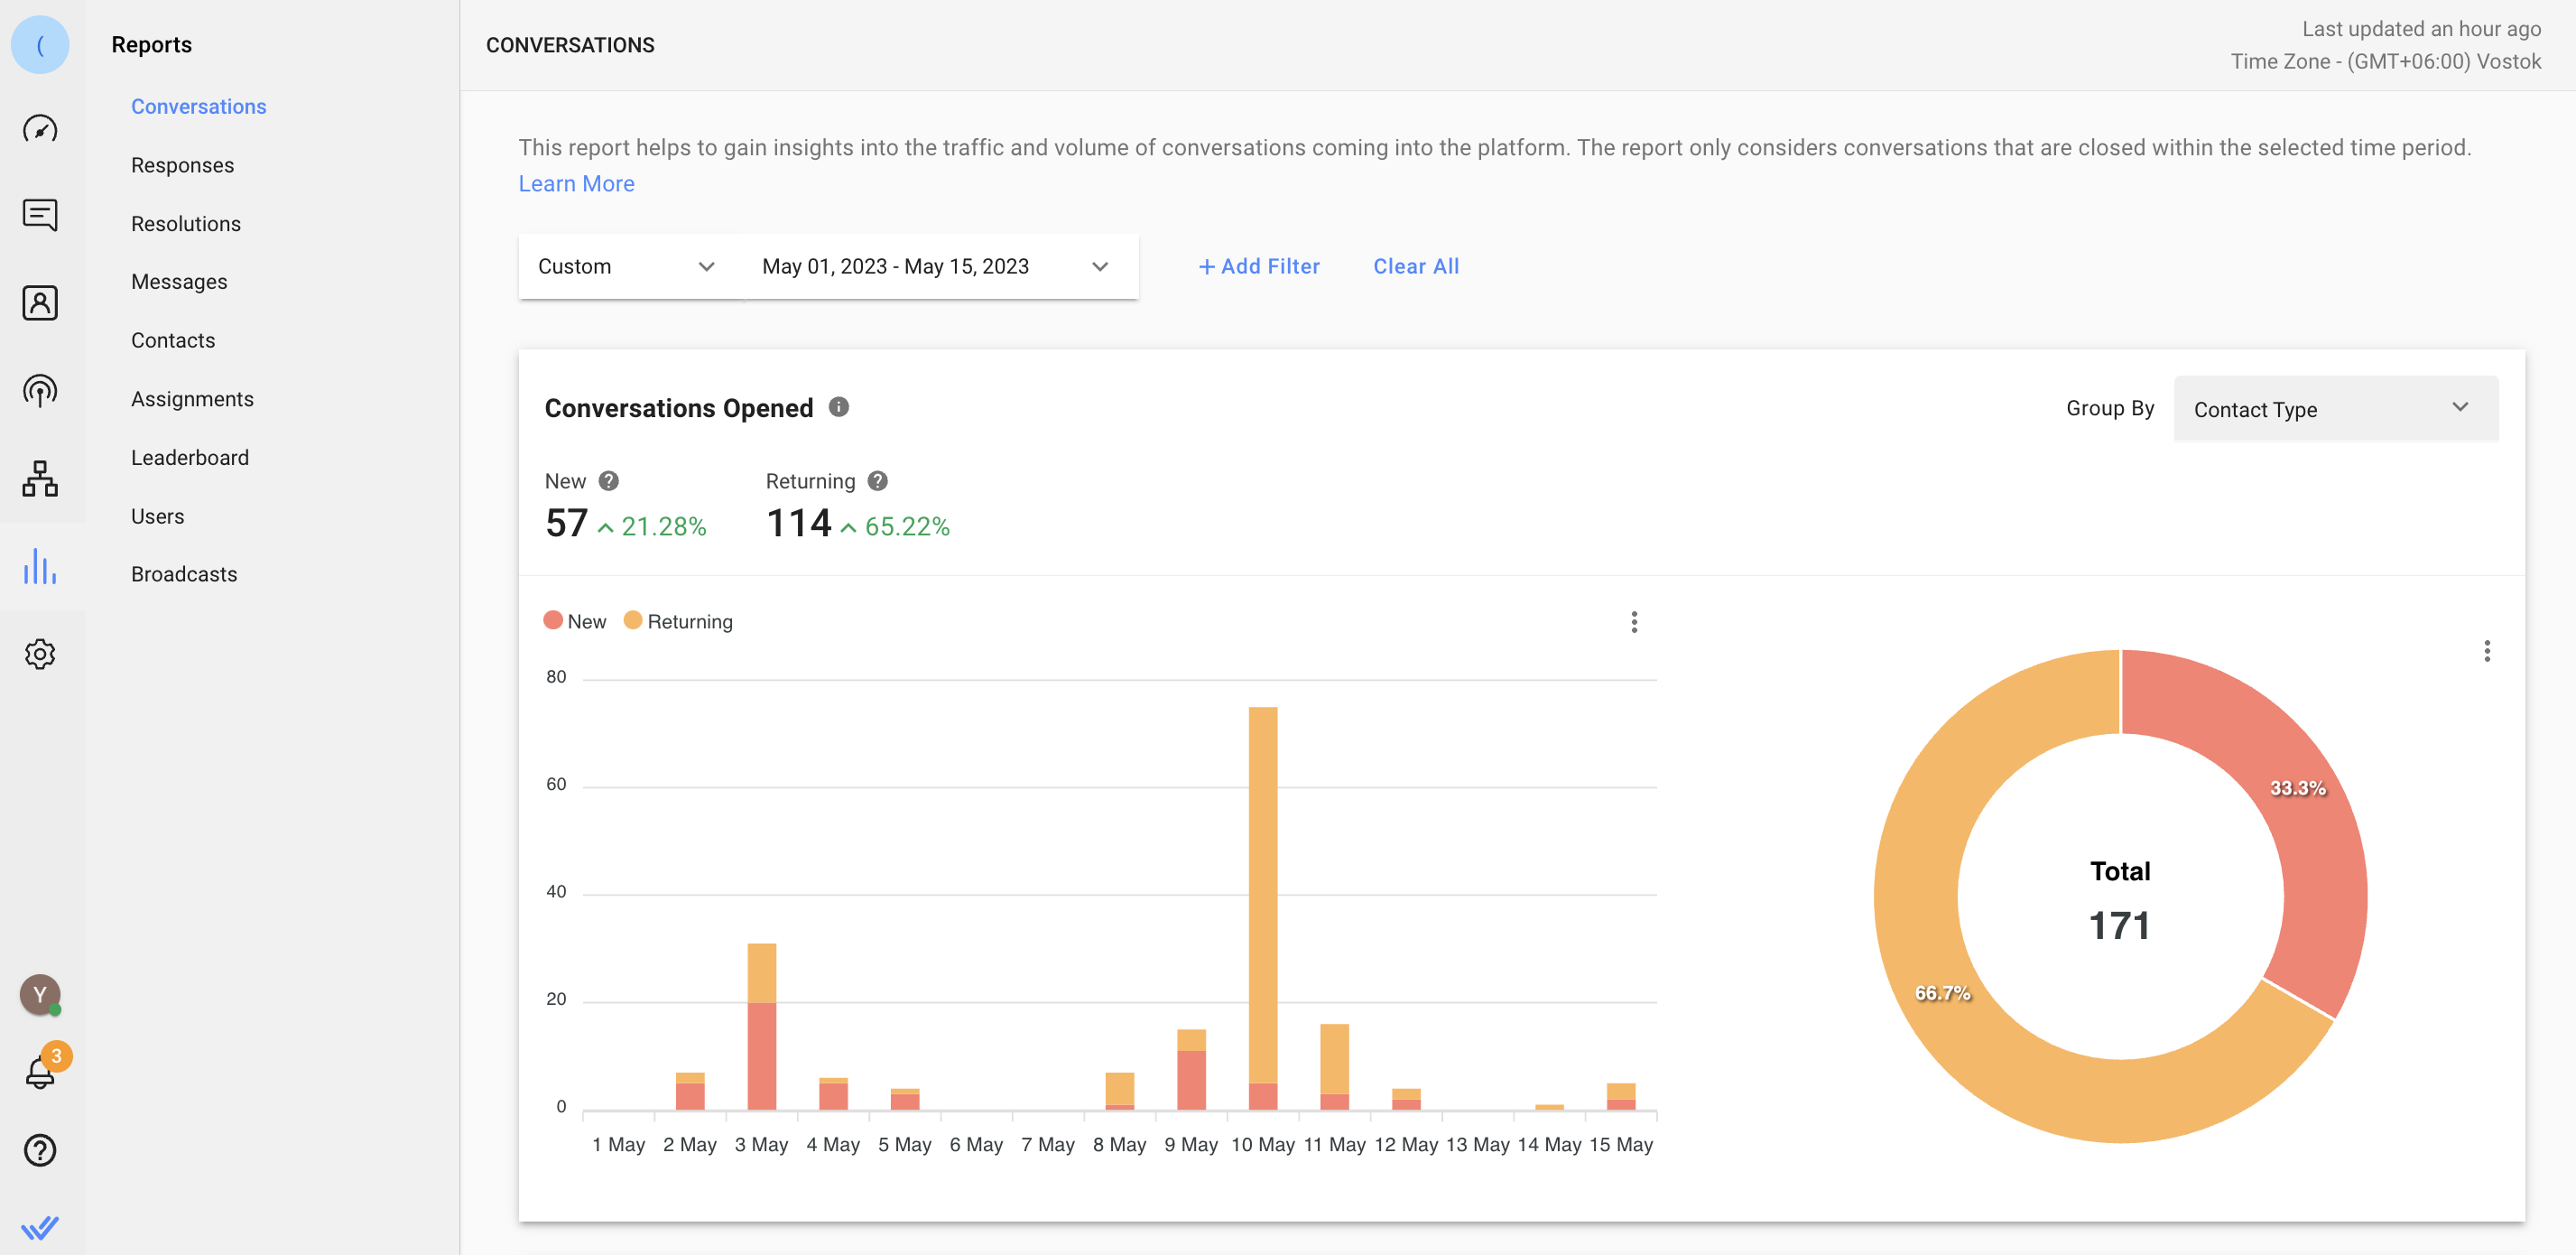
Go to Reports module > Conversations > Conversations Opened > select Contact Type in the Group By drop-down list > select the date range.
Identify the most used Channel for inbound conversations
Use the Incoming Messages chart to identify the Channel customers used the most when sending messages to your business. Understanding the Channel's popularity among your customers helps to justify a subscription cost for a particular Channel if necessary. For example, if most of your customers are using WhatsApp to message you, then it’s justifiable to keep paying for your official WhatsApp API account.

Go to Reports module > Messages > Incoming Messages.
Identify the average response and resolution time as a team
Use the Leaderboard chart to identify the overall average response and resolution time of any team.
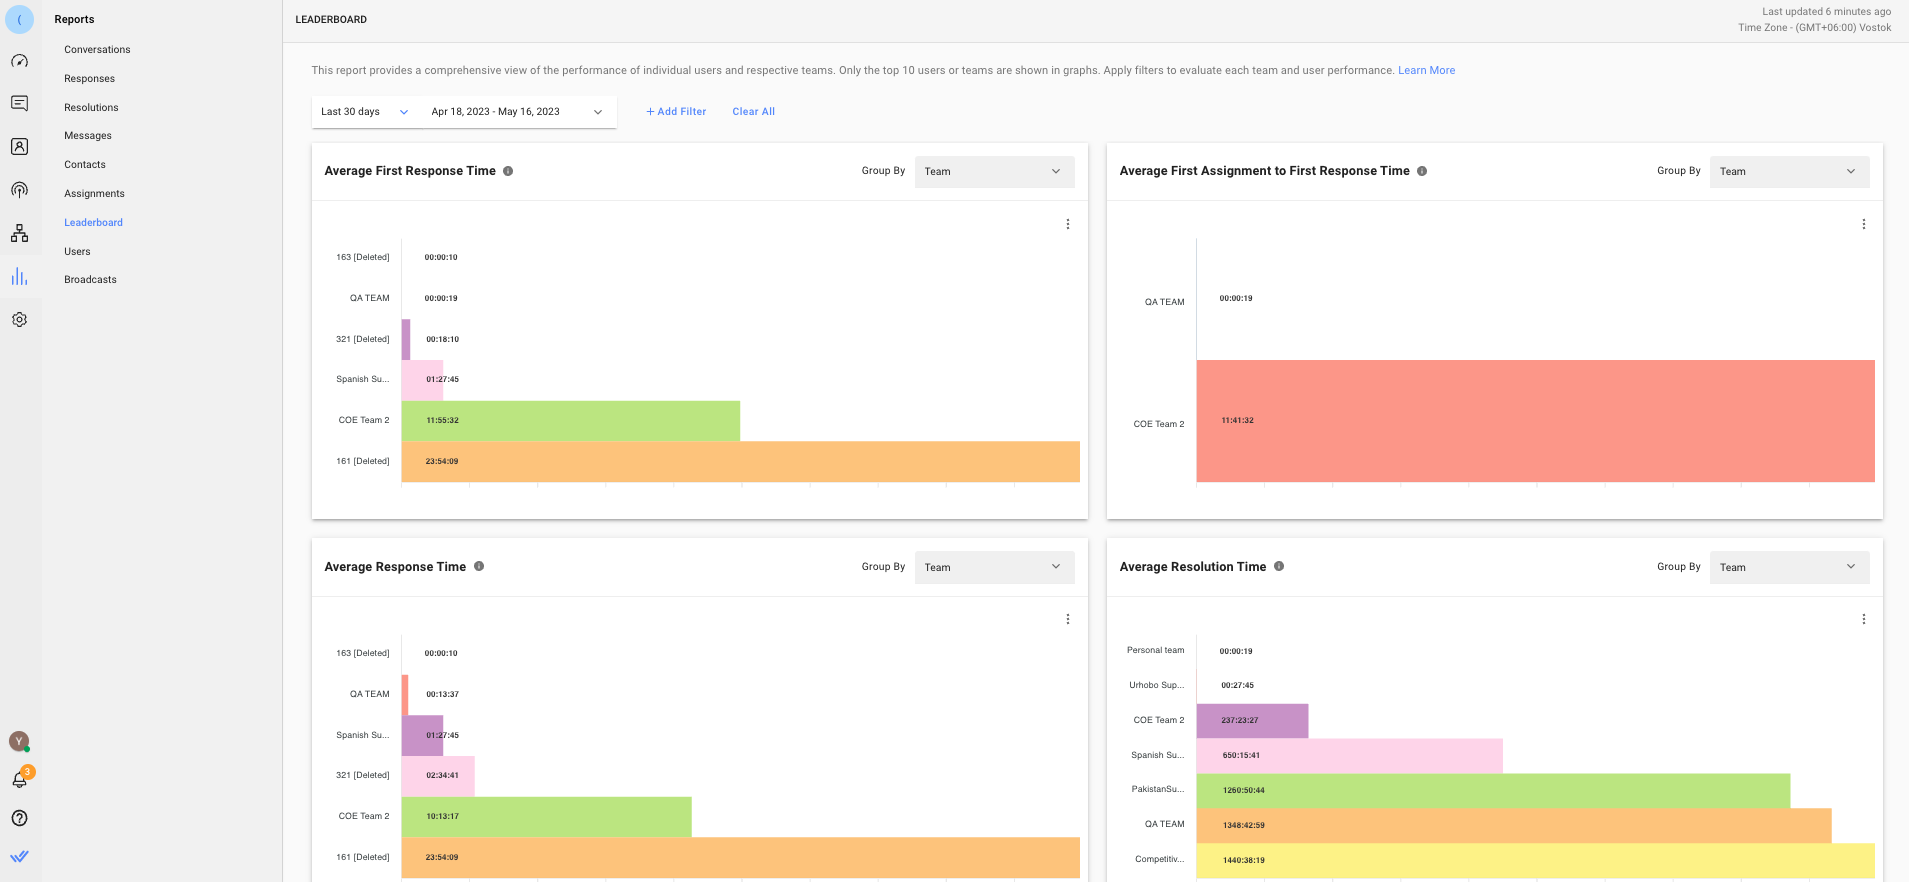
Go to Reports module > Leaderboard > Average Response Time or Average Resolution Time > select Team in the Group By drop-down list. By default, only the top 10 users or teams will be shown in the charts. If you would like to see the average response and resolution time for different team(s), use the Teams filter to get data for individual teams.
Evaluate the performance of each agent
Use the User Performance table to view detailed performance reports on each agent. Here, you can compare agents' workload and set a benchmark for performance goals based on the average statistics. All metrics in this list are based on conversations closed by the agent.
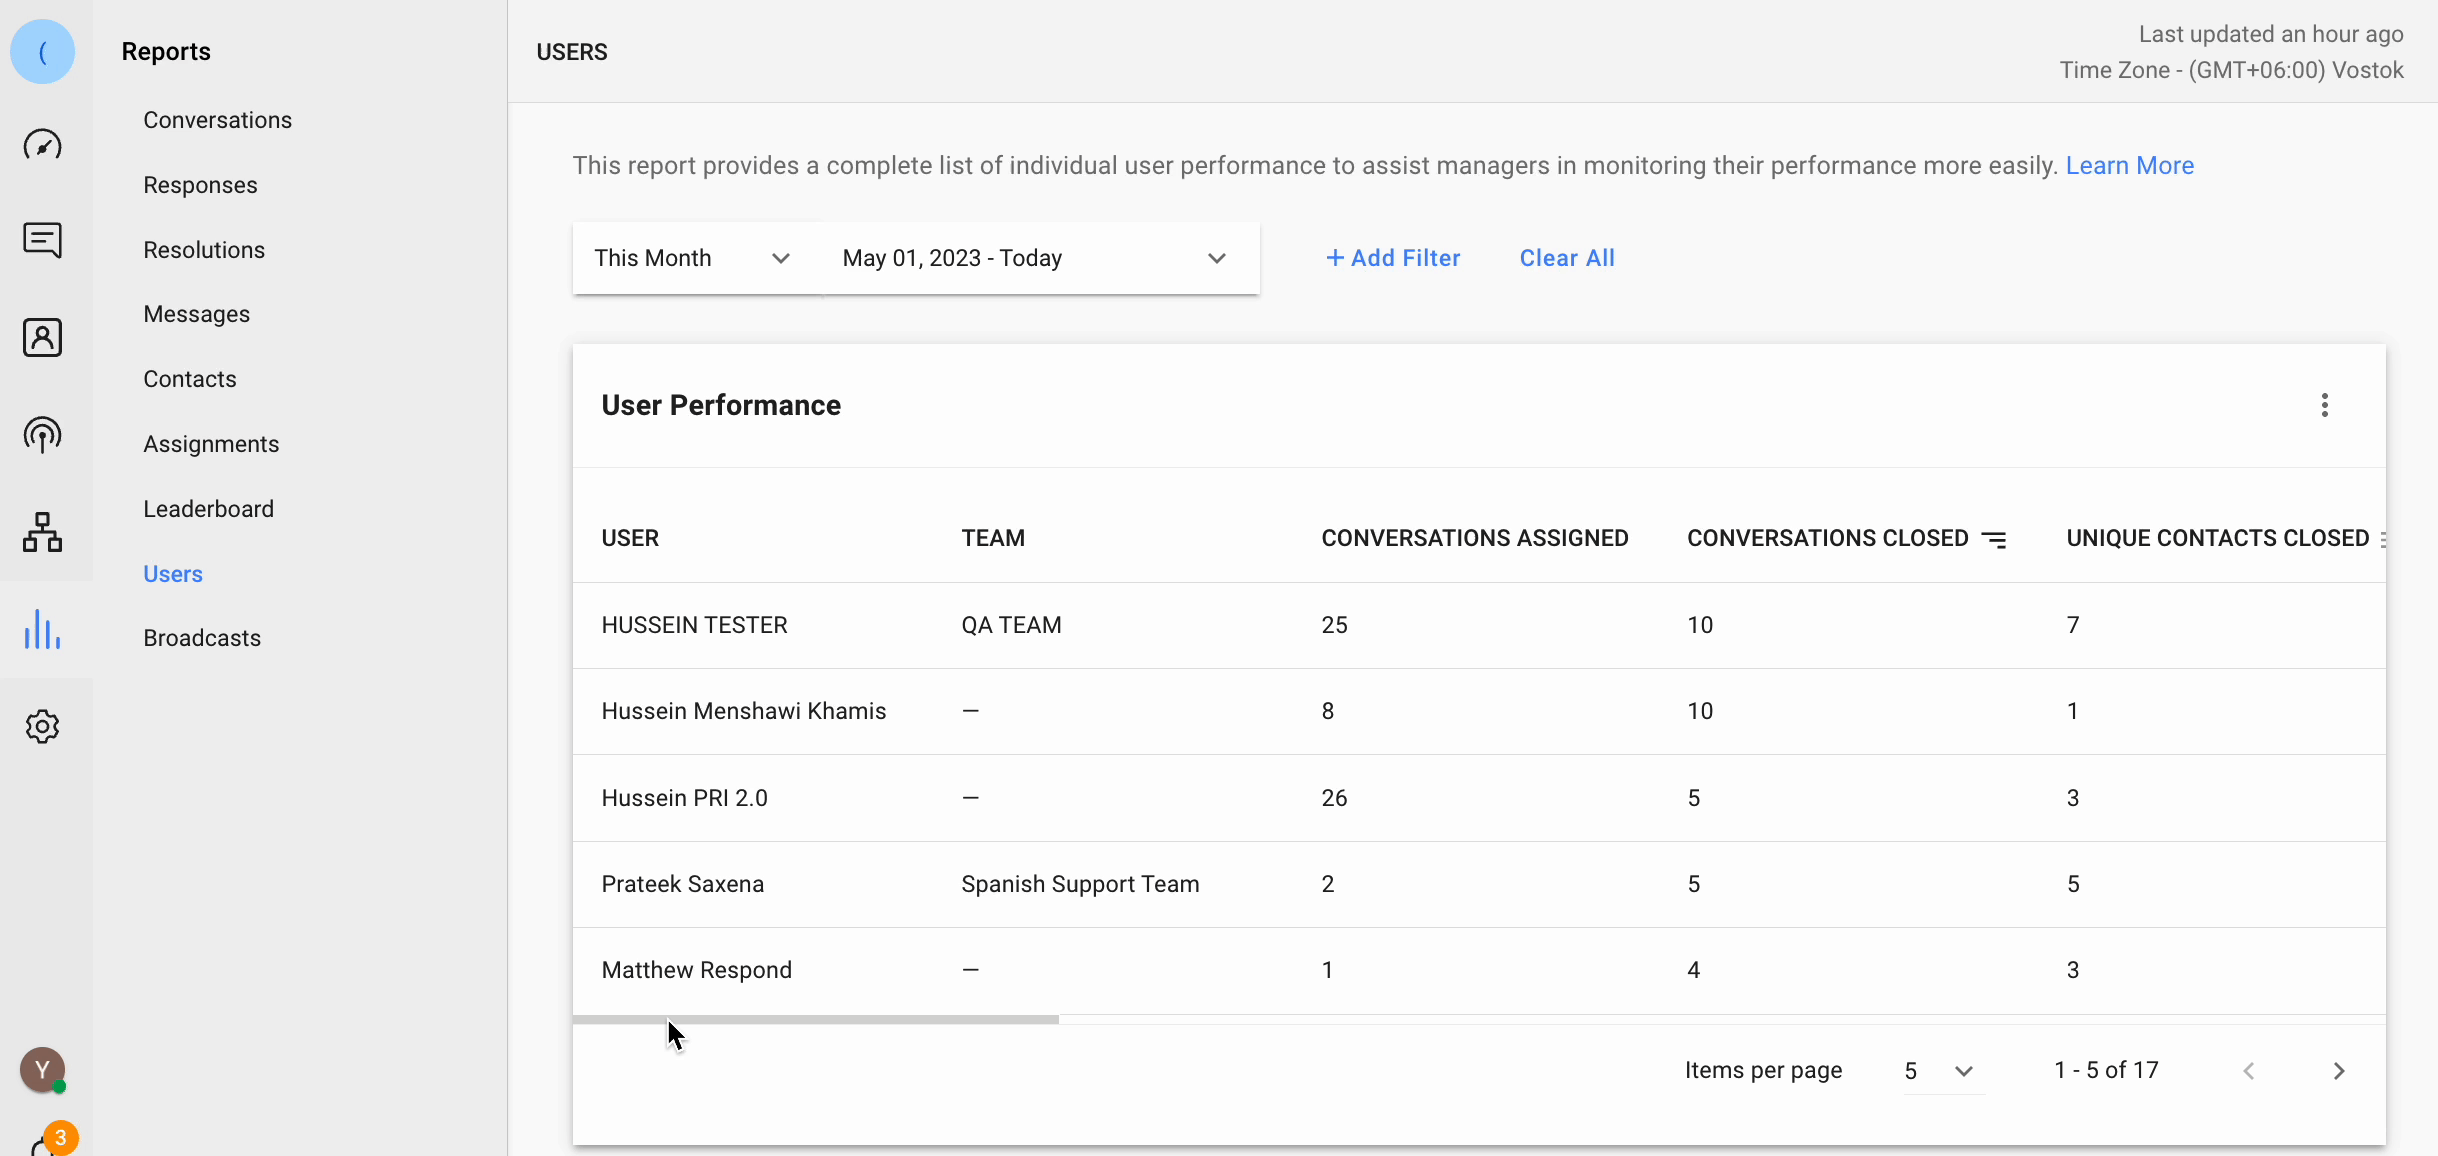
Go to Reports module > Users > User Performance table list. To see an individual agent’s performance in other report tabs, use the Users filter when you are on those tabs.
Identify potential anomalies for resolved conversations
Use the Conversation List table to get a rundown of all resolved conversations.
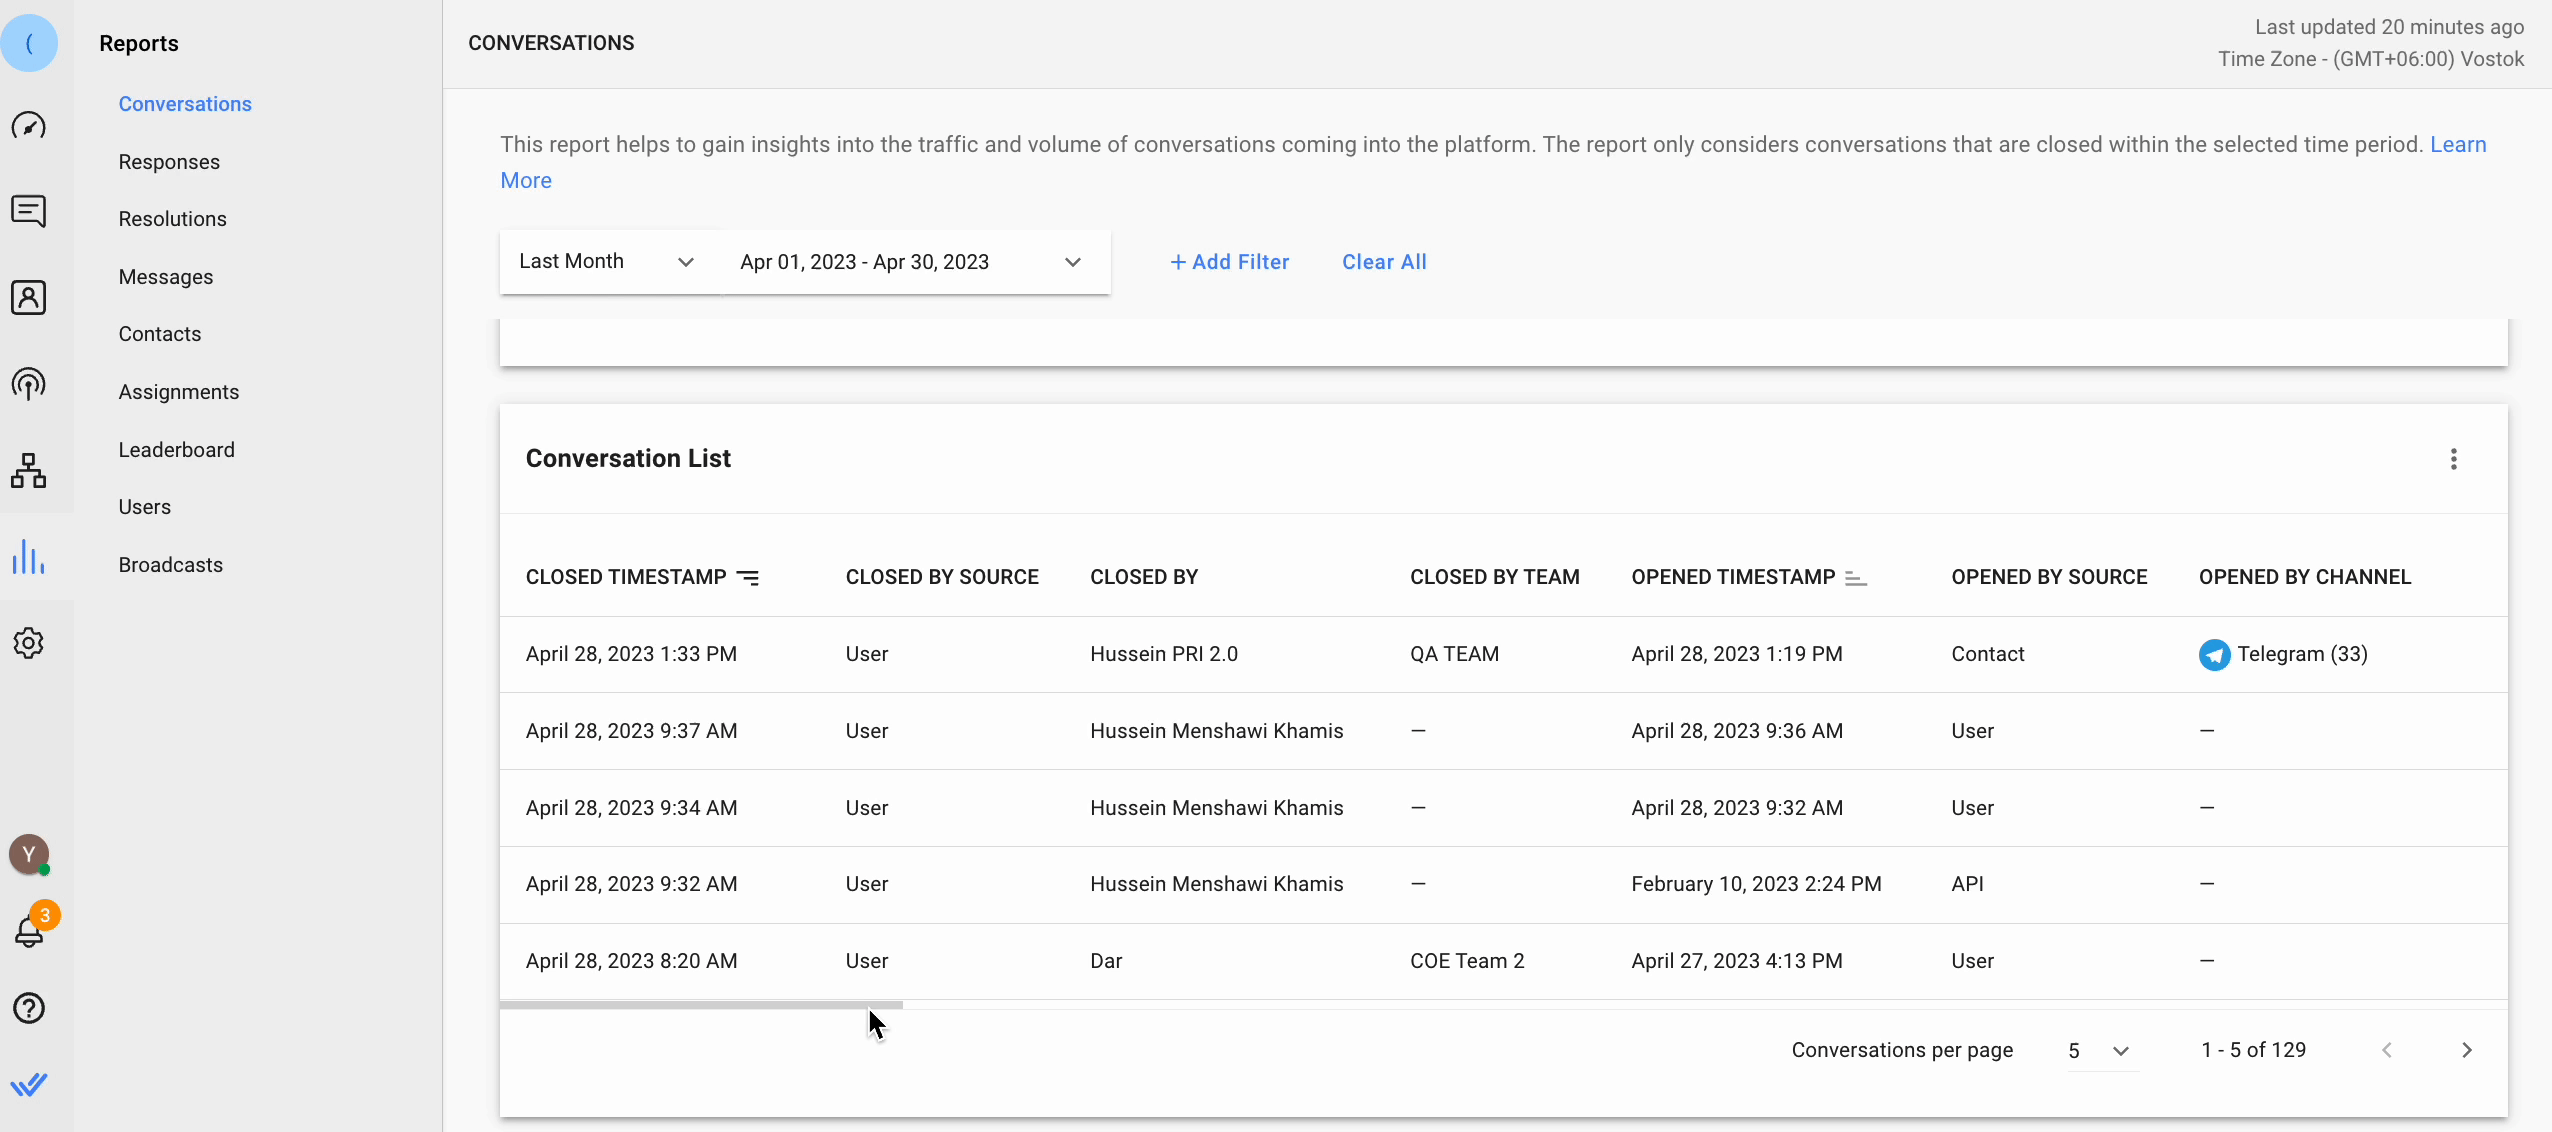
Go to Conversations > Conversation List table.
Support managers can use this list to evaluate the quality of conversations with customers by analyzing the columns available here. For example, if a conversation has a long Resolution Time with high number of Messages, you'll want to investigate if this was an uncommon issue or if the agent requires more training on an existing issue.
The closing note summaries written by your agents when closing conversations can be monitored for further analysis by clicking on the Contact name should any closing notes raise red flags.
Identify potential anomalies for outbound conversations
Use the Outgoing Messages by Source chart to identify anomalies for outbound conversations in your team. Support agents usually do not message the customer first unless it’s necessary for follow-up purposes or used by dedicated support agents to stay in touch with VIP customers. For example, if a support agent is found to have a high open conversation rate, managers may want to check in with the agent for an explanation.
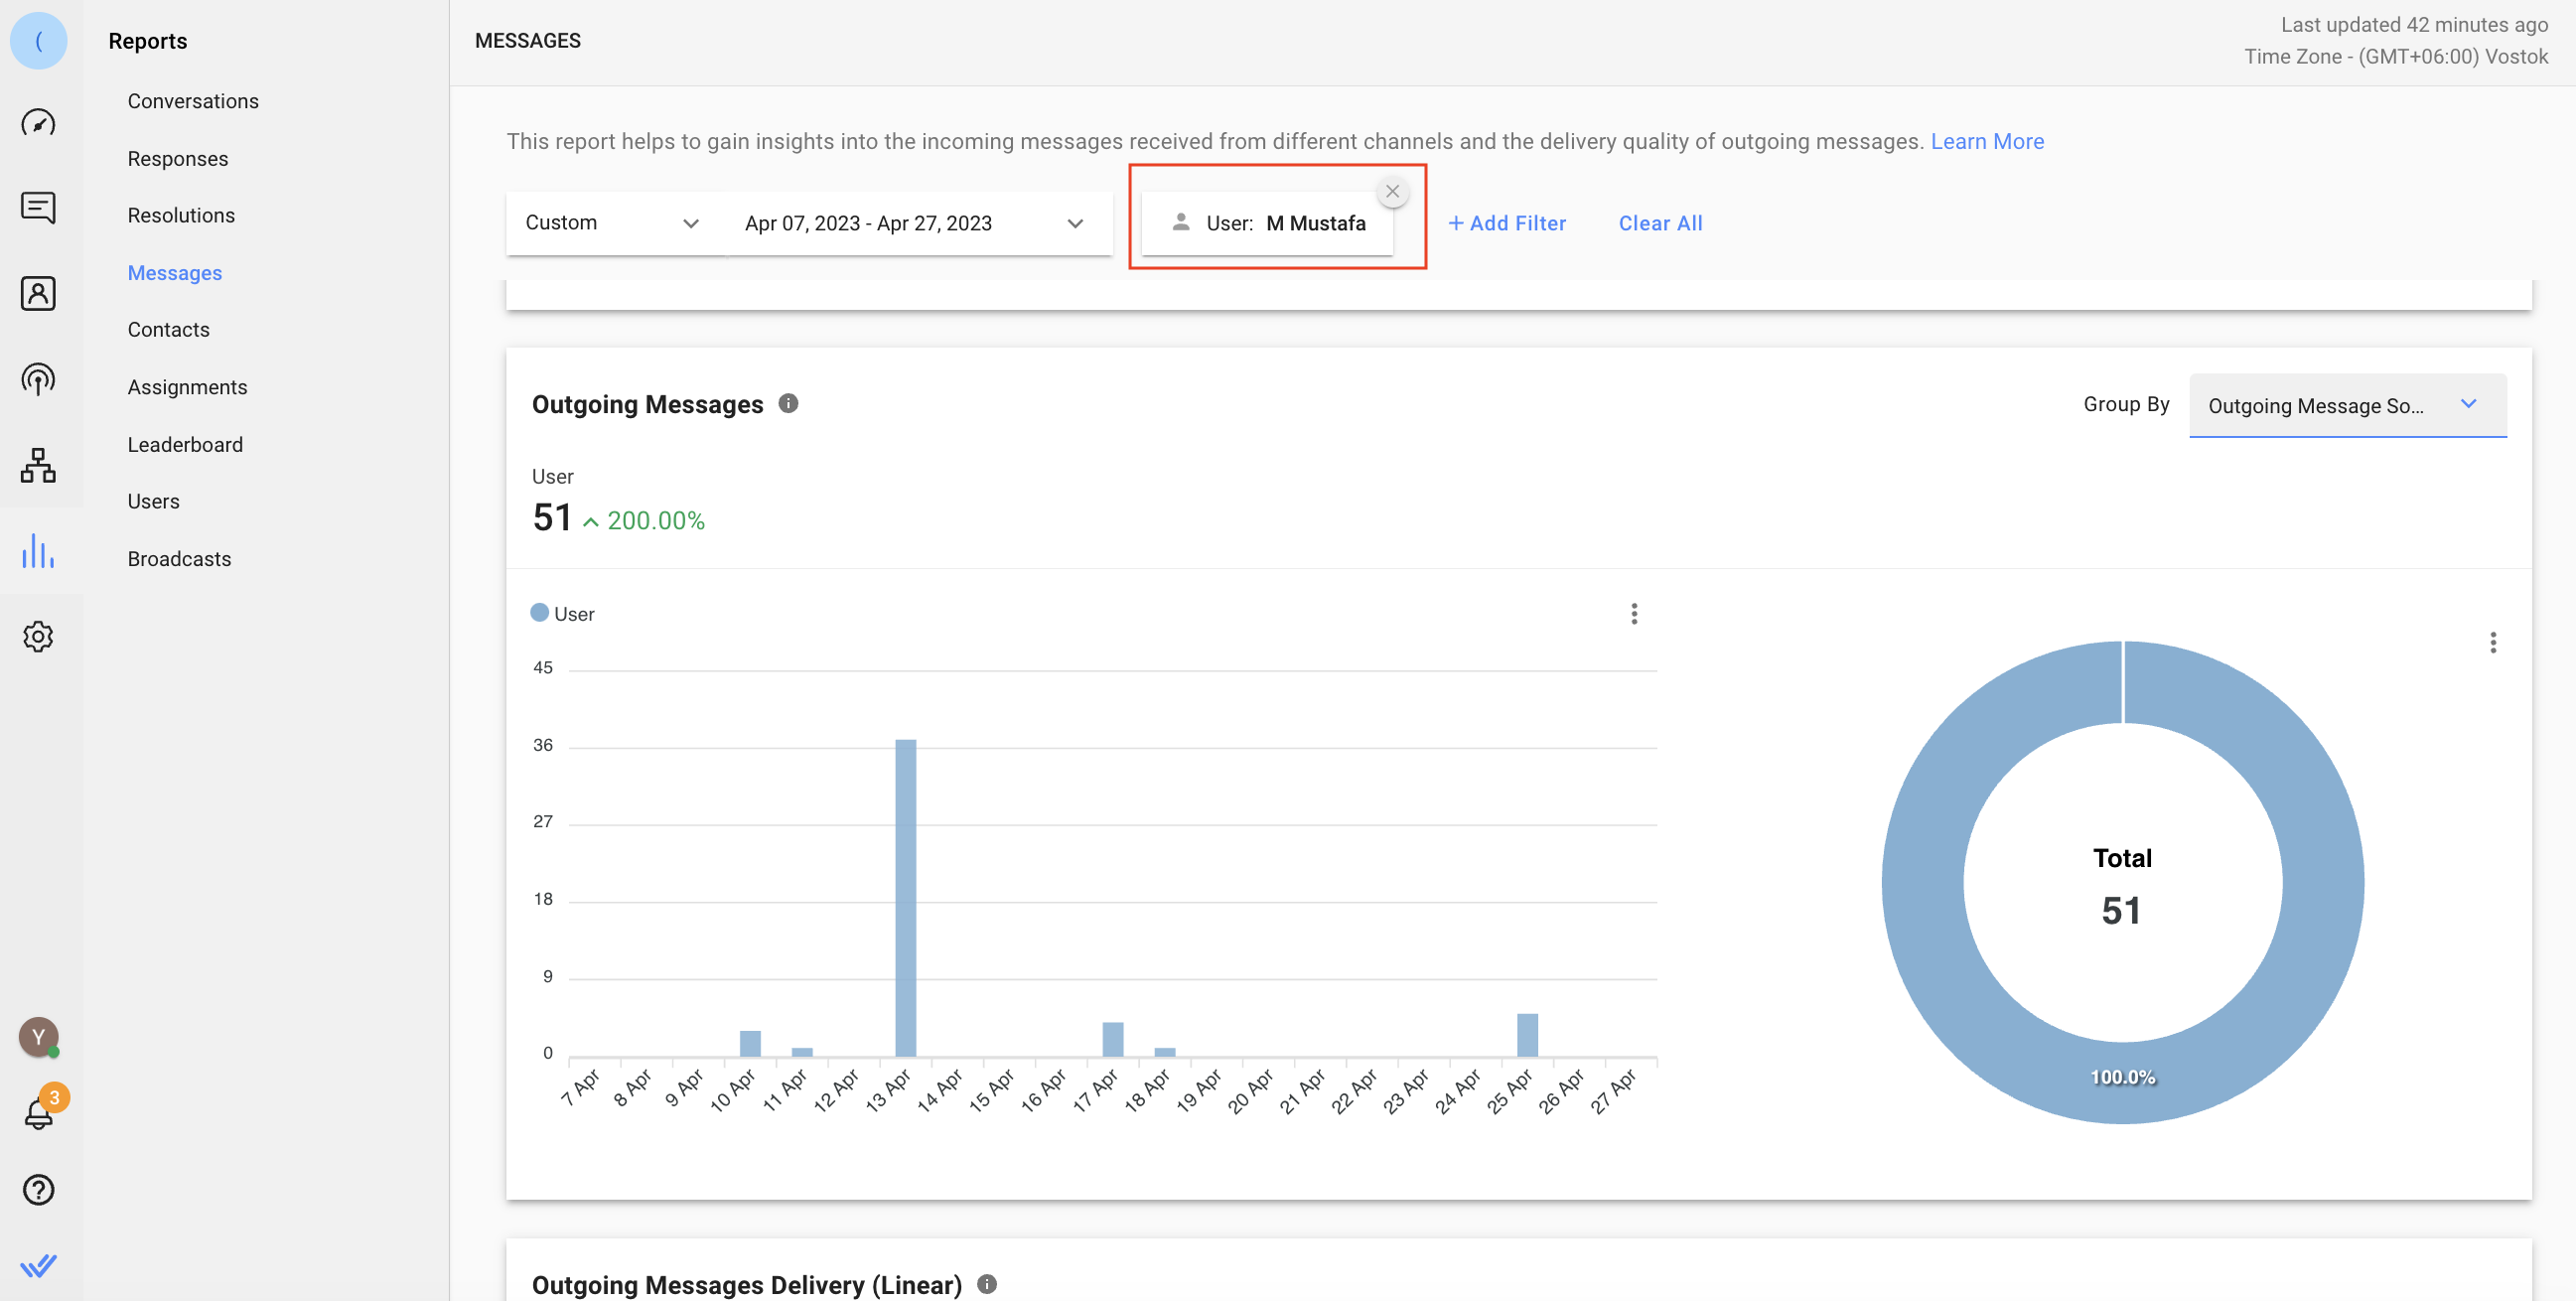
Go to Reports module > Messages > Outgoing Messages > select Outgoing Message Source in the Group By drop-down list > filter Users to see the data on outbound messages sent by a specific agent.
Export historical data to a CSV file from the Workspace Settings
This method allows you to get historical records for messages or closed conversations from the Workspace by exporting the data to a CSV file for your long-term in-depth support trend analysis.
Method Objectives
- Get historical records on Conversations or Messages
How-to
Get historical records on Conversations or Messages
Use Data Export to export Conversations or Messages records from the Workspace for in-depth analysis.
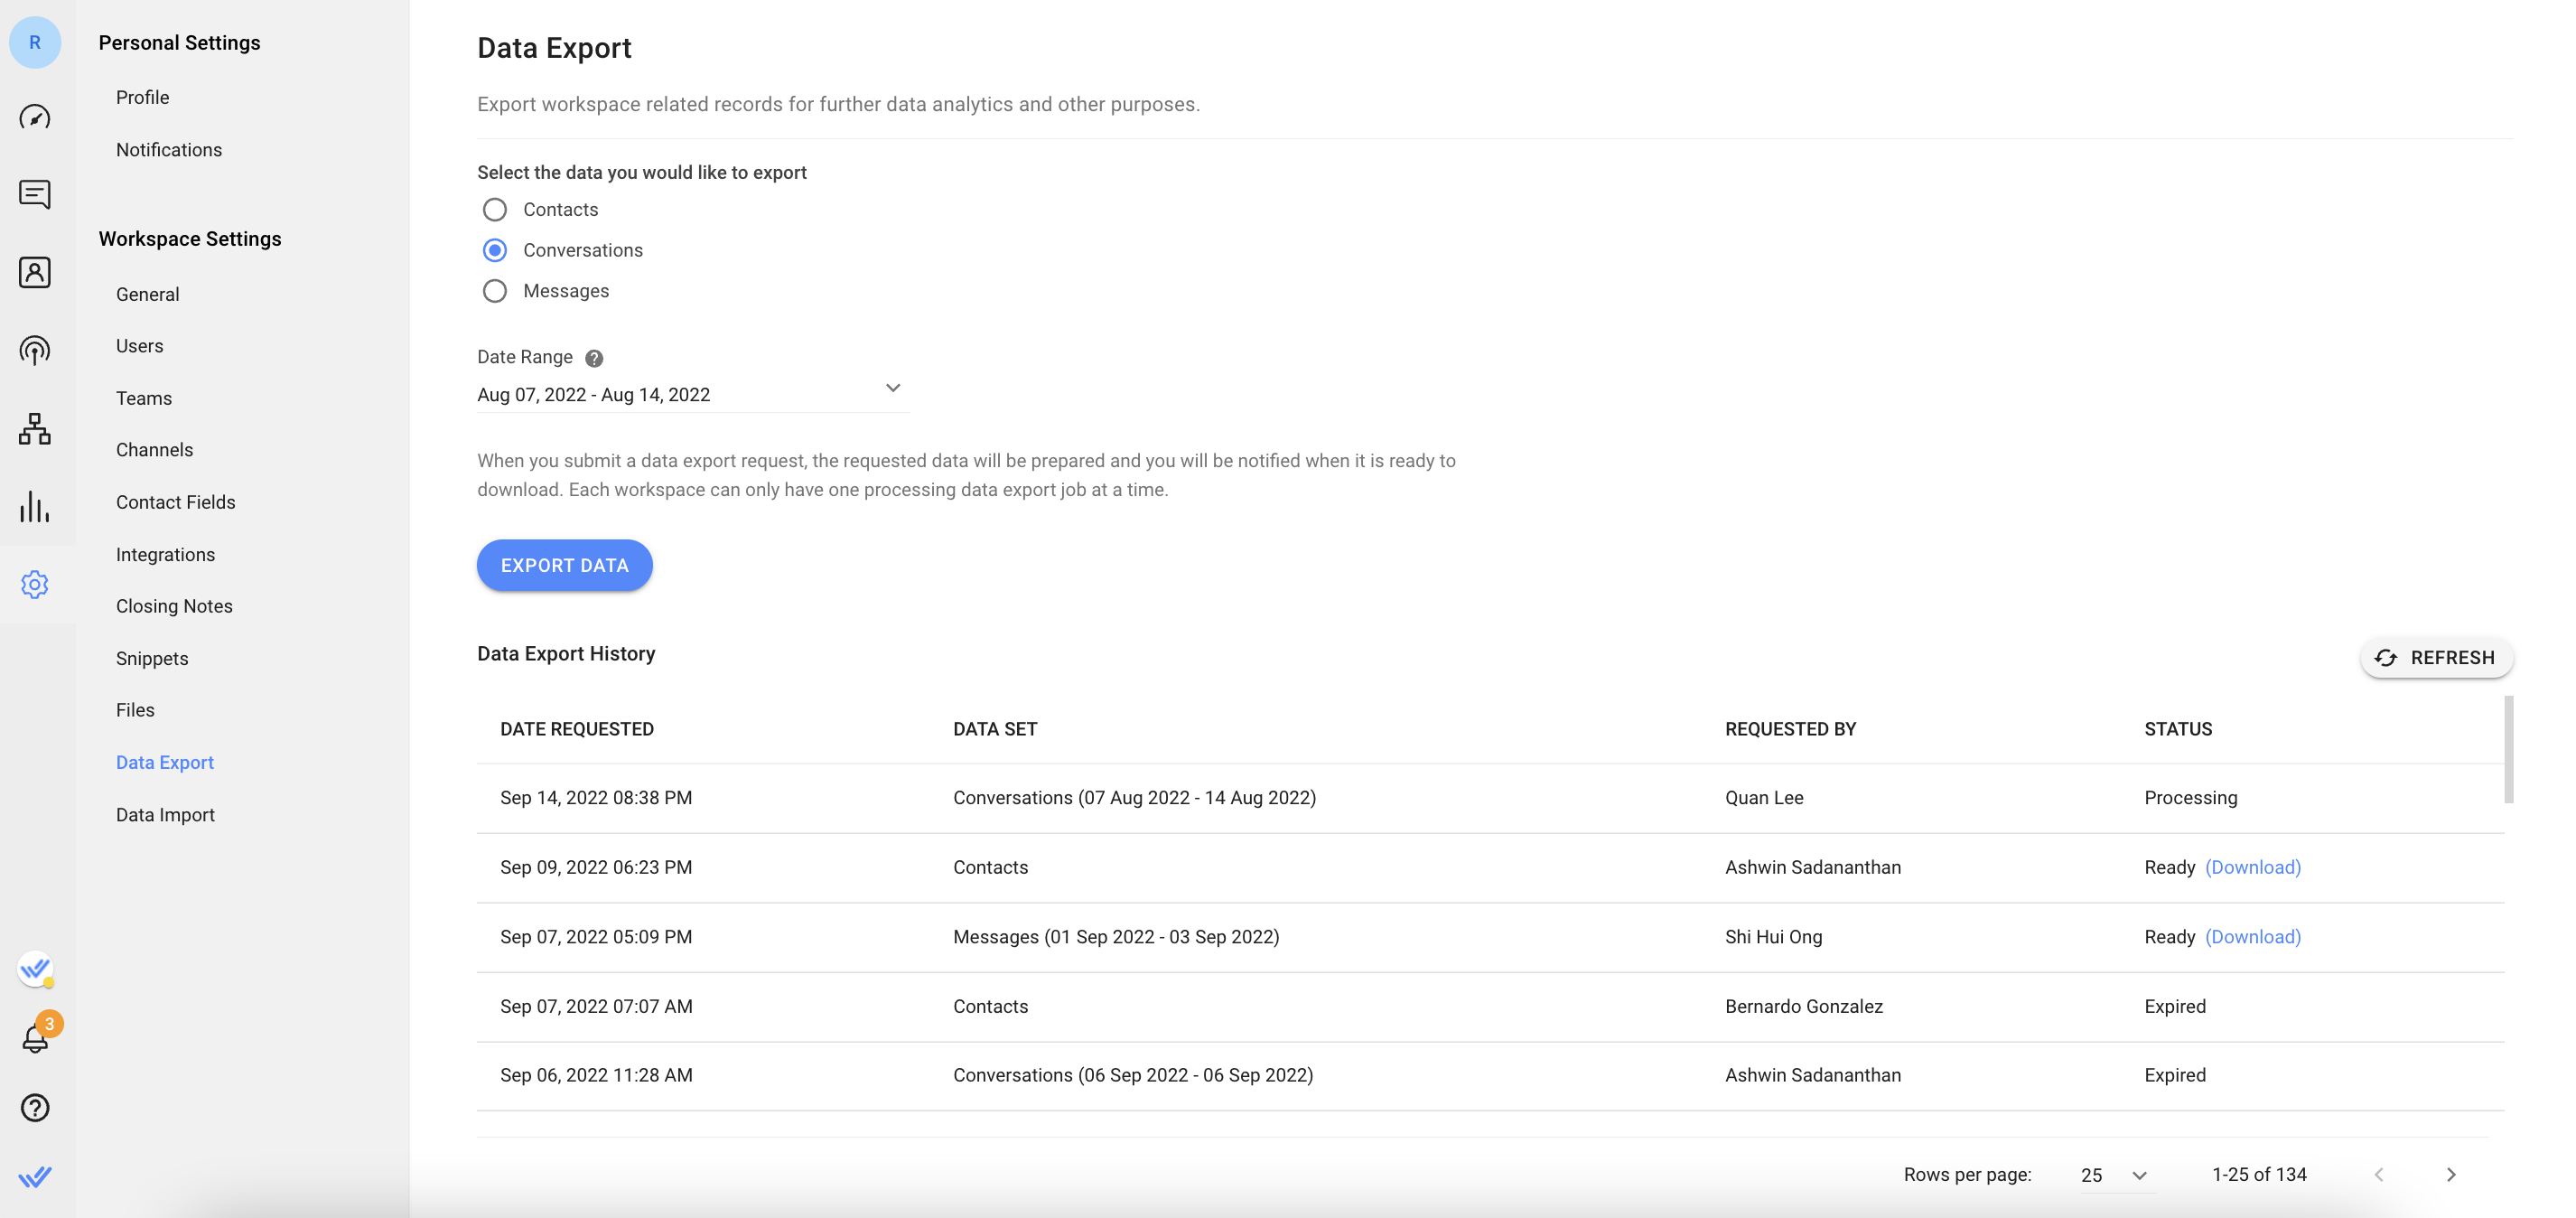
Go to Settings module > select Data Export under Workspace Settings > select the data to export from the drop-down list > set the date range from the drop-down list (only available for Conversations, Messages, and Failed Messages data) > click Export Data to begin the process. Once it’s ready, download the file from the Data Export History table anytime within 7 days.
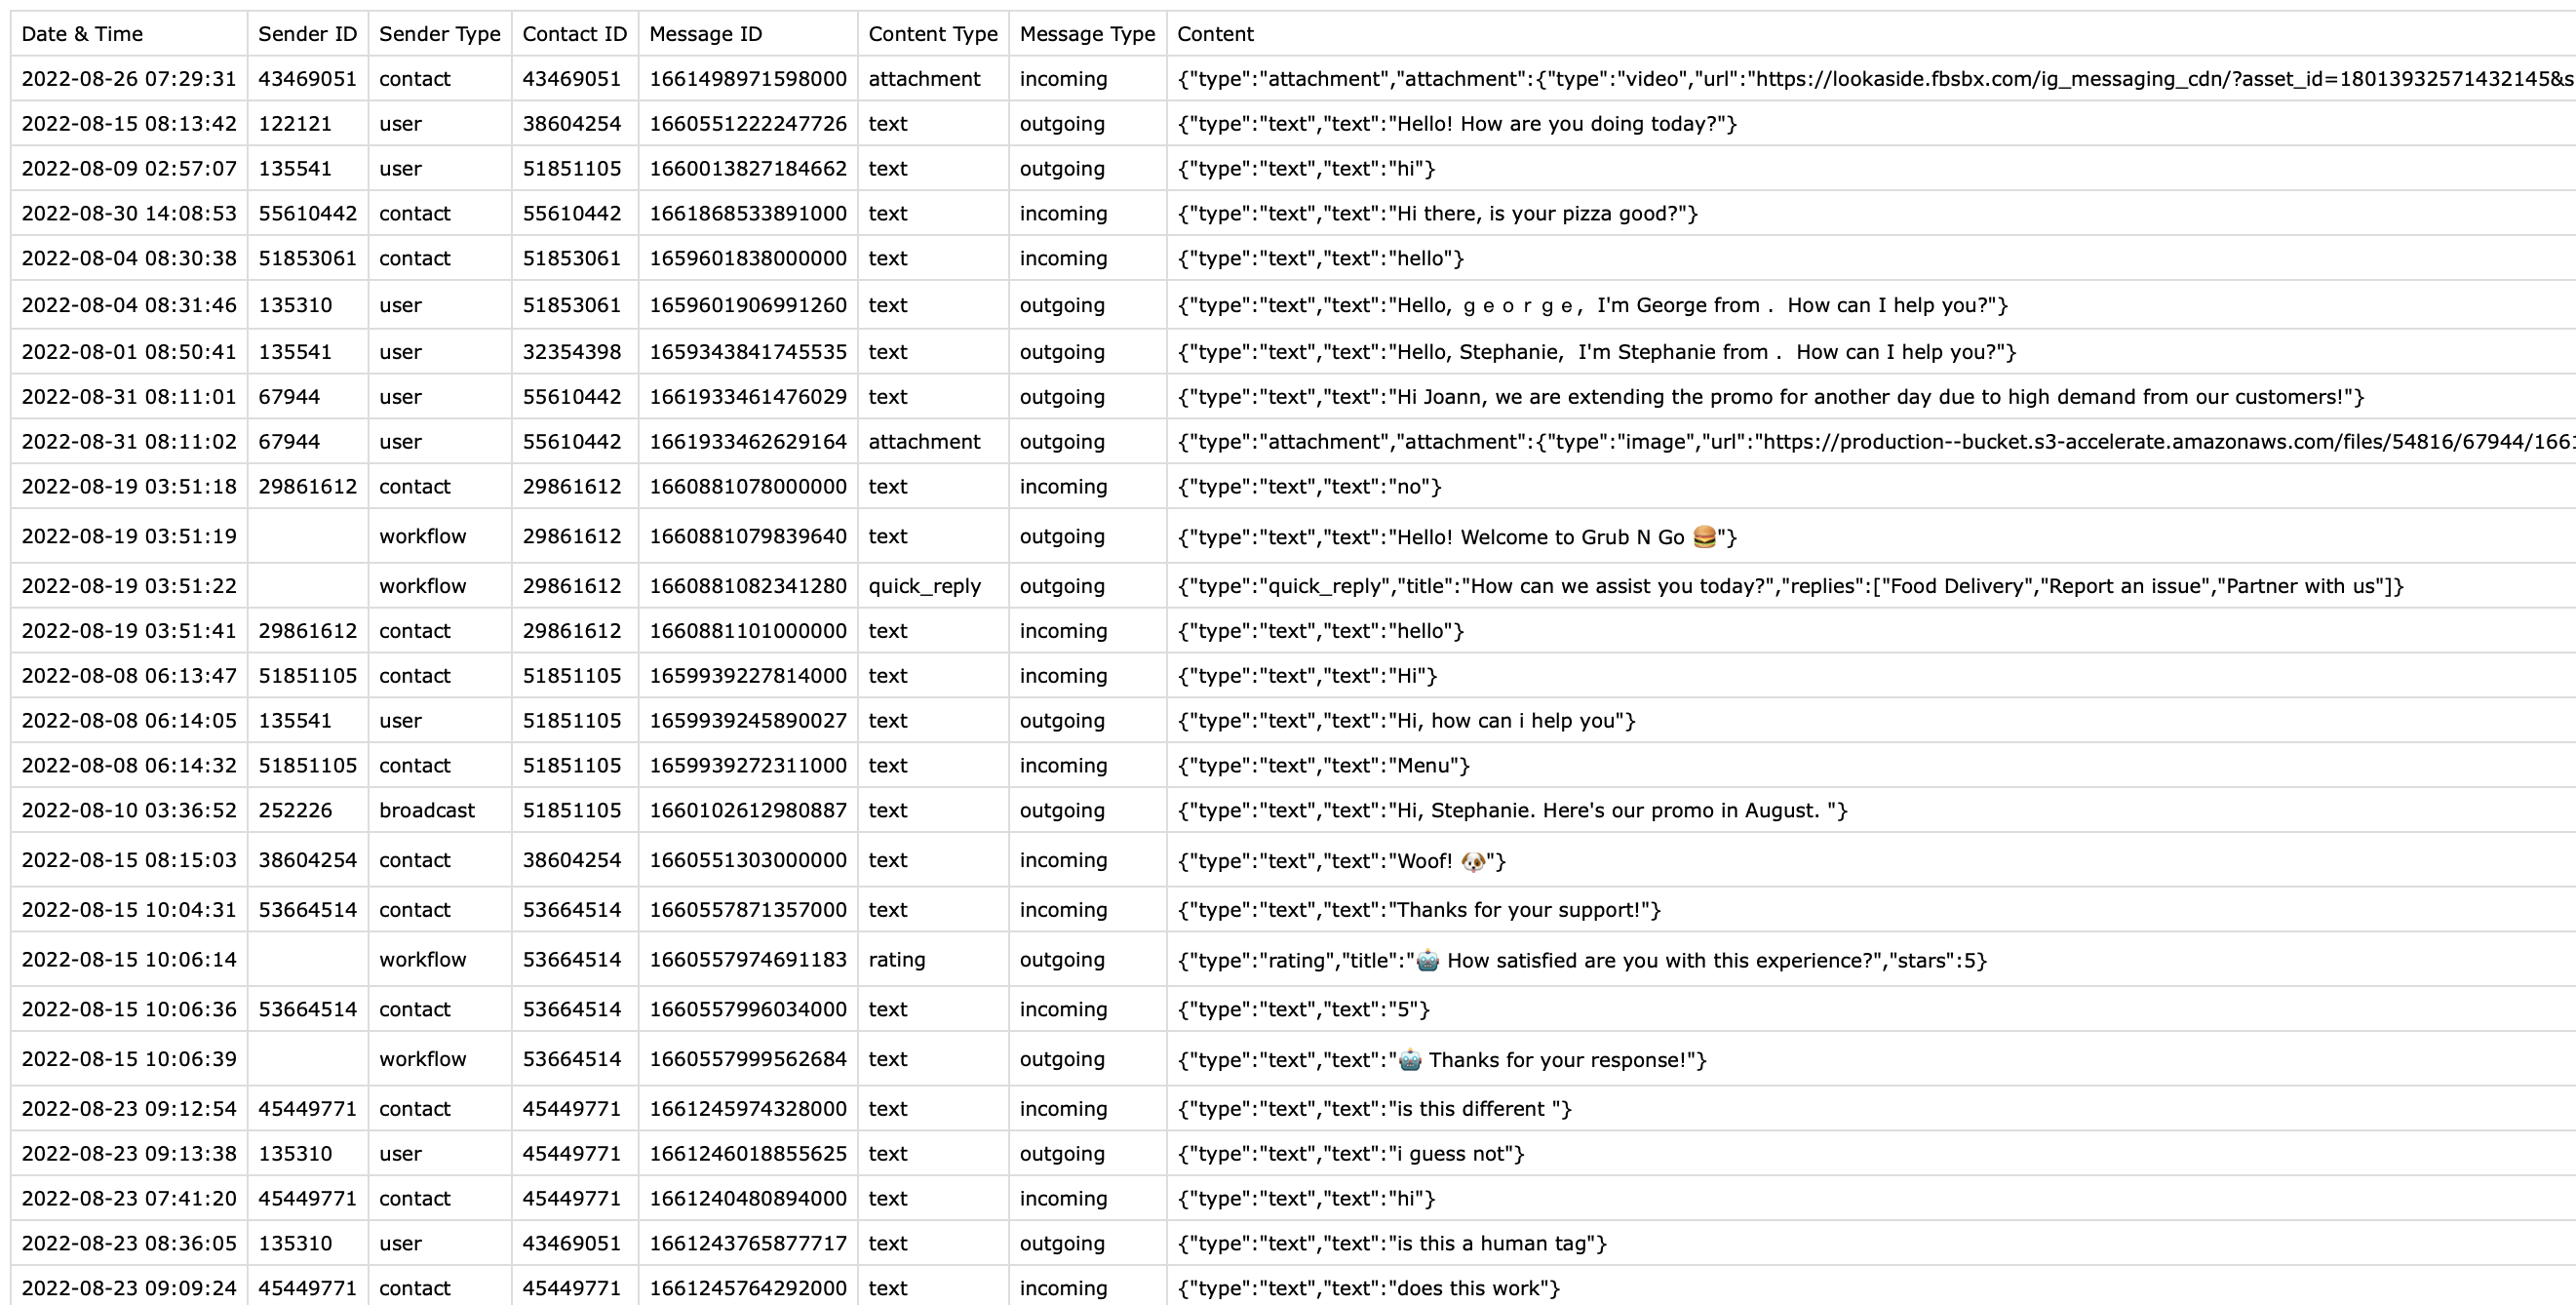
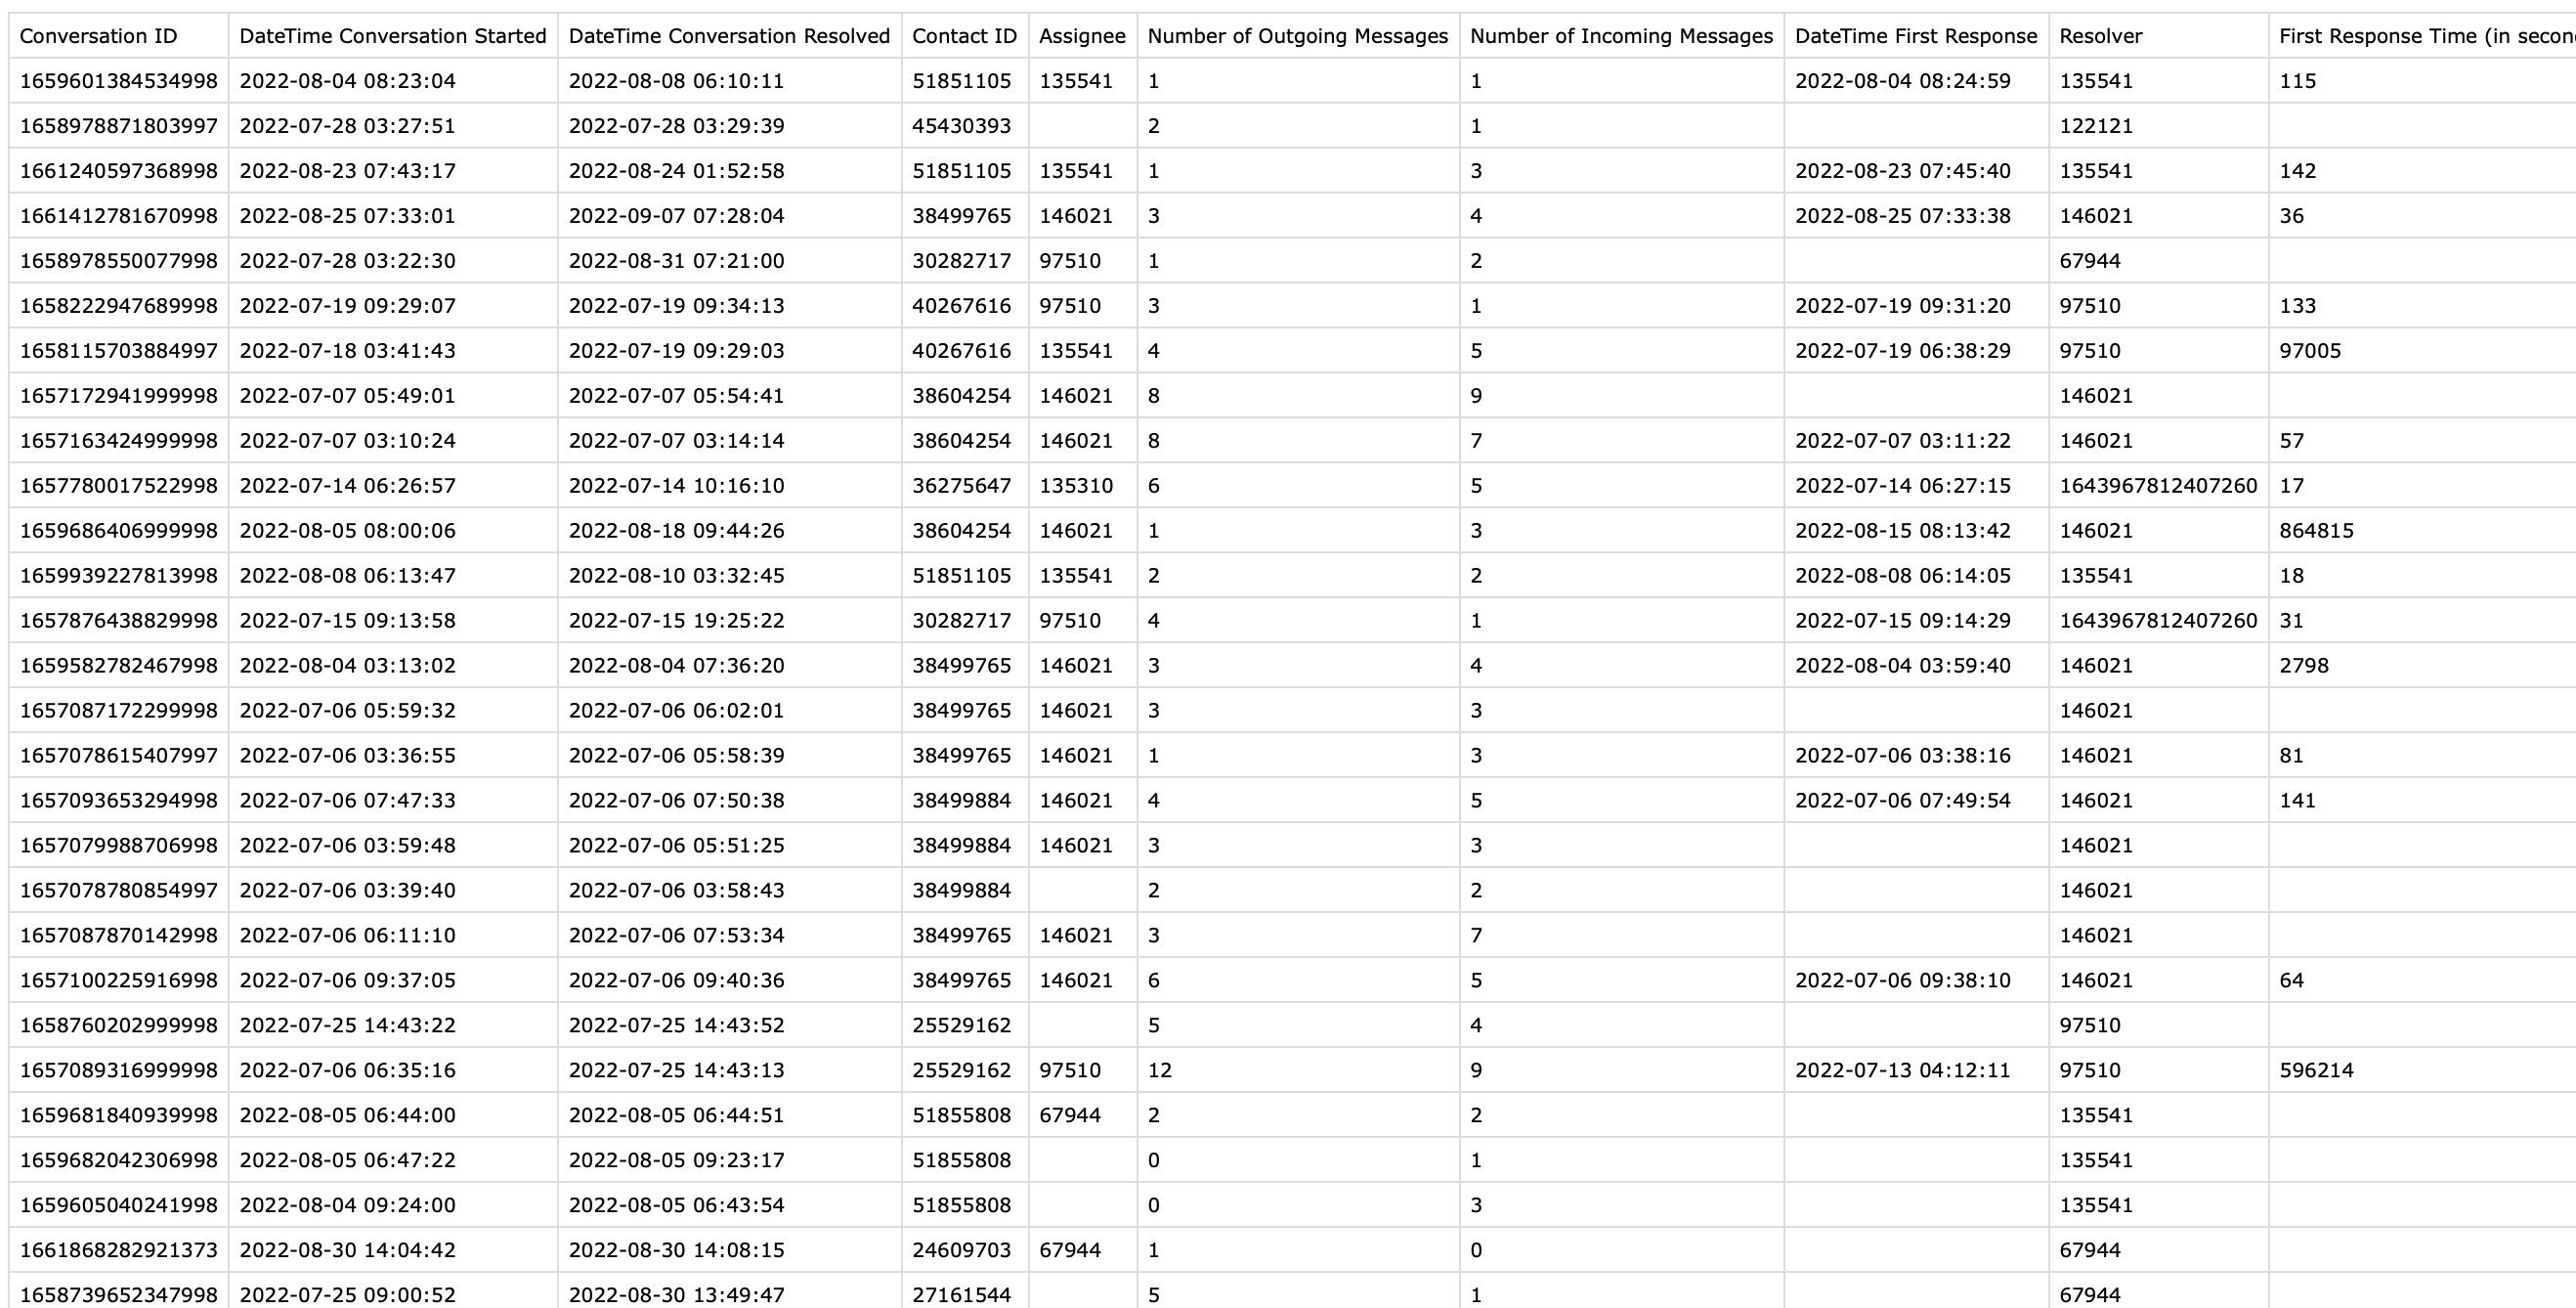
Messages Data Details
Conversations Data Details
Send real-time data to a Google Sheet or an external data warehouse using Workflows
This method allows you to pick and export selected real-time data updates for closed conversations in the Workspace. Export the data automatically to a Google Sheet or an external data warehouse using Workflows for consistent and uniform data collection based on your business needs.
Method Objectives
- Send data to a Google Sheet or an external data warehouse.
Workflow Setup
Send data to a Google Sheet or an external data warehouse
Use Workflows’ Trigger Variables to send specific closed conversation data to a Google Sheet or an external data warehouse. These Variables are only available when the Conversation Closed Trigger is selected.
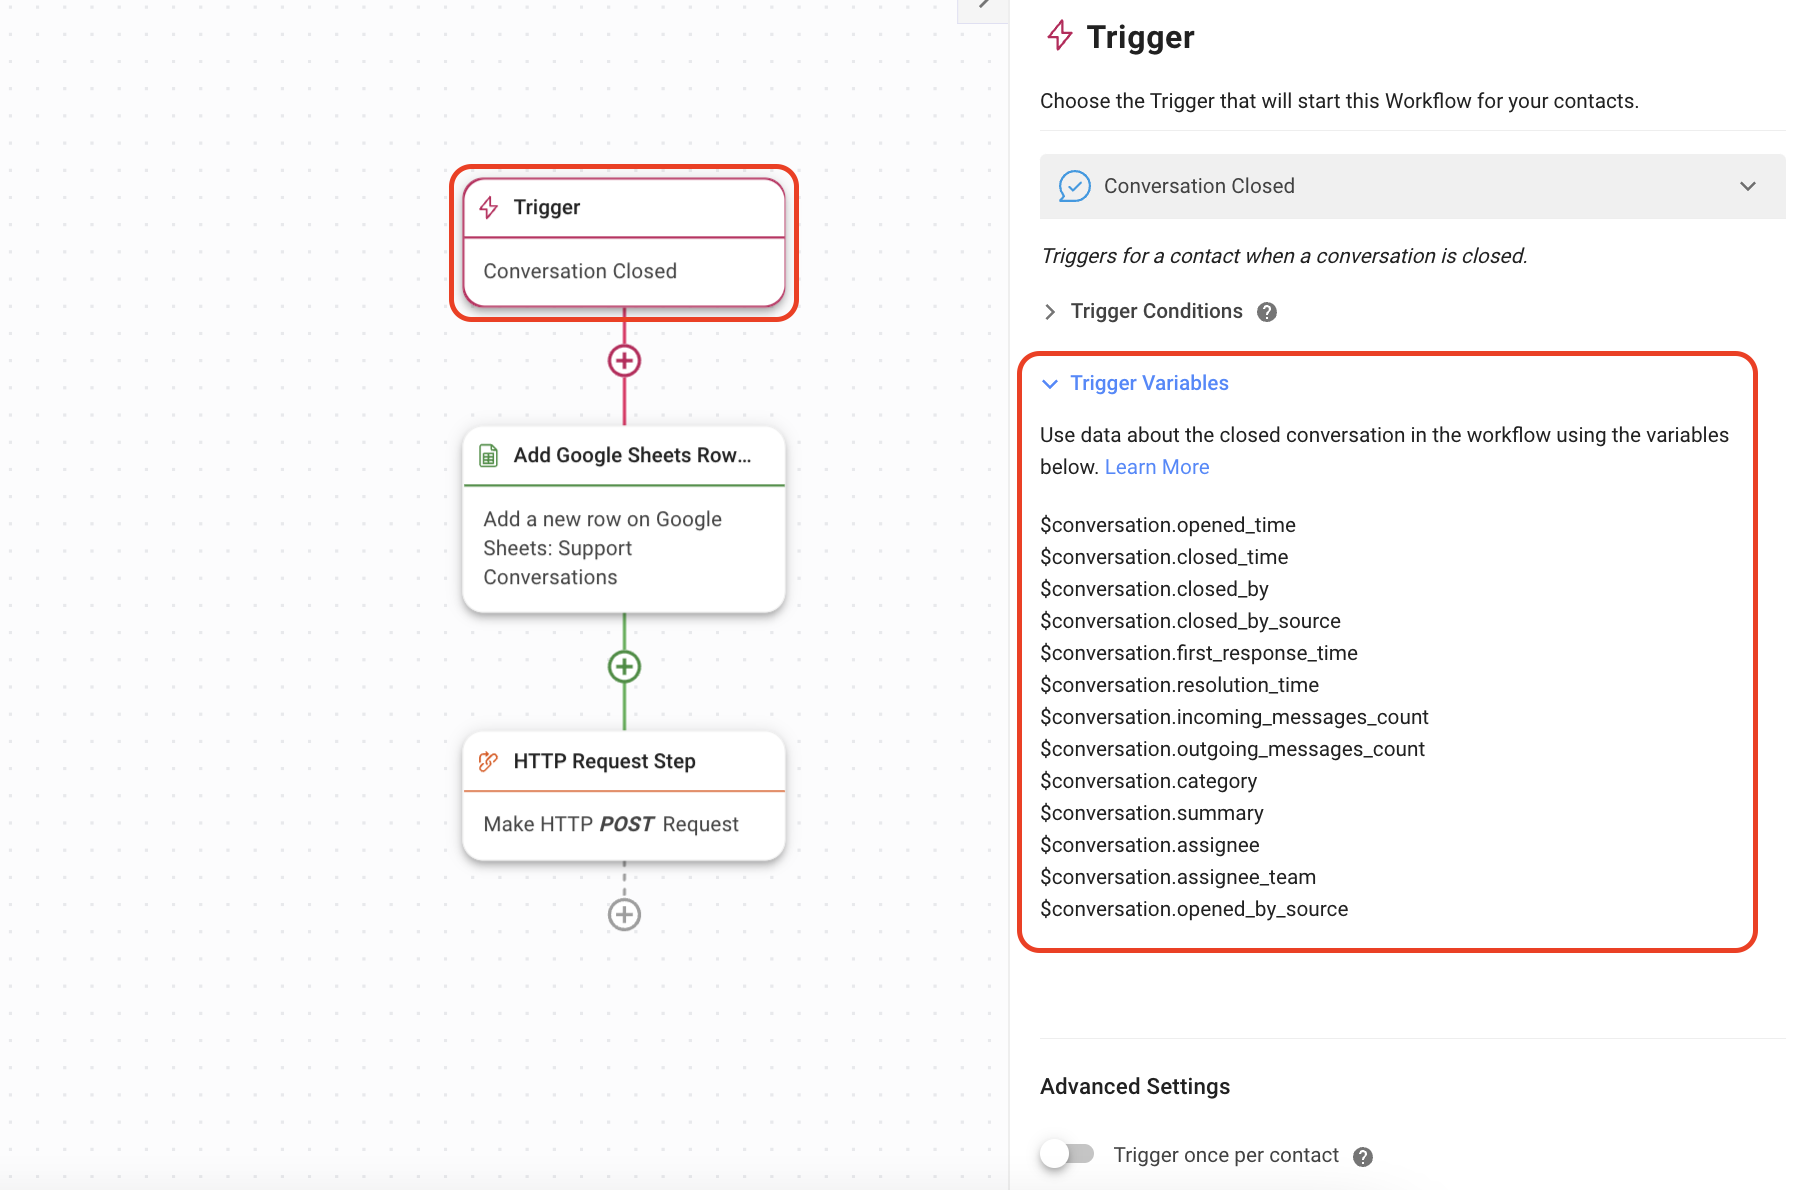
Set Trigger to Conversation Closed > select the preferred Trigger Conditions > use the Trigger Variables list in the toggle as a reference for specific data you choose to export based on your business needs.
Apply the relevant Trigger Variables in the configuration of the Add Google Sheets Row Step or HTTP Request Step to automatically send selected closed conversation data to a Google Sheet or a data warehouse.