Table of Contents
- Connecting WhatsApp Cloud API
- Channel Configuration
- Metadata Received by Channel
- Managing WhatsApp Cloud API Profile
- Managing WhatsApp Message Templates
- Supported File Types
- Rate Limits
- FAQ and Troubleshooting
- Unable to Send Messages
- Messages Are Not Arriving
- Unable To Receive Read Receipts
- Unable To Send Outbound Messages: Validating Access Token Error
- Contact Not Receiving Messages
- What are the requirements for phone number to be used to sign up for WhatsApp Cloud API?
- Is Business Verification needed to start using Cloud API?
- Can I view my conversation insights for my WhatsApp Business Account?
- What are WhatsApp messaging limits?
- How do I add a payment method to my WhatsApp Business Account?
- Why did my message fail to send with an error "Business eligibility payment issue"?
- What is WhatsApp Cloud API pricing?
- How do I delete a phone number from a business account?
- Can I use respond.io to send a WhatsApp Cloud API broadcast with the Meta test number?
- Can I delete the Meta test number from my connected Cloud API account?
- Why do I see duplicate Contacts from the same WhatsApp channel?
- How do I change my Cloud API Display Name?
- What steps should I take once my new Display Name for my Cloud API is approved?
- Why did I encounter the error "Error validating access token: The session has been invalidated because the user changed their password or Facebook has changed the session for security reasons" when trying to send a message?
WhatsApp Cloud API

- Connecting WhatsApp Cloud API
- Channel Configuration
- Metadata Received by Channel
- Managing WhatsApp Cloud API Profile
- Managing WhatsApp Message Templates
- Supported File Types
- Rate Limits
- FAQ and Troubleshooting
- Unable to Send Messages
- Messages Are Not Arriving
- Unable To Receive Read Receipts
- Unable To Send Outbound Messages: Validating Access Token Error
- Contact Not Receiving Messages
- What are the requirements for phone number to be used to sign up for WhatsApp Cloud API?
- Is Business Verification needed to start using Cloud API?
- Can I view my conversation insights for my WhatsApp Business Account?
- What are WhatsApp messaging limits?
- How do I add a payment method to my WhatsApp Business Account?
- Why did my message fail to send with an error "Business eligibility payment issue"?
- What is WhatsApp Cloud API pricing?
- How do I delete a phone number from a business account?
- Can I use respond.io to send a WhatsApp Cloud API broadcast with the Meta test number?
- Can I delete the Meta test number from my connected Cloud API account?
- Why do I see duplicate Contacts from the same WhatsApp channel?
- How do I change my Cloud API Display Name?
- What steps should I take once my new Display Name for my Cloud API is approved?
- Why did I encounter the error "Error validating access token: The session has been invalidated because the user changed their password or Facebook has changed the session for security reasons" when trying to send a message?
Facebook announced the release of WhatsApp Cloud API on 20th May, and it’s available to any business of any size, big and small to communicate with customers using the official WhatsApp API.
Connecting WhatsApp Cloud API
Watch the video below for a step-by-step guide on How to Connect WhatsApp Cloud API to respond.io.
To chat with your customers over WhatsApp Cloud API, connect a WhatsApp Business Profile and Meta Business Account.
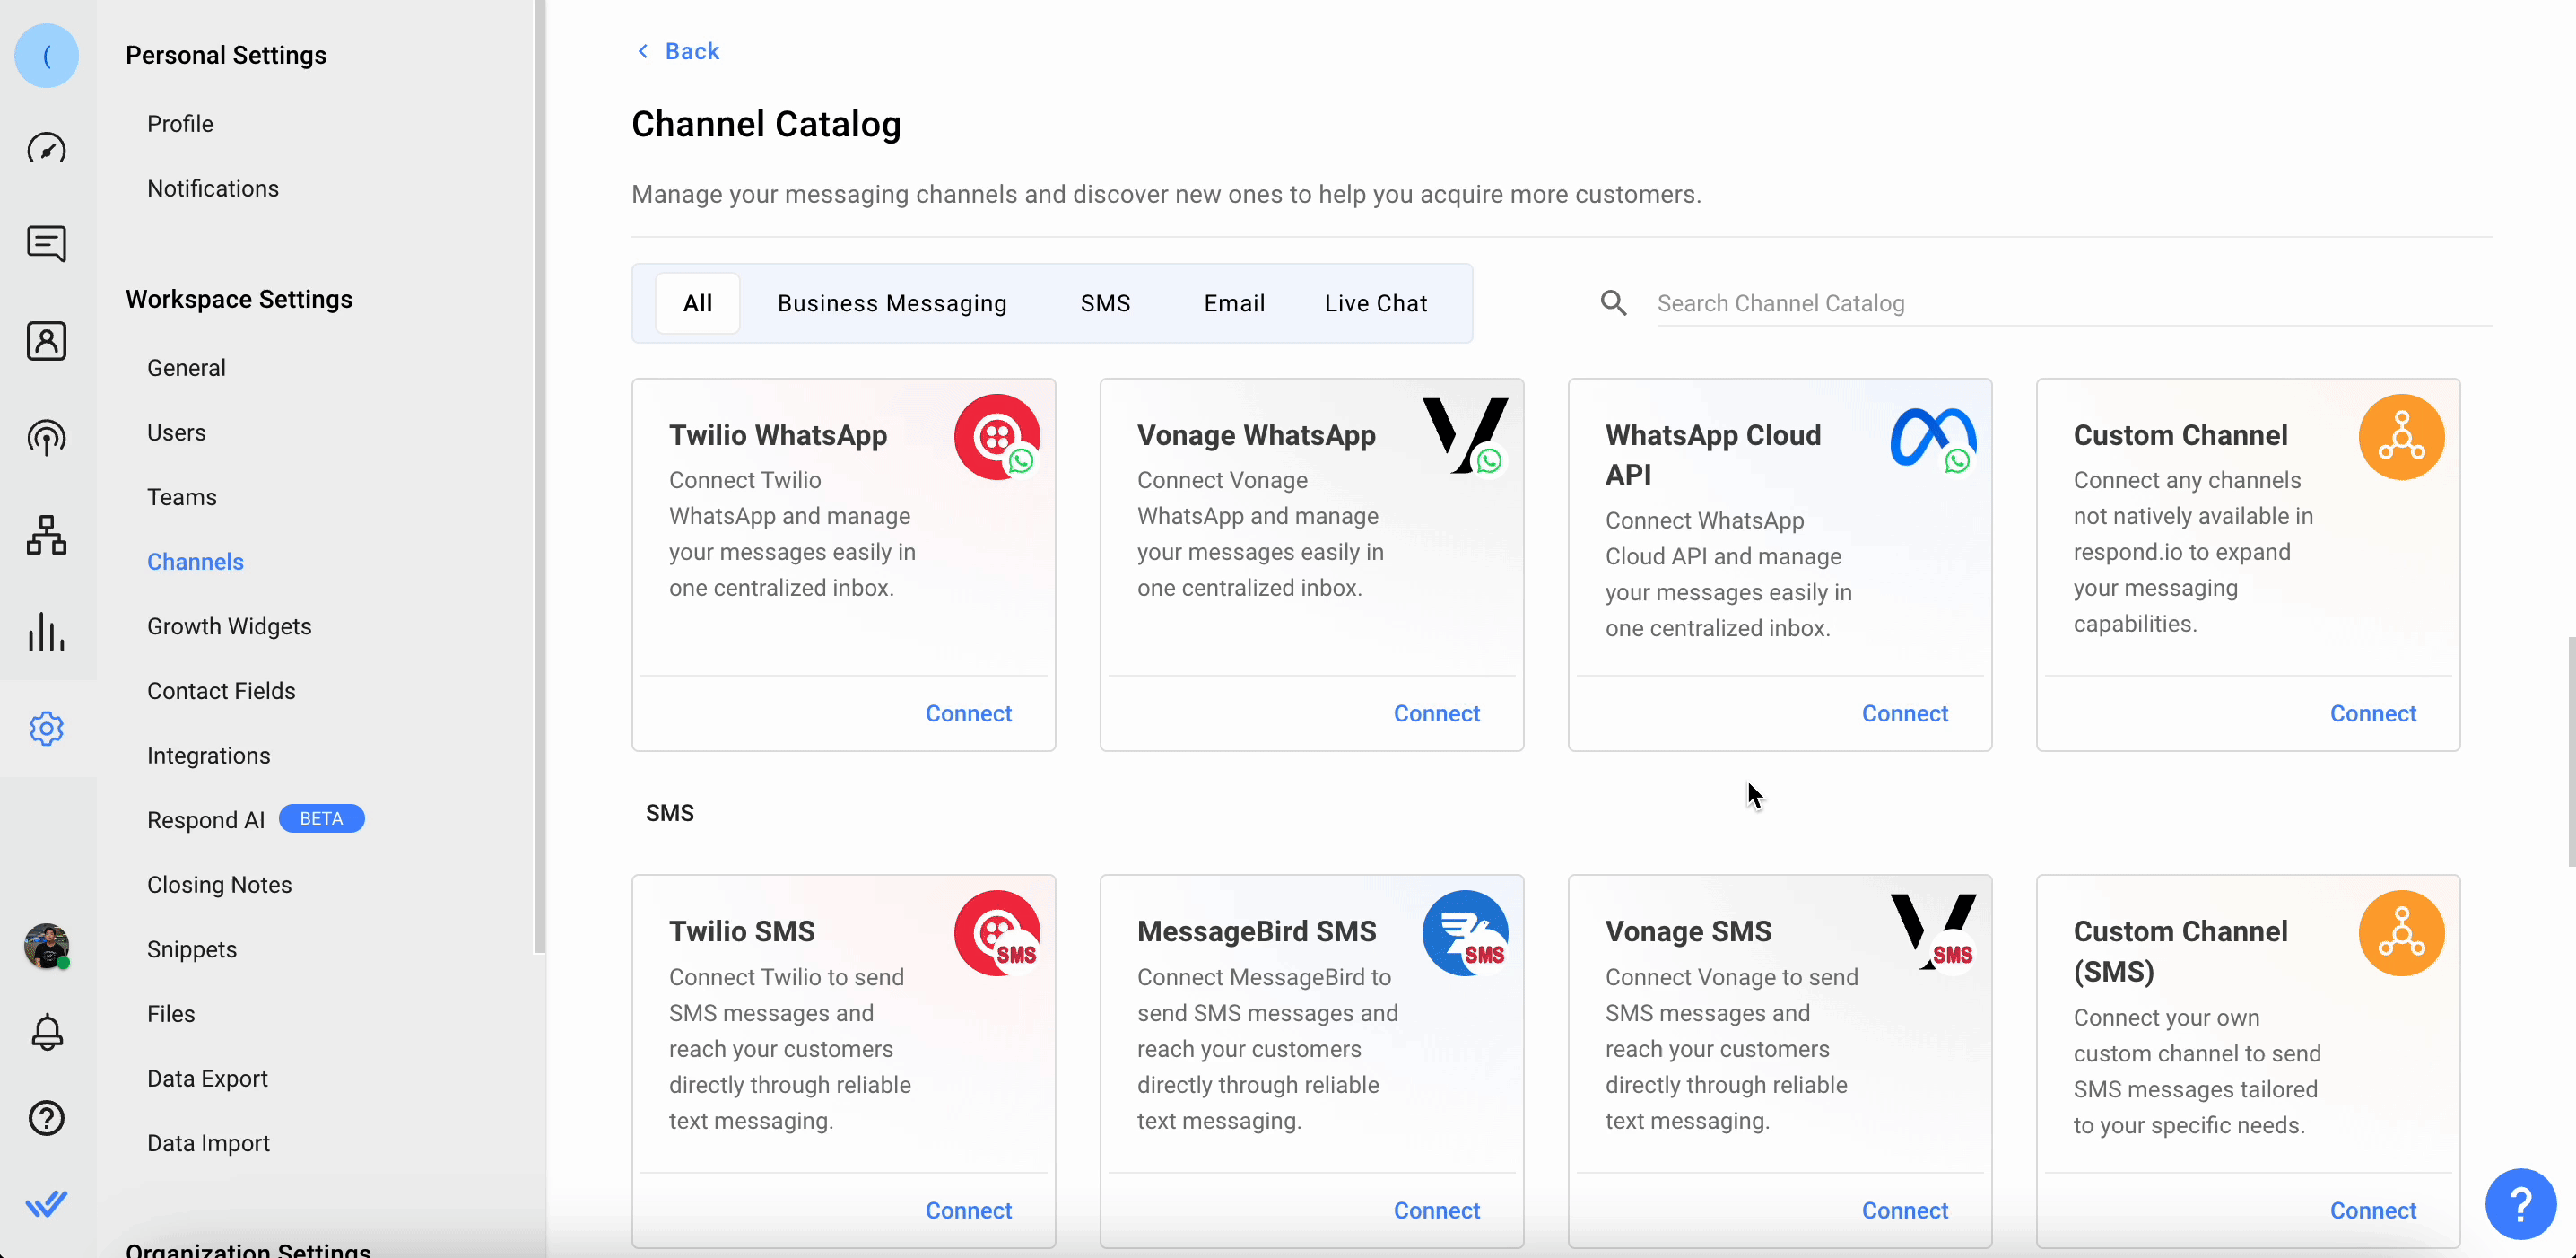
Step 1: Navigate to Workspace Settings > Click Add Channel
Step 2: Locate the WhatsApp Cloud API Channel > Click Connect.
Step 3: Click the Connect With Facebook button.
Step 4: Sign in using the Facebook account with admin access to the Facebook App and Meta business account.
Step 5: In the dropdown list, select the WABA name with the WhatsApp number you would like to connect.
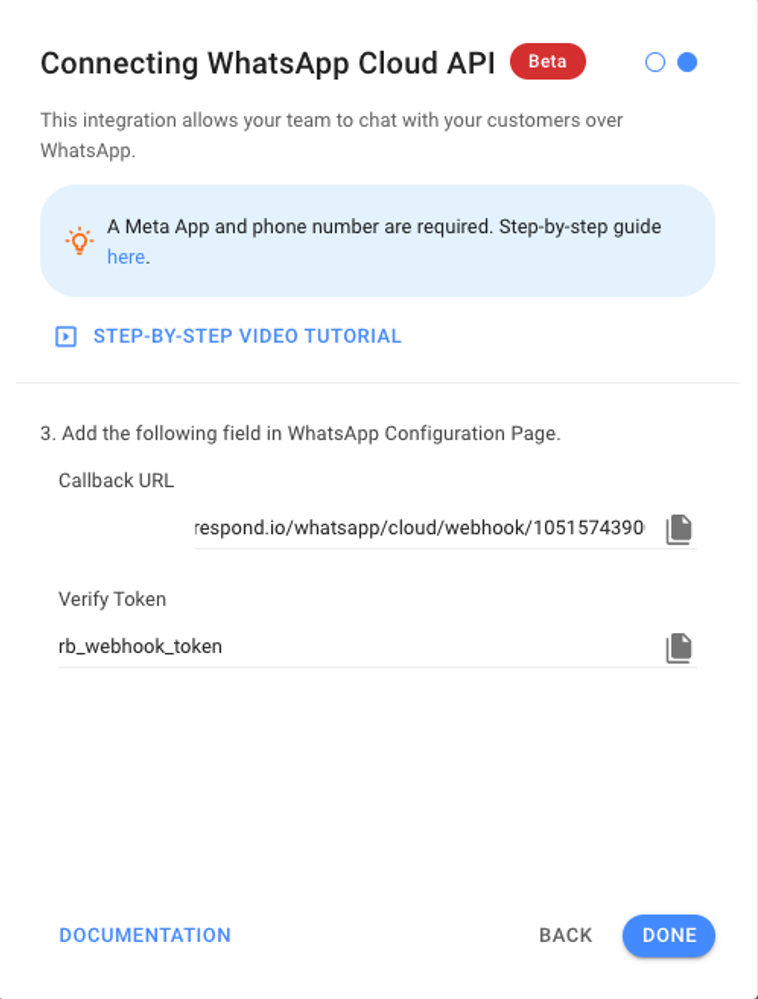
Step 6: Add the Callback URL. Go back to the WhatsApp section in Facebook Developer App. Navigate to the Configuration subsection and set up the Callback URL. Add the generated Callback URL and verify the token from respond.io to the corresponding fields at the webhook dialog.
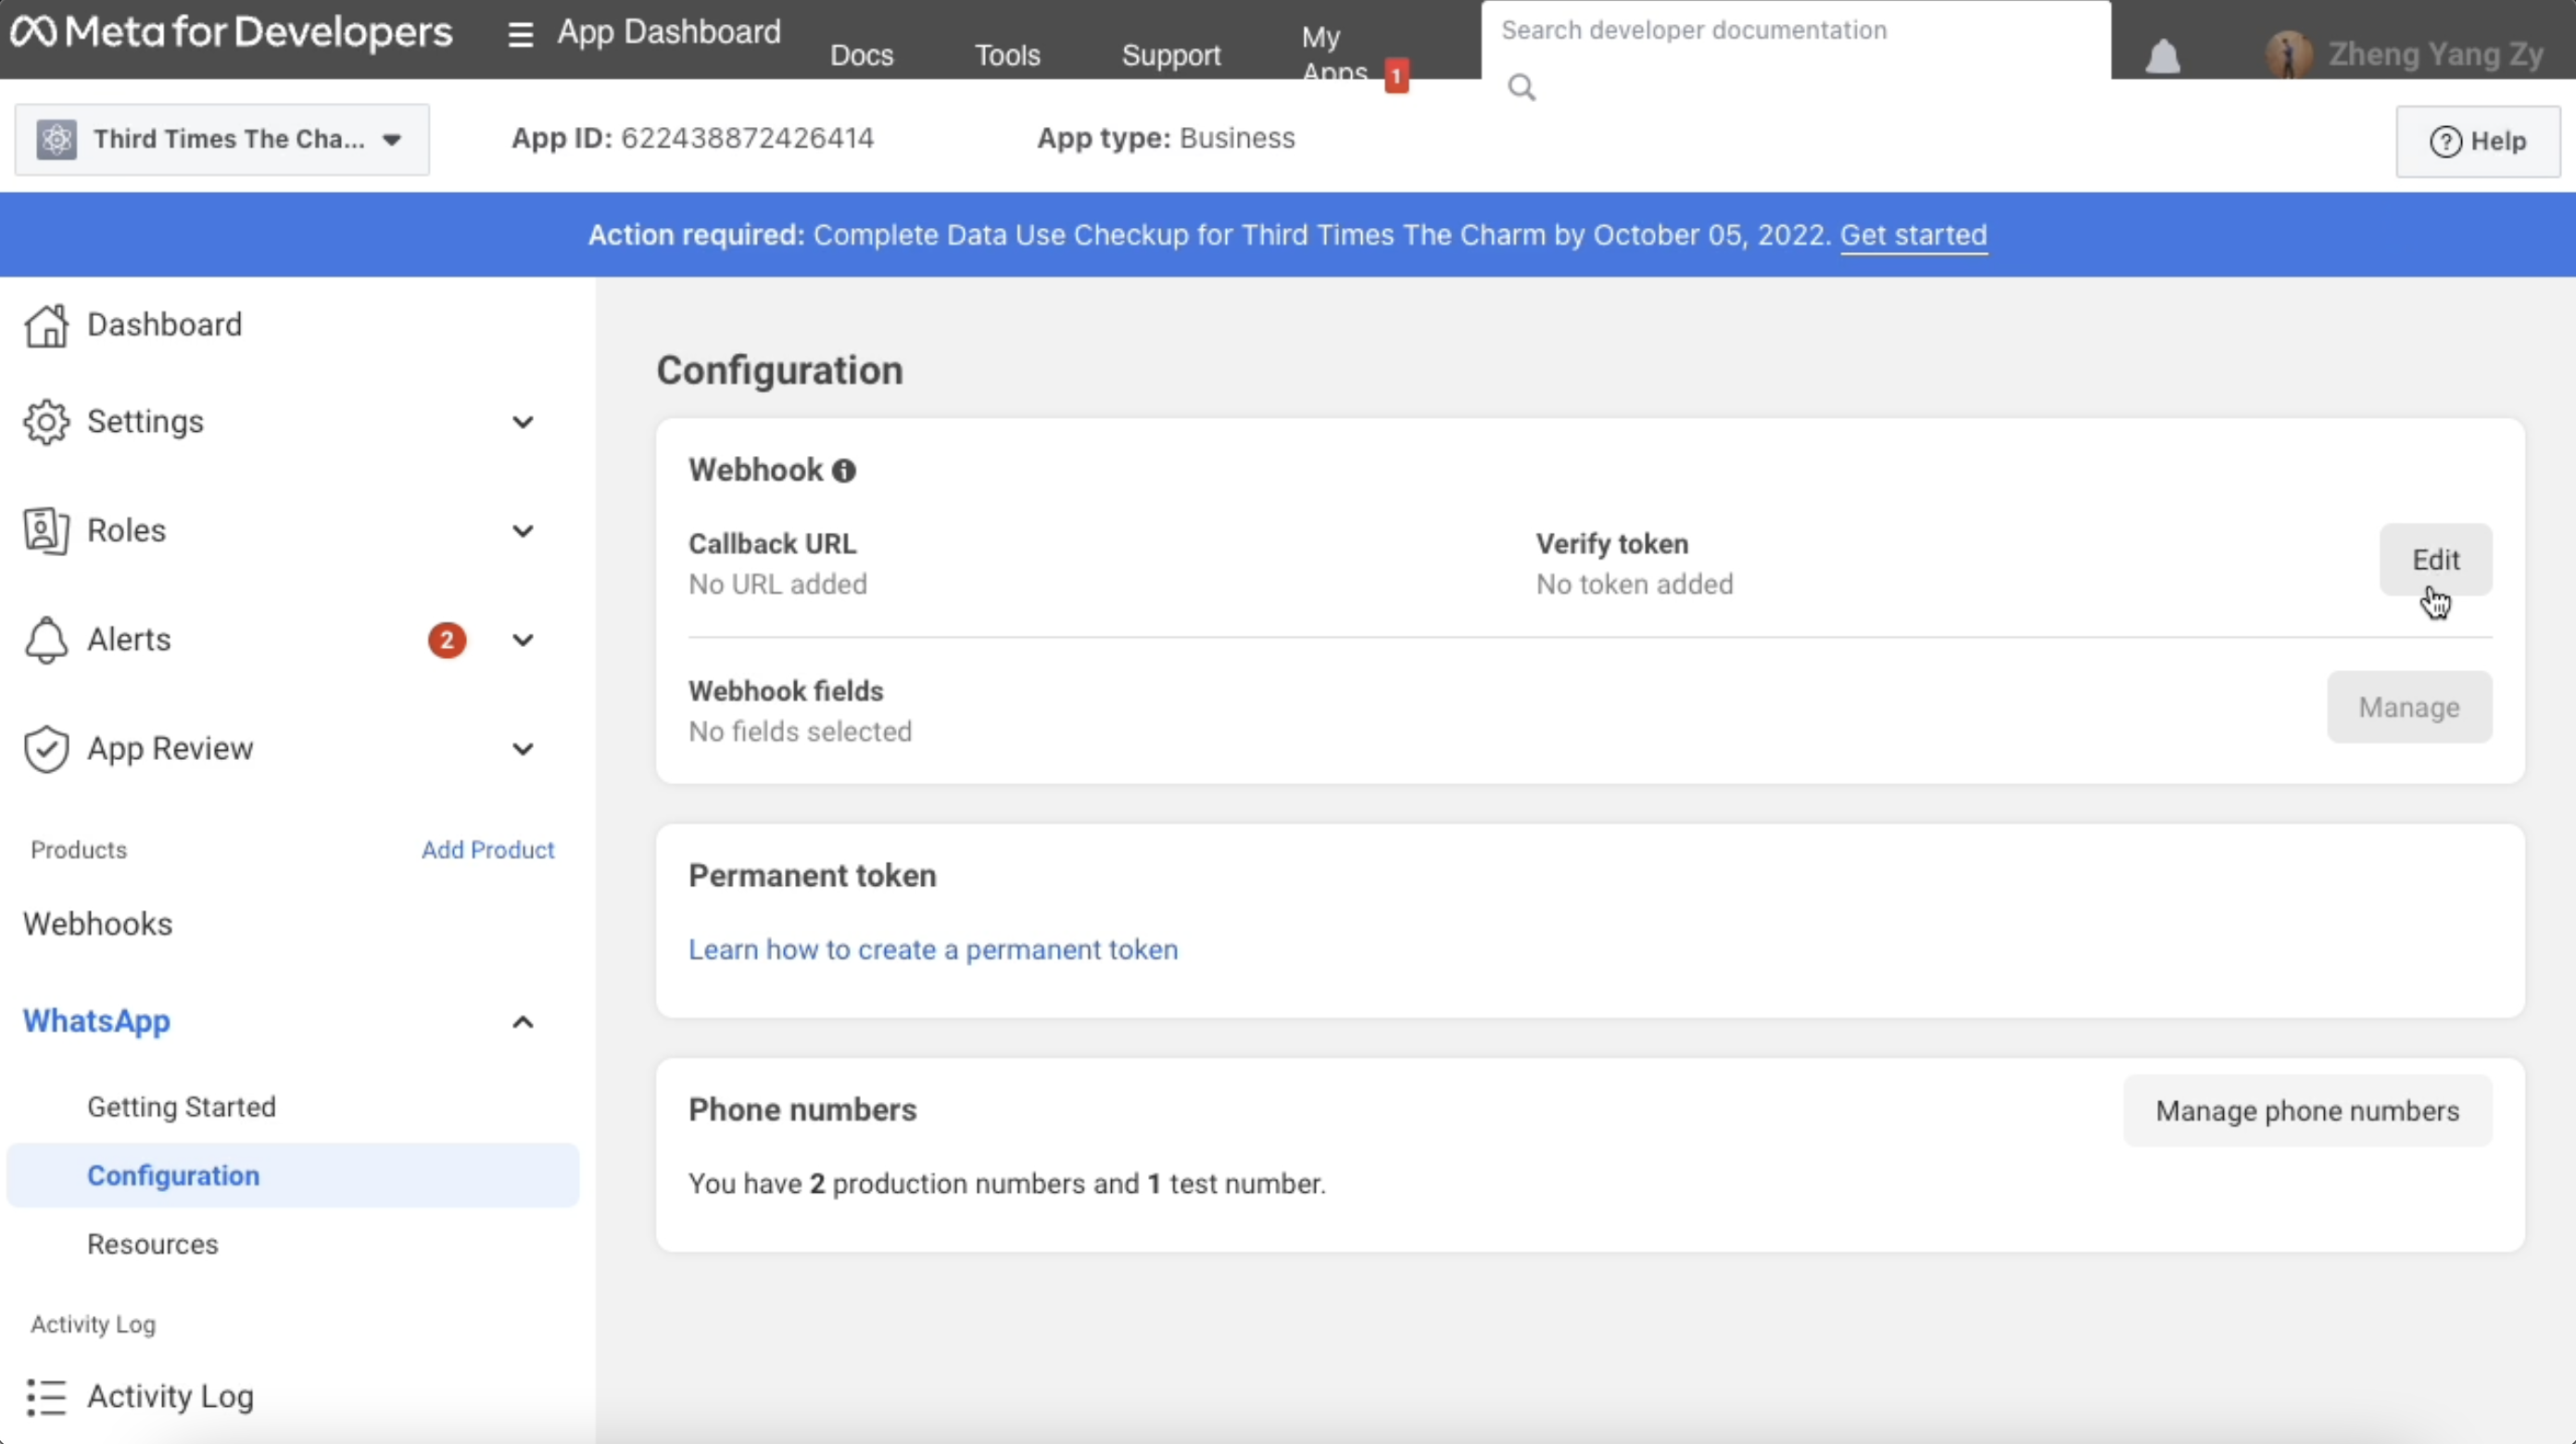
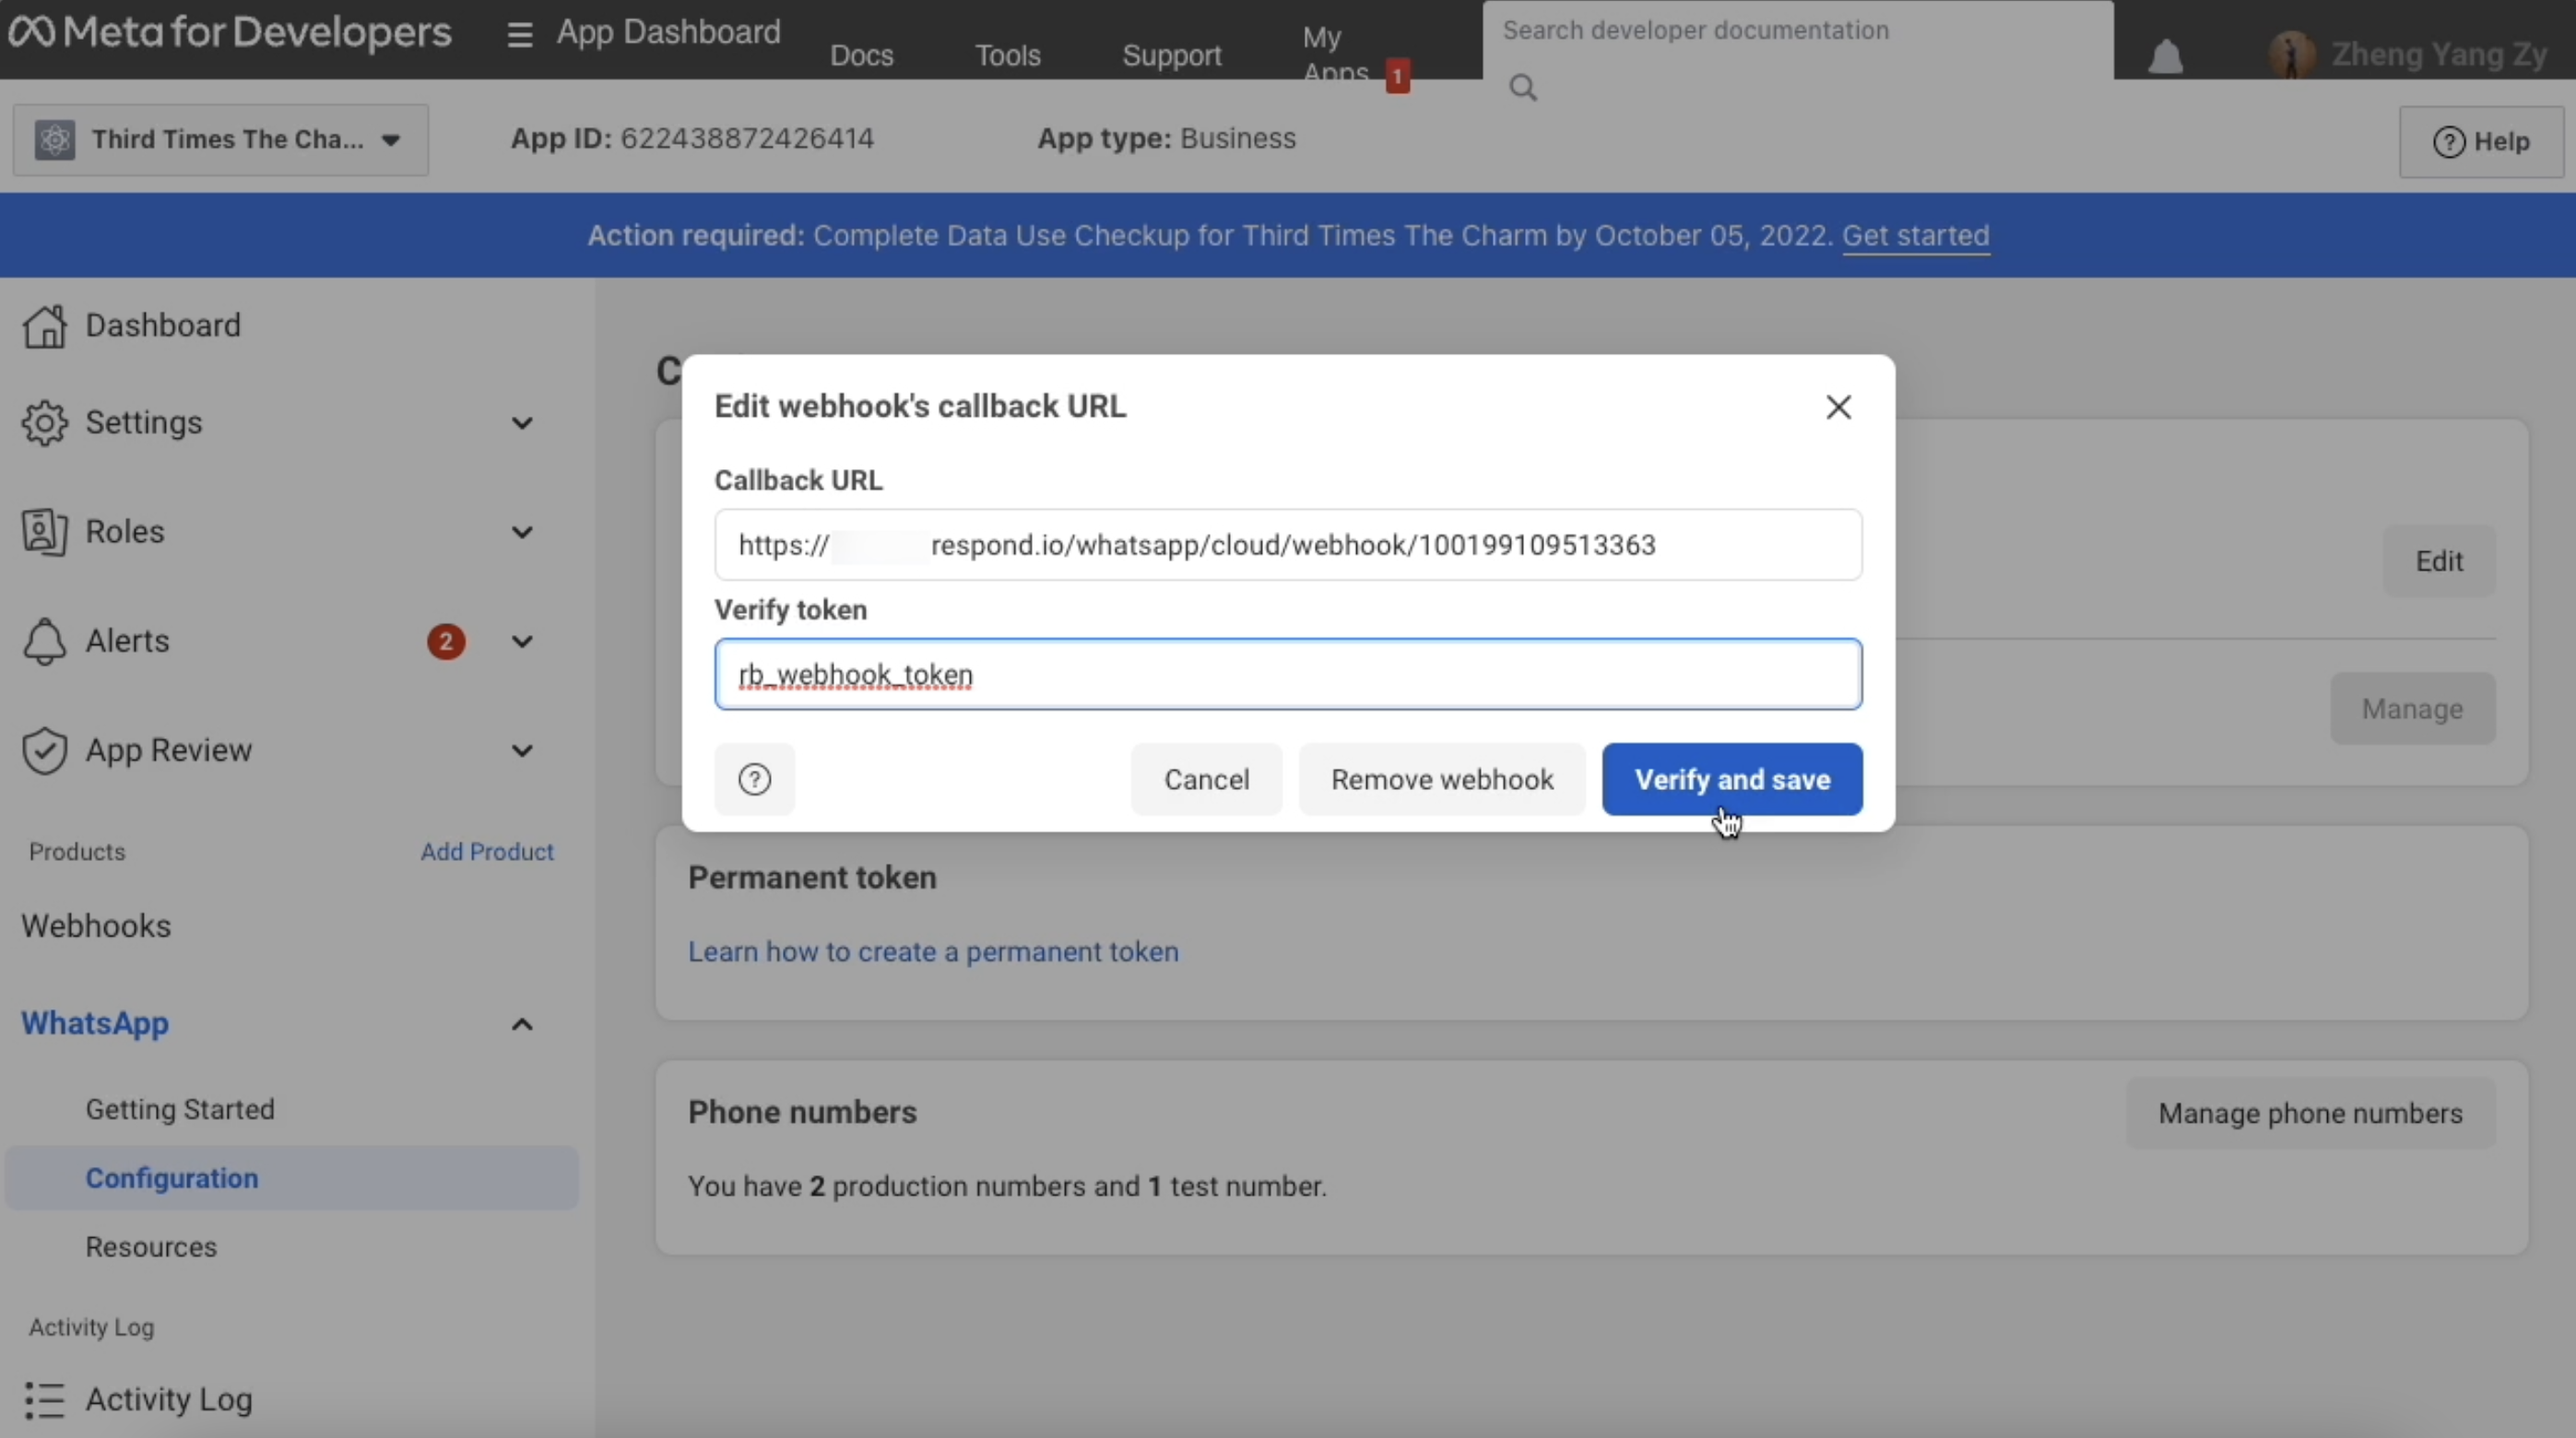
Step 7: On the Facebook App, verify and save changes to the app.
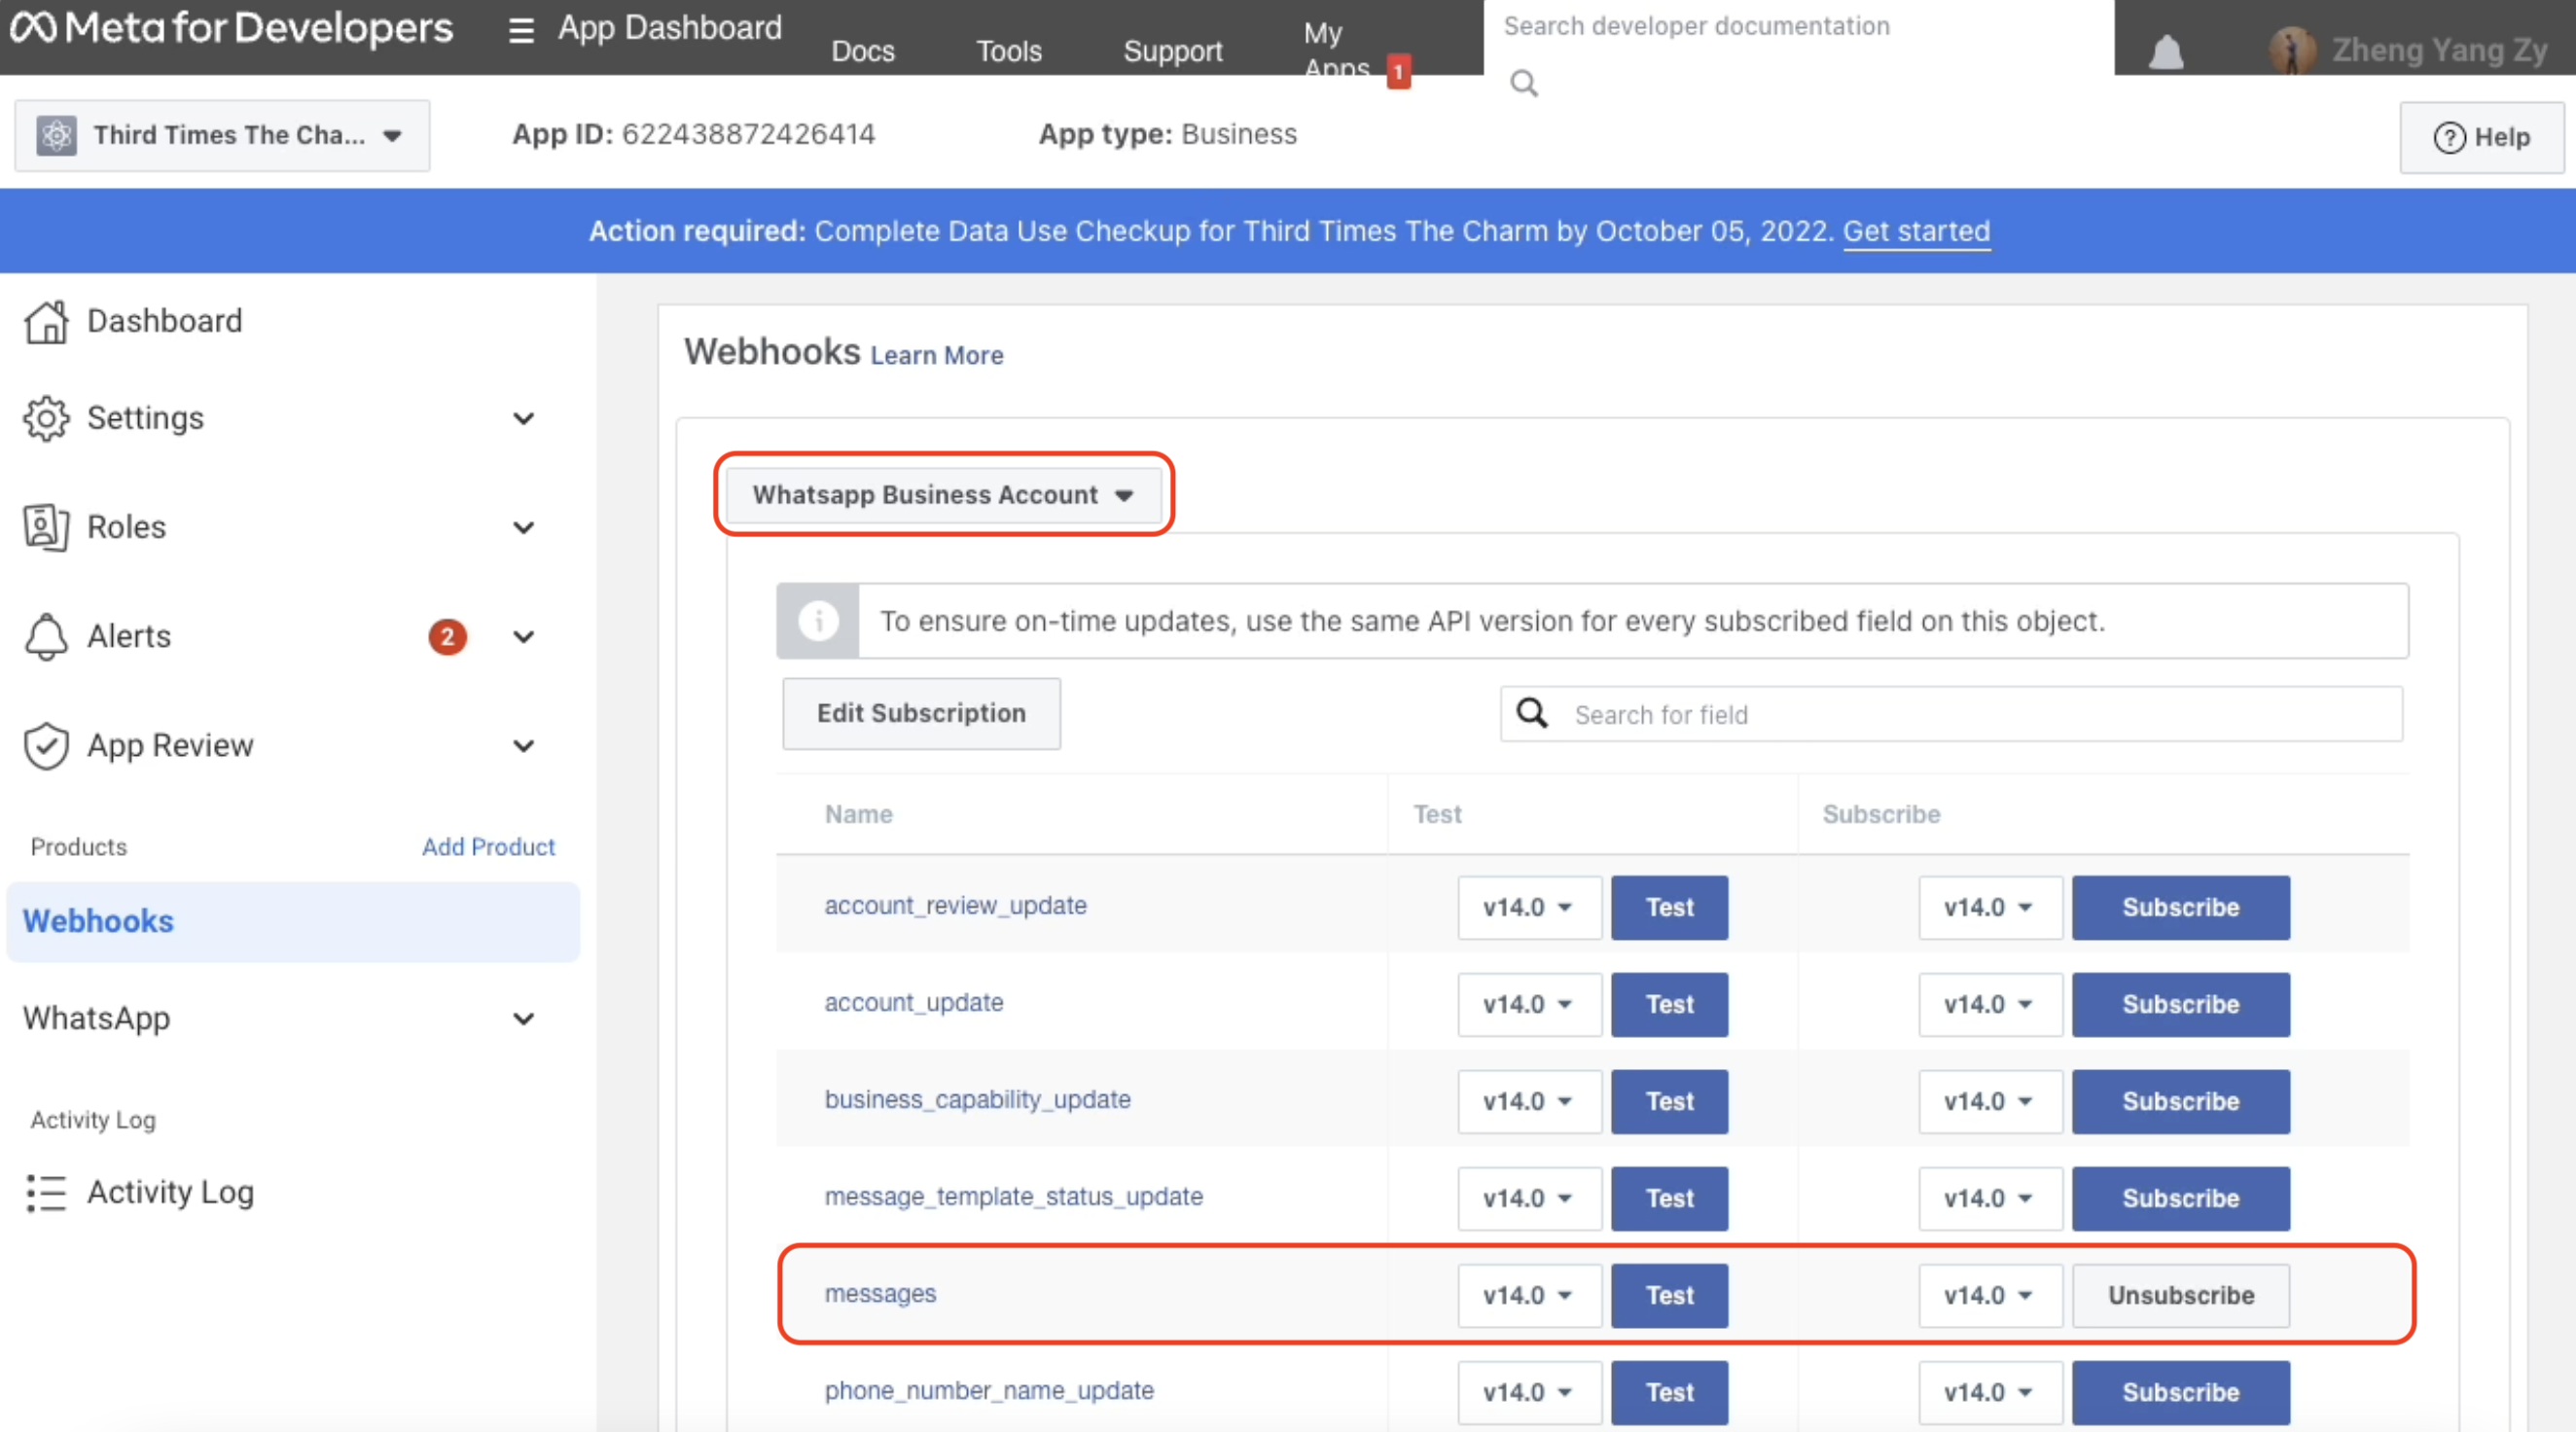
Step 8: Subscribe to the webhook event. On your Facebook App, select the Webhooks tab under the Products panel and select WhatsApp Business Account in the dropdown list. Click on subscribe messages event.
Step 9: Click the toggle at the top of the page to turn on live mode.
Step 10: Click Save Changes to complete the setup.
Channel Configuration
Step 1: Navigate to Workspace Settings > Click Channels.
Step 2: Locate the WhatsApp Cloud API Channel > Click Manage.
Step 3: Configure the Channel name, which is used internally to identify the account.
Step 4: Click Save Changes to update the channel configuration.
Metadata Received by Channel
Different channels provide different sets of Contact’s metadata to respond.io platform. Here’s the list of Contact’s data you’ll be able to obtain from this channel:
- Phone number
- Phone number ID
- Profile name
- Whatsapp ID
Managing WhatsApp Cloud API Profile
Step 1: Navigate to Workspace Settings > Click Channels.
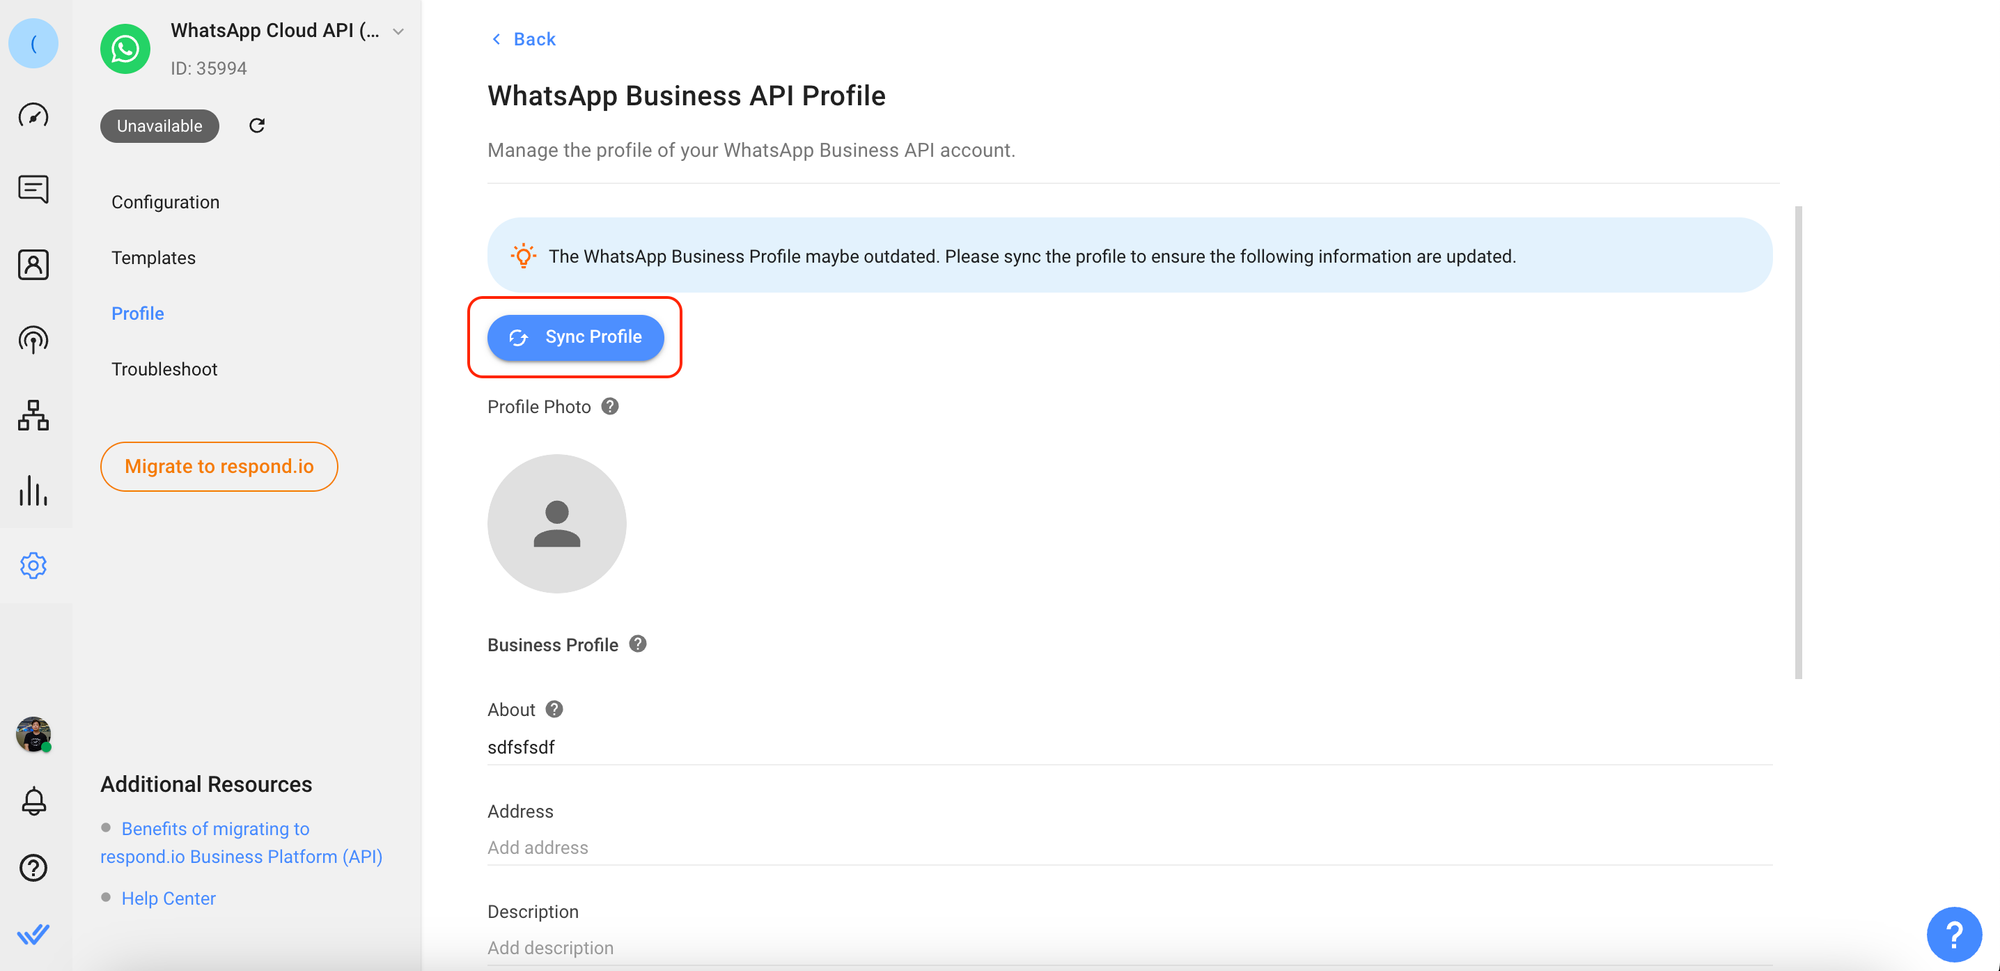
Step 2: Locate the WhatsApp Cloud API Channel > Click Manage > Profile.

Step 3: Click Sync Profile to obtain the latest WhatsApp Business Profile information from WhatsApp.
Step 4: Edit the following information as needed.
Fields | Description |
Profile Photo | Image shown as the profile picture of the WhatsApp business account. An image size of 640x640 is recommended. |
About | The business's About text. This text appears in the business's profile beneath its profile image, phone number, and contact buttons. |
Address | Address of the business. Maximum of 256 characters. |
Description | Description of the business. Maximum of 512 characters. |
Email address (in valid email format) to contact the business. Maximum of 128 characters. | |
Vertical | Industry of the business. Must be one of these accepted values:
The business vertical cannot be set back to an empty value after it is created. |
Website | URLs (including |
Step 5: Review the information and click Save Changes.
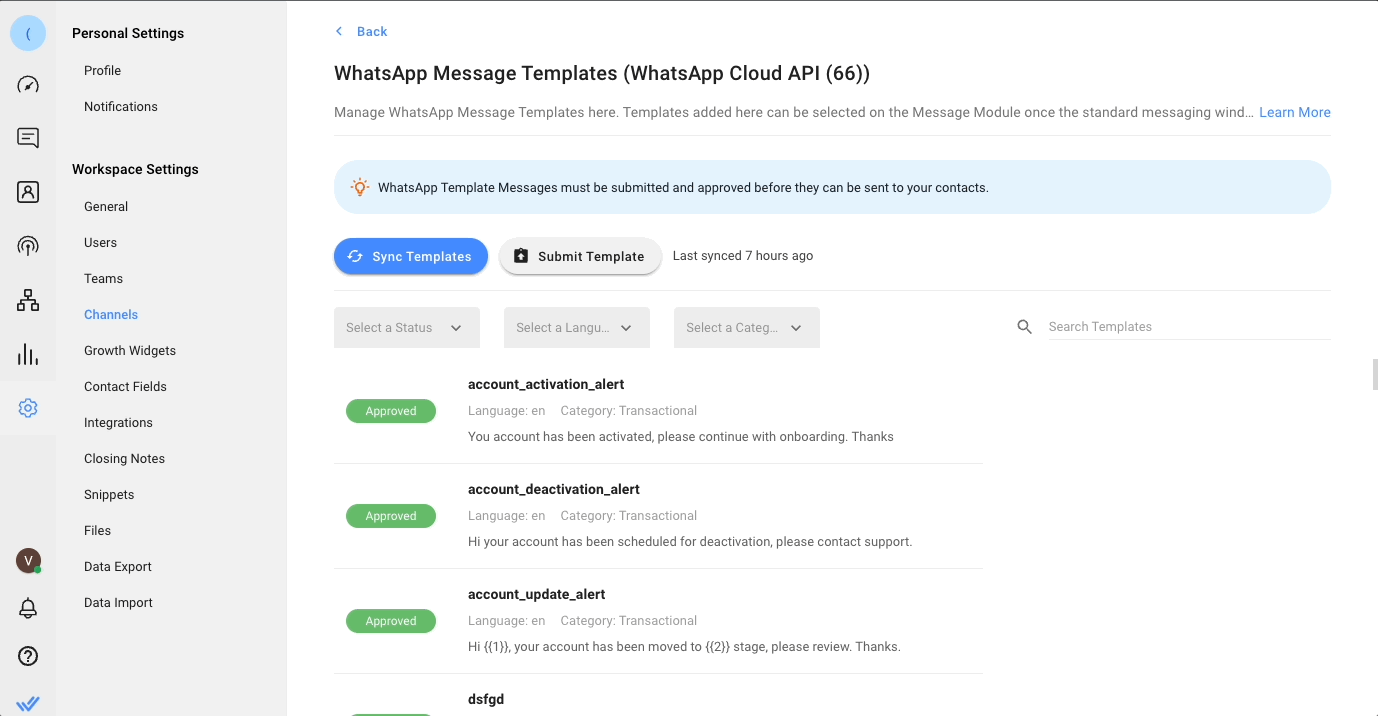
Managing WhatsApp Message Templates
- Submitted the message template for approval
- Added the approved message template to the Workspace by syncing the message template
Submitting Message Templates
Step 1: Navigate to Workspace Settings > Click Channels.
Step 2: Locate the WhatsApp Cloud API Channel > Click Manage.
Step 3: Click Templates > Submit Template to submit a message template for approval.
Step 4: Fill in the required information needed to create a template.
Field | Description |
Template Name | The name can only contain lowercase alphanumeric characters and underscores ( _ ) |
Category | The category to which the message template belongs. |
Language | The language that the template is written in. |
Step 5: Create the message by filling in the necessary components, then review the message in the preview section. You may include parameters {{1}}, {{2}}, etc. as placeholders to be filled in with personalized content.
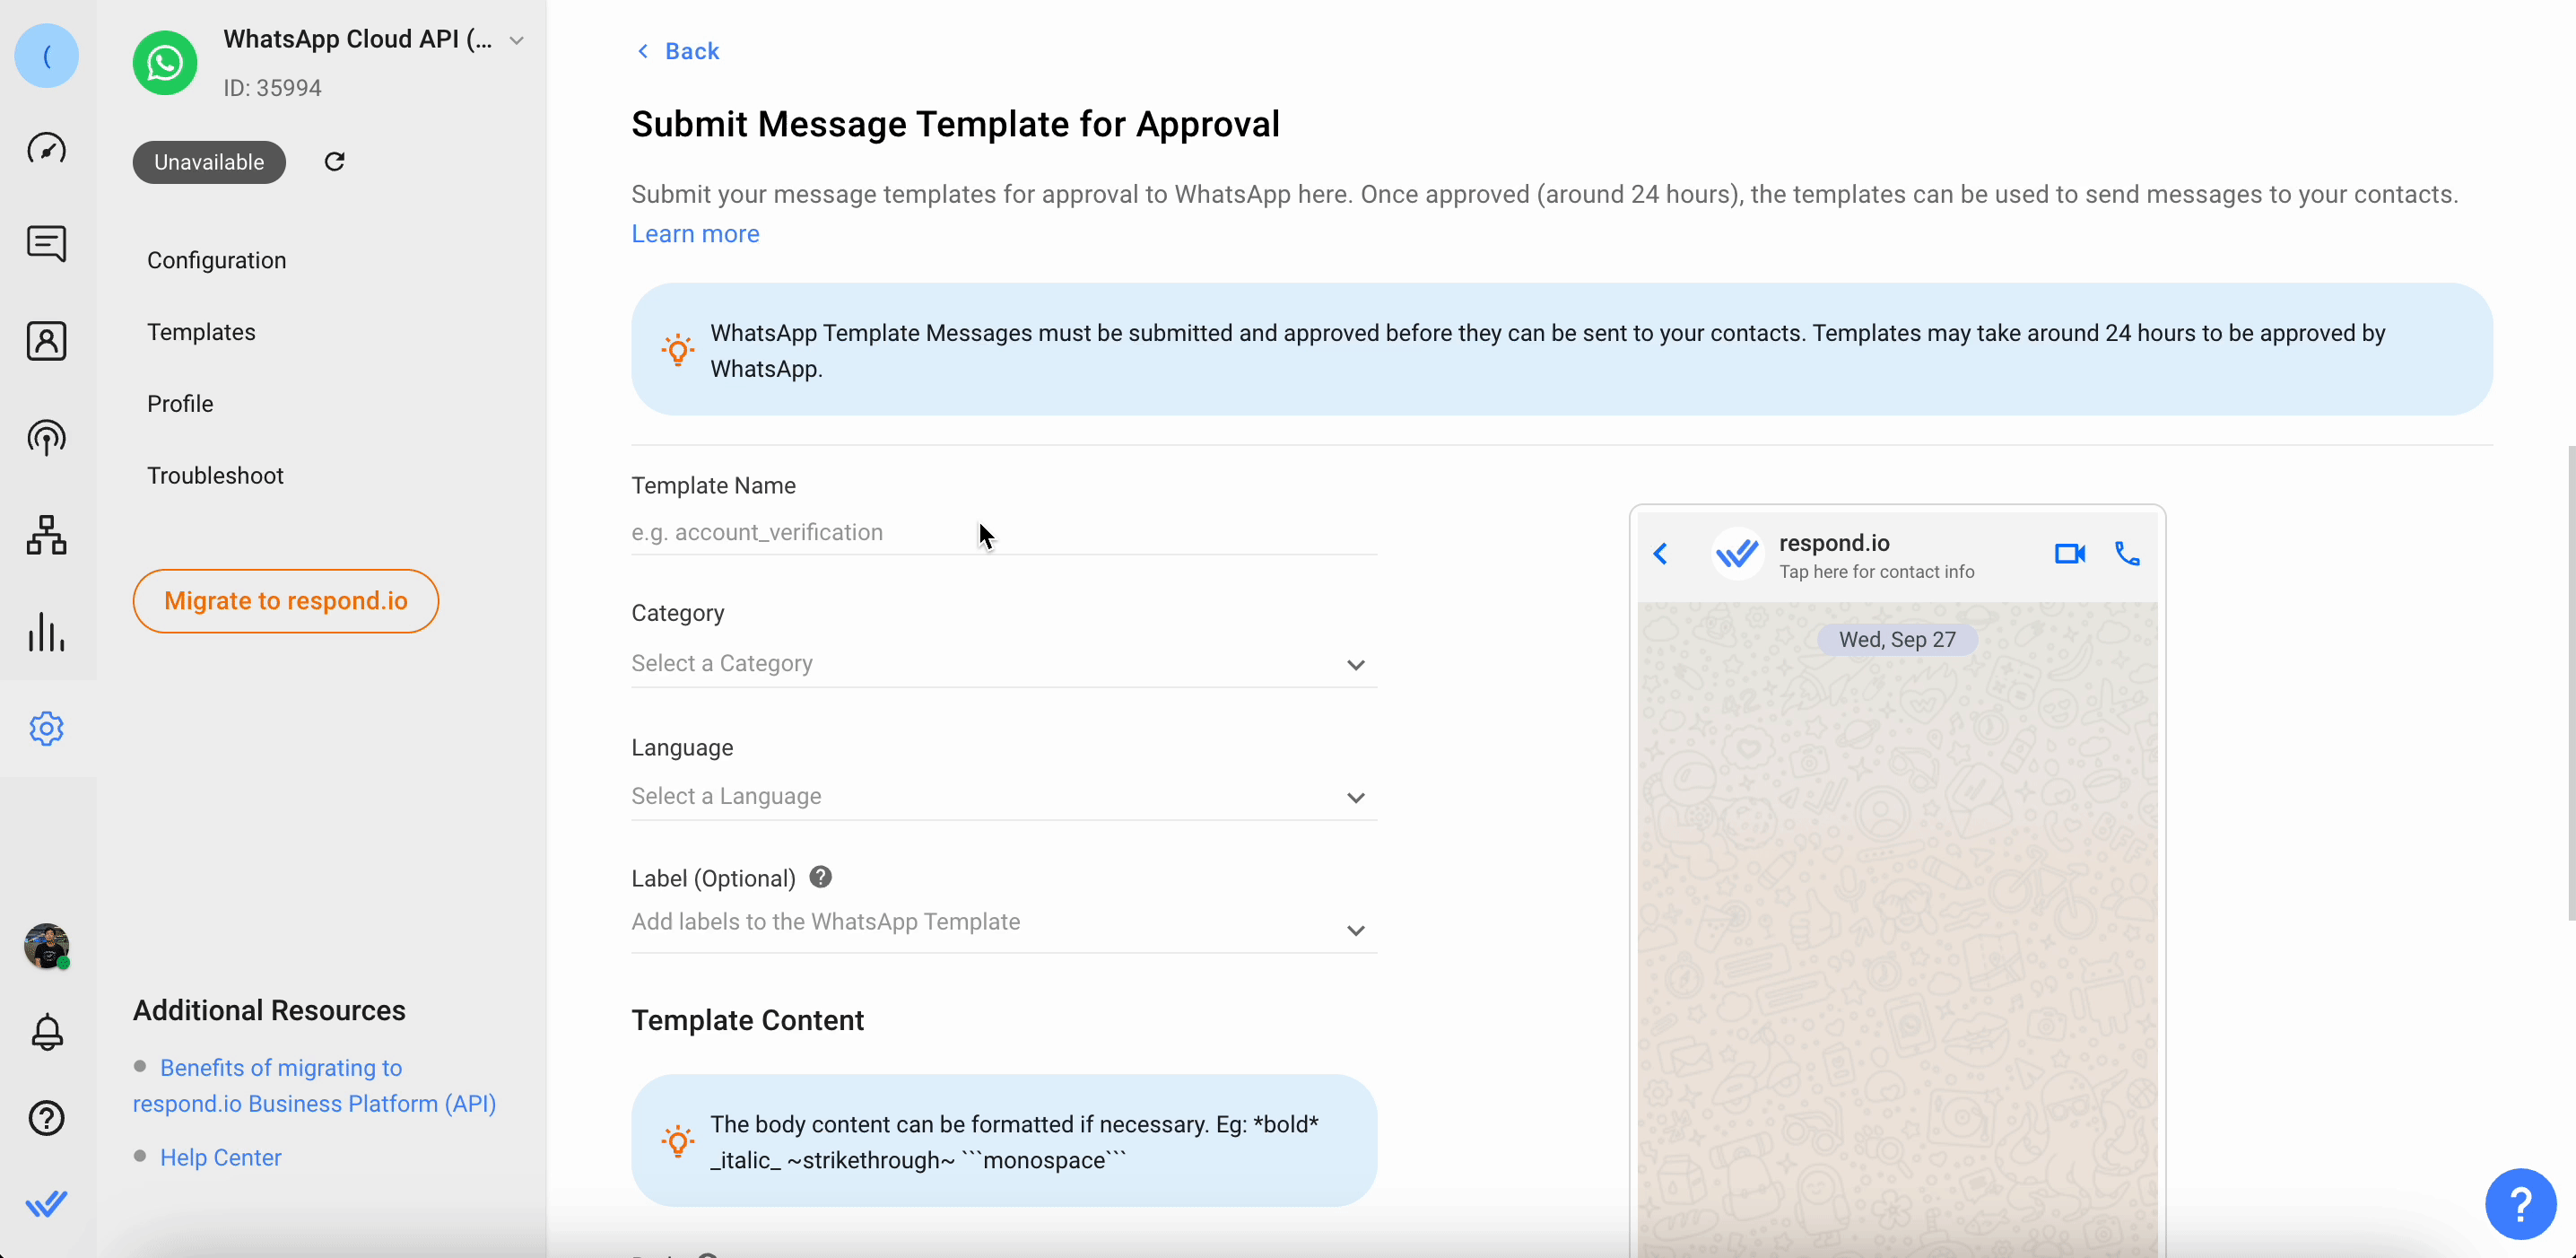
Building Block | Description |
Body | The Body contains the most important text of your template. Only text is supported. You may use markdown to format the content of this block. Learn more here. |
Header | The Header is optional and serves as the title or header of your template. It supports the following:
* Respond.io platform accepts uploads up to 20MB in size. |
Footer | The Footer is optional and only supports text. It can be used to provide supplementary information in your message template. |
Button | The Button is optional and adds interactivity to your templates. There are two types available:
* Quick Reply Buttons are supported only on iOS, Android and web platforms, but not on Windows platform. Refer to more details here. |
Step 6: Provide sample value
This is only applicable if you have included any parameters in your message template content.
Syncing Message Templates
Step 1: Navigate to Workspace Settings > Click Channels.
Step 2: Locate the WhatsApp Business Platform (API) channel > Click Manage.
Step 3: Click Templates > Sync Template to begin the syncing process.
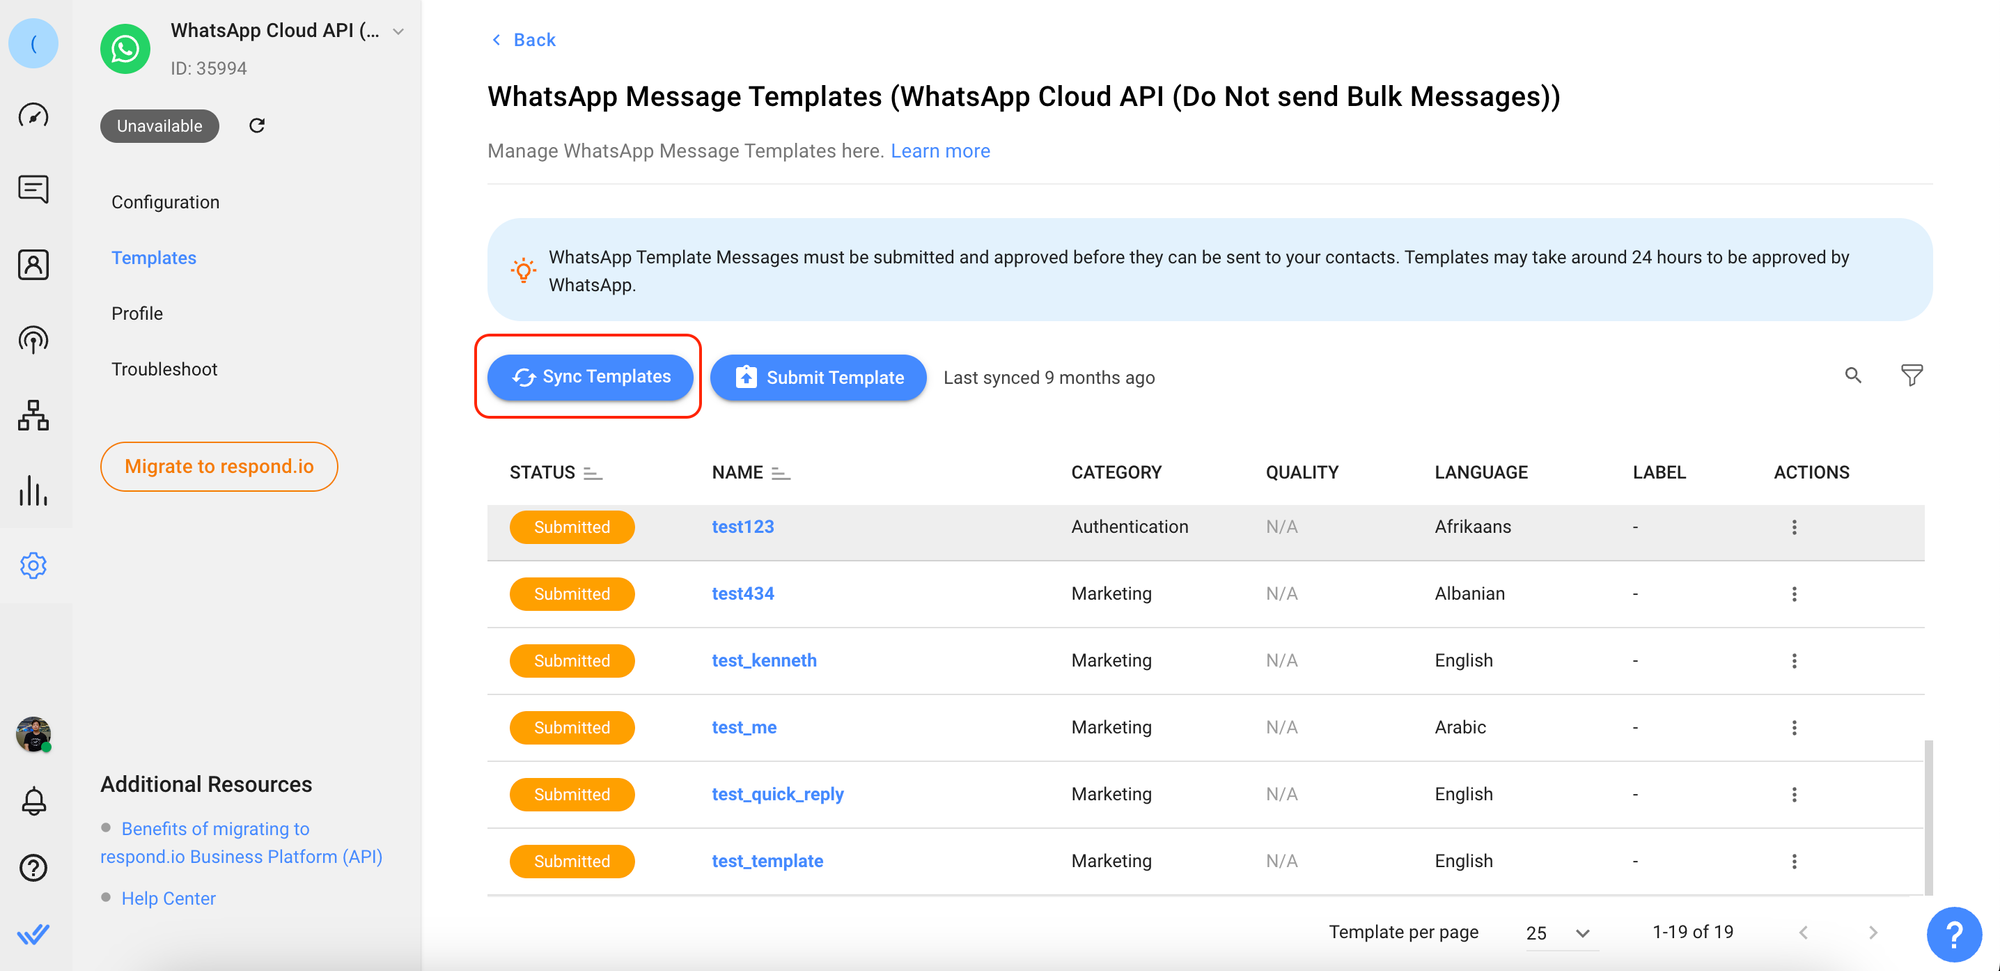
- The message templates will be listed with their corresponding statuses.
- The last synced date time will be updated.
- If your template is rejected, the rejection reason will be displayed below the rejected message template.
The following table lists the possible statuses for the message templates:
Status | Description |
Submitted | The message template is submitted and pending approval. |
Approved | The message template is approved and can be sent to contacts. |
Rejected | The message template is rejected and cannot be used. |
Supported File Types
The file type supported by WhatsApp and the maximum file size for the type is as follows:
- Audio & Video (16MB)
- Document (100 MB)
- Image (5 MB)
- Sticker (100 KB)
- Contact Card
- Reactions
- Deleted Message
- Polls
- Ephemeral Message
Rate Limits
A rate limit is the number of API calls an app or user can make within a given time period defined by the channel. Learn more about the rate limits for this channel here.
FAQ and Troubleshooting
Unable to Send Messages
Make sure that the number you've connected to the platform is a WhatsApp Cloud API number.
Messages Are Not Arriving
Step 1: Navigate to the Facebook App Webhook page
Open the Facebook App and navigate to the Webhooks page.
Step 2: Verify the subscribed event
Select Whatsapp Business Account and verify if the messages event is subscribed.
Step 3: Send a test message
Send a test message to the WhatsApp phone number and check if it arrived.
Unable To Receive Read Receipts
When the user connected to WhatsApp Cloud API changes their Facebook password, the permissions will be outdated and need to be refreshed.
Step 1: Navigate to Workspace Settings > Click Channels.
Step 2: Locate the WhatsApp Business Platform (API) channel > Click Manage.
Step 3: Click Troubleshoot > Refresh Permission to refresh WhatsApp permissions.
Step 4: Send a test message to the WhatsApp phone number and check if it arrived.
Unable To Send Outbound Messages: Validating Access Token Error
This can happen due to a few reasons:
- When the session for validating the access token has expired.
- There was a change to the user's admin privilege in Meta Business Manager.
- There was a password change on Meta Business Manager.

To solve this error, you must refresh your WhatsApp Cloud API channel permissions and send a test message again.
Contact Not Receiving Messages
If your Contacts cannot receive messages from your WhatsApp Cloud API number, make sure that they have agreed to the latest WhatsApp terms and privacy policy.
What are the requirements for phone number to be used to sign up for WhatsApp Cloud API?
- The phone number used for WhatsApp Cloud API can't be used in the WhatsApp personal or business app. You'll have to delete the account on the WhatsApp personal or business app before you can use the number to sign up for awhatsApp Cloud API.
- You can still use the number for other purposes, such as calling and receiving SMS after registering it on the WhatsApp Business Platform.
- Once you use a phone for WhatsApp Cloud API you can no longer use that number on the WhatsApp Business App.
Is Business Verification needed to start using Cloud API?
It isn’t mandatory to complete Facebook Business Verification to start sending messages on WhatsApp. Without business verification, your business will still be able to:
- Respond to unlimited user-initiated conversations.
- Send business-initiated conversations (message templates) to 250 unique customers in a rolling 24-hour period.
- Register up to 2 phone numbers.
Businesses can initiate Business Verification only when they're ready to scale business-initiated conversations or want to become an Official Business Account.
Can I view my conversation insights for my WhatsApp Business Account?
Yes, you can monitor your messaging and spending analytics in real-time for your WhatsApp business account in the Insights tab of your Meta WhatsApp Manager. Read more here.
What are WhatsApp messaging limits?
Messaging limits determine the maximum number of business-initiated conversations each phone number can send in a rolling 24-hour period. These limits do not apply to user-initiated conversations. A business-initiated conversation starts when the first message is delivered to a customer and ends 24 hours later. Read more here.
How do I add a payment method to my WhatsApp Business Account?
You can add a payment method to your Whatsapp Business account in Business Manager. Learn how to add a payment method to your WhatsApp Business Account here.
Why did my message fail to send with an error "Business eligibility payment issue"?
This is most likely due to you exceeding the monthly free tier threshold without a valid payment method. To resolve this issue, add a valid payment method.
What is WhatsApp Cloud API pricing?
WhatsApp API uses a conversation-based pricing model that charges businesses for the number of conversations they have. A conversation starts when your business' message is delivered to a customer and lasts for a 24-hour customer service window, during which any number of messages can be exchanged between the customer and the business. Businesses incur charges for each individual conversation, regardless of how many messages are sent or received within that customer service window.
How do I delete a phone number from a business account?
There are a few requirements and steps needed to delete a phone number, read more here.
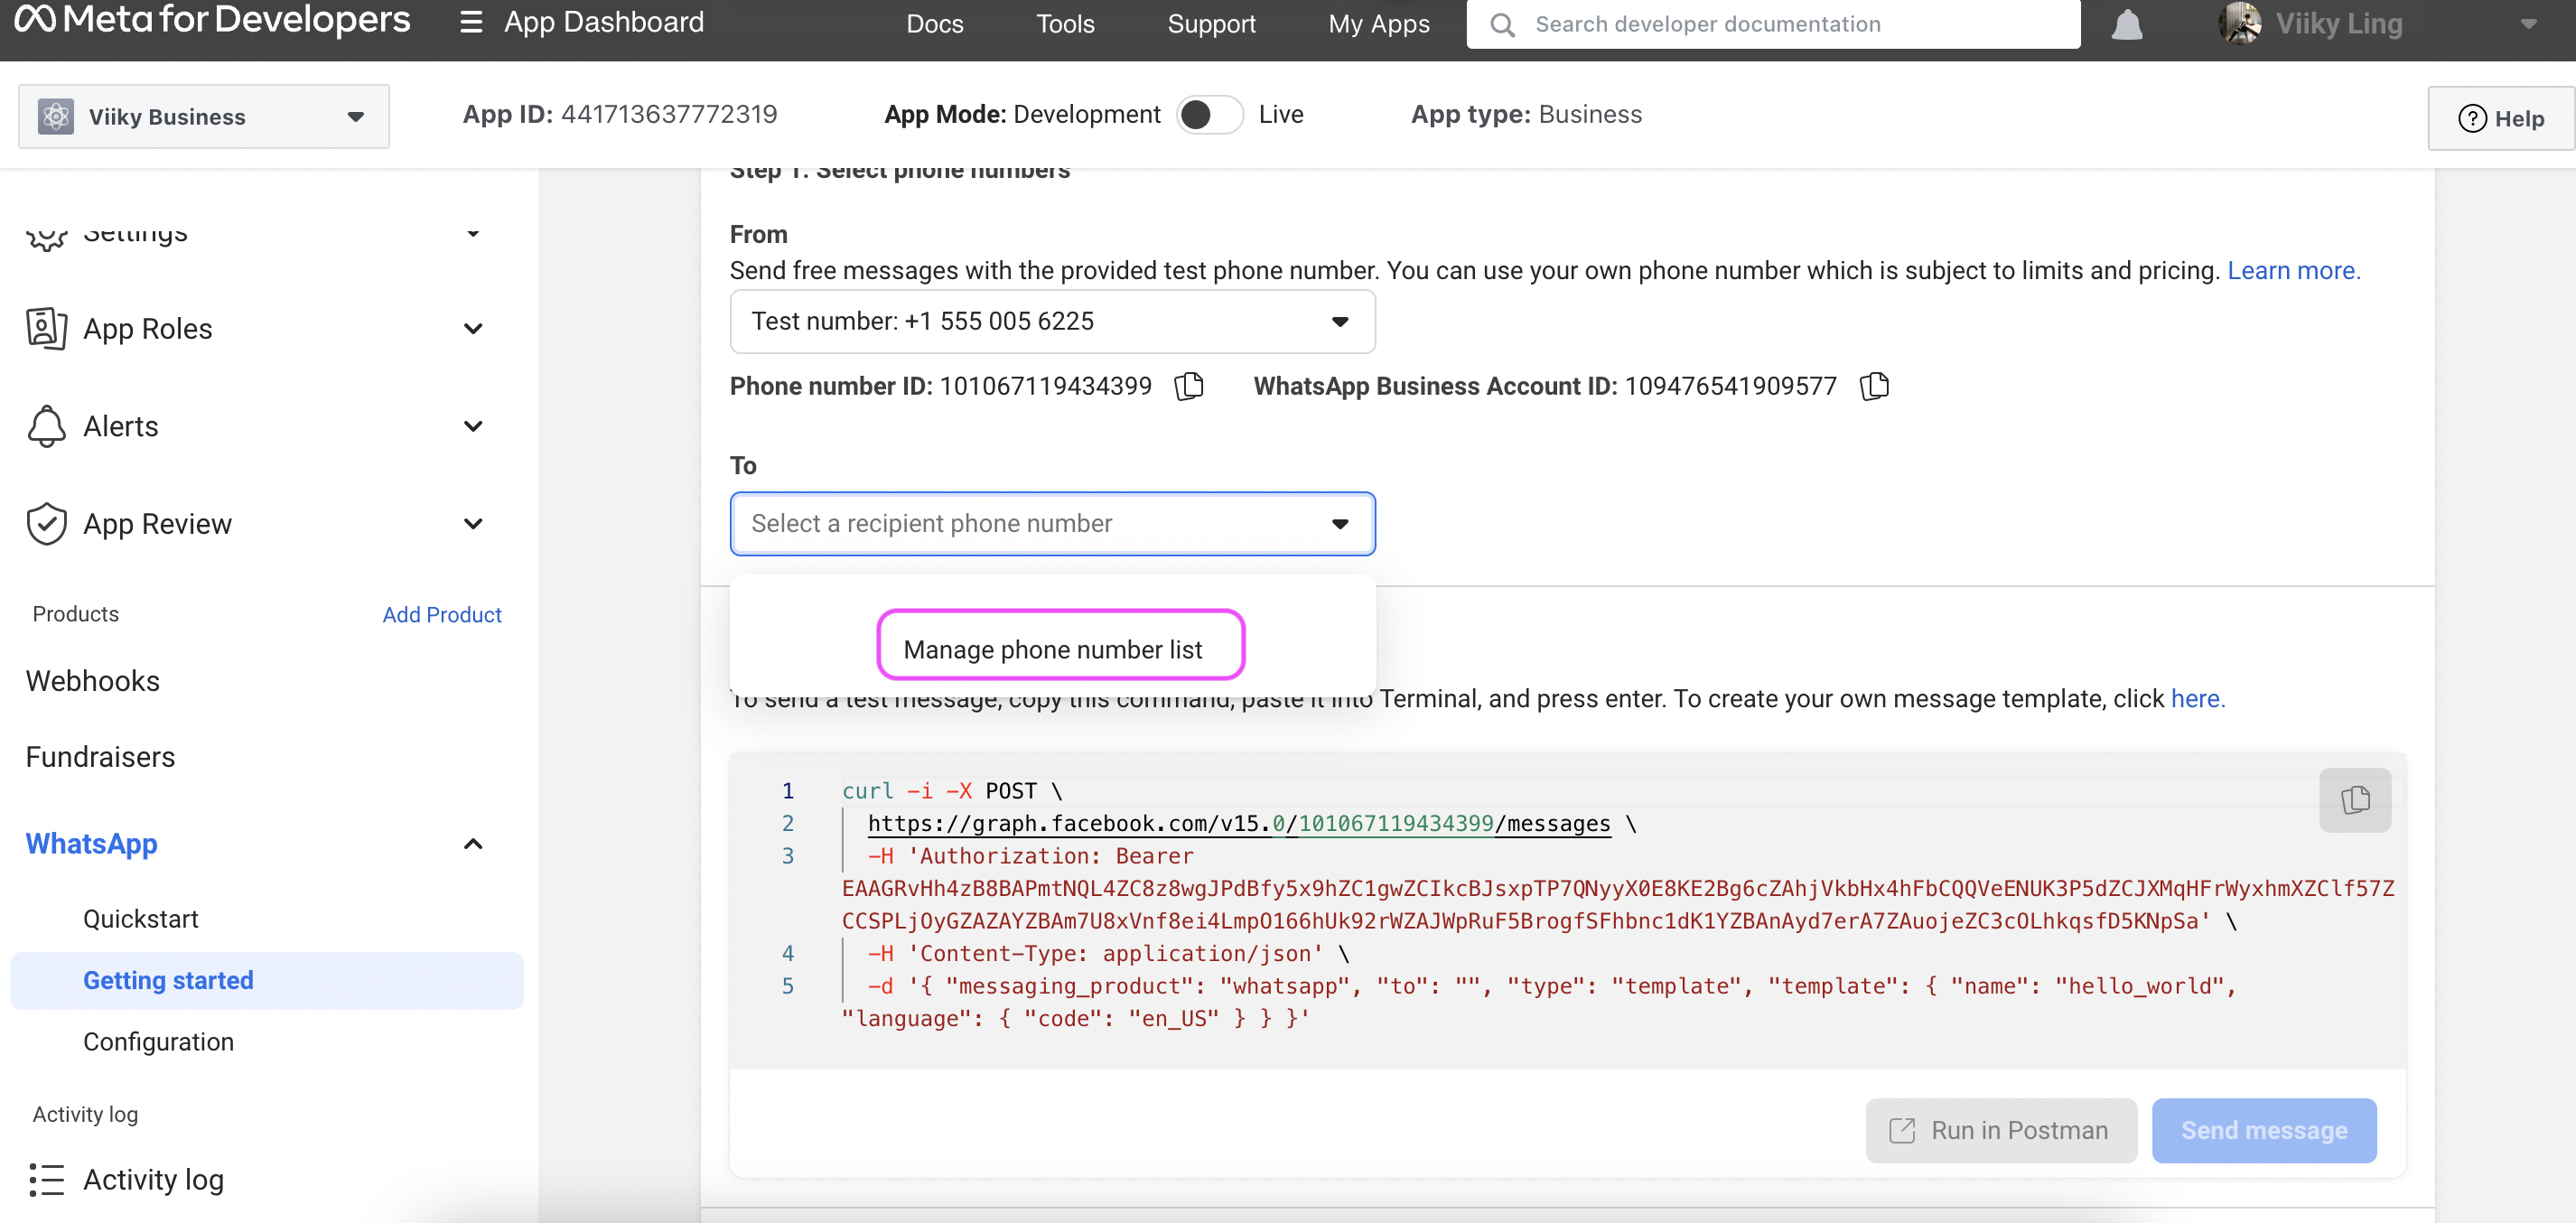
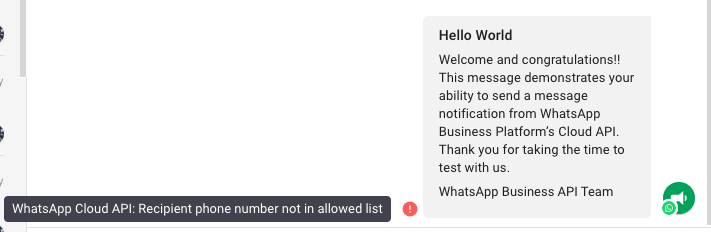
Can I use respond.io to send a WhatsApp Cloud API broadcast with the Meta test number?
You can send a test broadcast from the platform using the Meta test number. However, a broadcast using the test number is limited to five recipients. You must first add these five recipients to the phone number list in the Meta Developer tools.
If you do not add recipients to this list or if you attempt to send a broadcast to recipients not on this list, you will receive this error message:
Can I delete the Meta test number from my connected Cloud API account?
No, this number is automatically provided to all accounts to use for sending test messages and cannot be deleted. Just be careful to note that this is a test number not to be used for other purposes.
Why do I see duplicate Contacts from the same WhatsApp channel?
WhatsApp passes the Contact’s phone number in a format that is different from the E.164 format that respond.io uses. This difference causes Contacts from certain countries to be duplicated. Should this occur, do reach out to us here.
How do I change my Cloud API Display Name?
To change your Cloud API display name, follow these steps:
- Navigate to Your FBM > WhatsApp Account > Phone Number. This page displays your messaging limit and quality.
- Hover over the pencil icon next to the display name to enable editing.
- Click Next to submit your new display name to Meta for approval.
- Await confirmation of approval from Meta.
What steps should I take once my new Display Name for my Cloud API is approved?
After receiving approval from Meta for your new display name, complete the following steps:
- Re-register your phone number using the newly approved display name.
- Execute a POST API call to verify your phone number.
- Make another POST API call to re-register the verified phone number.
- Once successful, your Cloud API's display name update is complete.
Why did I encounter the error "Error validating access token: The session has been invalidated because the user changed their password or Facebook has changed the session for security reasons" when trying to send a message?
This error will occur if you have recently updates your Facebook credentials, it may disrupt the Channel connection on our platform, leading to errors when sending messages.
To resolve this issue, you need to refresh the channel permissions on our platform using your updated Facebook credentials. This process requires an Admin role. By refreshing the permissions, you'll re-establish the connection with the new credentials, ensuring that your outbound messages are sent successfully without encountering errors.