Quick Start
What is respond.io?
Setting Up an Account
Connecting Channels
Inviting Your Teammates
Getting Contacts to Message You
Automated Welcome and Away Messages
Responding to Messages
Glossary of Terms
Channels
WhatsApp Business Platform (API) Quick Start
Getting Ready for Inbound Conversations
Getting Ready for Promotional Messaging
WhatsApp Official Business Account (Blue Tick)
Grow your WhatsApp Audience by Maximizing Entry Points
Get WhatsApp API Account for Government Agencies
WhatsApp Business Calling API
Meta Business Verification
WhatsApp Message Templates
WhatsApp Pricing
WhatsApp Business Platform (API) Channel Configuration
WhatsApp Messaging Limits
Meta Product Catalog
Change Your WhatsApp Business Display Name
Migrating from WhatsApp Personal or WhatsApp Business App
Phone Number Migration to respond.io WhatsApp Business Platform (API)
Turn-off WhatsApp Number Two-Step Verification
WhatsApp Cloud API
360dialog WhatsApp
Twilio WhatsApp
MessageBird WhatsApp
Vonage WhatsApp
Phone Number Migration to WhatsApp Cloud API
TikTok
Facebook Messenger
Facebook Messenger Overview
Facebook Messenger Quick Start
Facebook Chat Plugin
Facebook Private Replies
Facebook Message Tag
LINE
Viber
Telegram
Website Chat Widget
Website Chat Widget Overview
Website Chat Widget Quick Start
Install Website Chat Widget on WordPress
Install Website Chat Widget on Shopify
Install Website Chat Widget on Wix
Install Website Chat Widget on Joomla
Install Website Chat Widget on Squarespace
SMS
Custom Channel
Product
Dashboard & Reporting
Dashboard
Reports Overview
Reports: Conversations
Reports: Responses
Reports: Resolutions
Reports: Messages
Reports: Contacts
Reports: Assignments
Reports: Leaderboard
Reports: Users
Reports: Broadcasts
Inbox
Inbox Overview
Assignment and Closing a Conversation
Custom Inboxes
Interacting with Respond AI Prompts
Using AI Assist
Contacts
Broadcasts Module
Workflows
Workflows Overview
Workflow Triggers
Workflow Steps Overview
Step: AI Agent
Step: Send a Message
Step: Ask a Question
Step: Assign To
Step: Branch
Step: Update Contact Tag
Step: Update Contact Field
Step: Open Conversation
Step: Close Conversation
Step: Add Comment
Step: Jump To
Step: Date & Time
Step: Wait
Step: Trigger Another Workflow
Step: HTTP Request
Step: Add Google Sheets Row
Step: Send TikTok Lower Funnel Event
How to Avoid Workflow Loops
Step: Update Lifecycle
Step: Send Conversions API Event
Dynamic Variables
Workspace Settings
Managing a Workspace
General info (previously General)
User settings (previously Users)
Teams (previously Team Settings)
Channels
Growth Widgets
Contact Fields
Integrations
Respond AI
Closing Notes
Snippets
Tags
Files
Data Export
Contact Import
Lifecycle
Organization Settings
Organization Overview
Account info (previously General)
Admin Settings (previously Users)
Workspaces
WhatsApp Fees
Billing & Usage
Security
User Account
Mobile App
Installing respond.io Mobile App
Messaging From Your Mobile
Managing Notifications On Your Mobile
Configuring mobile app settings
Help Menu
Conversation Led Growth
Capture Leads
How to Collect Contacts’ Emails and Phone Numbers
How to Route Contacts from CTC Ads to Agents
How to Send Outbound Sales Messages
How to Track Conversation Source from Multiple Websites
How to Enrich Customer Data from a CRM or other Business Software
Convert Leads
How to Automate Product Info Sharing in Conversations Initiated via CTC Ads
How to Automatically Qualify Contacts Based on Budget Using AI Agent
Assignment Strategy: How to Automate Contact Distribution & Load Balancing
How to Maximize Customer Service Potential with AI Agent
How to Automate Contact Information Collection with AI
How to Block Contacts and Manage Spam
How to Create Automated Welcome and Away Messages
How to Create Automated Chat Menus
How to Route Contacts to Preferred AI Agent
How to Route Contacts by their Preferred Language
How to Route Contacts by Team Functions
How to Route Contacts by Shifts
Assignment Strategy: How to Unassign Agents after Conversations Closed
How to Get Contacts’ Consent for Personal Data Collection
How to Promptly Transfer Conversation Between Agents
How to Guide Customers from Exploration to Purchase with Engaging Menus
How to Optimize Customer Onboarding with Automated & Customized Welcome Messages
How to Streamline Meeting Scheduling via CTC Ads
How to Get a Complete View of the Customers
How to Simplify Customer Escalation with Automation
How to Transfer Contacts to the Next Shift Automatically
How to Optimize Agents’ Productivity in the Inbox Module
How to Write an Optimal AI Persona (Best Practices)
How to Write the Best Knowledge Sources for AI Agents
How to Align AI Conversations with Your Brand Voice
How to Draft Customer Replies with AI
How to Convert Image to Text Using AI
How to Automate Calculations Using AI
How to Automate Lifecycle Tracking in Google Sheets
Retain Customers
How to Route New and Returning Contacts
How to Route VIP Contacts
How to Send CSAT to Customer and Save Data in Google Sheets or CRMs
How to Send Outbound Support Messages
How to improve lead targeting and automatically send purchase events to Meta when a customer makes a payment
Reporting and Analytics
Broadcasts Use Cases
How to Send a Simple Broadcast
How to Start a Workflow Based on Broadcast Response
How to Import to Broadcast via WhatsApp
How to Troubleshoot a Failed Broadcast
Integrations
Dialogflow
Dialogflow Overview
Dialogflow: Connecting to Dialogflow
Dialogflow: Creating a Chatbot
Dialogflow: Managing Intents
Dialogflow: Parameters
Dialogflow: Events
Dialogflow: Response Templates
Dialogflow: Custom Payloads
Dialogflow: Fulfillment Webhook Request
Zapier
E-Commerce Integration: Shopify
E-Commerce Integration: BigCommerce
E-Commerce Integration: WooCommerce
E-Commerce Integration: Magento
CRM Integration: HubSpot
CRM Integration: Salesforce
CRM Integration: Pipedrive
CRM Integration: ActiveCampaign
Zapier
Make
Meta Business Accounts
TikTok Messaging Ads Integration
Developer API
HubSpot
Webhooks
Salesforce
Table of Contents
- Home
- Product
- User Account
- Profile
Profile
Updated
by Joshua Lim
Getting Here
A user can view their user profile from two locations:
User profile menu
View your user profile menu by clicking on your profile photo at the bottom of the left sidebar.

User profile
Displays your name and email address.
Activity status indicator
Using this, you can change your current status within the platform. Learn more about Activity Status.
Actions
Notifications
Click to manage notifications preferences.
Billing & Usage
Click to go to the Billing & Usage page of the Organization. (Only shown to Organization Admins and Billing Admins)
Sign out
Click to sign out of the platform.
User profile page
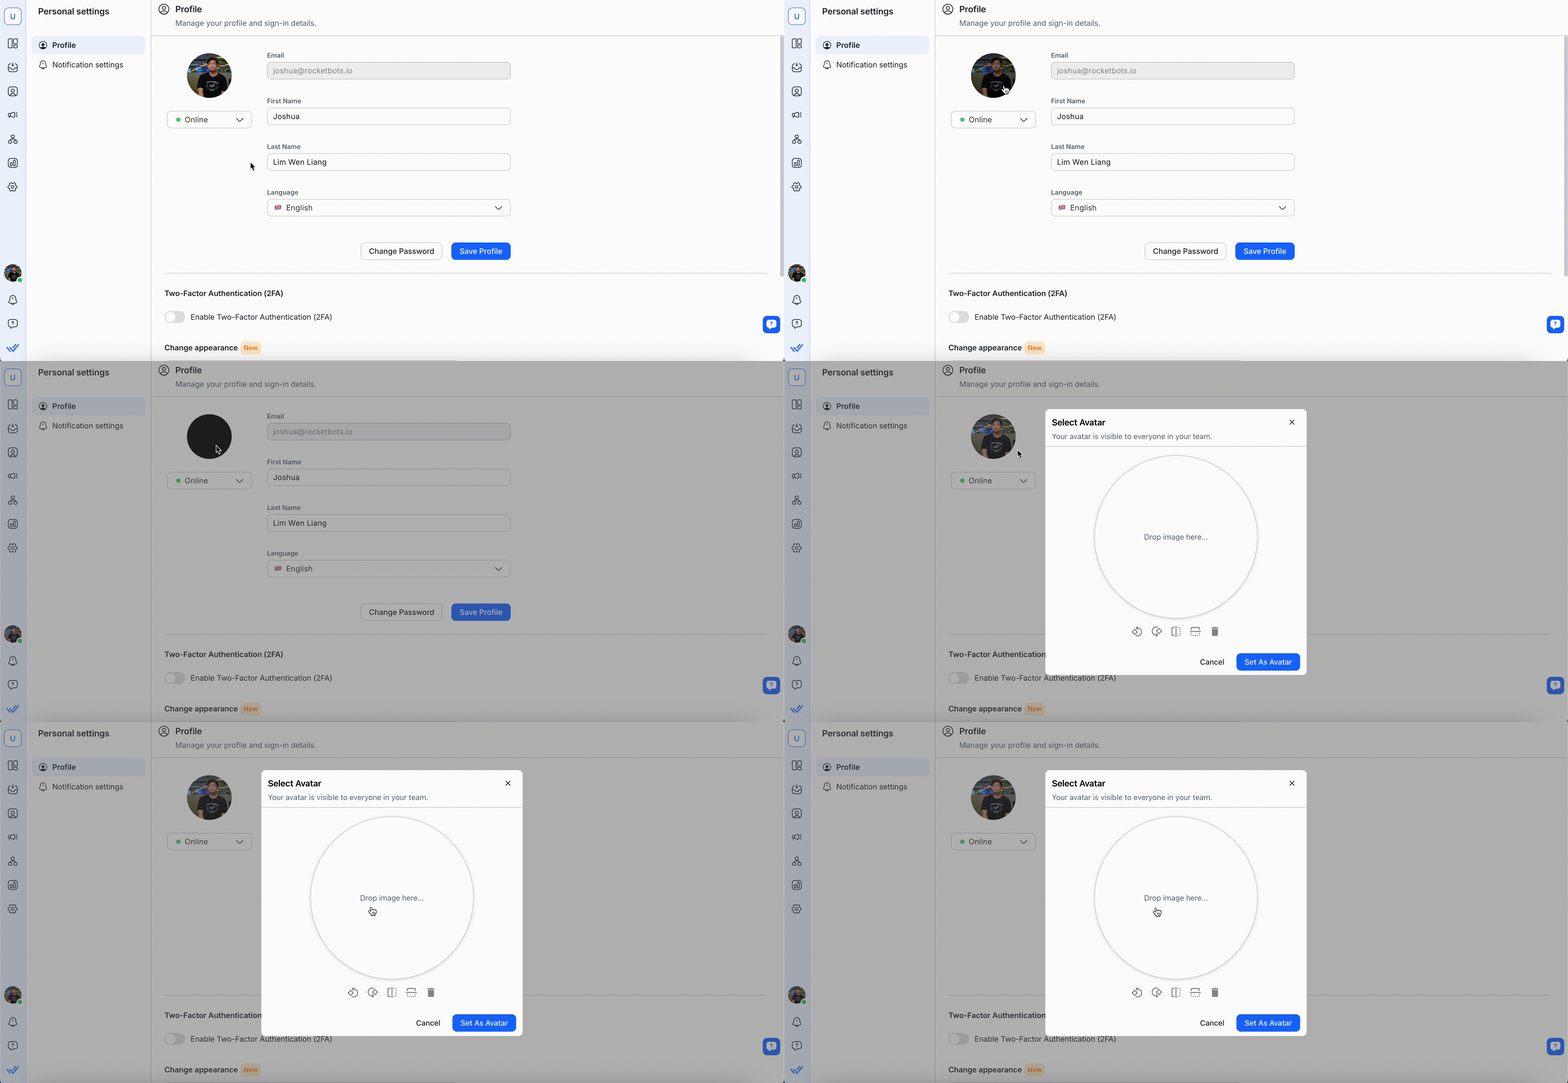
The User profile page is more extensive than the User profile menu, where you can edit more information on your user profile. This page can be accessed from the Settings module > Personal Settings > Profile.

Profile Avatar
Click on the avatar to change your avatar image.

Drag and drop an image into the placeholder or click it to upload from your computer. Use the edit tools below to adjust your avatar or click the trash icon to remove it. Once satisfied, click Set As Avatar to save.
Activity status indicator
Change your current status within the platform. Find out more about Activity Status.
Profile information
First Name & Last Name
You can make changes to your first name and last name.
Password
You can change or update your profile password on this page.
Language
You can switch to your preferred language by clicking on the Language dropdown. The available languages are:
- English 🇬🇧
- Spanish (Español) 🇪🇸
- Portuguese (Português) 🇵🇹
- Arabic (عربي) 🇸🇦
- Burmese (မြန်မာဘာသာ) 🇲🇲
- Thai (ภาษาไทย) 🇹🇭
- Traditional Chinese (繁體中文) 🇹🇼
- Simplified Chinese (简体中文) 🇨🇳
- Italian (Italiano) 🇮🇹
- German (Deutsch) 🇩🇪
- Russian (Русский) 🇷🇺
- French (Français) 🇫🇷
- Japanese (日本語) 🇯🇵
- Indonesian (Bahasa Indonesia) 🇮🇩
- Turkish (Türkçe) 🇹🇷
- Korean (한국어) 🇰🇷
- Vietnamese (Tiếng Việt) 🇻🇳
- Hebrew (עברית) 🇮🇱
Notifications
In this dropdown menu, you can change how often you would like to receive notifications.
For more information on Notifications, read more here.
Two-Factor Authentication (2FA)
Pre-requisite: You must install an authenticator app, i.e., Google Authenticator or Authy, on your mobile.
Two-Factor Authentication (2FA) addresses the issue of password vulnerability and provides an additional layer of security (e.g., in case your password is compromised). This reinforces the safety measures taken to protect sensitive data by eliminating the chances of unauthorized access to your account.
All of this is achieved by adding a layer of protection to your account that requires an authentication code in addition to your password. Once you have provided the correct password, you must provide an authentication code (generated by an authenticator app installed on your mobile device) to log in.

Enabling Two-Factor Authentication (2FA) on Your Account
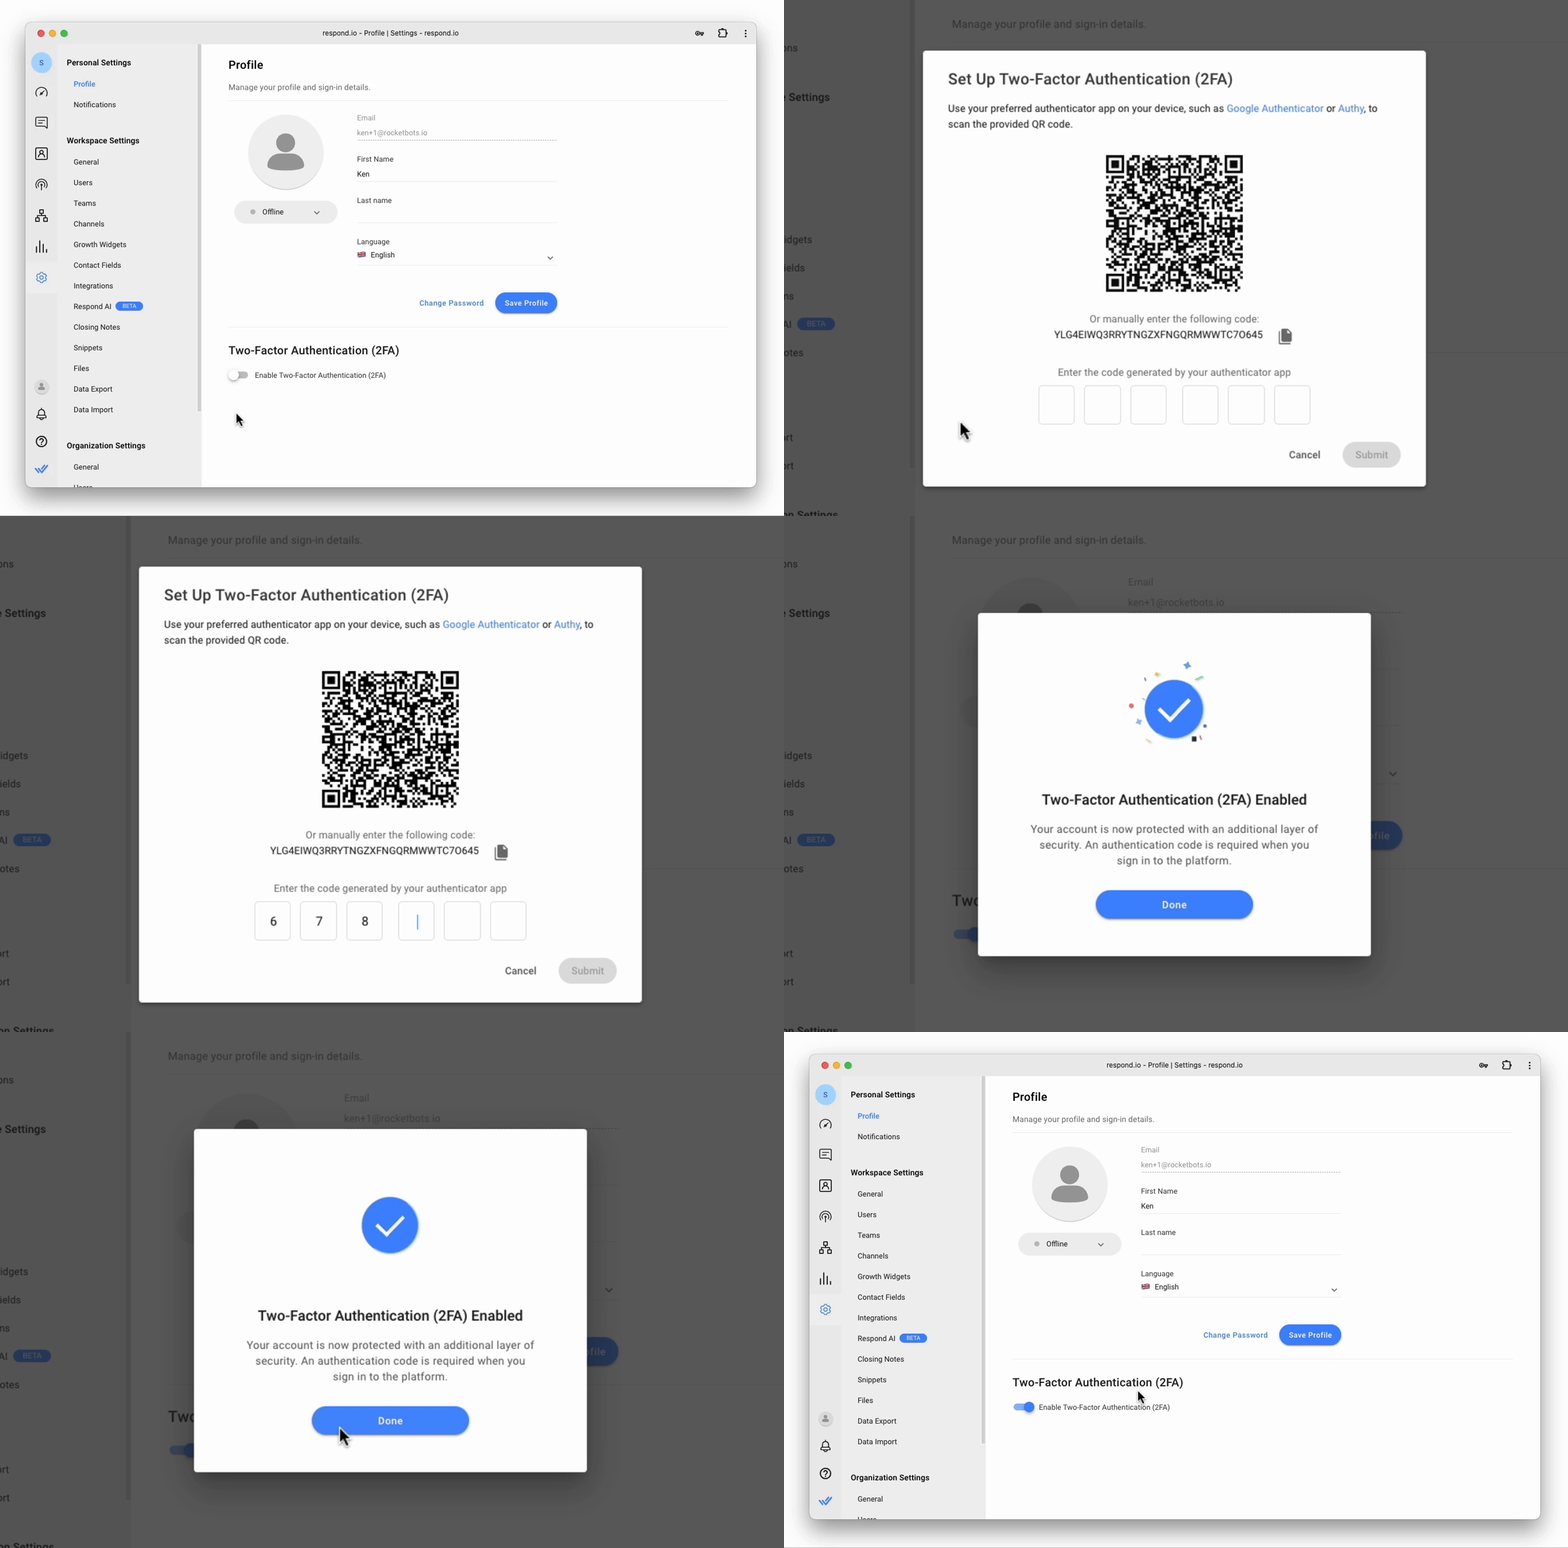
You can enable Two-Factor Authentication (2FA) on your account by following the steps provided below:
- Turn the Enable Two-Factor Authentication (2FA) toggle on.
- Open the preferred authenticator app on your mobile and scan the QR code that displays on the platform. Alternatively, enter the alpha-numeric code that displays (in case you cannot scan the code from your mobile device) into the authenticator app.
- Enter the 6-digit code generated by your authenticator app into the Set Up Two-Factor Authentication (2FA) dialog box.
- If required, click Submit.
- A dialog confirms that Two-Factor Authentication (2FA) has been enabled, click Done to return to the Profile page.

Disabling Two-Factor Authentication (2FA)
You can disable Two-Factor Authentication (2FA) by toggling off Enable Two-Factor Authentication (2FA). A confirmation dialog is displayed, confirming your choice.
Dark Mode
Customize your viewing experience by choosing your preferred theme. The platform offers three display options, including Dark Mode.

How to enable Dark Mode:
- Go to Settings > Personal Settings > Profile
- Under Dark Mode, select On to enable dark mode
FAQ and Troubleshooting
Can I delay enabling Two-Factor Authentication (2FA) on my profile?
If you want you can choose to postpone the activation of Two-Factor Authentication (2FA), however, the following platform behavior will be observed:
- Member users will only be able to access their Personal Settings module.
- Admin users will only be able to access the Personal Settings and Organization Settings > Security page.
Feeling stuck? Do not fear.
Need assistance? Contact us for support. Help is here!This is the text block that will appear when the button is clicked.
User Activity Status
Related Articles
Dialogflow: Fulfillment Webhook Request
Learn how to use fulfillment webhook requests to pass data from respond.io to Dialogflow.
WhatsApp Business Platform (API) Channel Configuration
Learn how to configure your WhatsApp Business Platform (API) channel and manage your profile on respond.io.
Custom Channel Quick Start
Configure third-party messaging apps into respond.io.
