Quick Start
What is respond.io?
Setting Up an Account
Connecting Channels
Inviting Your Teammates
Getting Contacts to Message You
Automated Welcome and Away Messages
Responding to Messages
Glossary of Terms
Channels
WhatsApp Business Platform (API) Quick Start
Getting Ready for Inbound Conversations
Getting Ready for Promotional Messaging
WhatsApp Official Business Account (Blue Tick)
Grow your WhatsApp Audience by Maximizing Entry Points
Get WhatsApp API Account for Government Agencies
WhatsApp Business Calling API
Meta Business Verification
WhatsApp Message Templates
WhatsApp Pricing
WhatsApp Business Platform (API) Channel Configuration
WhatsApp Messaging Limits
Meta Product Catalog
Change Your WhatsApp Business Display Name
Migrating from WhatsApp Personal or WhatsApp Business App
Phone Number Migration to respond.io WhatsApp Business Platform (API)
Turn-off WhatsApp Number Two-Step Verification
WhatsApp Cloud API
360dialog WhatsApp
Twilio WhatsApp
MessageBird WhatsApp
Vonage WhatsApp
Phone Number Migration to WhatsApp Cloud API
TikTok
Facebook Messenger
Facebook Messenger Overview
Facebook Messenger Quick Start
Facebook Chat Plugin
Facebook Private Replies
Facebook Message Tag
LINE
Viber
Telegram
Website Chat Widget
Website Chat Widget Overview
Website Chat Widget Quick Start
Install Website Chat Widget on WordPress
Install Website Chat Widget on Shopify
Install Website Chat Widget on Wix
Install Website Chat Widget on Joomla
Install Website Chat Widget on Squarespace
SMS
Custom Channel
Product
Dashboard & Reporting
Dashboard
Reports Overview
Reports: Conversations
Reports: Responses
Reports: Resolutions
Reports: Messages
Reports: Contacts
Reports: Assignments
Reports: Leaderboard
Reports: Users
Reports: Broadcasts
Inbox
Inbox Overview
Assignment and Closing a Conversation
Custom Inboxes
Interacting with Respond AI Prompts
Using AI Assist
Contacts
Broadcasts Module
Workflows
Workflows Overview
Workflow Triggers
Workflow Steps Overview
Step: AI Agent
Step: Send a Message
Step: Ask a Question
Step: Assign To
Step: Branch
Step: Update Contact Tag
Step: Update Contact Field
Step: Open Conversation
Step: Close Conversation
Step: Add Comment
Step: Jump To
Step: Date & Time
Step: Wait
Step: Trigger Another Workflow
Step: HTTP Request
Step: Add Google Sheets Row
Step: Send TikTok Lower Funnel Event
How to Avoid Workflow Loops
Step: Update Lifecycle
Step: Send Conversions API Event
Dynamic Variables
Workspace Settings
Managing a Workspace
General info (previously General)
User settings (previously Users)
Teams (previously Team Settings)
Channels
Growth Widgets
Contact Fields
Integrations
Respond AI
Closing Notes
Snippets
Tags
Files
Data Export
Contact Import
Lifecycle
Organization Settings
Organization Overview
Account info (previously General)
Admin Settings (previously Users)
Workspaces
WhatsApp Fees
Billing & Usage
Security
User Account
Mobile App
Installing respond.io Mobile App
Messaging From Your Mobile
Managing Notifications On Your Mobile
Configuring mobile app settings
Help Menu
Conversation Led Growth
Capture Leads
How to Collect Contacts’ Emails and Phone Numbers
How to Route Contacts from CTC Ads to Agents
How to Send Outbound Sales Messages
How to Track Conversation Source from Multiple Websites
How to Enrich Customer Data from a CRM or other Business Software
Convert Leads
How to Automate Product Info Sharing in Conversations Initiated via CTC Ads
How to Automatically Qualify Contacts Based on Budget Using AI Agent
Assignment Strategy: How to Automate Contact Distribution & Load Balancing
How to Maximize Customer Service Potential with AI Agent
How to Automate Contact Information Collection with AI
How to Block Contacts and Manage Spam
How to Create Automated Welcome and Away Messages
How to Create Automated Chat Menus
How to Route Contacts to Preferred AI Agent
How to Route Contacts by their Preferred Language
How to Route Contacts by Team Functions
How to Route Contacts by Shifts
Assignment Strategy: How to Unassign Agents after Conversations Closed
How to Get Contacts’ Consent for Personal Data Collection
How to Promptly Transfer Conversation Between Agents
How to Guide Customers from Exploration to Purchase with Engaging Menus
How to Optimize Customer Onboarding with Automated & Customized Welcome Messages
How to Streamline Meeting Scheduling via CTC Ads
How to Get a Complete View of the Customers
How to Simplify Customer Escalation with Automation
How to Transfer Contacts to the Next Shift Automatically
How to Optimize Agents’ Productivity in the Inbox Module
How to Write an Optimal AI Persona (Best Practices)
How to Write the Best Knowledge Sources for AI Agents
How to Align AI Conversations with Your Brand Voice
How to Draft Customer Replies with AI
How to Convert Image to Text Using AI
How to Automate Calculations Using AI
How to Automate Lifecycle Tracking in Google Sheets
Retain Customers
How to Route New and Returning Contacts
How to Route VIP Contacts
How to Send CSAT to Customer and Save Data in Google Sheets or CRMs
How to Send Outbound Support Messages
How to improve lead targeting and automatically send purchase events to Meta when a customer makes a payment
Reporting and Analytics
Broadcasts Use Cases
How to Send a Simple Broadcast
How to Start a Workflow Based on Broadcast Response
How to Import to Broadcast via WhatsApp
How to Troubleshoot a Failed Broadcast
Integrations
Dialogflow
Dialogflow Overview
Dialogflow: Connecting to Dialogflow
Dialogflow: Creating a Chatbot
Dialogflow: Managing Intents
Dialogflow: Parameters
Dialogflow: Events
Dialogflow: Response Templates
Dialogflow: Custom Payloads
Dialogflow: Fulfillment Webhook Request
Zapier
E-Commerce Integration: Shopify
E-Commerce Integration: BigCommerce
E-Commerce Integration: WooCommerce
E-Commerce Integration: Magento
CRM Integration: HubSpot
CRM Integration: Salesforce
CRM Integration: Pipedrive
CRM Integration: ActiveCampaign
Zapier
Make
Meta Business Accounts
TikTok Messaging Ads Integration
Developer API
HubSpot
Webhooks
Salesforce
Table of Contents
- Home
- Integrations
- Zapier
- Zapier
Zapier
Updated
by JQ Lee
Connect respond.io to Zapier and unlock the possibilities of 5000+ integrations.
You can integrate your Contact information from the respond.io platform to thousands of CRMs, email providers, CMS, analytics tools, ads, and more. Let's have a quick look at this integration.

Getting Started
In order to get started with the respond.io - Zapier Integration, you will need the following:
- A respond.io account
- A Zapier account
Creating Zaps
There are two ways you can create Zaps:
Create a Zap from Template
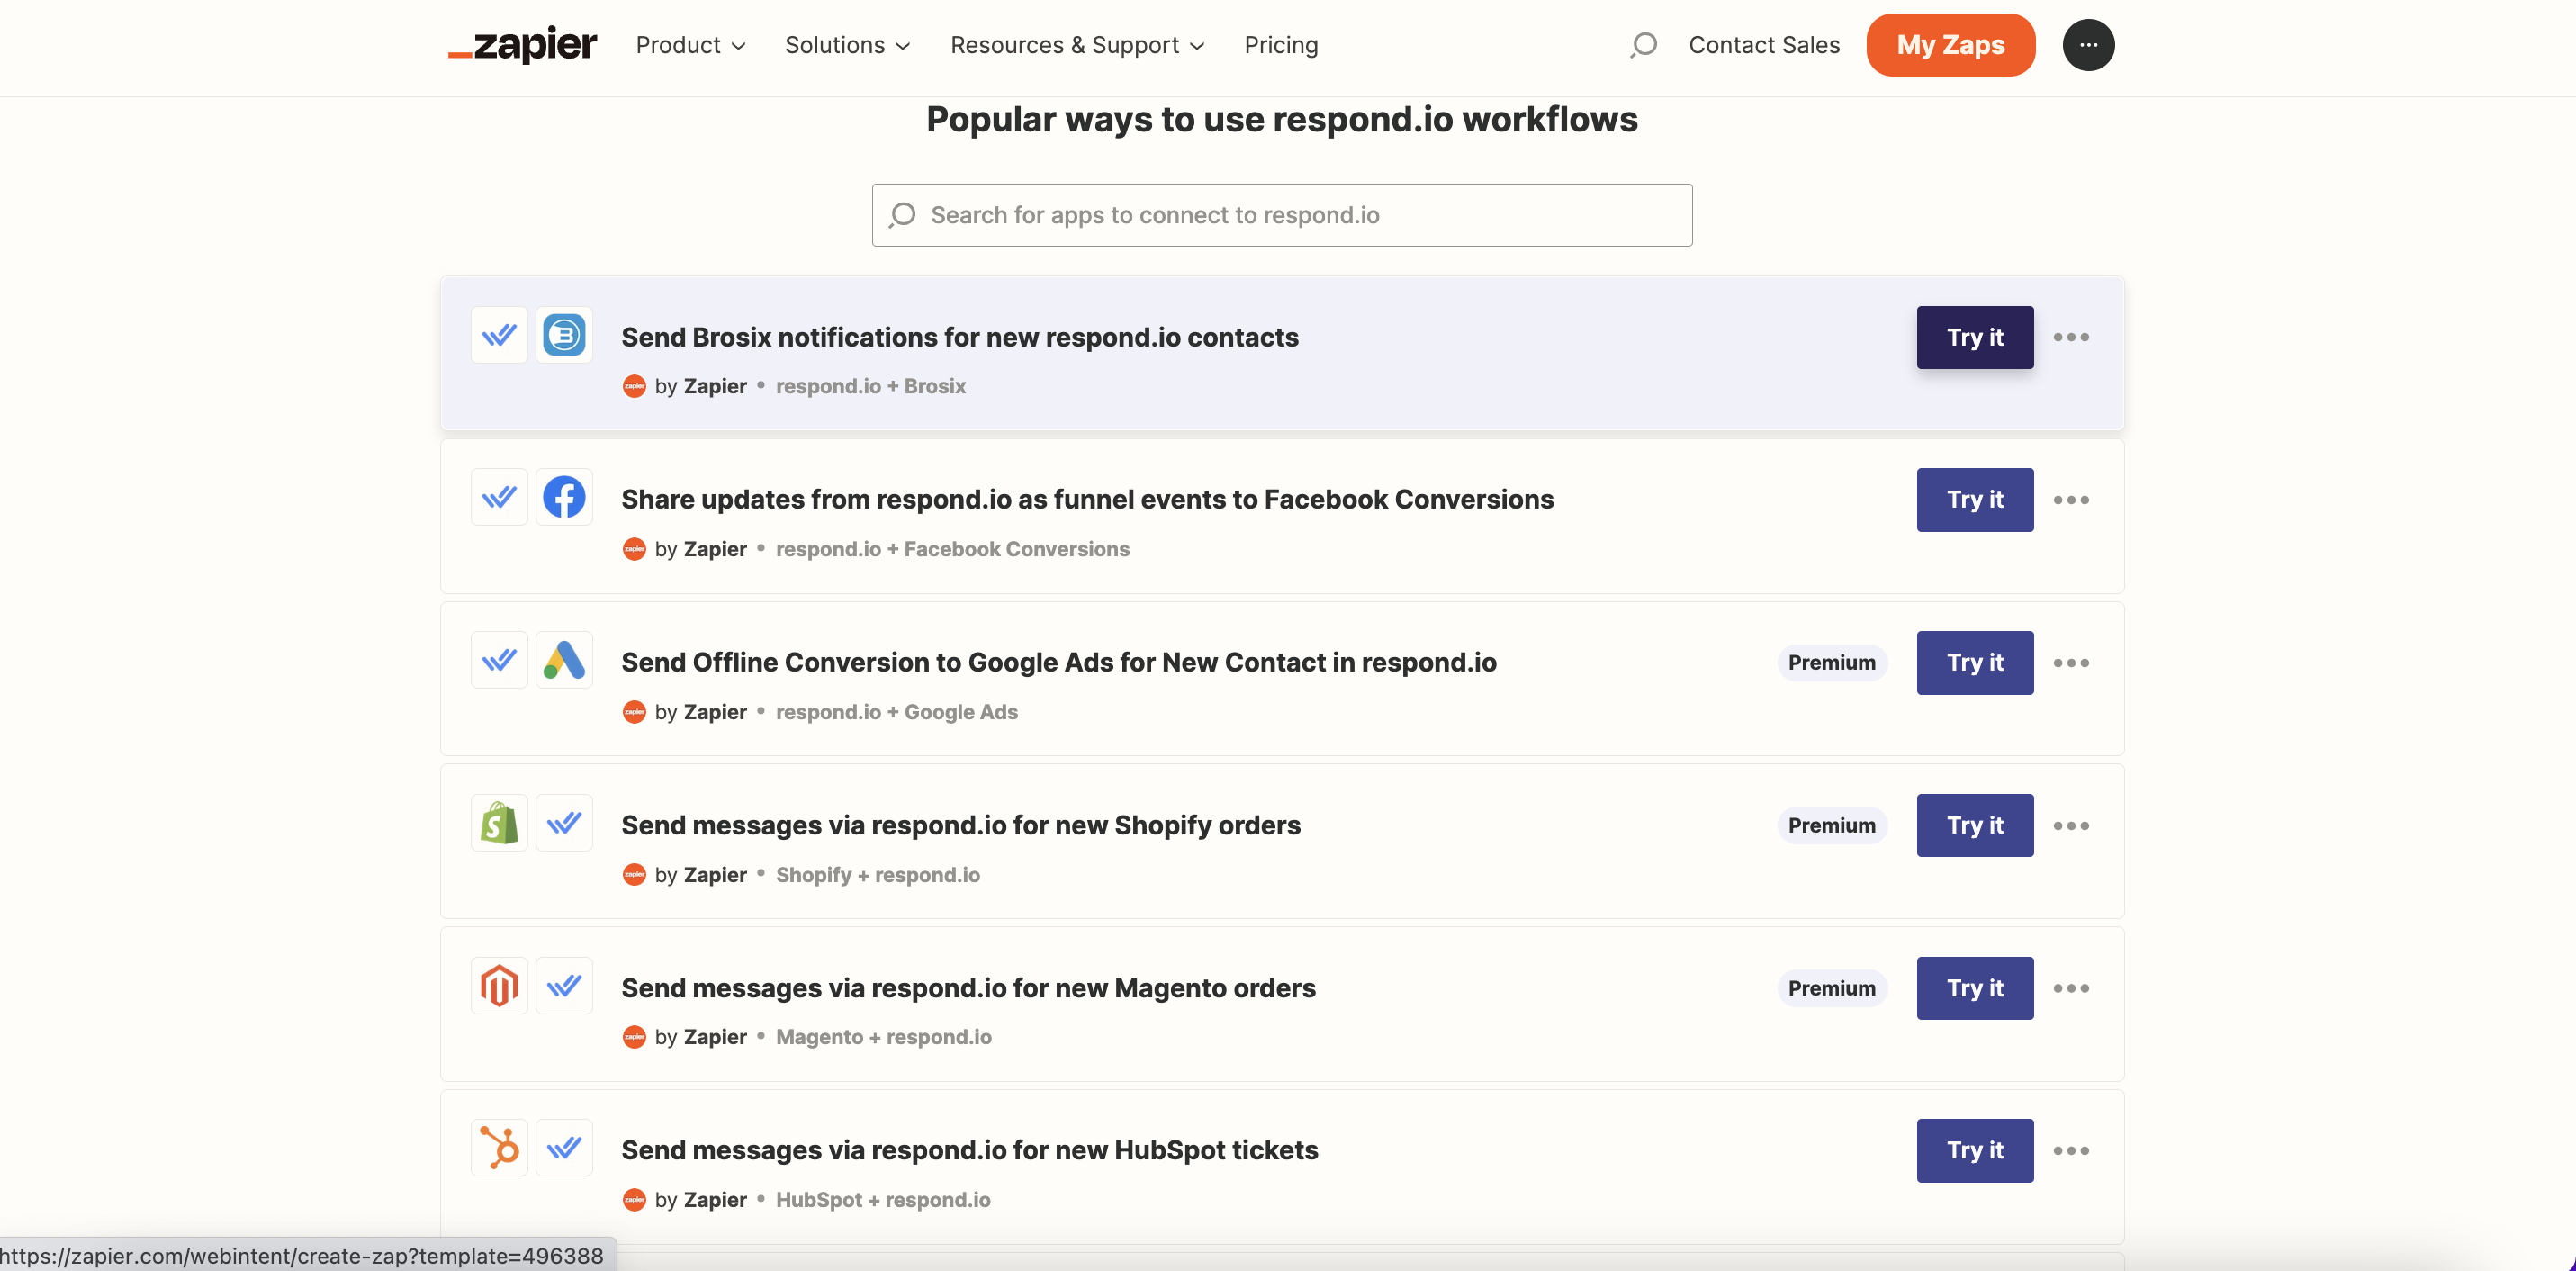
Templates are pre-built Zaps. We have templates available connecting respond.io to popular CRM and e-commerce platforms. To use a Zap template, choose from the list of respond.io templates here and click Try It.
Create a Zap from Scratch
To create a Zap from scratch, follow the steps below:
Step 1: Navigate to Zap editor
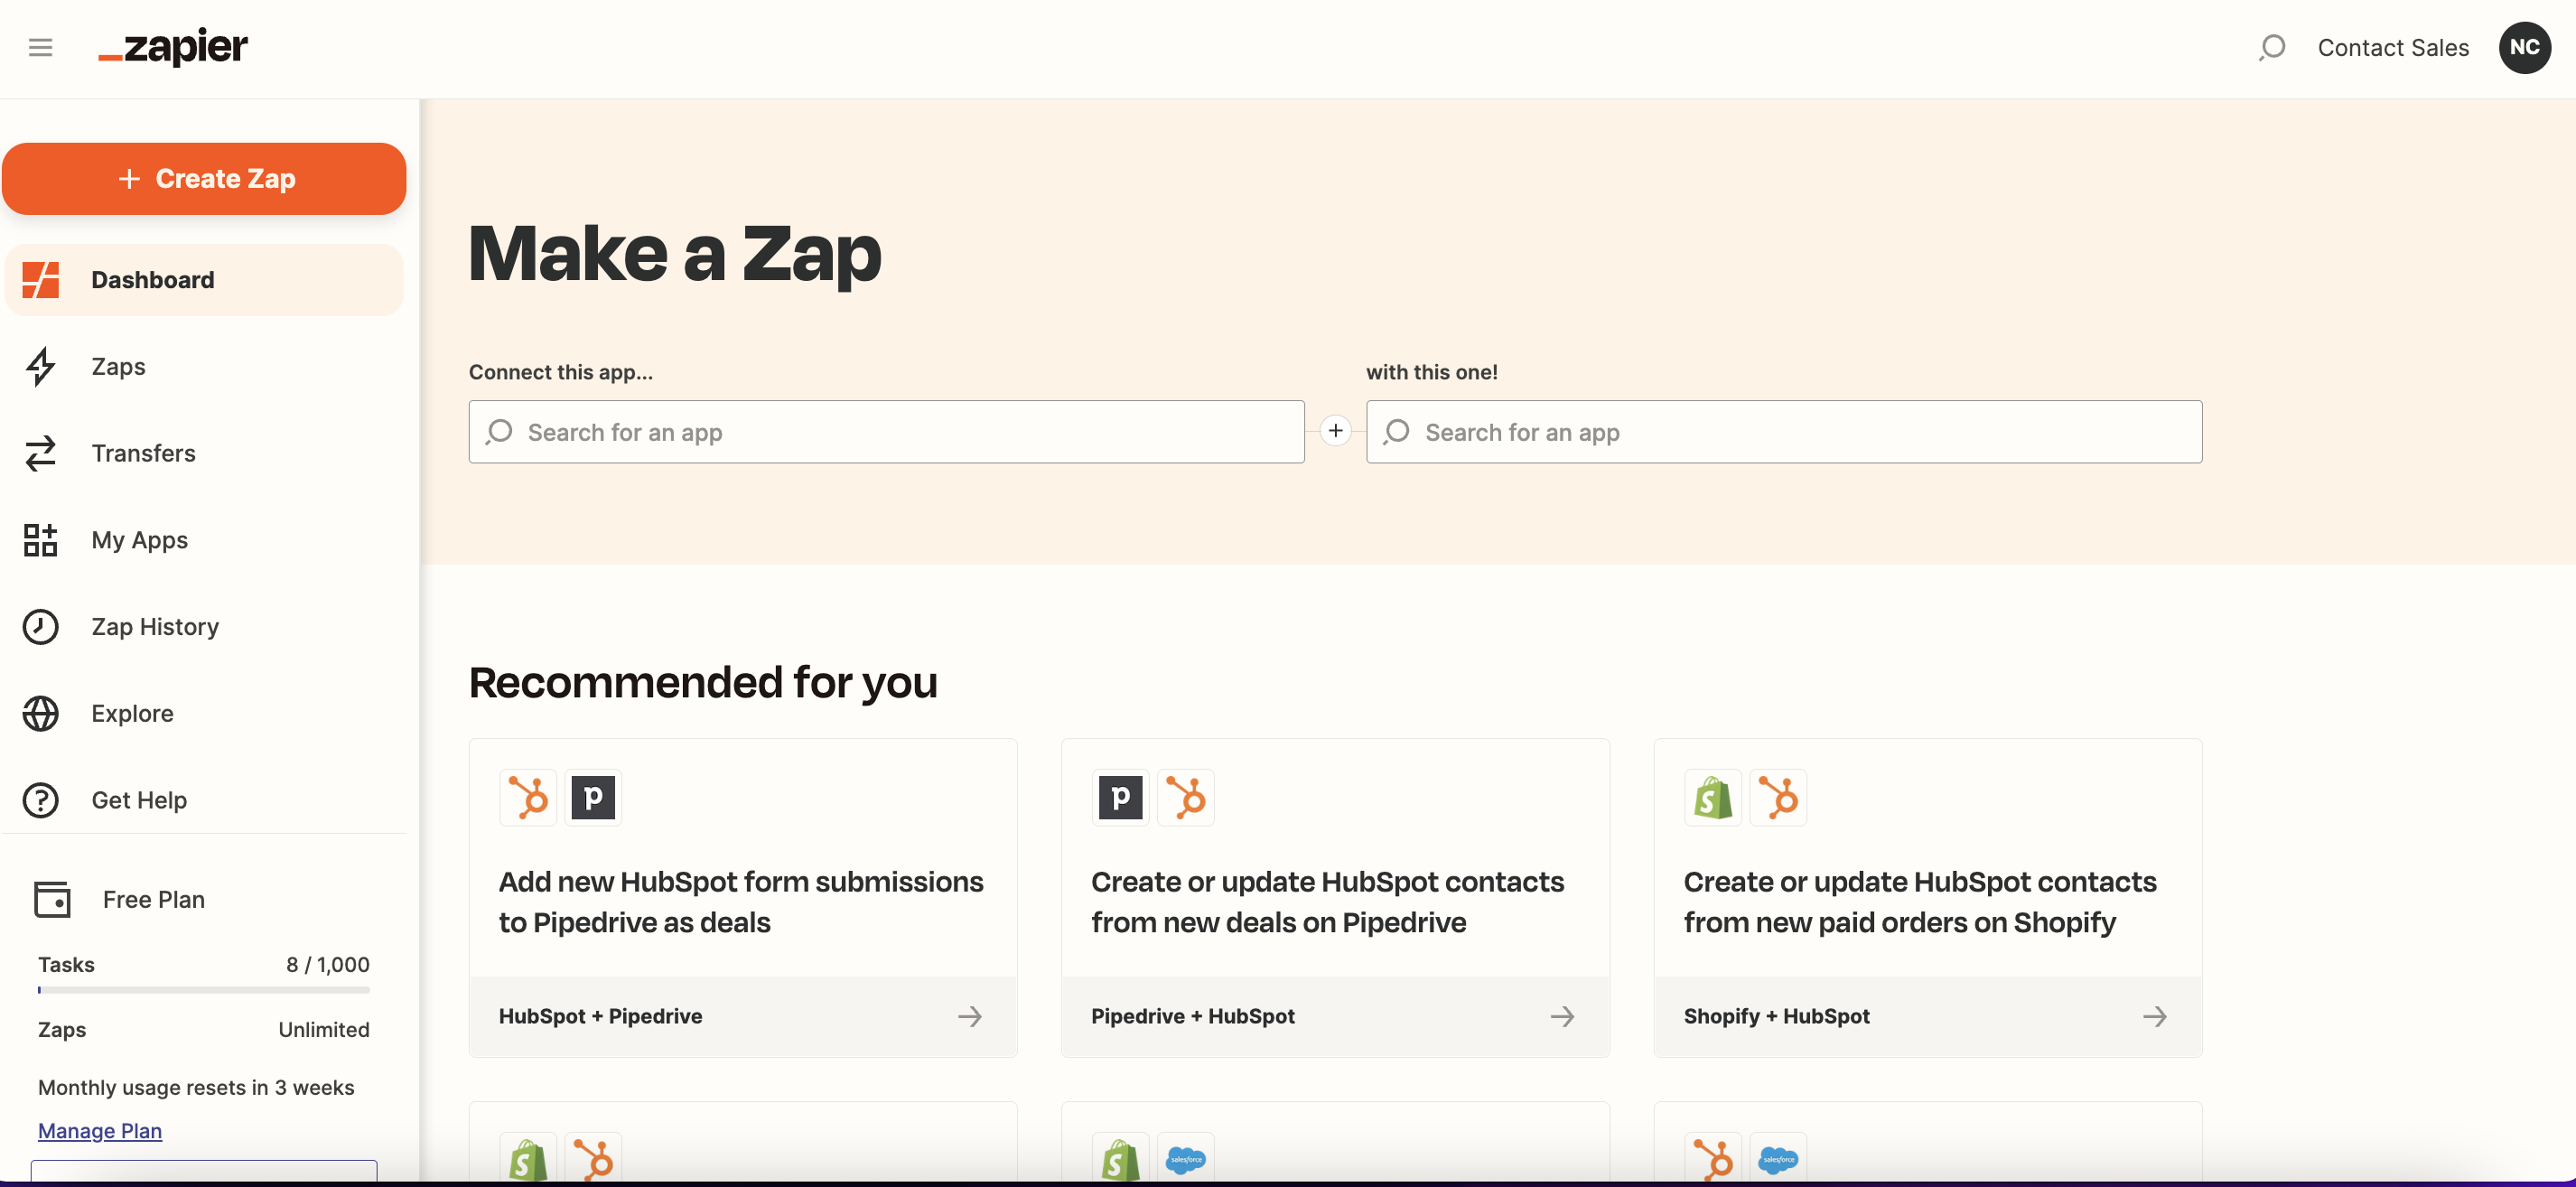
In your Zapier Account, hover over the left sidebar menu and click + Create Zap.
Step 2: Add and Set Up a Trigger
- Choose your trigger app: The Zap will be triggered by an event that occurs in this app.If you’re using respond.io as the trigger, search respond.io in the search bar and select respond.io app.
- Select your event: This will be the event that occurs in the selected app that triggers the Zap.View the full list of trigger events available for respond.io here.
- Select or connect your app account: Select or connect the specific app account to use in the Zap trigger.To connect respond.io in Zapier, follow the instructions here.
- Set up and test your trigger: Set up the options to fit your needs and test your trigger to see if it pulls in the right data.
Step 3: Add and Set Up an Action
- Choose your action app: The Zap will perform an action in this app when it is triggered.If you’re using respond.io for the action, search respond.io in the search bar and select respond.io app.
- Select your event: This will be the event that the Zap performs in the selected app when it is triggered.View the full list of action events available for respond.io here.
- Select or connect your app account: Select or connect the specific app account to use in the Zap action.To connect respond.io in Zapier, follow the instructions here.
- Set up and test your trigger: Set up the data that you want to send over to your action app and test to see if it's working as expected.
Step 4: Name and Publish the Zap
When your Zap is ready, give your Zap a name and click Publish.
Connect respond.io to Zapier
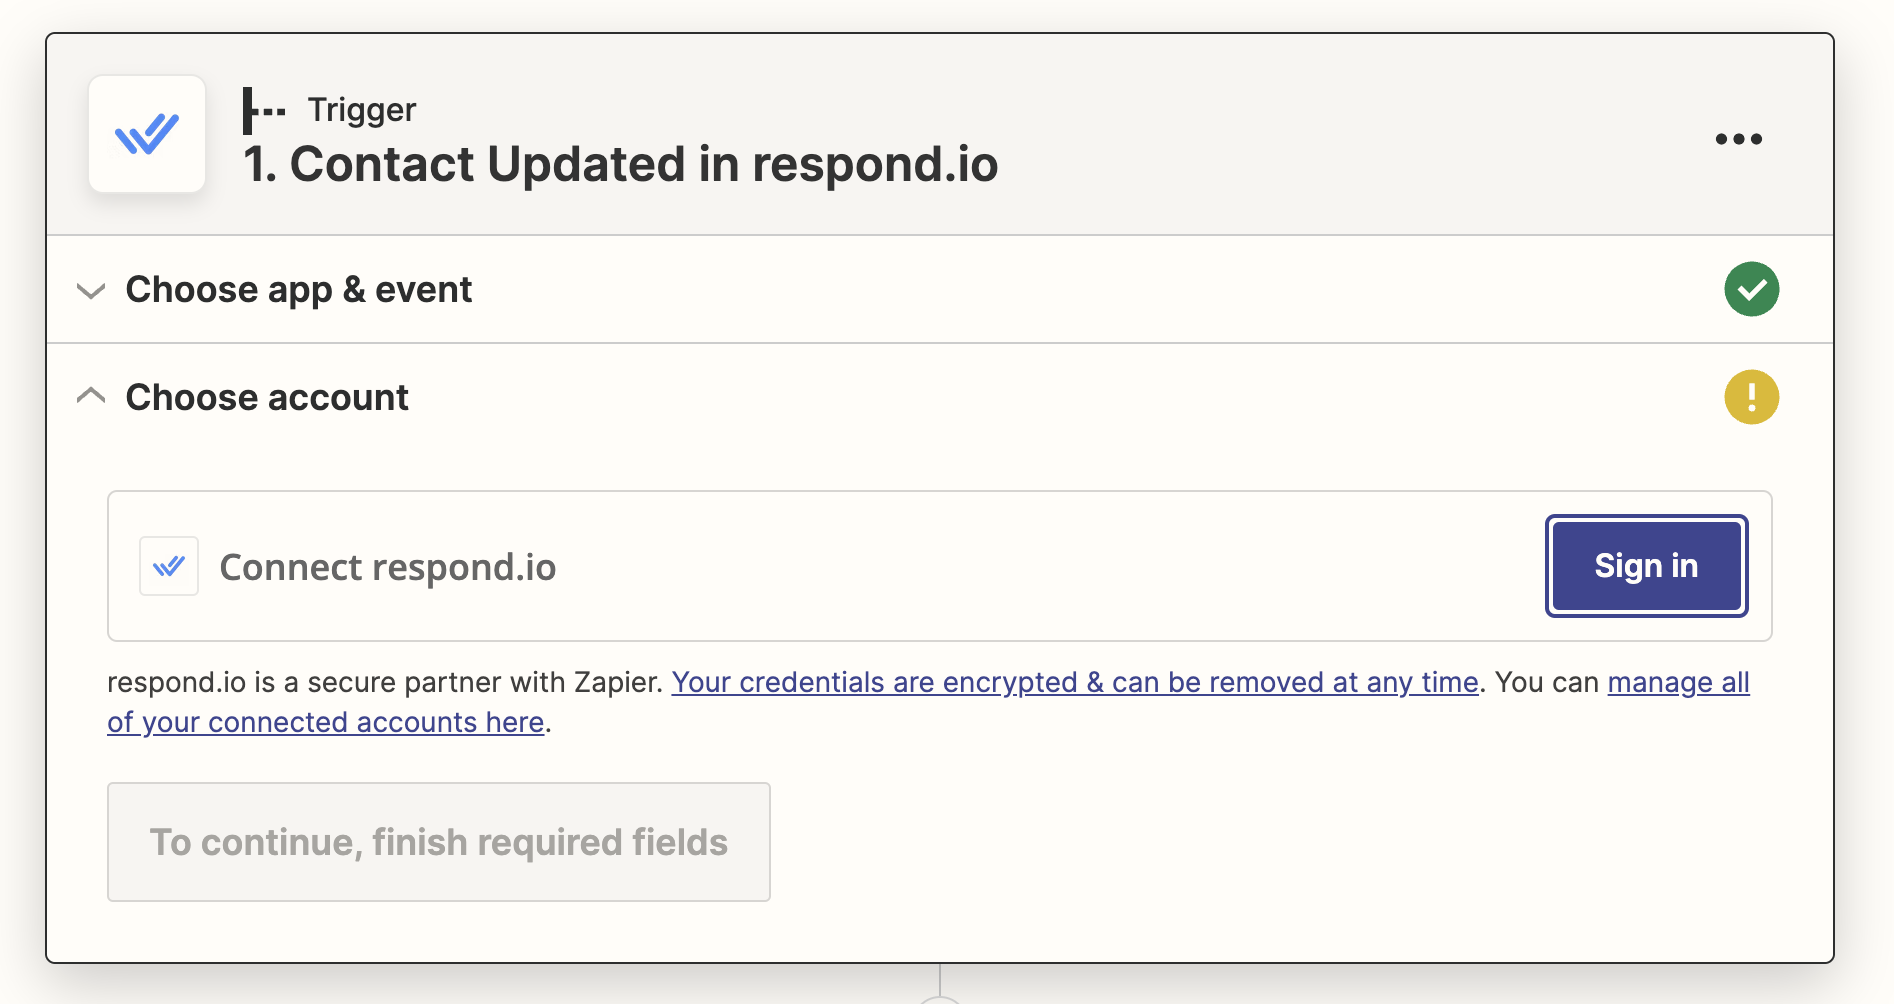
When connecting respond.io app in Zapier for the first time, you are required to sign in and add an API Key. You can obtain the API Key in respond.io’s platform settings as shown in the steps below.
Step 1: Navigate to Integrations Zapier Page
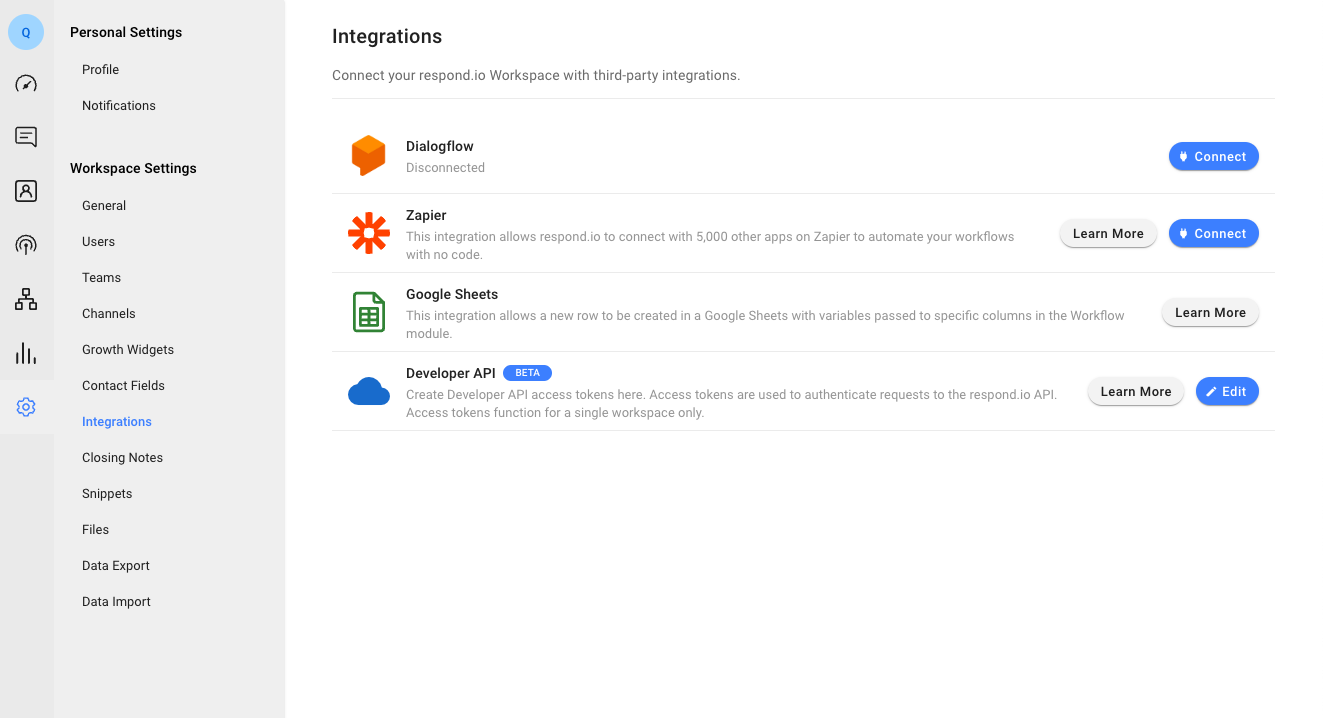
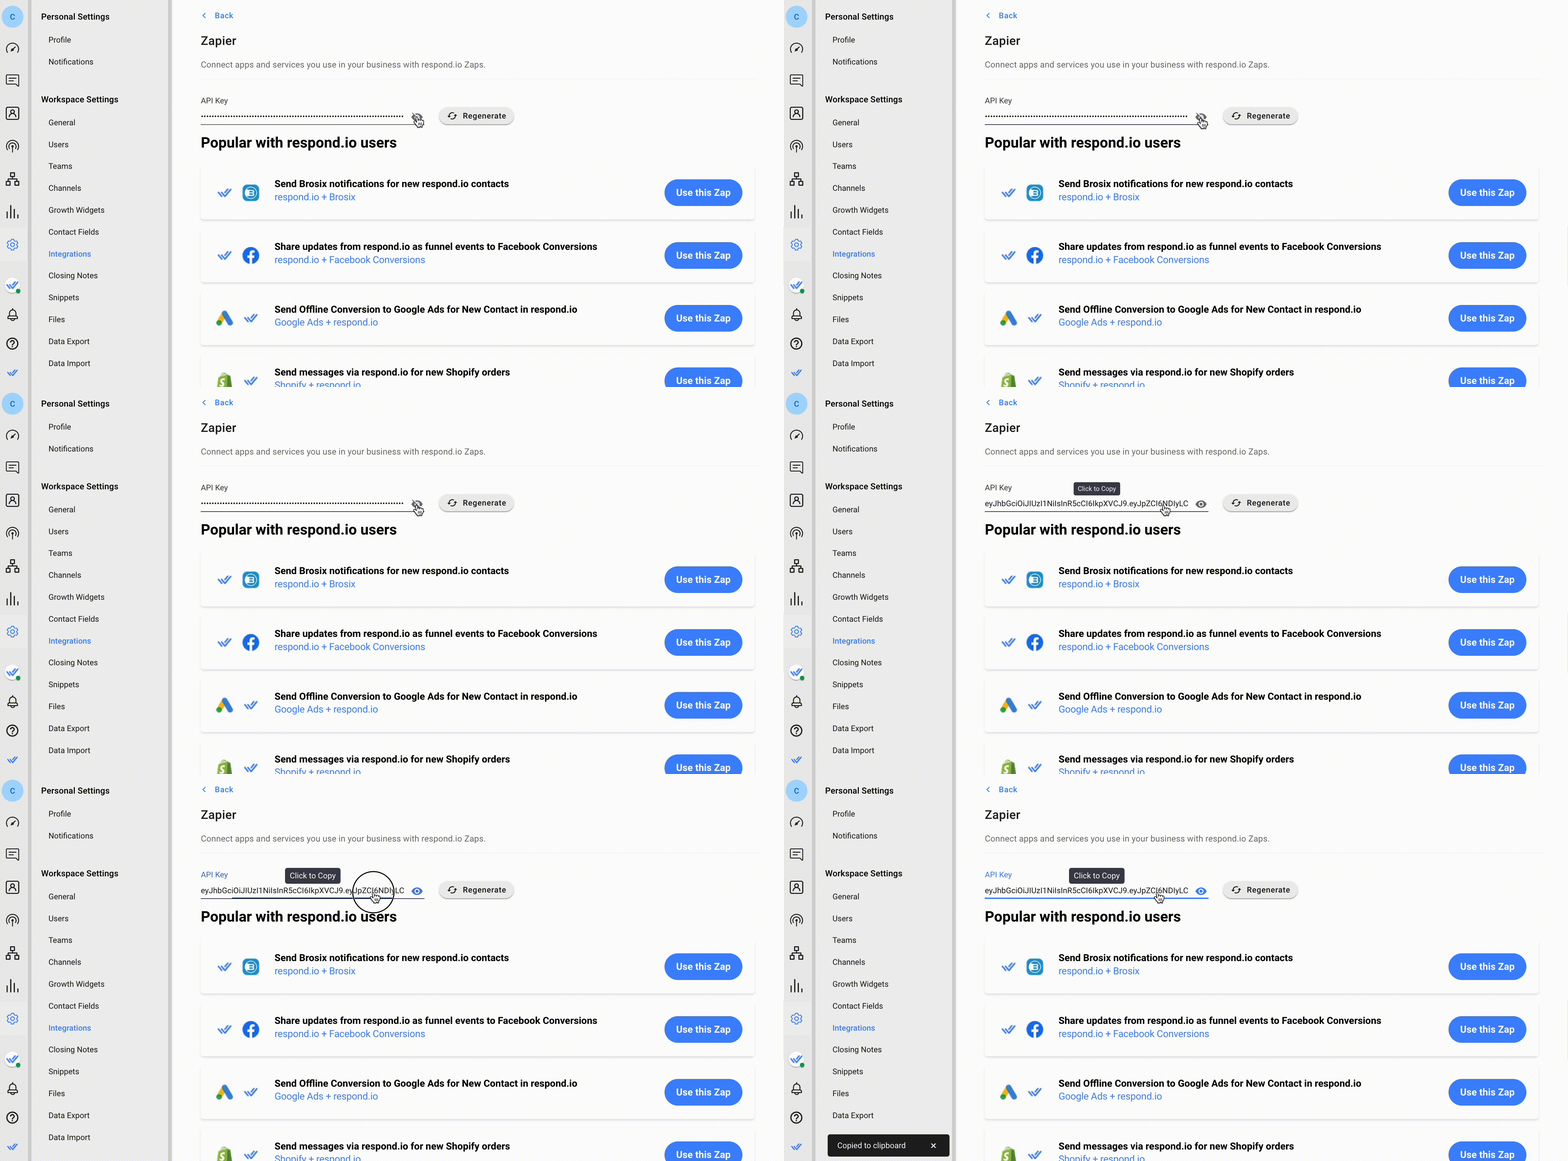
Log in to the respond.io Workspace you wish to connect and navigate to the Settings module > Integrations under the Workspace Settings > Click Connect next to Zapier. You will be navigated to the Zapier page in respond.io.
Step 2: Obtain the API Key
To copy the API Key, unhide and click on the API Key.
Step 3: Connect your respond.io Account
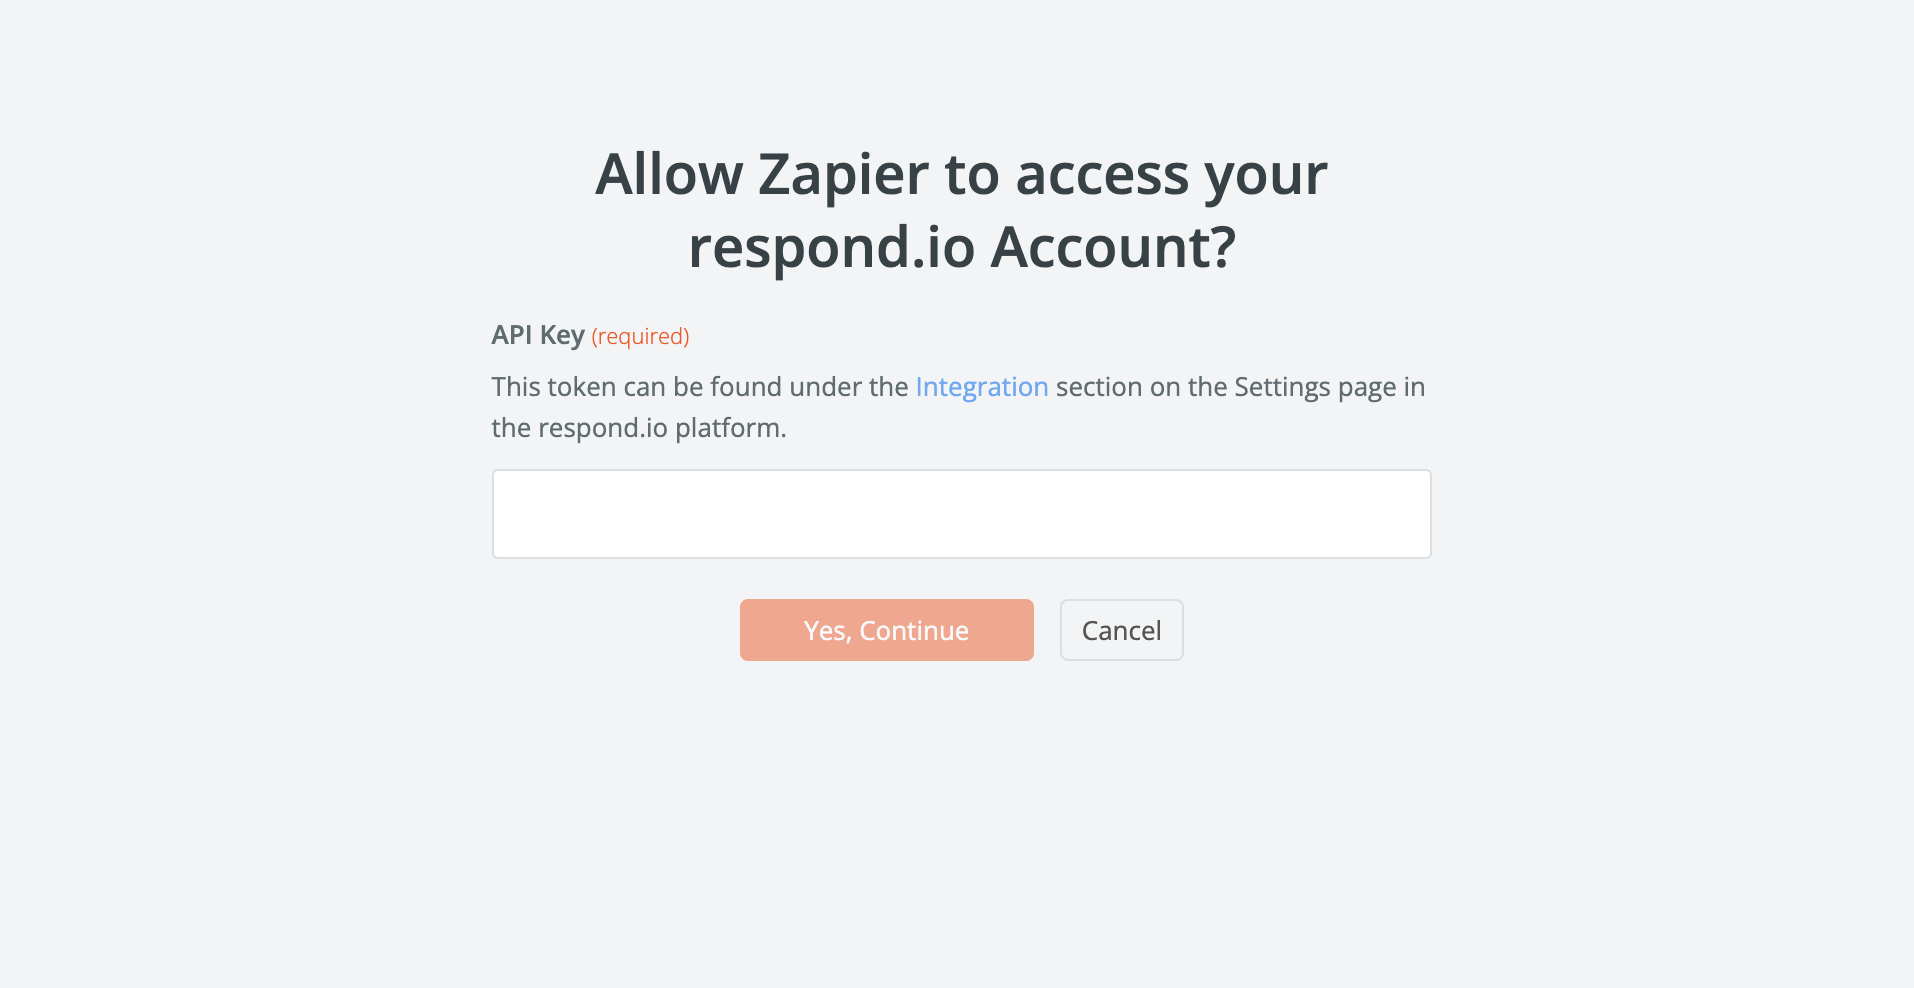
On Zapier, click Sign in to open a pop up.

Paste the API Key in the pop up and click Yes, Continue to connect respond.io app in Zapier.
FAQ and Troubleshooting
Why do I get the Too Many Requests (HTTP Status → 429) error?
Your Zap or other integration with the Bearer Token is likely asking for or sending information to the app too frequently within a given timeframe.
Why do I get the Validation (HTTP Status → 400) error?
You will encounter this error if you have provided more than the allowed pagination limit. The limit per page is 100.
What causes a Zap Loop?
A popular use case for integrations is syncing Contacts. However, Zapier does not support syncing by default and attempting to do this may cause an endless loop.
Example:
Zap 1: When a Contact is created in respond.io, create a Contact in X app.
Zap 2: When a Contact is created in X app, create a Contact in respond.io.
Find the solution for this here.
What to do if my Contact Identifiers are Incompatible?
Certain apps that you may want to integrate with (e.g., HubSpot and Shopify) require an email address or phone number to identify a Contact. You may not have these for all your respond.io Contacts if they’re on channels that do not provide them such as Viber, Telegram or Facebook Messenger.
If you do not have the required email address or phone number, the Zap will not work. Set up a filter to avoid getting error messages. Alternatively, consider using Workflows to collect Contacts’ email addresses or phone numbers.
Will Zapier's messages open a Contact's conversation?
All messages that are sent via Zapier will not open a Contact's conversation. These messages are available in the closed Contact filter. Simply adjust the filter in the Messages module to view the messages sent via Zapier.
Feeling stuck? Do not fear.
Need assistance? Contact us for support. Help is here!This is the text block that will appear when the button is clicked.
CRM Integration: ActiveCampaign
Related Articles
CRM Integration: HubSpot
Learn how to use Zapier and Workflows to automatically sync Contact data and create deals and tickets by integrating HubSpot with respond.io.
E-Commerce Integration: Shopify
Learn how to integrate Shopify with respond.io using Zapier to sync Contact information and manage orders and carts.
E-Commerce Integration: BigCommerce
Learn how to integrate BigCommerce with respond.io using Zapier to automatically manage Contact information and send customers messages.
