Table of Contents
How to Troubleshoot a Failed Broadcast

Identify the Cause of Broadcast Failure
If you suspect that a broadcast has failed, here are a few ways to investigate and identify it.
- Check the Failed Message Log in Reports module
- View error message in Failed Status
- Check the number of Completed Recipients
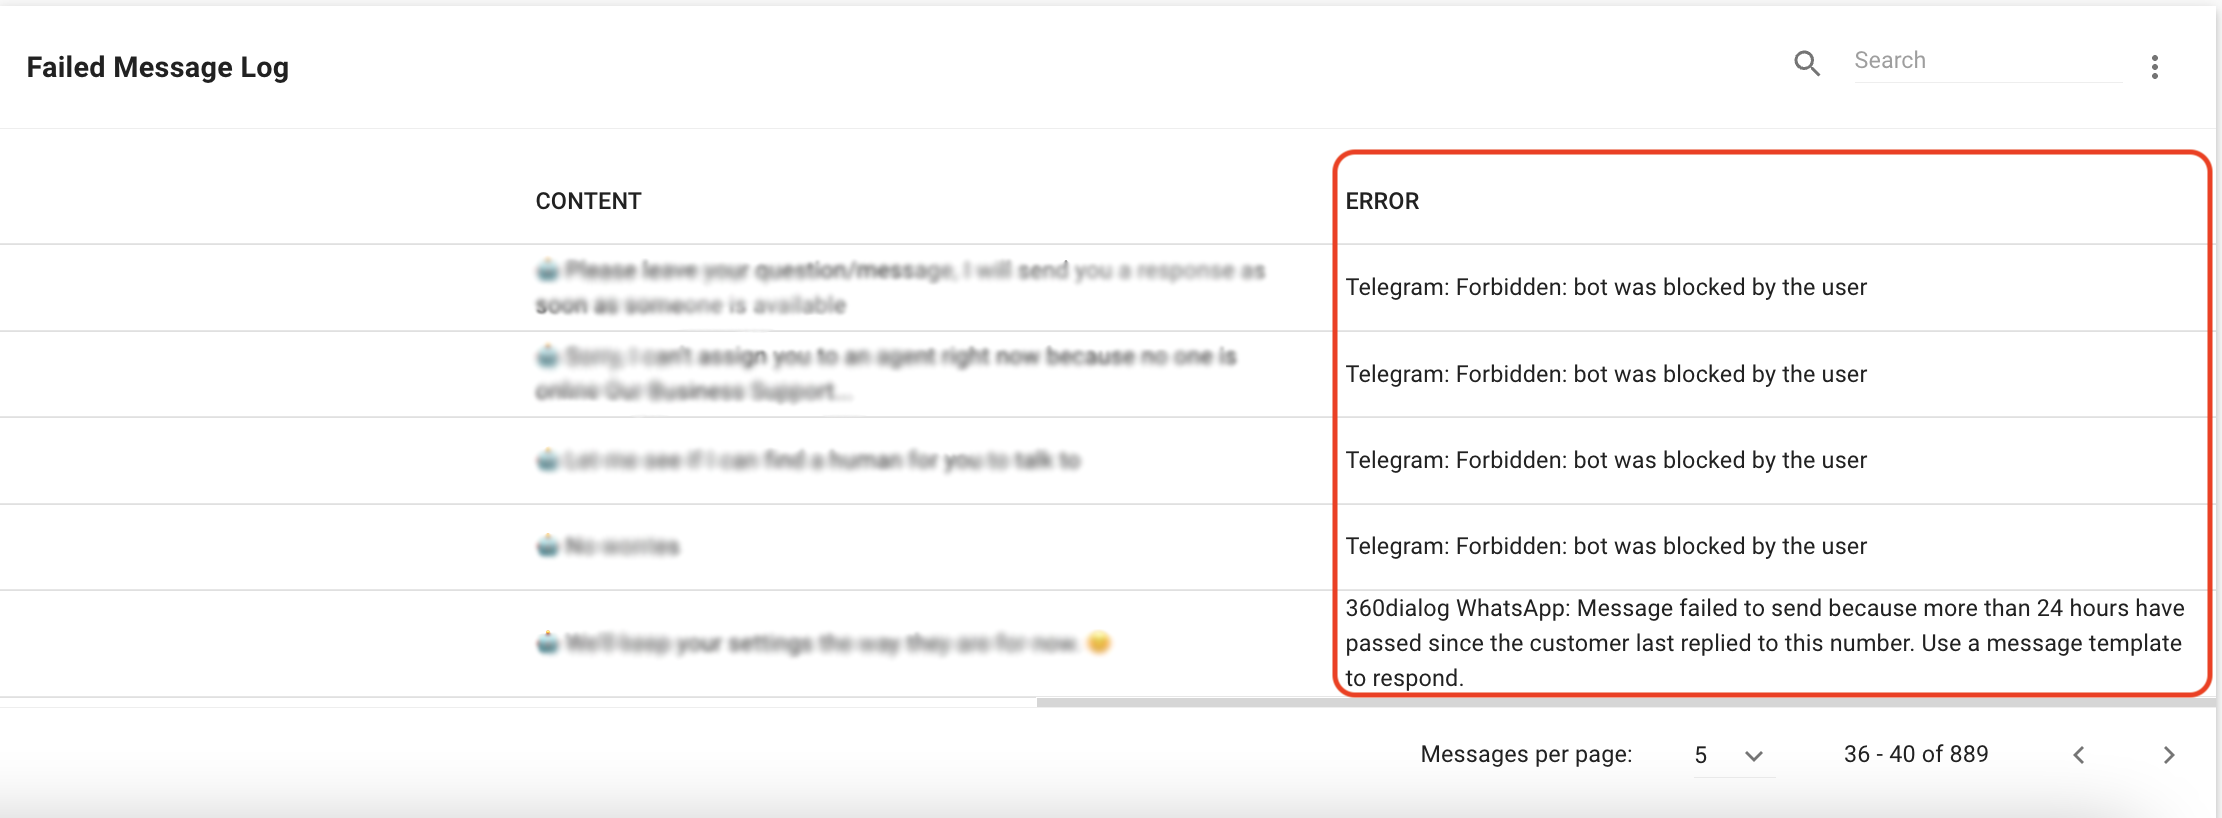
Check the Failed Message Log in Reports module
Sometimes, broadcasts are completed, but some Contacts fail to receive the messages. This could happen because the broadcast exceeded or violated the Channel limitations.
To view messages that failed to be delivered for a specific broadcast:
Step 1: Go to Reports module > Messages > Failed Message Log.
Step 2: You can filter the messages:
- by Broadcast Name: Select the broadcast(s) to view only messages for the selected broadcast(s).
- by Date: Select the date the broadcast was sent.

View the errors by scrolling all the way to the right in the Failed Message Log report. In this example, the majority of errors were caused by Contacts blocking the business on the Channel.
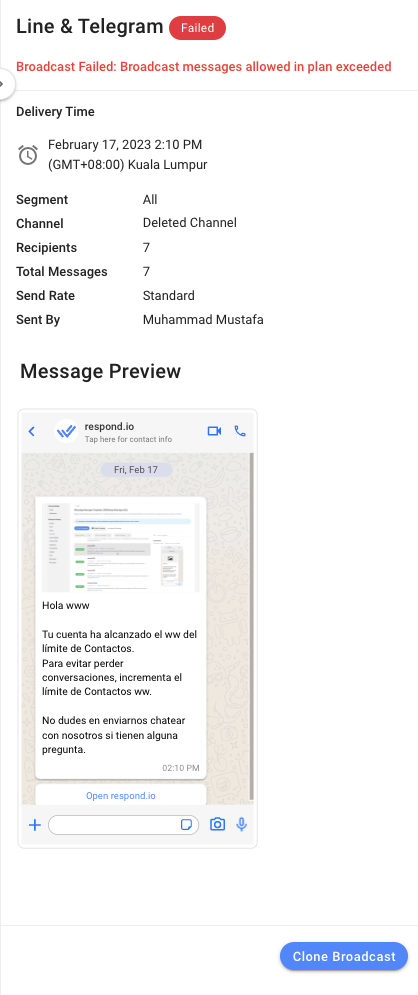
View error message in Failed Status
In the Broadcast module, select Failed status > choose your broadcast. The error message will appear in the Broadcast Details Drawer.
Here is a list of reasons for failed broadcasts:
Error Message | Failed Reason |
Contact Segment not found | The Contact Segment could not be found. |
Limit Reached: The maximum number of Segments in a Workspace is 500. Delete a Segment before creating a new one. | You have reached the maximum number of Segments allowed in the Workspace. You will need to delete a Segment before creating a new one. |
Contact Segment name must be unique. | The Segment name is duplicated. You need to create a unique name for each Segment. |
Broadcast Failed: Broadcast messages allowed in plan exceeded. | The Broadcast failed because the limit in the current plan has been exceeded. The broadcast message limits can be found here. |
Broadcast Failed: No Contacts in the Target Segment | The Broadcast failed because there are no recipients in the Target Segment selected. Ensure that there are Contacts in the Target Segment. |
Broadcast Failed: Target Segment not found. | The Broadcast failed because the Target Segment was not found. |
Check the number of Completed Recipients
If you find that your Completed Recipient number is different from your Targeted Recipient number, it could be due to several reasons.
The behavior of dynamic Segments
Segments are updated whenever a Contact enters or exits the Segment. There may be cases where Contacts enter or exit the Segment during the duration between scheduling and sending of a broadcast message. This is an expected behavior due to the dynamic nature of Segments.
Example: Suppose a broadcast is scheduled to send in 2 days to 100 Contacts in a Segment. During the 2-day period, 5 new Contacts that fit that criterion are automatically added to the Segment. When the broadcast is sent out, it will be delivered to 105 Contacts. The targeted recipient number is 100, while the completed recipient number is 105.
The Segment includes duplicated Contacts
A broadcast is sent to one Contact, while any duplicate Contacts are excluded from the number of recipients, which will reduce the original Targeted recipient number. The platform will not attempt to send the broadcast message to duplicate Contacts.
To avoid having duplicate Contacts, we recommend the following best practices:
- Merging Contacts in the Dashboard.
- Selecting Add & Update Contact option when importing Contacts.
In some cases, a Broadcast may fail if a Segment contains Contacts with no assigned Channel (often caused by improper imports). To resolve this:
- Identify and remove Contacts without a Channel:
- Go to the affected Segment.
- Apply the filter: Channel > does not exist.
- Save the filter
- Select all Contacts > Delete
- Reimport the List:
- Use the original list of Contacts for the segment.
- Set the phone number as the identifier.
- Import using the Add + Update Contacts method.
- Assign a new Tag to distinguish this updated segment.
The format of the identifier is incorrect
If a Channel using a phone number as an identifier (e.g. WhatsApp, SMS) has an invalid format, it will be excluded from the recipient count and the platform will not attempt to send the broadcast message to those Contacts. Here’s a guide for the recommended formats.
Channel Limitations for Broadcasts
To avoid broadcast failure, take note of the limitations of each channel. See the following for specific channel limitations and policies on broadcasts:
Resending Failed Broadcast Messages
When broadcasts cannot be fully sent due to Channel limitations, they are delivered partially.
Example: A business that belongs to WhatsApp's standard tier can only send out 1,000 messages in a 24-hour period. If the business sends out a broadcast with 1,500 messages, only 1,000 messages will be delivered and the other 500 will fail.
In such cases, you might want to identify the recipients who have not received the message and resend it to them.
There are two methods to resend failed broadcast messages:
- Download Failed Messages using Data Export, reimport to add tags in bulk, create a Segment, and resend (recommended).
- View the Failed Message Log from the Reports Module, manually add tags, create a Segment, and resend.
Download Failed Messages using Data Export, reimport to add tags in bulk and resend
Step 1: Go to Settings > Data Export > Select Failed Messages from the dropdown > Set the date range for the date when the broadcast was sent > Click Export Data and download the CSV.
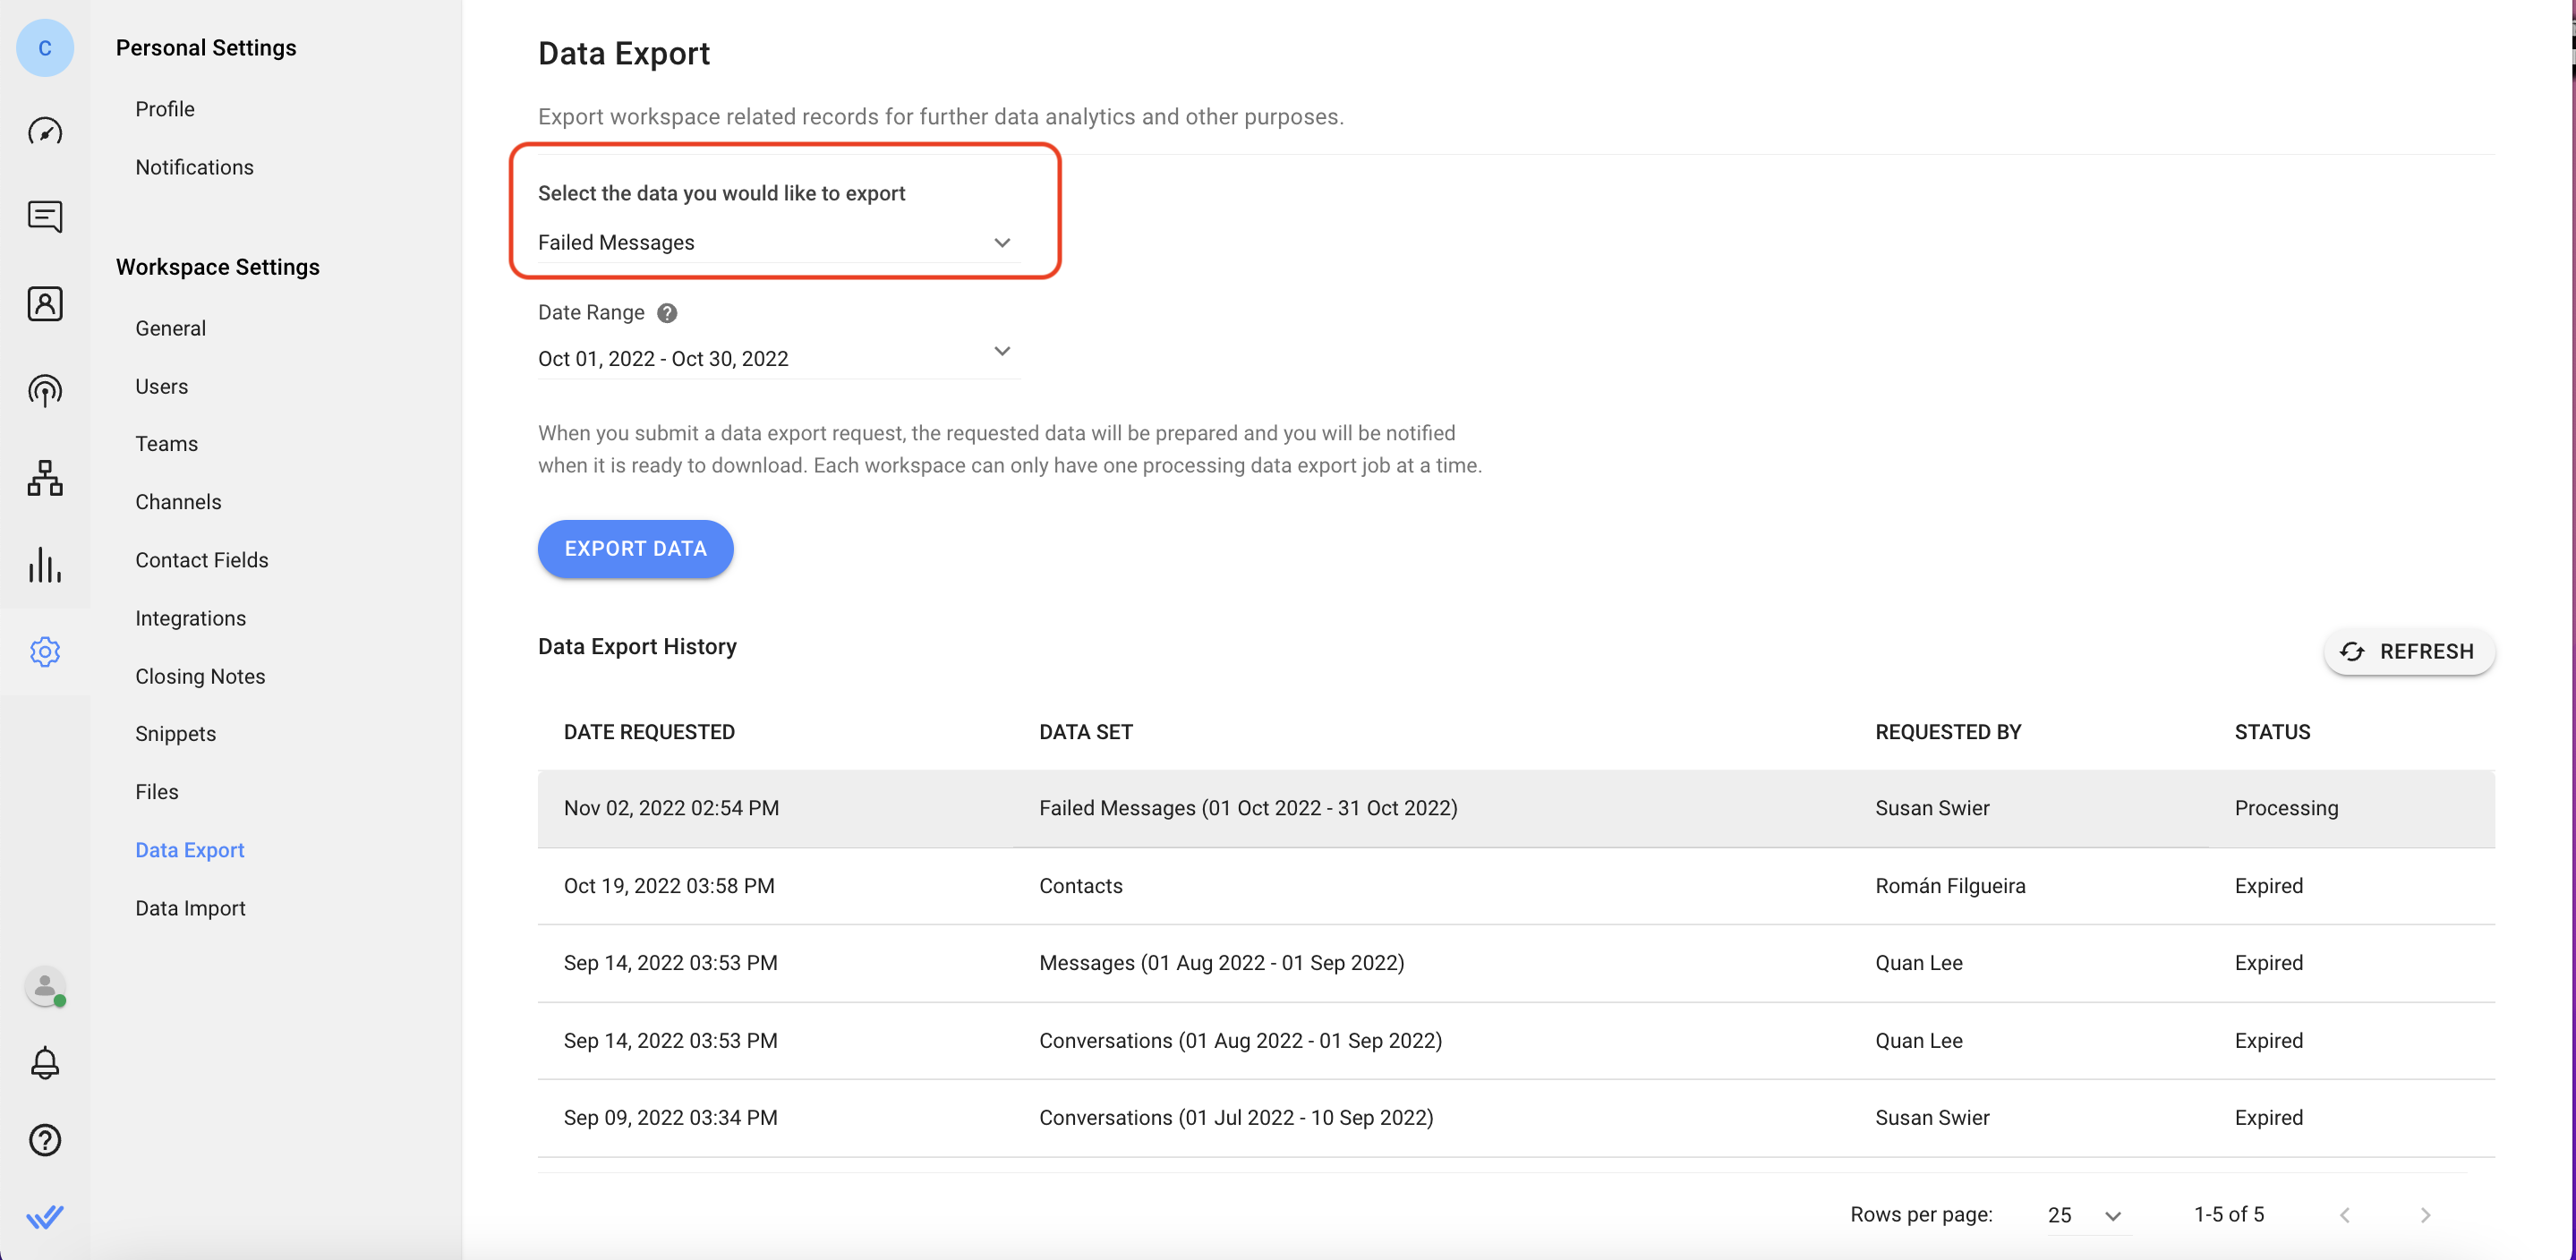
The CSV provides the following information: Date & Time, Sender ID, Sender Type, Contact ID, Message ID, Content Type, Content, Channel ID, Type, Sub-type and Error.
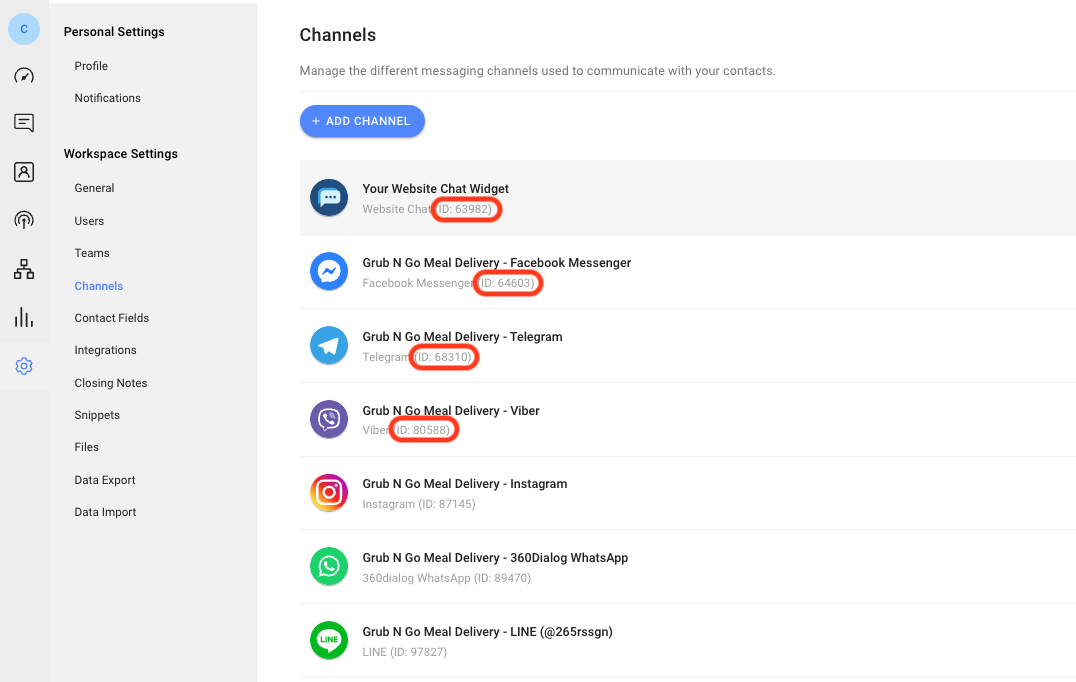
Filter the CSV by Channel ID to show only the failed messages from the Channel the broadcast was sent on.
How to find your Channel ID
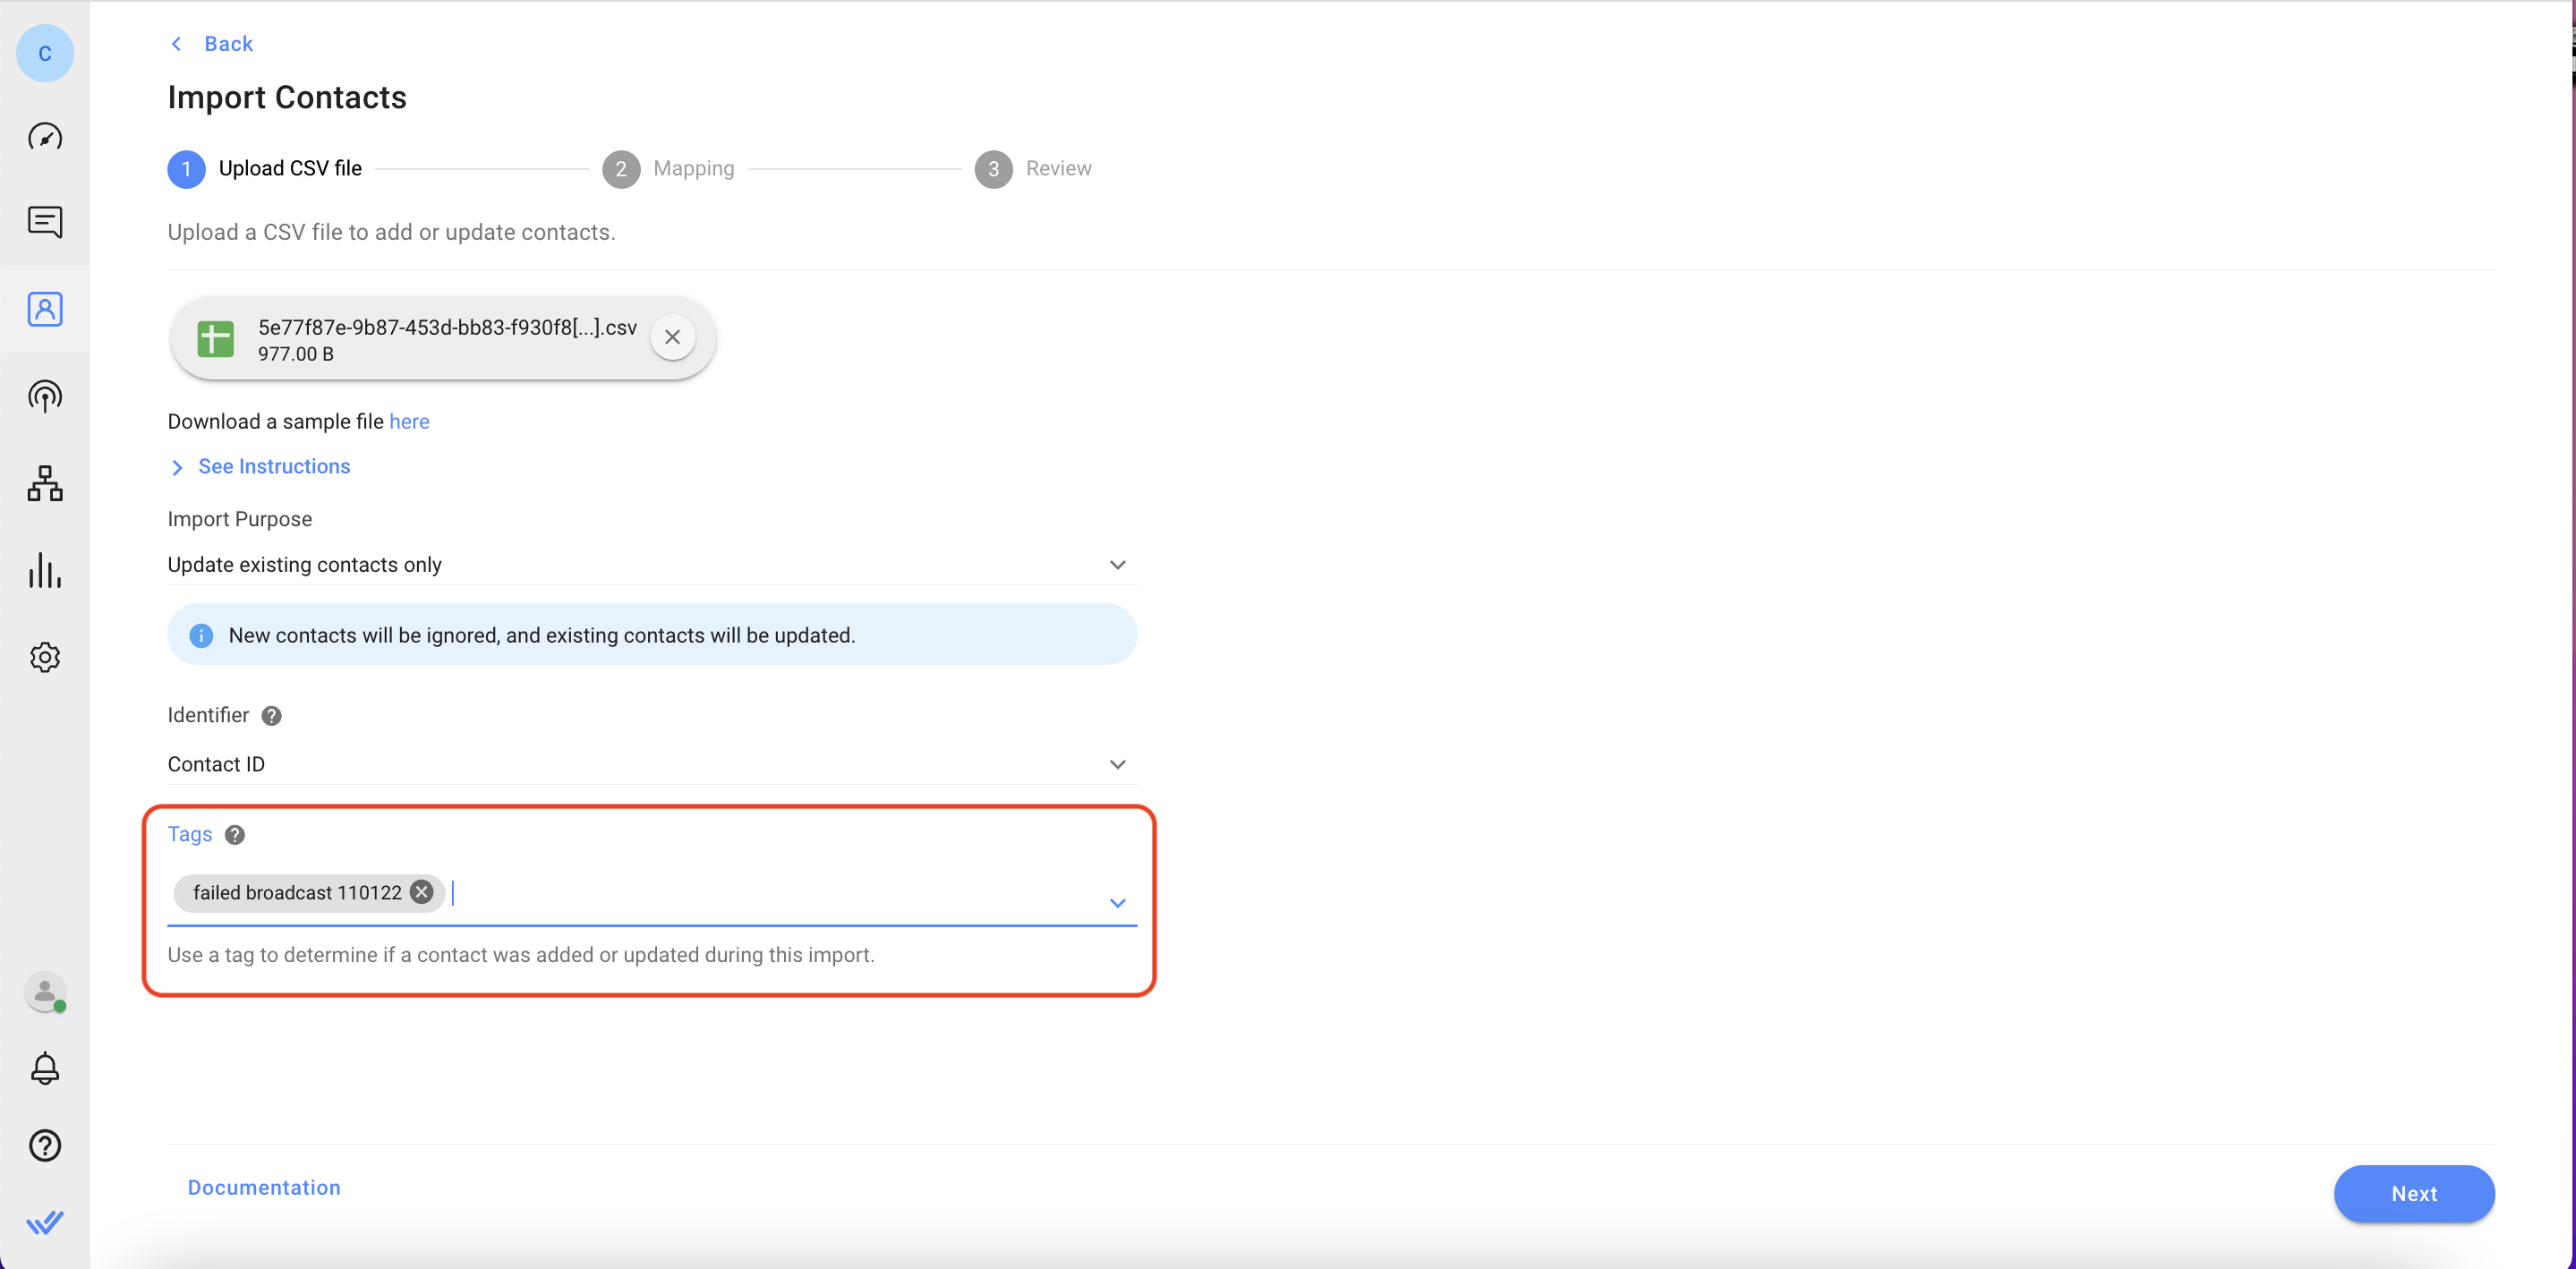
Step 2: Go to Import Contacts > add the CSV file > select Update existing contacts only > select Contact ID for the identifier.
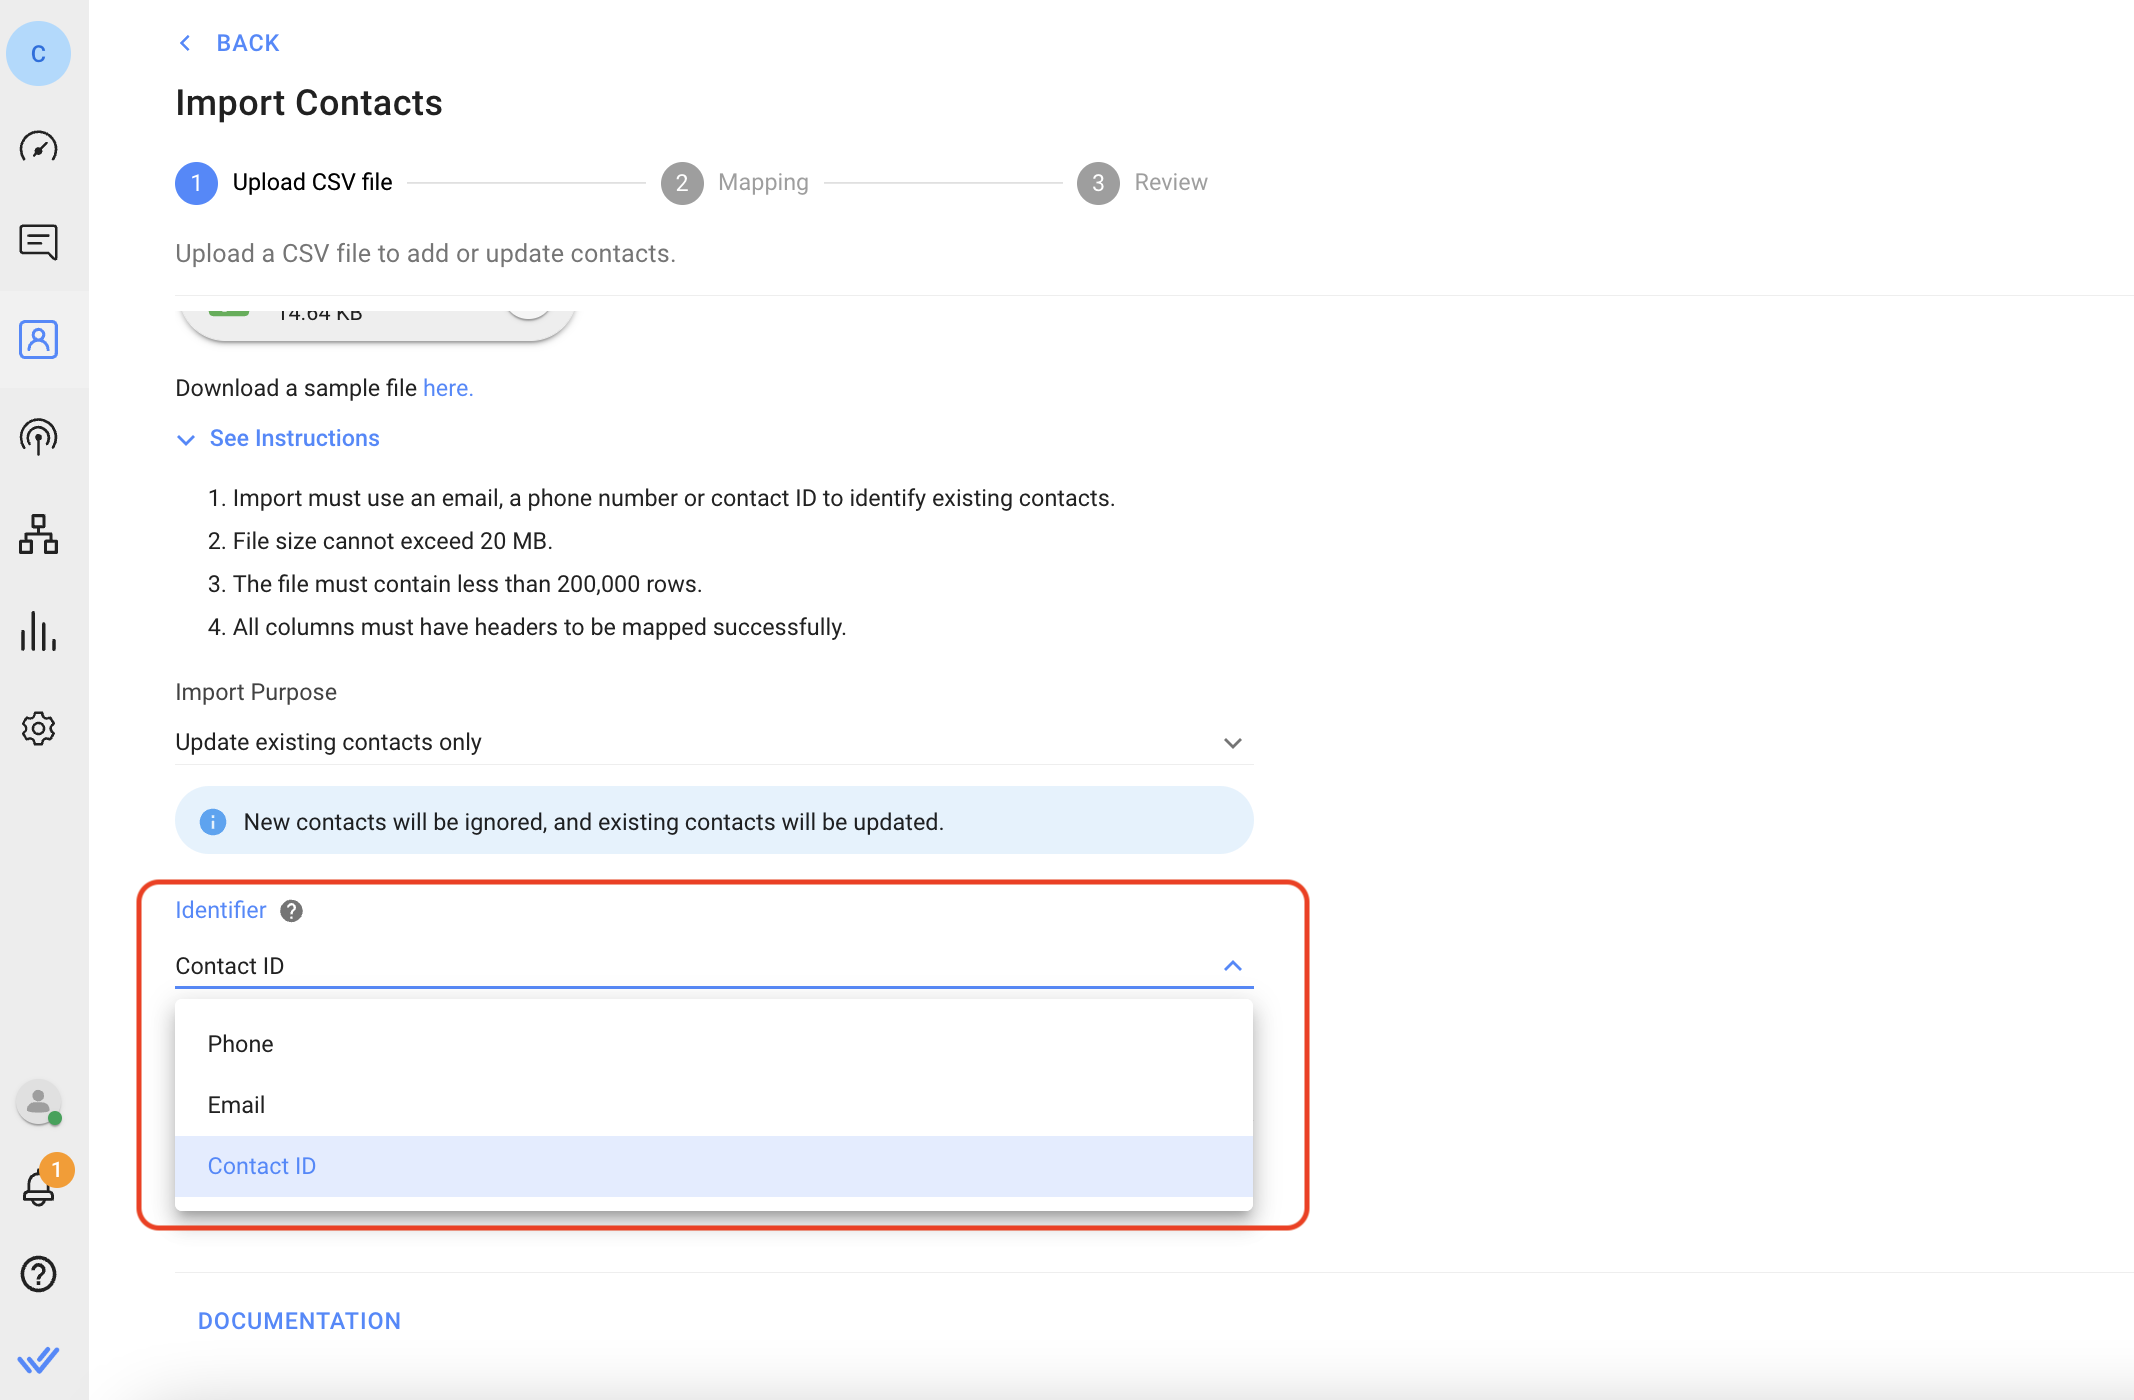
Add a tag, e.g., failed broadcast 110122 to identify these as the Contacts that did not receive the broadcast and import.
Step 3: Create a Segment that contains the failed messages by filtering with the following criteria: Contact Tag > has any of > Tag.
Step 4: Resend the broadcast to these Contacts using the Segment.
View the Failed Message Log from the Reports module, manually add tags and resend
Step 1: Follow the steps to check the Failed Message Log and identify the Contacts who did not receive the broadcast.
Step 2: Go to each contact’s profile on the list who did not receive the broadcast and add a tag, e.g., failed broadcast 110122.
Step 3: Create a Segment that contains the failed messages by filtering with the following criteria: Contact Tag > has any of > Tag.
Step 4: Resend the broadcast to Contacts with the new Segment.