Quick Start
What is respond.io?
Setting Up an Account
Connecting Channels
Inviting Your Teammates
Getting Contacts to Message You
Automated Welcome and Away Messages
Responding to Messages
Glossary of Terms
Channels
WhatsApp Business Platform (API) Quick Start
Getting Ready for Inbound Conversations
Getting Ready for Promotional Messaging
WhatsApp Official Business Account (Blue Tick)
Grow your WhatsApp Audience by Maximizing Entry Points
Get WhatsApp API Account for Government Agencies
WhatsApp Business Calling API
Meta Business Verification
WhatsApp Message Templates
WhatsApp Pricing
WhatsApp Business Platform (API) Channel Configuration
WhatsApp Messaging Limits
Meta Product Catalog
Change Your WhatsApp Business Display Name
Migrating from WhatsApp Personal or WhatsApp Business App
Phone Number Migration to respond.io WhatsApp Business Platform (API)
Turn-off WhatsApp Number Two-Step Verification
WhatsApp Cloud API
360dialog WhatsApp
Twilio WhatsApp
MessageBird WhatsApp
Vonage WhatsApp
Phone Number Migration to WhatsApp Cloud API
Facebook Messenger
Facebook Messenger Overview
Facebook Messenger Quick Start
Facebook Chat Plugin
Facebook Private Replies
Facebook Message Tag
LINE
Viber
Telegram
Website Chat Widget
Website Chat Widget Overview
Website Chat Widget Quick Start
Install Website Chat Widget on WordPress
Install Website Chat Widget on Shopify
Install Website Chat Widget on Wix
Install Website Chat Widget on Joomla
Install Website Chat Widget on Squarespace
SMS
Custom Channel
Product
Dashboard & Reporting
Dashboard
Reports Overview
Reports: Conversations
Reports: Responses
Reports: Resolutions
Reports: Messages
Reports: Contacts
Reports: Assignments
Reports: Leaderboard
Reports: Users
Reports: Broadcasts
Inbox
Inbox Overview
Assignment and Closing a Conversation
Custom Inboxes
Interacting with Respond AI Prompts
Using AI Assist
Contacts
Broadcasts Module
Workflows
Workflows Overview
Workflow Triggers
Workflow Steps Overview
Step: AI Agent
Step: Send a Message
Step: Ask a Question
Step: Assign To
Step: Branch
Step: Update Contact Tag
Step: Update Contact Field
Step: Open Conversation
Step: Close Conversation
Step: Add Comment
Step: Jump To
Step: Date & Time
Step: Wait
Step: Trigger Another Workflow
Step: HTTP Request
Step: Add Google Sheets Row
Step: Send TikTok Lower Funnel Event
Step: Send Conversions API Event
Dynamic Variables
Workspace Settings
Managing a Workspace
Workspace Settings: General
Workspace Settings: Users
Workspace Settings: Teams
Workspace Settings: Channels
Workspace Settings: Growth Widgets
Workspace Settings: Contact Fields
Workspace Settings: Integrations
Workspace Setting: Respond AI
Workspace Settings: Closing Notes
Workspace Settings: Snippets
Workspace Settings: Tags
Workspace Settings: Files
Workspace Settings: Data Export
Workspace Settings: Data Import
Workspace Settings: Lifecycle
Organization Settings
Organization Overview
Organization Settings: General
Organization Settings: Users
Organization Settings: Workspaces
Organization Settings: WhatsApp Fees
Organization Settings: Billing & Usage
Organization Settings: Security
User Account
Mobile App
Installing respond.io Mobile App
Messaging From Your Mobile
Managing Notifications On Your Mobile
Configuring mobile app settings
Help Menu
Conversation Led Growth
Capture Conversations
How to Route Contacts from CTC Ads to Agents
How to Send Outbound Sales Messages
How to Track Conversation Source from Multiple Websites
How to Enrich Customer Data from a CRM or other Business Software
How to Route VIP Contacts
Convert Conversations
How to Maximize Customer Service Potential with AI Agent
How to Automate Contact Information Collection with AI
How to Automatically Qualify Contacts Based on Budget Using AI Agent
How to Block Contacts and Manage Spam
How to Create Automated Welcome and Away Messages
How to Create Automated Chat Menus
How to Route Contacts to Preferred AI Agent
How to Route Contacts by their Preferred Language
How to Route Contacts by Team Functions
How to Route Contacts by Shifts
Assignment Strategy: How to Automate Contact Distribution & Load Balancing
Assignment Strategy: How to Unassign Agents after Conversations Closed
How to Collect Contacts’ Emails and Phone Numbers
How to Get Contacts’ Consent for Personal Data Collection
How to Promptly Transfer Conversation Between Agents
How to Guide Customers from Exploration to Purchase with Engaging Menus
How to Optimize Customer Onboarding with Automated & Customized Welcome Messages
How to Streamline Meeting Scheduling via CTC Ads
How to Automate Product Info Sharing in Conversations Initiated via CTC Ads
How to Get a Complete View of the Customers
How to Simplify Customer Escalation with Automation
How to Transfer Contacts to the Next Shift Automatically
How to Optimize Agents’ Productivity in the Inbox Module
How to Write an Optimal AI Persona (Best Practices)
How to Write the Best Knowledge Sources for AI Agents
How to Align AI Conversations with Your Brand Voice
How to Draft Customer Replies with AI
How to Convert Image to Text Using AI
How to Automate Calculations Using AI
Retain Customers
How to Route New and Returning Contacts
How to Send CSAT to Customer and Save Data in Google Sheets or CRMs
How to Send Outbound Support Messages
Reporting and Analytics
Broadcasts Use Cases
How to Send a Simple Broadcast
How to Start a Workflow Based on Broadcast Response
How to Import to Broadcast via WhatsApp
How to Troubleshoot a Failed Broadcast
Integrations
Dialogflow
Dialogflow Overview
Dialogflow: Connecting to Dialogflow
Dialogflow: Creating a Chatbot
Dialogflow: Managing Intents
Dialogflow: Parameters
Dialogflow: Events
Dialogflow: Response Templates
Dialogflow: Custom Payloads
Dialogflow: Fulfillment Webhook Request
E-Commerce & CRM Integrations
E-Commerce Integration: Shopify
E-Commerce Integration: BigCommerce
E-Commerce Integration: WooCommerce
E-Commerce Integration: Magento
CRM Integration: HubSpot
CRM Integration: Salesforce
CRM Integration: Pipedrive
CRM Integration: ActiveCampaign
Zapier
Make
Meta Business Accounts
TikTok Messaging Ads Integration
Developer API
Webhooks
Table of Contents
- Home
- Conversation Led Growth
- Convert Conversations
- How to Convert Image to Text Using AI
How to Convert Image to Text Using AI
Using AI with Optical Character Recognition (OCR) technology enables businesses to extract information from images, hence streamlining the data entry process, reducing the manual effort and minimizing the risk of errors.
This approach facilitates the conversion of crucial information from images into text format, enabling businesses to upload the information as Knowledge Sources. Consequently, this contributes to enhancing the accuracy of AI replies, ensuring they are up-to-date.
How to Convert Image to Text
This article outlines steps for converting image to text using two AI tools in the market: Sider and ChatGPT-4. For your consideration, read on to find out which tool fits your business requirements and budget.
1. Sider
- Extracts text, numbers and equations from images.
- It can only recognize handwriting in English.
- Extraction feature is free, requires a paid upgrade to use additional features.
- Requires a word processor to convert the extracted text into a PDF file (for those wanting to use extracted text as Knowledge Source).
2. ChatGPT-4 Text Extractor
- Can accurately recognize text in images.
- Only available in ChatGPT-4 and requires a paid upgrade to use this feature.
- Can directly convert the extracted text into a PDF file.
Method Objectives
Convert image to text using Sider
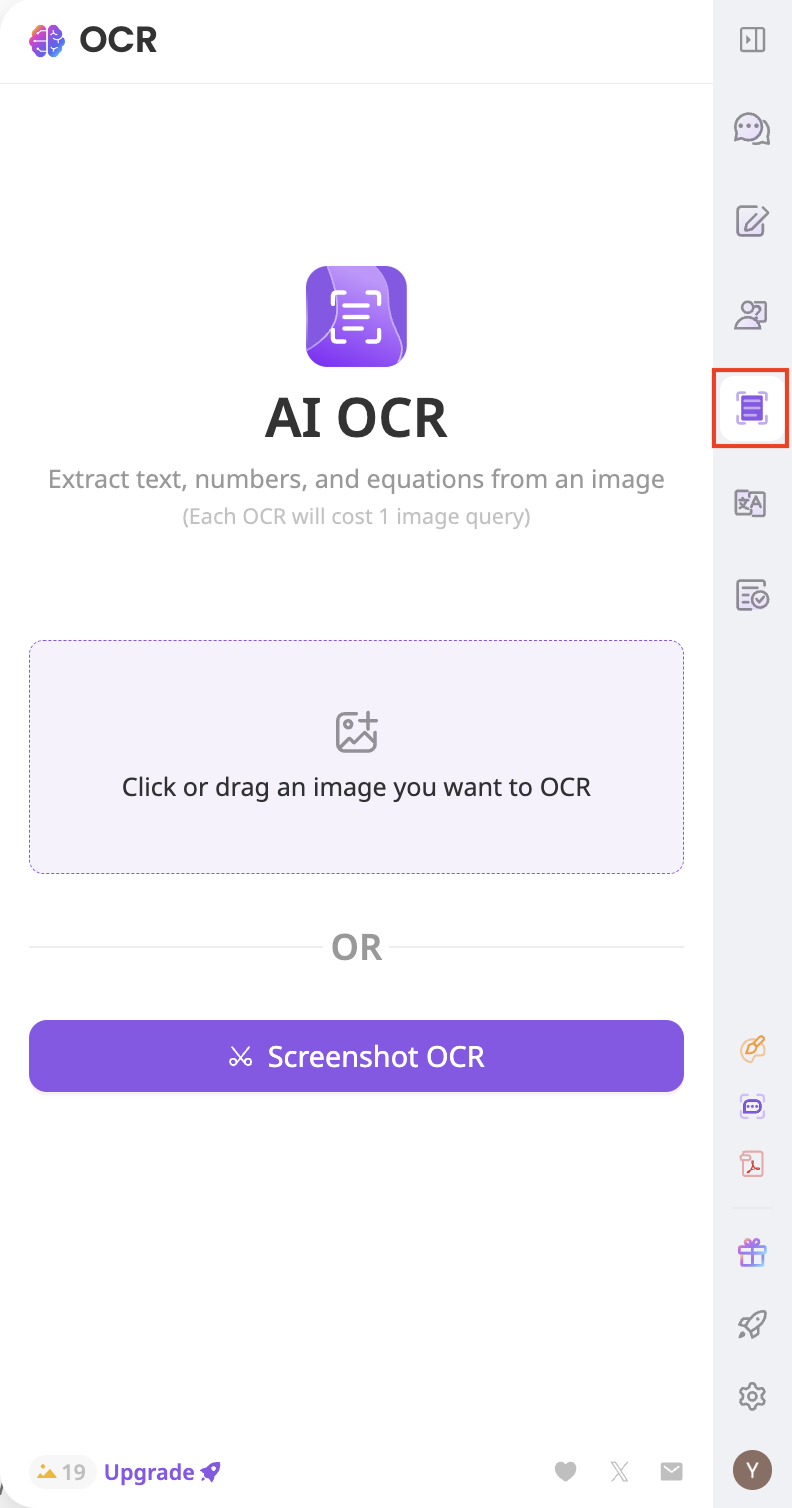
- Download the Sider extension on your computer > Create an account and log in.
- Click the Sider icon on the extension bar to launch the sidebar > Click the OCR icon.

- Upload the image. Ensure the file size is less than 10MB and the width or height of the image is not more than 4096 pixel.
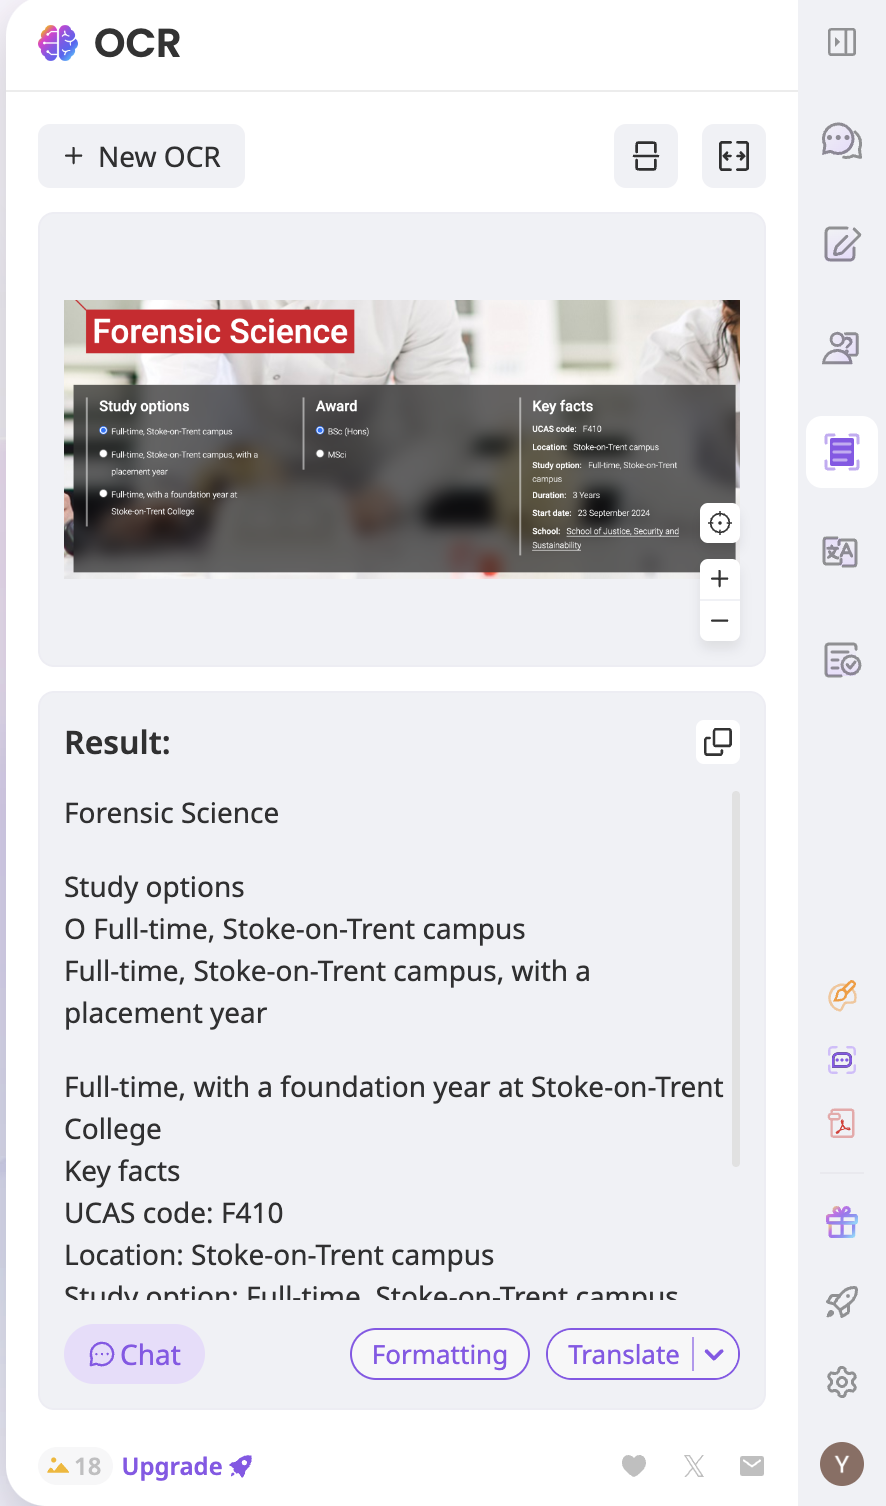
If the image uploaded fits the requirements, the extraction process will automatically begin and the result is displayed once the process is complete.

- Click Formatting for Sider to automatically format the text into a readable layout.
- To upload the extracted text as a Knowledge Source, convert the text into a PDF file by clicking the Copy icon at the result to copy the entire text.
- Paste the text to a word processor (e.g. Microsoft Word or Google Docs) and save the file as PDF.
- Then, refer to this guide to learn how to upload the PDF file as a Knowledge Source.
Convert image to text using Text Extractor in ChatGPT-4
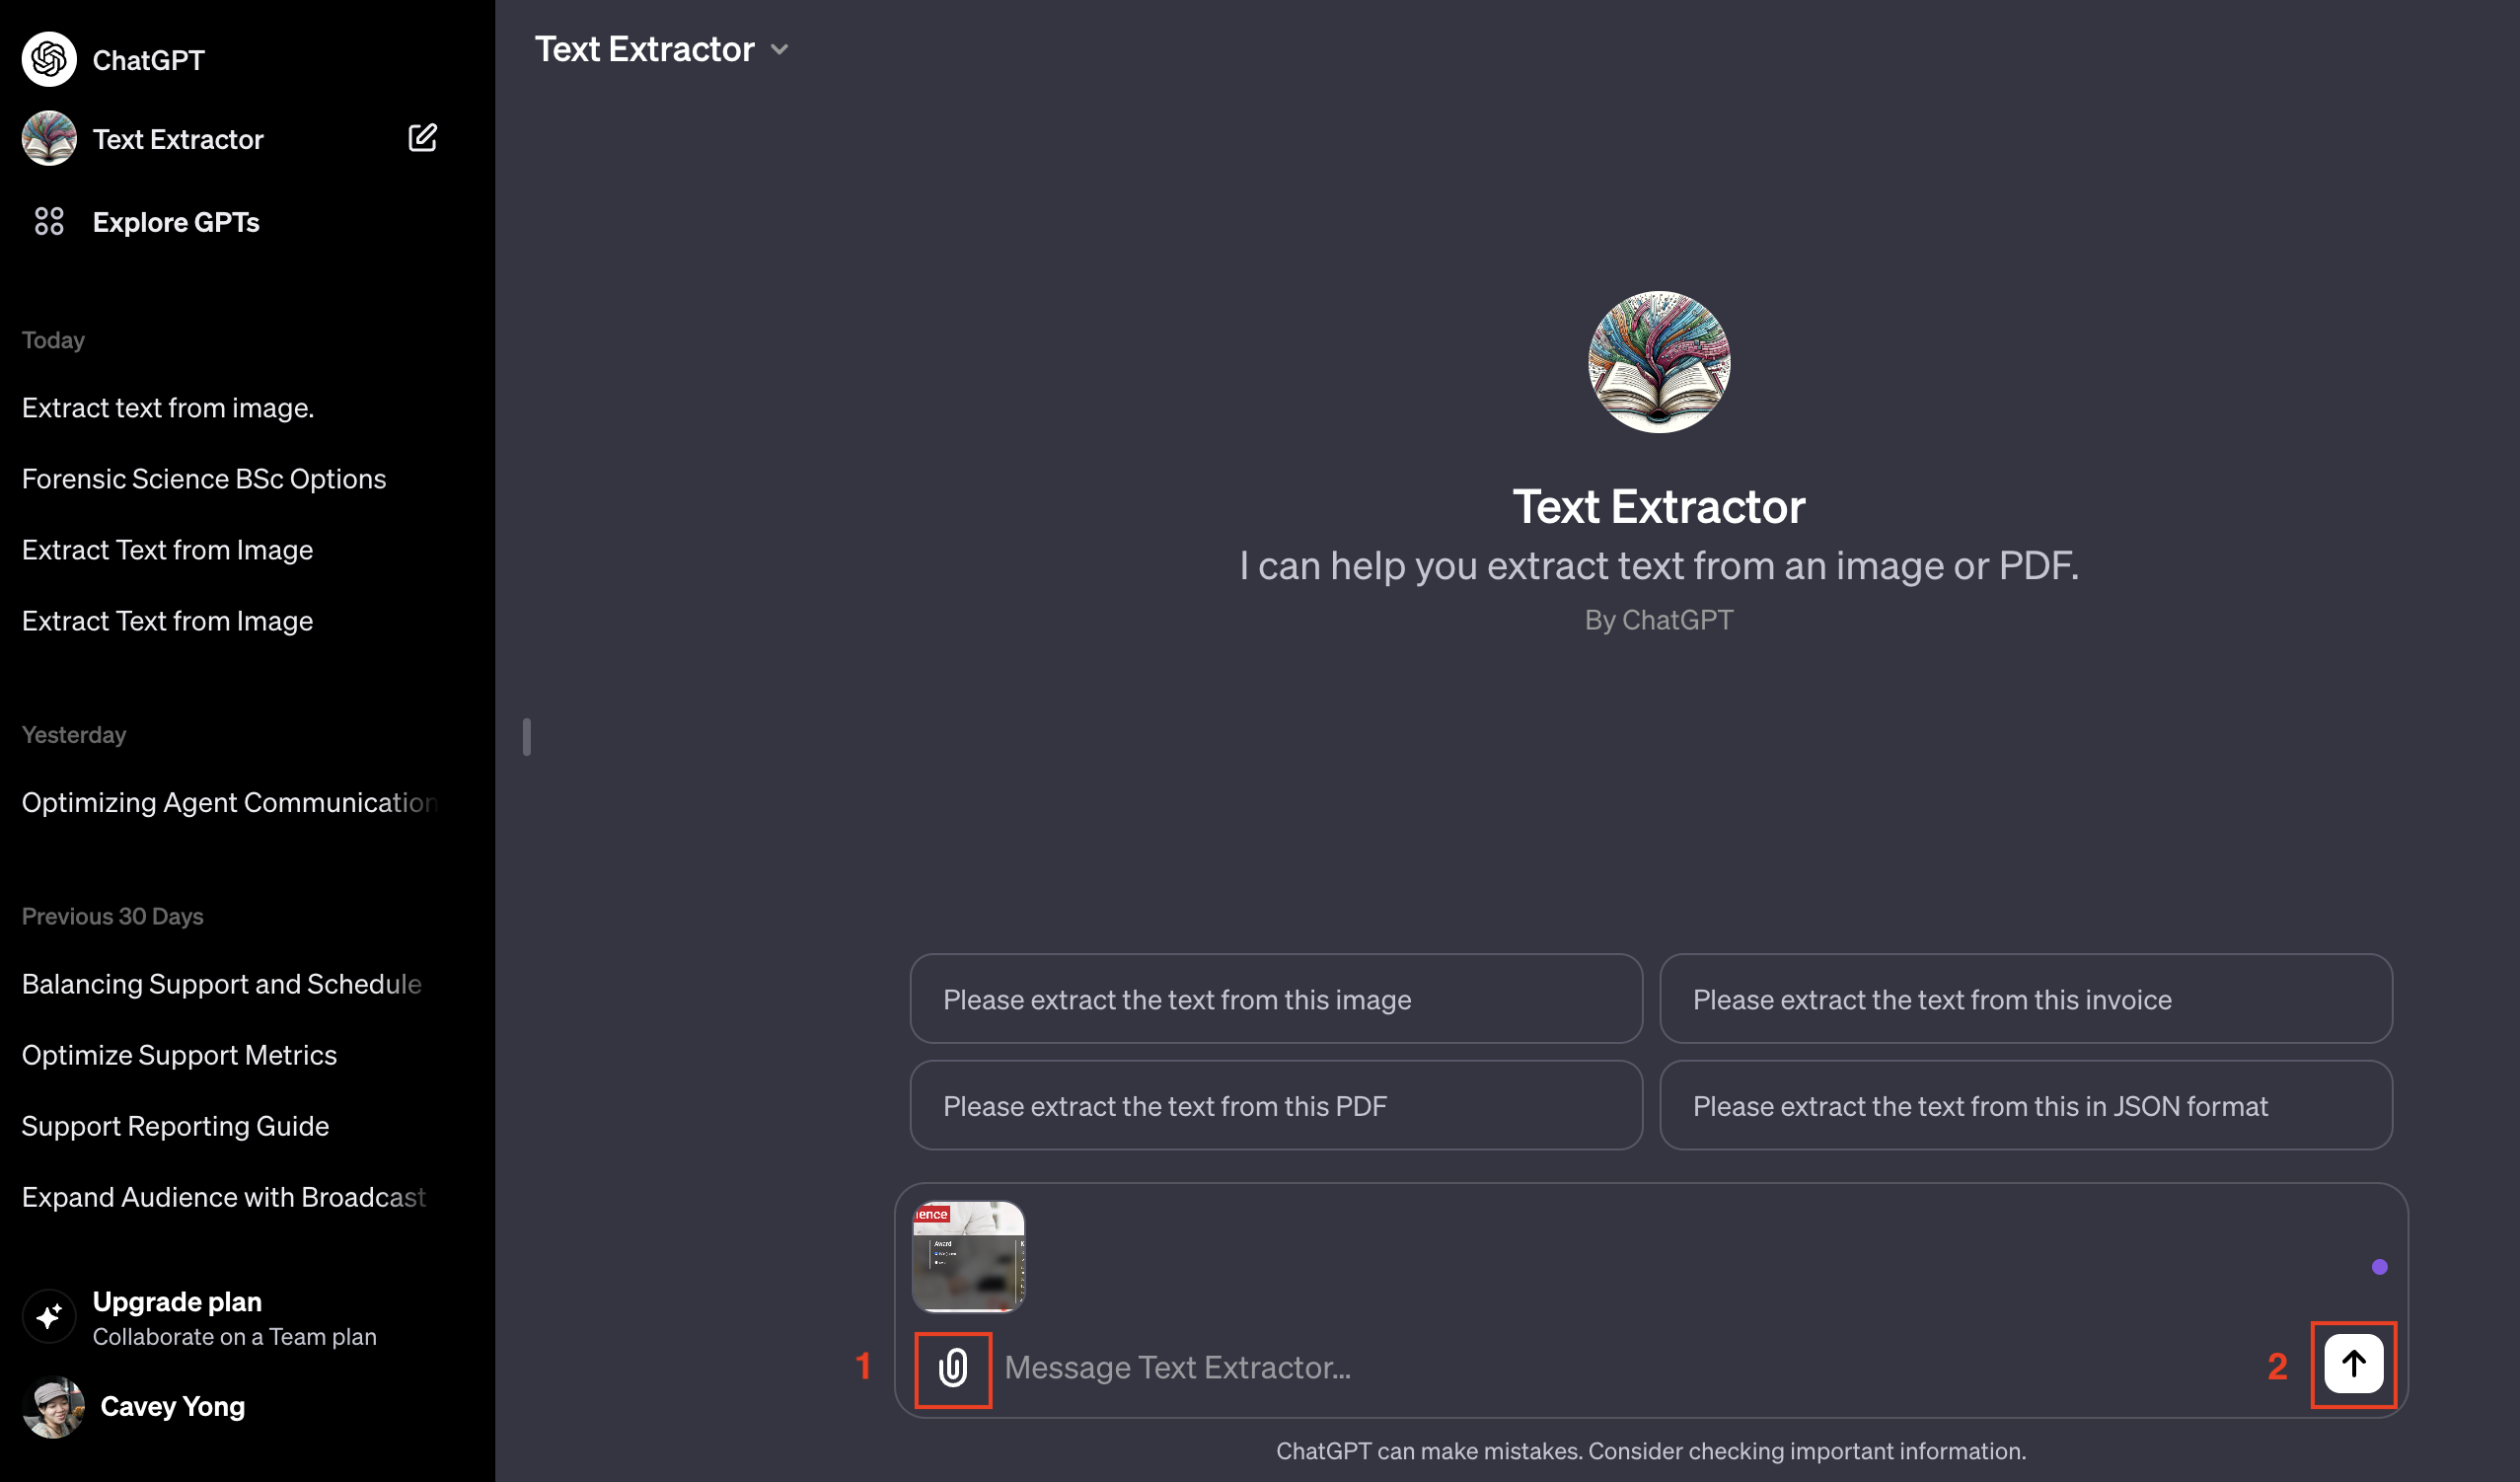
- On Text Extractor in ChatGPT-4, click 📎 icon and upload your image. Ensure the file type is supported e.g. JPEG, PNG, BMP, TIFF or GIF.
- Once the image is uploaded, click the Up arrow icon to start the extraction process.

- Once the extraction process is complete, the results will be displayed.
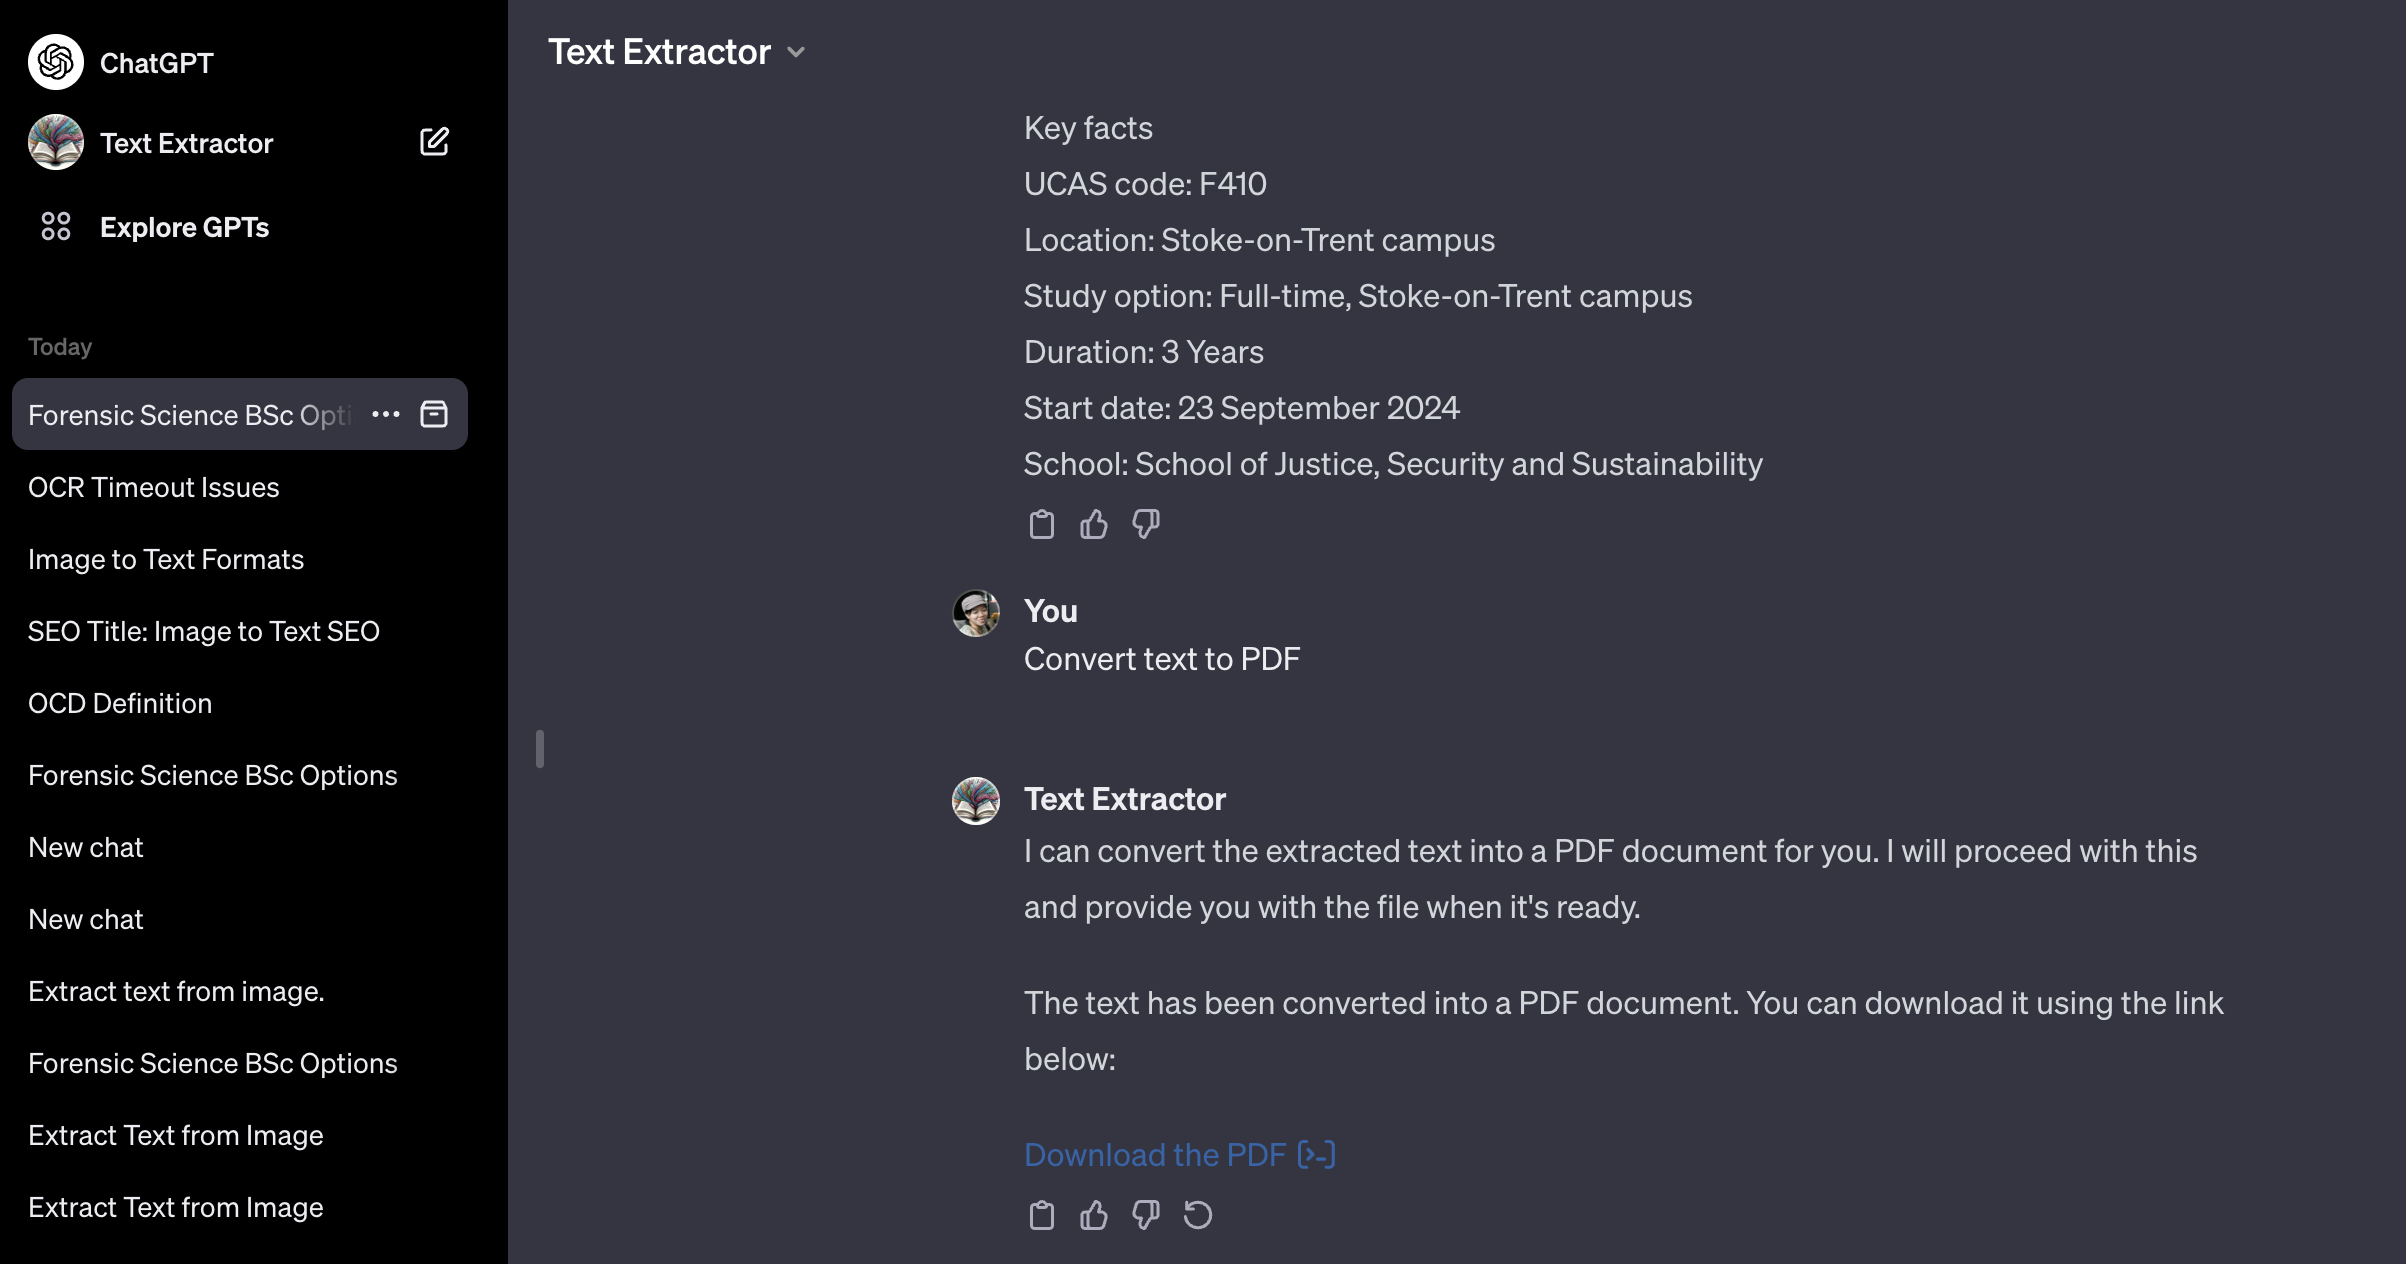
- To upload the extracted text as a Knowledge Source, convert the text into a PDF file by providing an instruction to generate a PDF file based on the text. The following is an example of the instruction:
Convert text to PDF
- Download the PDF file generated.

- Then, refer to this guide to learn how to upload the PDF file as a Knowledge Source.
Pro Tips
The effectiveness of the text extraction depends on the capabilities of the tool being used. To enhance the accuracy of text extraction from images, you may consider some of the key requirements listed as follows:
- Image quality: Use high-resolution and sharp images. Avoid low-resolution or pixelated images.
- Text legibility: Use image with clear and legible text.
- Minimal interference on background: Use image with text overlaid on simple backgrounds. Avoid image with text that blends into the background or that comes with watermark.
- Text orientation: Use images with text that are horizontally aligned. Text that are rotated at an angle may not produce the best results.
Feeling stuck? Do not fear.
Need assistance? Contact us for support. Help is here!This is the text block that will appear when the button is clicked.
How to Draft Customer Replies with AI
How to Automate Calculations Using AI
Related Articles
How to Automate Calculations Using AI
Learn how AI Assist can resolve customer queries that involve calculations.
How to Automatically Qualify Contacts Based on Budget Using AI Agent
Learn how to automatically qualify Contacts based on whether they have the budget for your service using AI Agent.
How to Route Contacts to Preferred AI Agent
Learn to automatically ask incoming Contacts if they want to talk to a Sales or a Support AI Agent and divert the Contact to the AI Agent of their choice.
