Quick Start
What is respond.io?
Setting Up an Account
Connecting Channels
Inviting Your Teammates
Getting Contacts to Message You
Automated Welcome and Away Messages
Responding to Messages
Glossary of Terms
Channels
WhatsApp Business Platform (API) Quick Start
Getting Ready for Inbound Conversations
Getting Ready for Promotional Messaging
WhatsApp Official Business Account (Blue Tick)
Grow your WhatsApp Audience by Maximizing Entry Points
Get WhatsApp API Account for Government Agencies
WhatsApp Business Calling API
Meta Business Verification
WhatsApp Message Templates
WhatsApp Pricing
WhatsApp Business Platform (API) Channel Configuration
WhatsApp Messaging Limits
Meta Product Catalog
Change Your WhatsApp Business Display Name
Migrating from WhatsApp Personal or WhatsApp Business App
Phone Number Migration to respond.io WhatsApp Business Platform (API)
Turn-off WhatsApp Number Two-Step Verification
WhatsApp Cloud API
360dialog WhatsApp
Twilio WhatsApp
MessageBird WhatsApp
Vonage WhatsApp
Phone Number Migration to WhatsApp Cloud API
TikTok
Facebook Messenger
Facebook Messenger Overview
Facebook Messenger Quick Start
Facebook Chat Plugin
Facebook Private Replies
Facebook Message Tag
LINE
Viber
Telegram
Website Chat Widget
Website Chat Widget Overview
Website Chat Widget Quick Start
Install Website Chat Widget on WordPress
Install Website Chat Widget on Shopify
Install Website Chat Widget on Wix
Install Website Chat Widget on Joomla
Install Website Chat Widget on Squarespace
SMS
Custom Channel
Product
Dashboard & Reporting
Dashboard
Reports Overview
Reports: Conversations
Reports: Responses
Reports: Resolutions
Reports: Messages
Reports: Contacts
Reports: Assignments
Reports: Leaderboard
Reports: Users
Reports: Broadcasts
Inbox
Inbox Overview
Assignment and Closing a Conversation
Custom Inboxes
Interacting with Respond AI Prompts
Using AI Assist
Contacts
Broadcasts Module
Workflows
Workflows Overview
Workflow Triggers
Workflow Steps Overview
Step: AI Agent
Step: Send a Message
Step: Ask a Question
Step: Assign To
Step: Branch
Step: Update Contact Tag
Step: Update Contact Field
Step: Open Conversation
Step: Close Conversation
Step: Add Comment
Step: Jump To
Step: Date & Time
Step: Wait
Step: Trigger Another Workflow
Step: HTTP Request
Step: Add Google Sheets Row
Step: Send TikTok Lower Funnel Event
How to Avoid Workflow Loops
Step: Update Lifecycle
Step: Send Conversions API Event
Dynamic Variables
Workspace Settings
Managing a Workspace
General info (previously General)
User settings (previously Users)
Teams (previously Team Settings)
Channels
Growth Widgets
Contact Fields
Integrations
Respond AI
Closing Notes
Snippets
Tags
Files
Data Export
Contact Import
Lifecycle
Organization Settings
Organization Overview
Account info (previously General)
Admin Settings (previously Users)
Workspaces
WhatsApp Fees
Billing & Usage
Security
User Account
Mobile App
Installing respond.io Mobile App
Messaging From Your Mobile
Managing Notifications On Your Mobile
Configuring mobile app settings
Help Menu
Conversation Led Growth
Capture Leads
How to Collect Contacts’ Emails and Phone Numbers
How to Route Contacts from CTC Ads to Agents
How to Send Outbound Sales Messages
How to Track Conversation Source from Multiple Websites
How to Enrich Customer Data from a CRM or other Business Software
Convert Leads
How to Automate Product Info Sharing in Conversations Initiated via CTC Ads
How to Automatically Qualify Contacts Based on Budget Using AI Agent
Assignment Strategy: How to Automate Contact Distribution & Load Balancing
How to Maximize Customer Service Potential with AI Agent
How to Automate Contact Information Collection with AI
How to Block Contacts and Manage Spam
How to Create Automated Welcome and Away Messages
How to Create Automated Chat Menus
How to Route Contacts to Preferred AI Agent
How to Route Contacts by their Preferred Language
How to Route Contacts by Team Functions
How to Route Contacts by Shifts
Assignment Strategy: How to Unassign Agents after Conversations Closed
How to Get Contacts’ Consent for Personal Data Collection
How to Promptly Transfer Conversation Between Agents
How to Guide Customers from Exploration to Purchase with Engaging Menus
How to Optimize Customer Onboarding with Automated & Customized Welcome Messages
How to Streamline Meeting Scheduling via CTC Ads
How to Get a Complete View of the Customers
How to Simplify Customer Escalation with Automation
How to Transfer Contacts to the Next Shift Automatically
How to Optimize Agents’ Productivity in the Inbox Module
How to Write an Optimal AI Persona (Best Practices)
How to Write the Best Knowledge Sources for AI Agents
How to Align AI Conversations with Your Brand Voice
How to Draft Customer Replies with AI
How to Convert Image to Text Using AI
How to Automate Calculations Using AI
How to Automate Lifecycle Tracking in Google Sheets
Retain Customers
How to Route New and Returning Contacts
How to Route VIP Contacts
How to Send CSAT to Customer and Save Data in Google Sheets or CRMs
How to Send Outbound Support Messages
How to improve lead targeting and automatically send purchase events to Meta when a customer makes a payment
Reporting and Analytics
Broadcasts Use Cases
How to Send a Simple Broadcast
How to Start a Workflow Based on Broadcast Response
How to Import to Broadcast via WhatsApp
How to Troubleshoot a Failed Broadcast
Integrations
Dialogflow
Dialogflow Overview
Dialogflow: Connecting to Dialogflow
Dialogflow: Creating a Chatbot
Dialogflow: Managing Intents
Dialogflow: Parameters
Dialogflow: Events
Dialogflow: Response Templates
Dialogflow: Custom Payloads
Dialogflow: Fulfillment Webhook Request
Zapier
E-Commerce Integration: Shopify
E-Commerce Integration: BigCommerce
E-Commerce Integration: WooCommerce
E-Commerce Integration: Magento
CRM Integration: HubSpot
CRM Integration: Salesforce
CRM Integration: Pipedrive
CRM Integration: ActiveCampaign
Zapier
Make
Meta Business Accounts
TikTok Messaging Ads Integration
Developer API
HubSpot
Webhooks
Salesforce
- Home
- Product
- Workspace Settings
- Lifecycle
Lifecycle
 Updated
by Shing-Yi Tan
The Lifecycle feature helps you track and manage Contacts throughout every stage of your sales process, from the first interaction to conversion.
By organizing your Contacts into different Lifecycle Stages, your team can gain valuable insights into where each Contact is in their customer journey, making it easier to tailor communications, manage conversations, and ultimately, convert leads into customers.
Setting up Lifecycle
The Lifecycle feature is automatically enabled for new organizations when they sign up. You can start organizing your Contacts into Lifecycle Stages right away in the Inbox and Contacts modules.
You can also enable Lifecycle manually by turning on the “Show Lifecycle Stages” toggle in the platform’s settings. This will make Lifecycle visible in the Inbox and Contacts modules.
To do this, go to Workspace settings > Lifecycle.
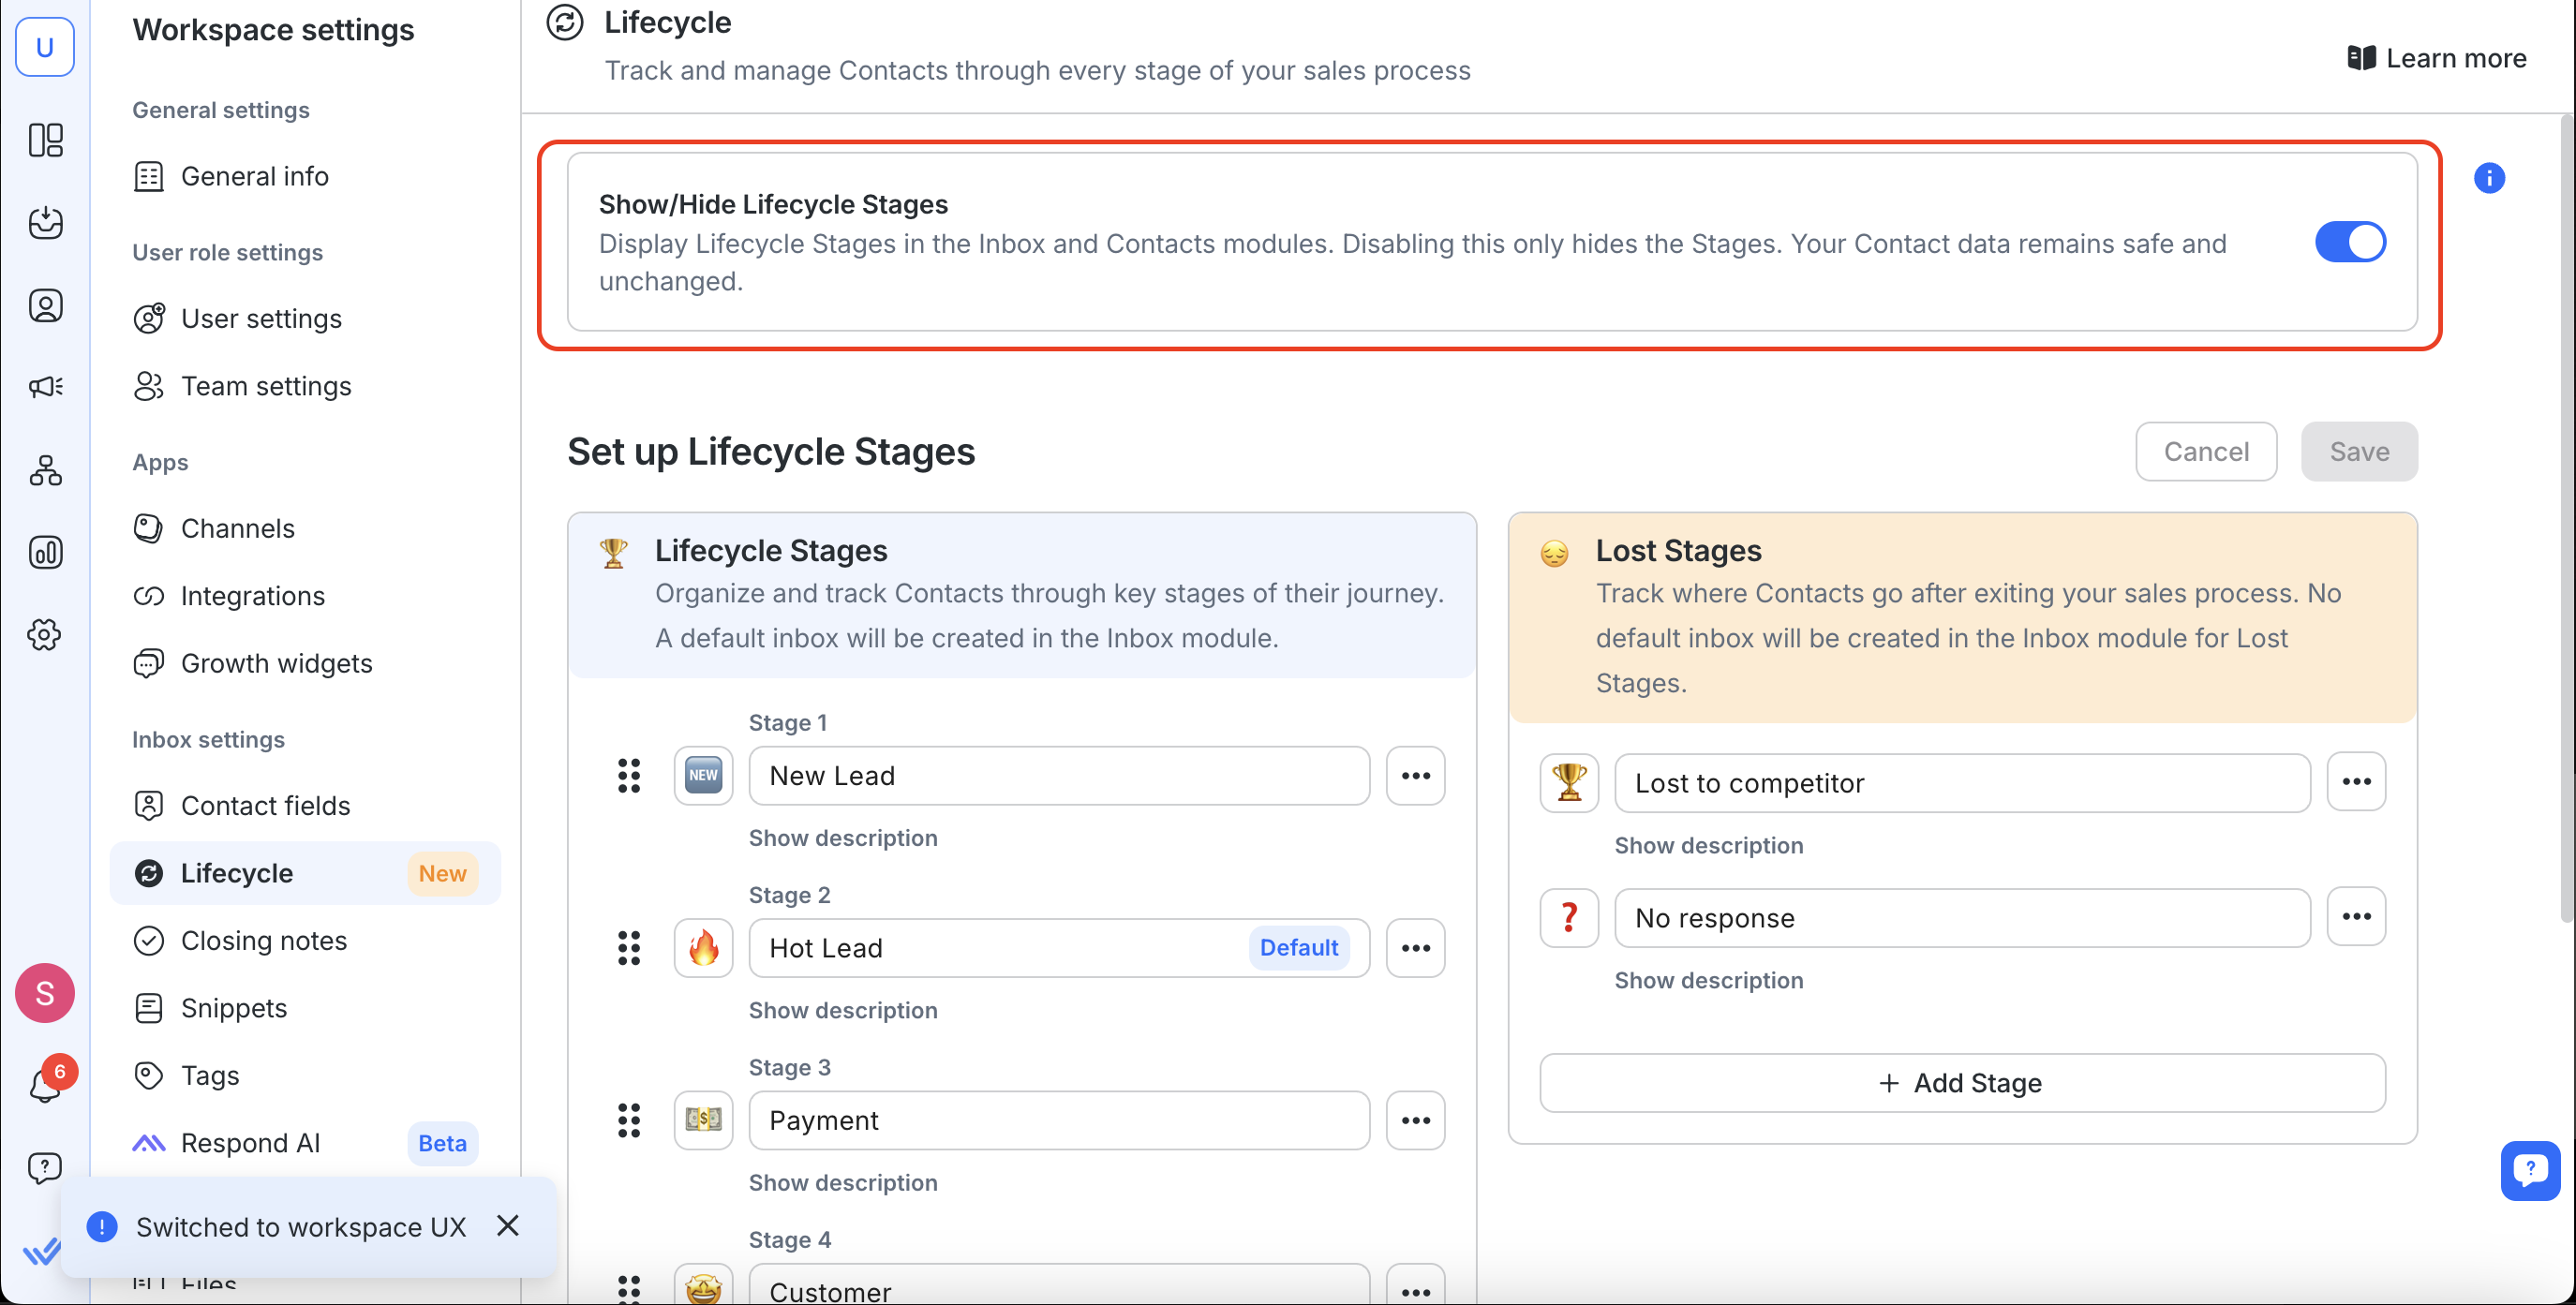
Watch how to set up Lifecycle for your organization:
Getting Started
Lifecycle is a flexible, customizable tool that allows you to define the stages of your sales process and easily move Contacts through these stages as they progress.
When a new Contact sends a message, Lifecycle automatically assigns them to a default stage, ensuring that all your Contacts are organized right from the start.
Lifecycle Stages
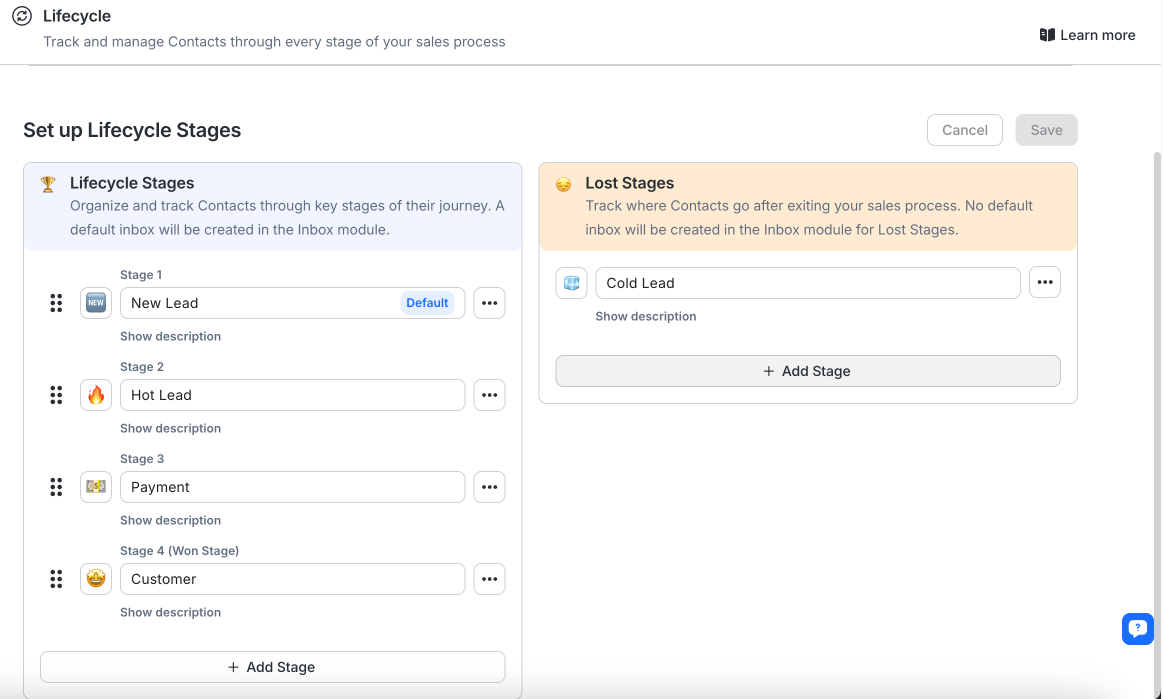
Lifecycle comes pre-configured with four primary stages and one Lost Stage to help you get started.
Lifecycle Stages:
- New Lead: The Contact has shown interest for the first time.
- Hot Lead: The Contact is actively interested and ready to move forward.
- Payment: The Contact is considering your offer and payment is in progress.
- Customer: The Contact has made a purchase and is now a paying customer.
Lost Stages:
Lost Stages are designed to track Contacts who leave the sales process, offering insights into drop-off points. Lifecycle comes with one Lost Stage, which you can edit or remove like all other Stages:
- Cold Lead: The Contact has stopped showing interest and is no longer responsive.
You can also add more Lost Stages to suit your business and sales process. Some examples are:
- Unqualified: Contact does not meet your business criteria (e.g., budget, needs).
- No Response: Multiple follow-ups, but the Contact remains unresponsive.
- Lost to Competitor: Contact chose a competitor’s product or service.
Setting a default Stage
You can set a default stage to automatically categorize new Contacts as soon as they message you. For instance, you can set "New Lead" as your default Stage to categorize all initial Contacts.
To set a default Stage:
- Go to Workspace Settings > Lifecycle
- Select the three-dot button > Select Set as default
- Select Save
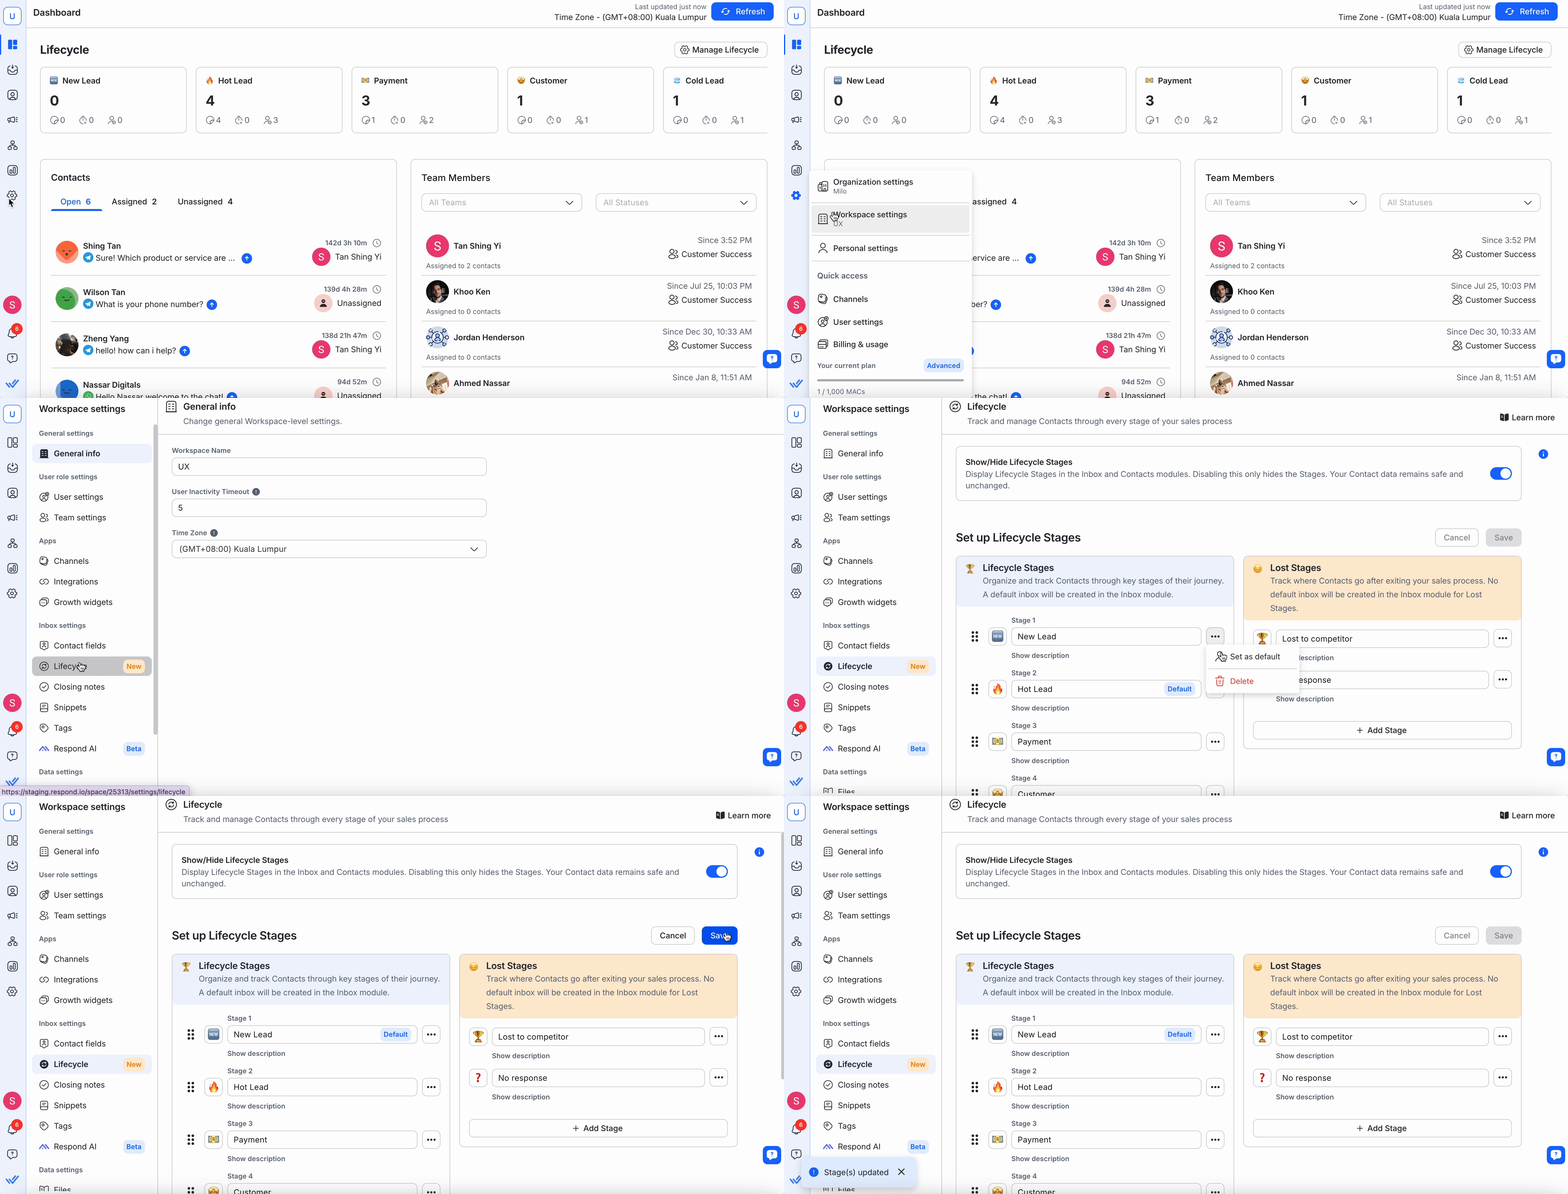
Creating a new Stage
You can create, rename, and manage up to 20 stages in total, which can include both Lifecycle Stages and Lost Stages, allowing you to customize your sales process and track drop-offs effectively.
Creating new Stages:
- Go to Workspace Settings > Lifecycle
- Select Add Stage
- Give your Stage a name and description
- Select Save
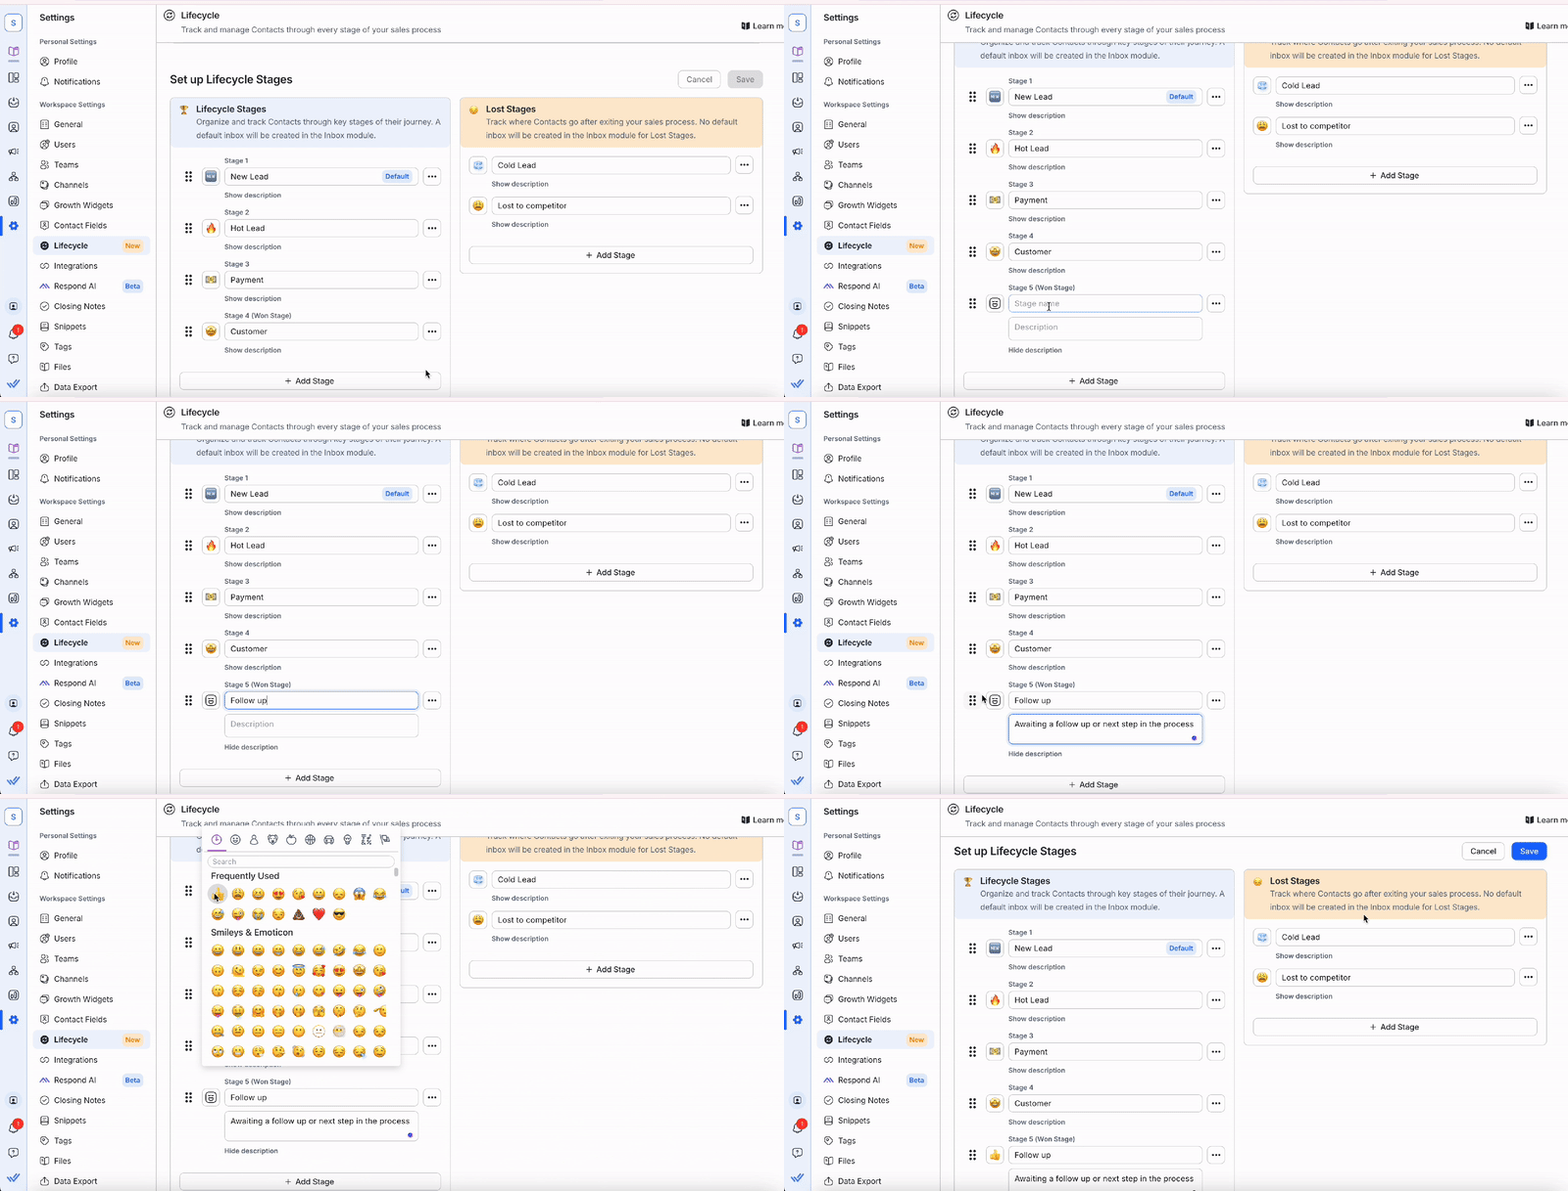
Creating Lost Stages:
- Go to Workspace Settings > Lifecycle
- In the Lost Stages column, select Add Stage
- Enter a name, description, and emoji for the stage
- Select Save
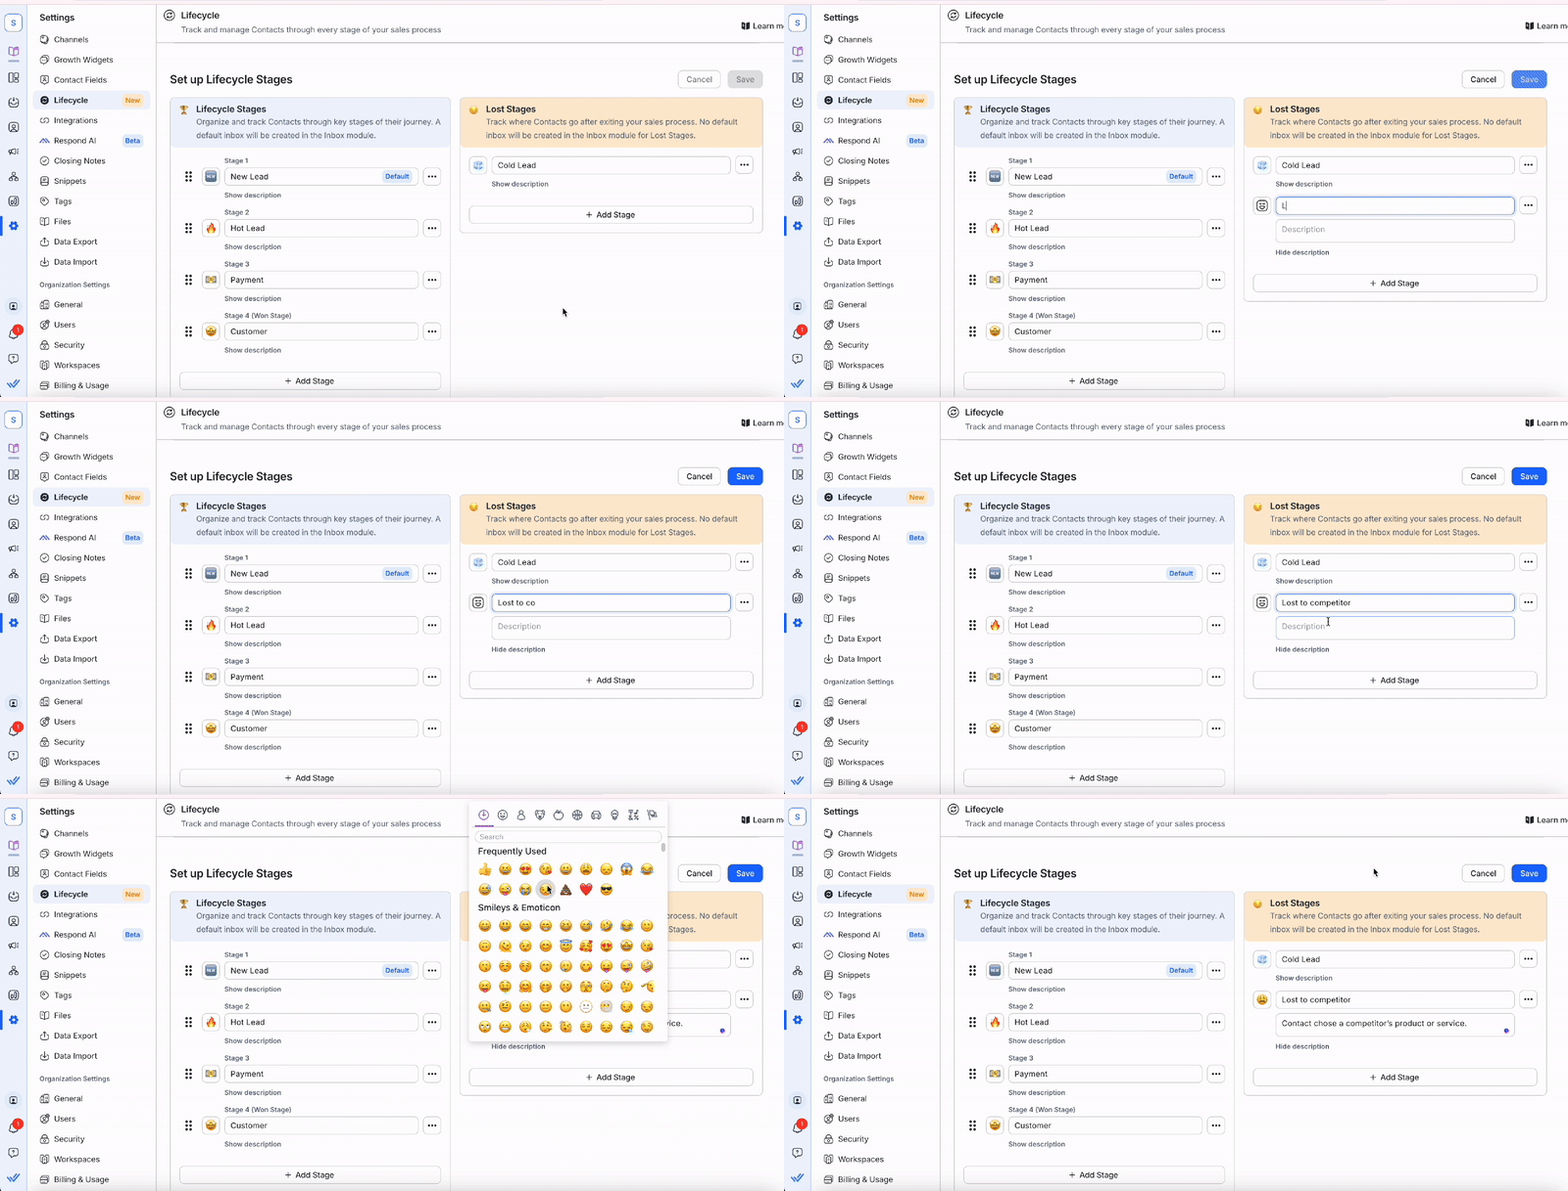
Lost Stages are not assigned to default inboxes but help you track drop-offs within your sales funnel.
Using Lifecycle in the Inbox Module
In the Inbox module, you can quickly assign and update stages for your Contacts. This includes both Lifecycle Stages and Lost Stages, allowing you to track progression in your sales process. For example, if a lead becomes unresponsive, you can move them to a Lost Stage such as Cold Lead.
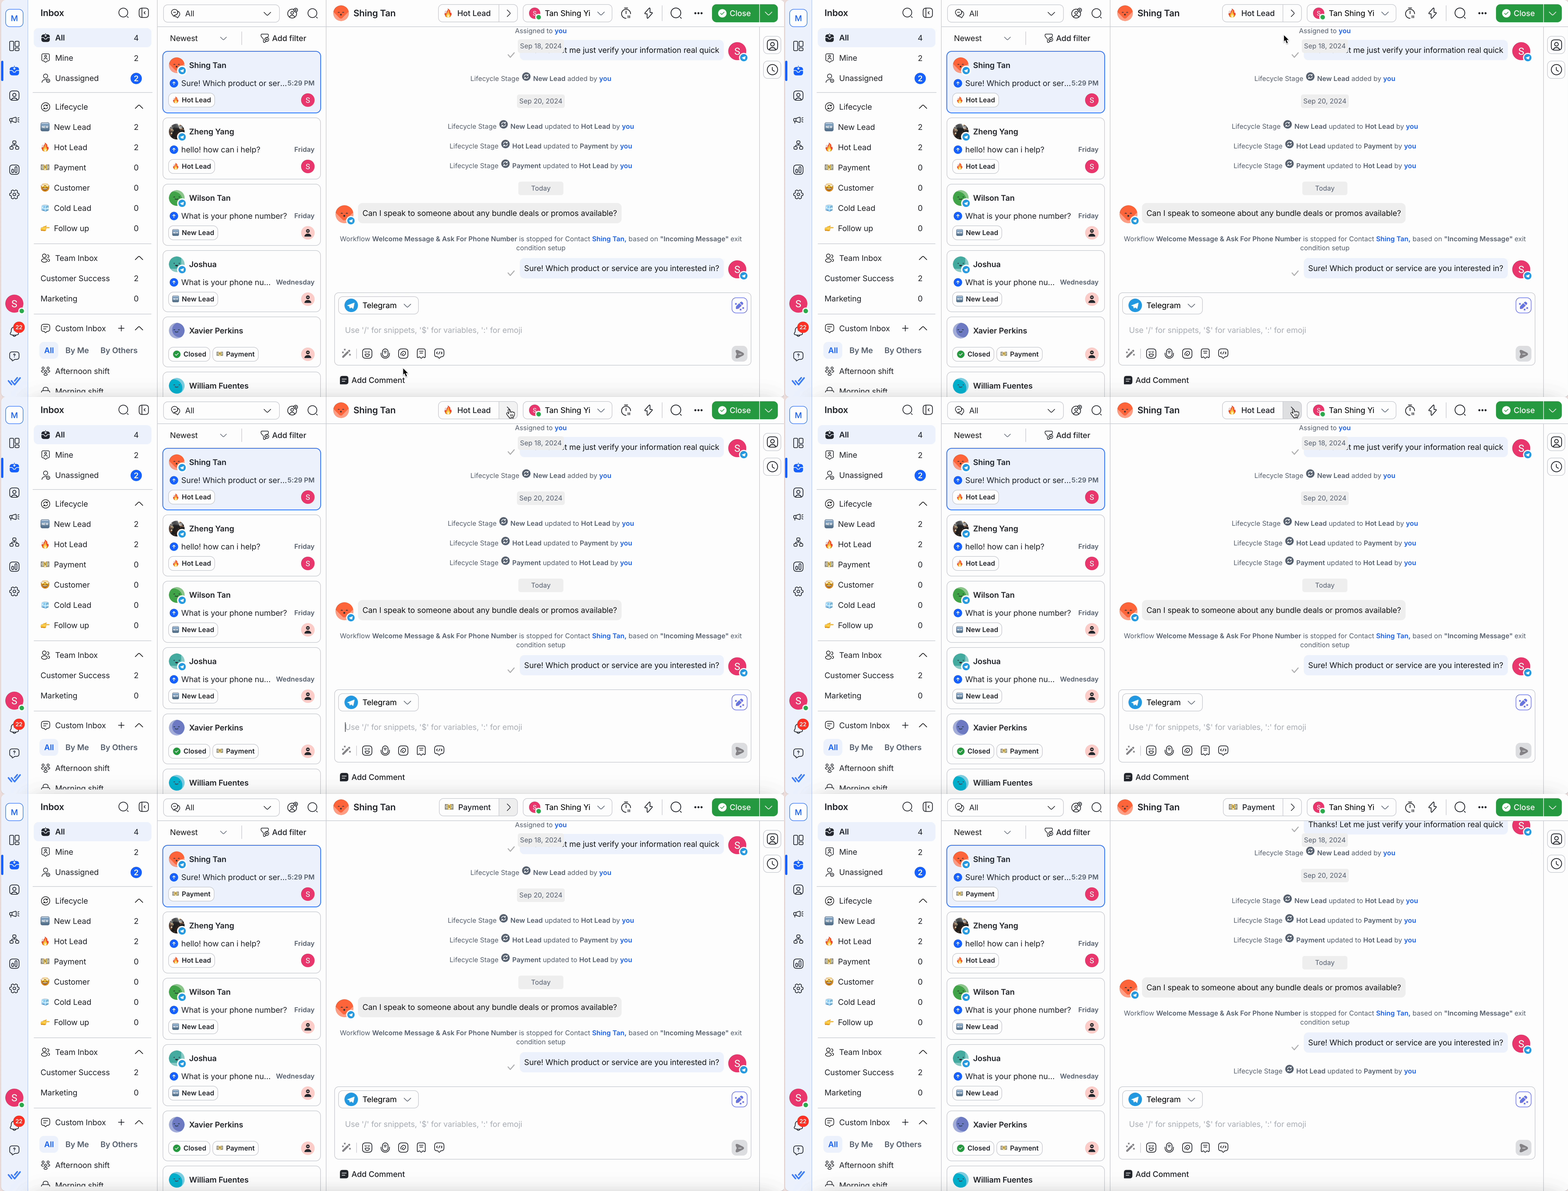
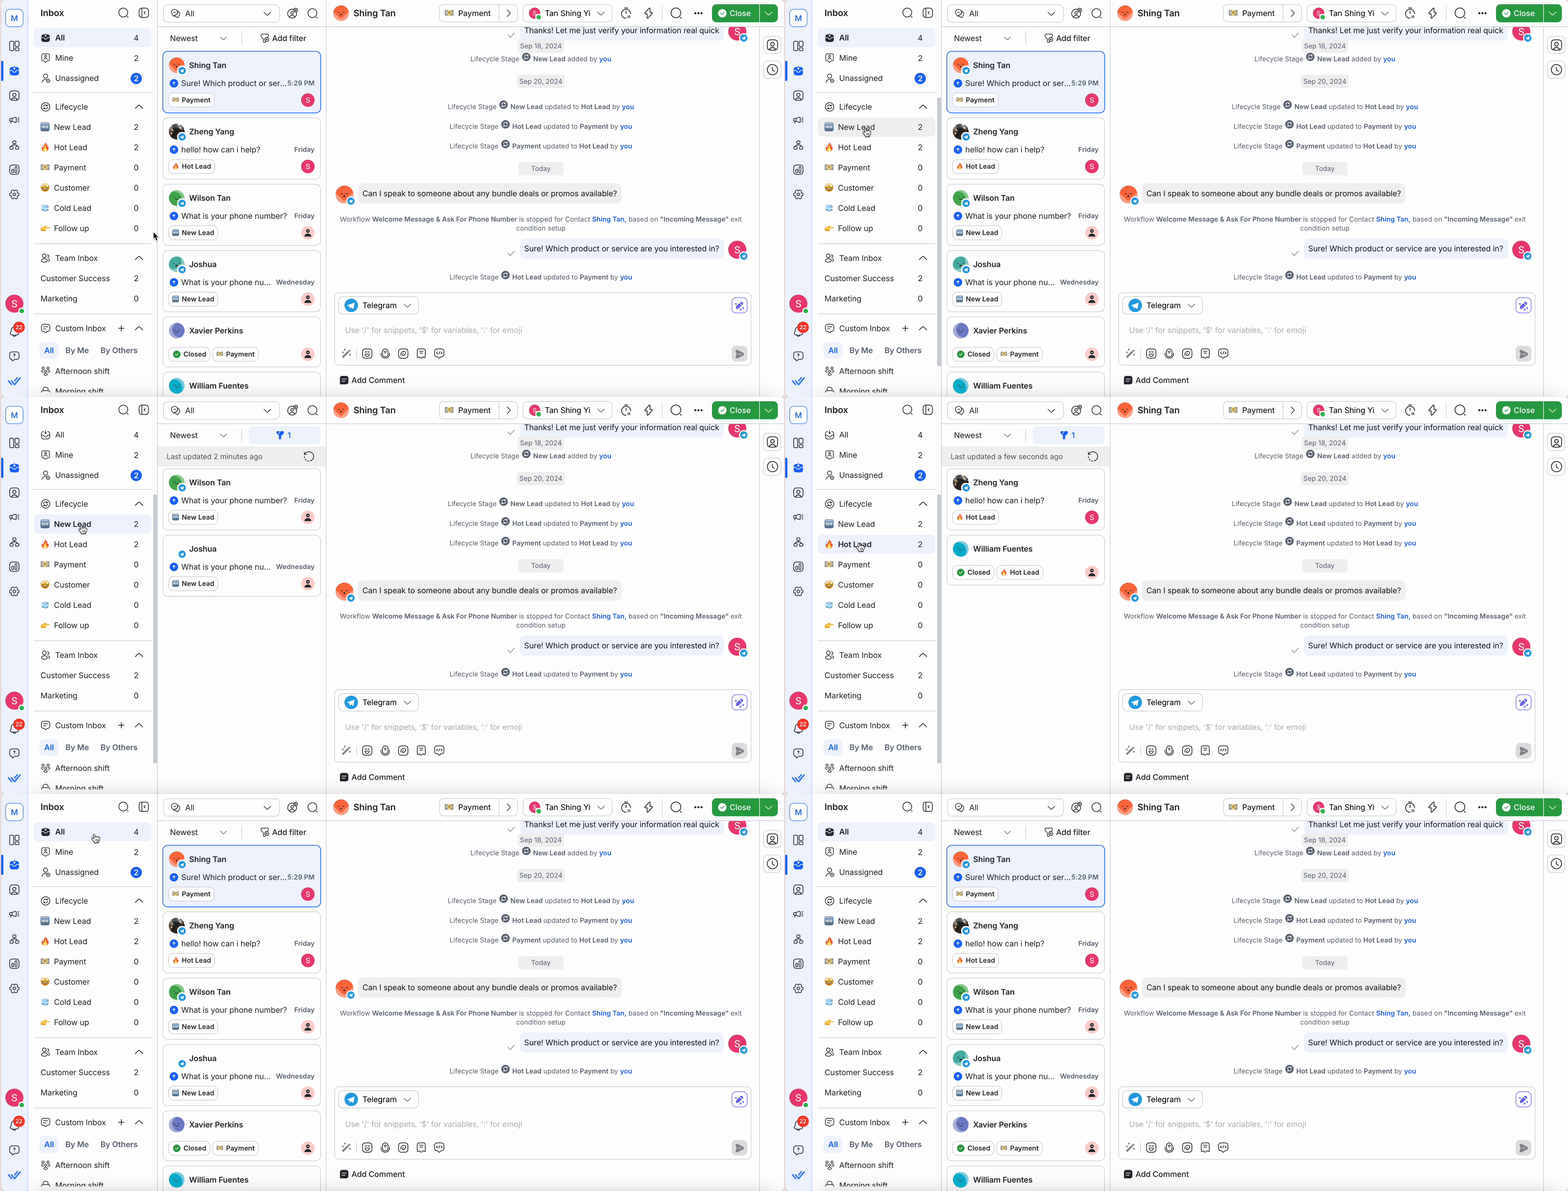
You can also filter conversations by stage, helping agents prioritize leads and focus on Contacts that are ready to move forward in the sales process.
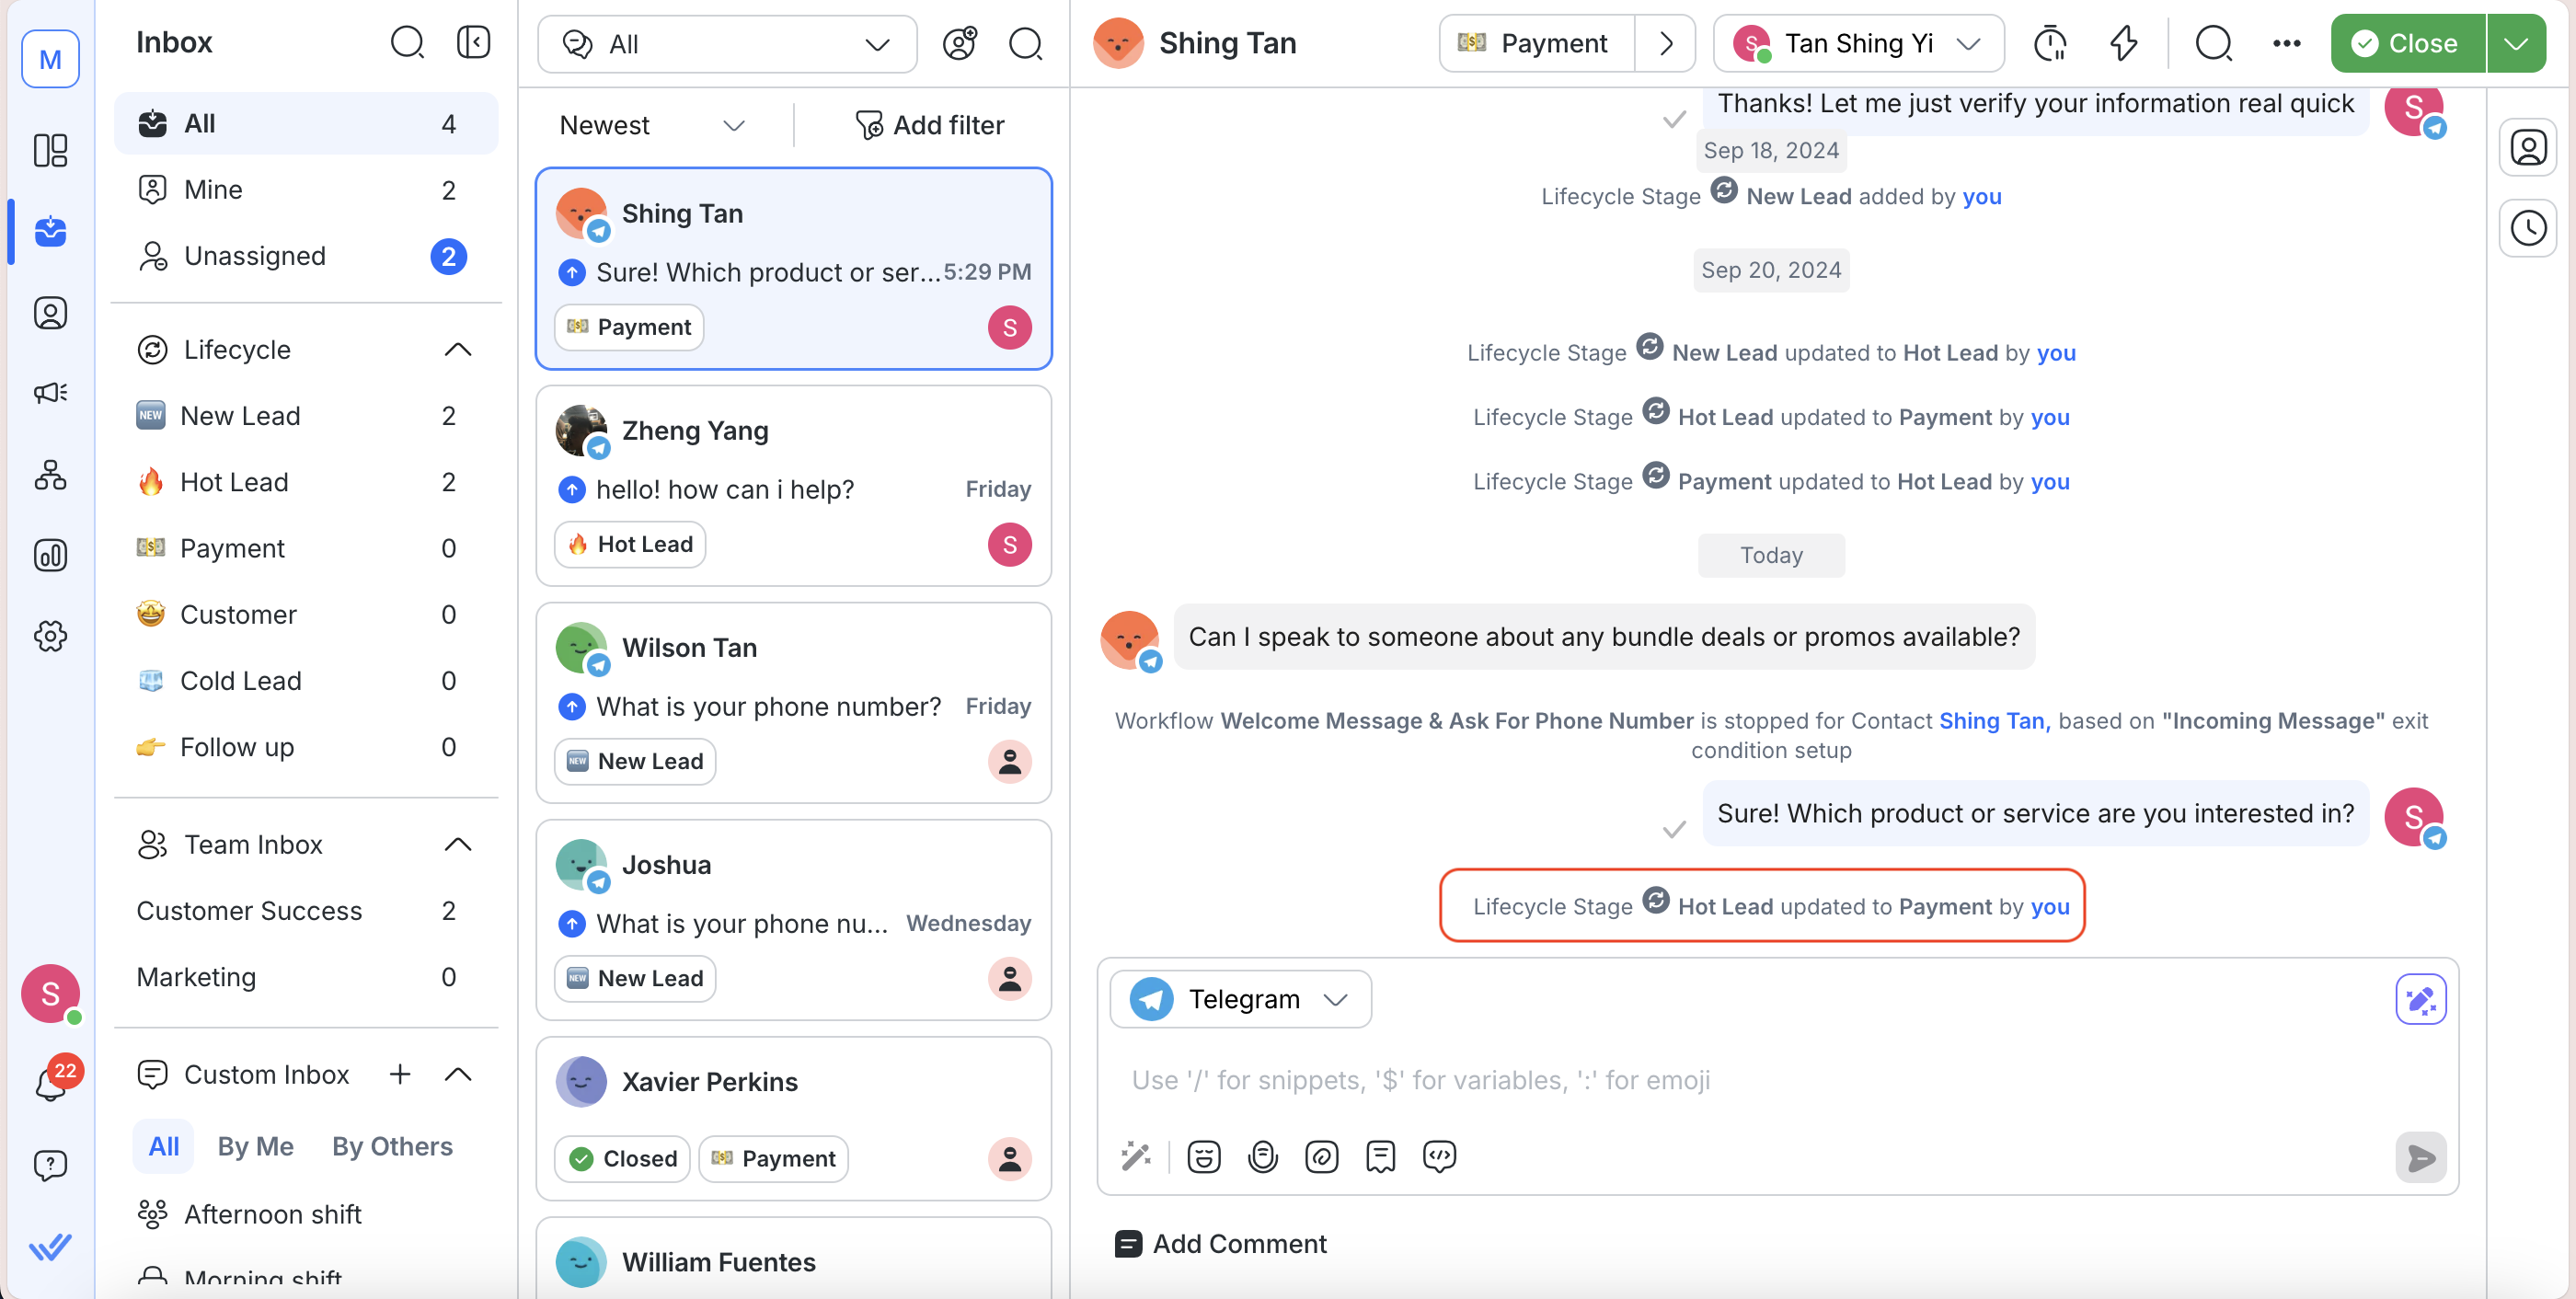
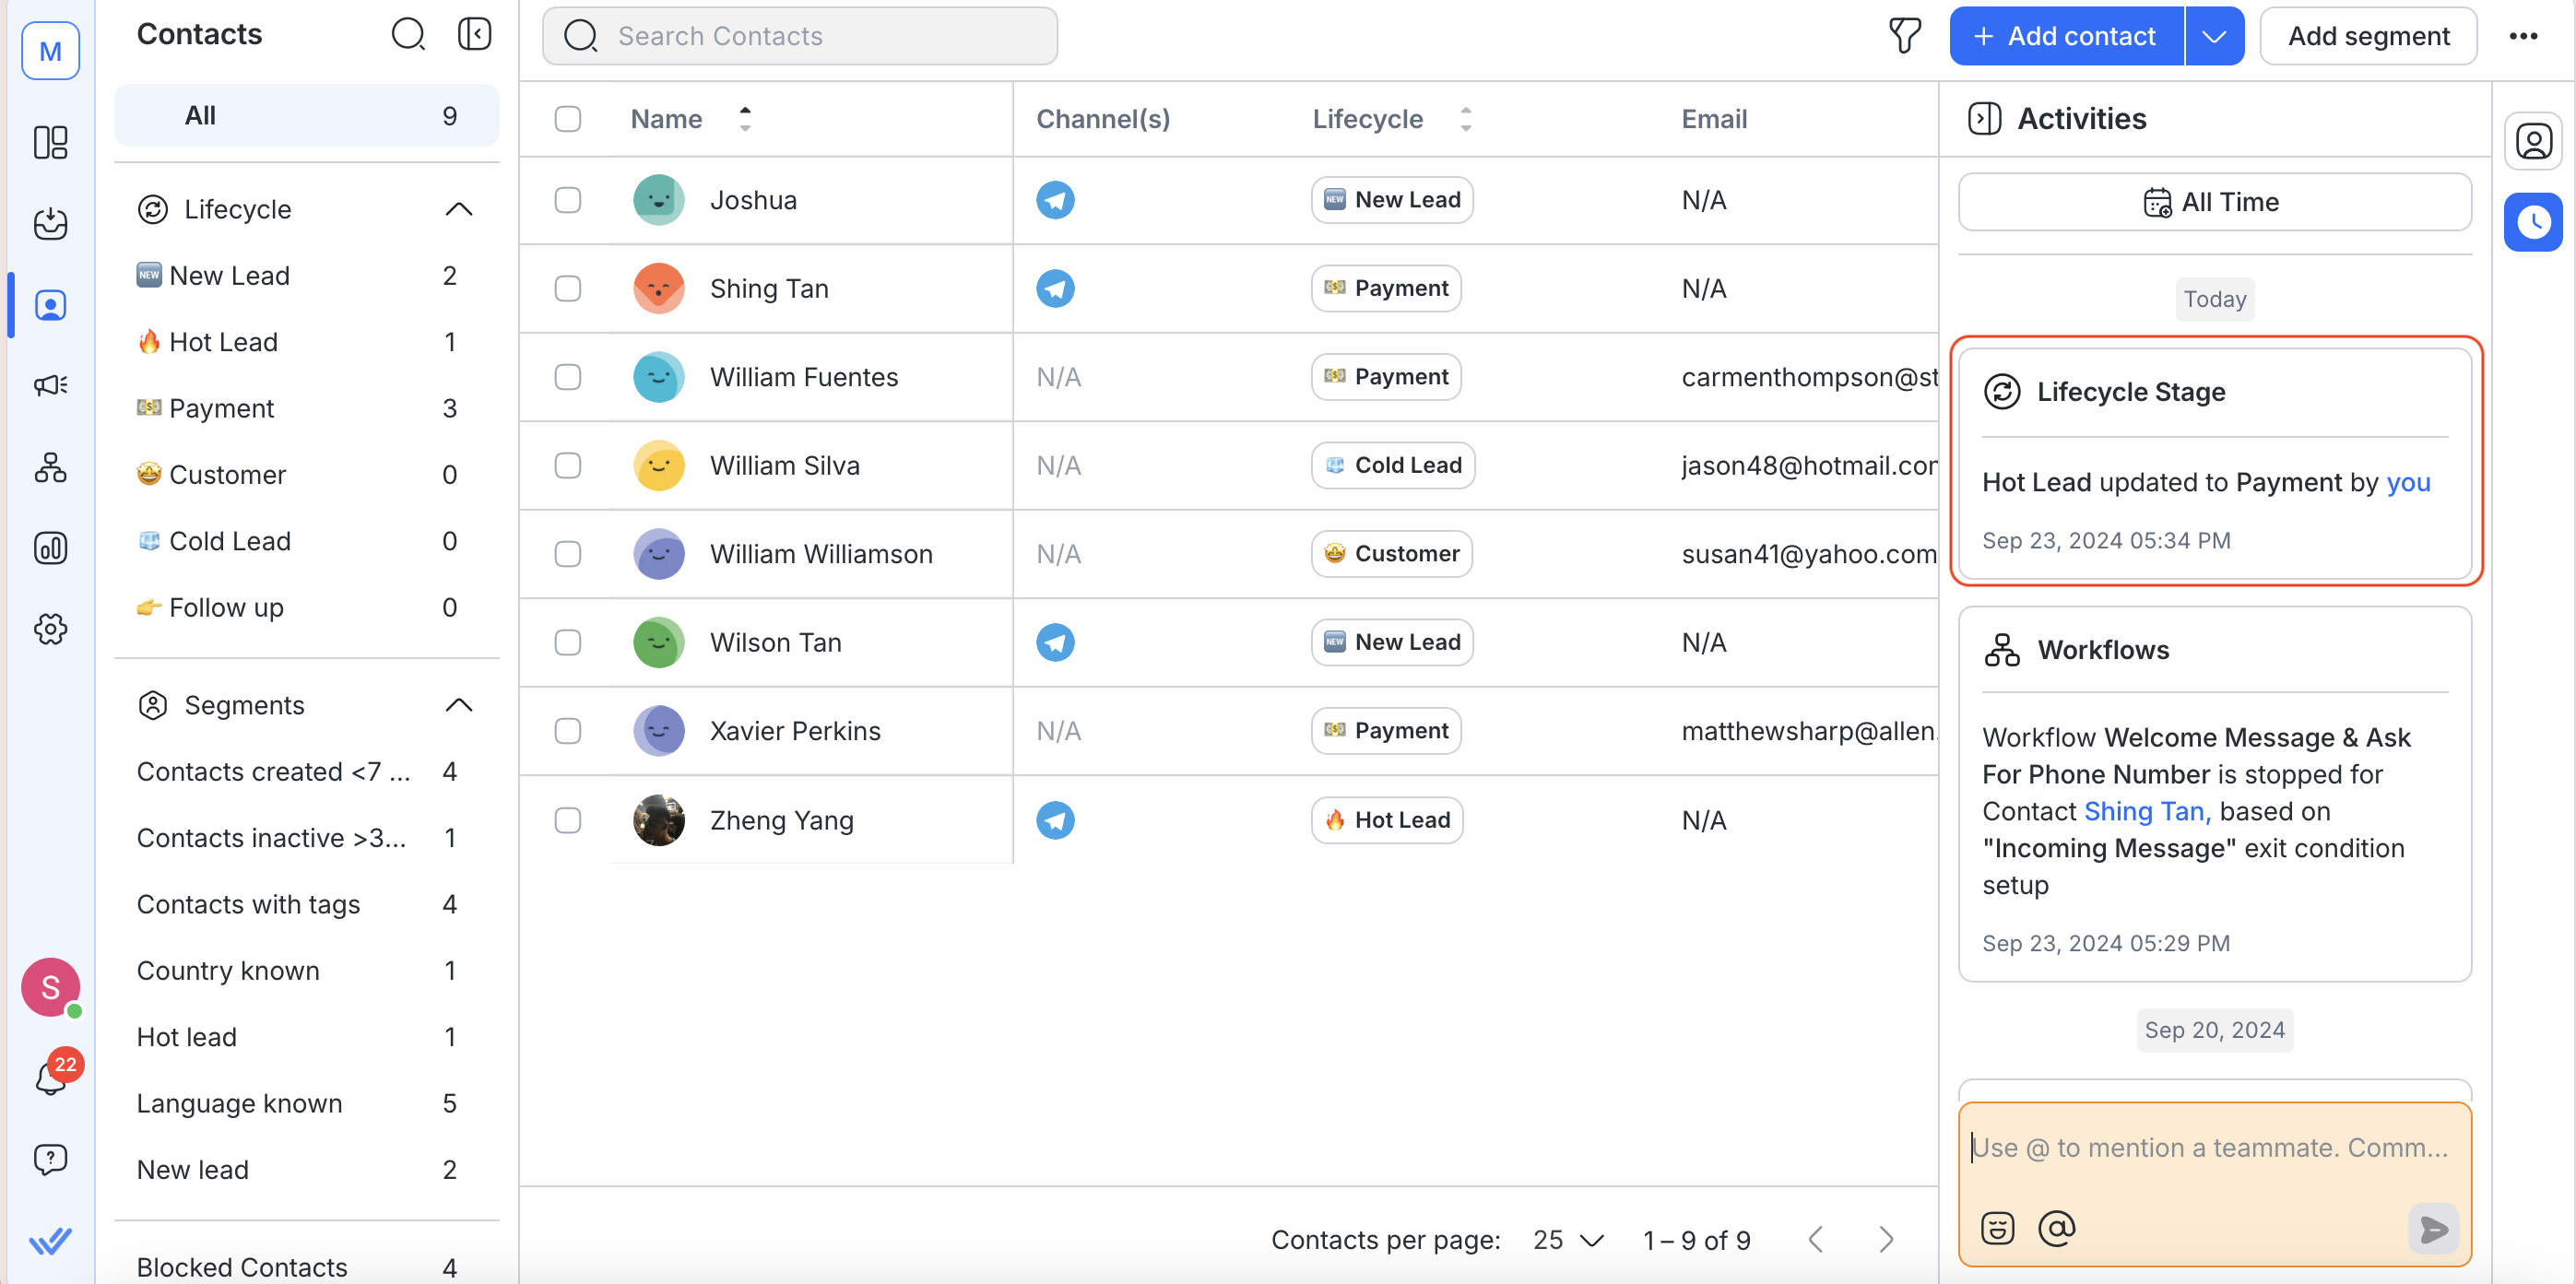
Each time a Lifecycle Stage is updated, it creates a Contact Event that logs when and by whom the change was made. This helps keep a record of every stage transition, offering transparency and clarity to your team.
See how Lifecycle works in the Inbox module once it's turned on:
Using Lifecycle in the Contacts Module
You can also view and change Stages of individual Contacts in the Contacts module.
To do this, select the Contact and the Lifecycle Stages will be displayed in the Contact details drawer. You can make changes to it as needed.
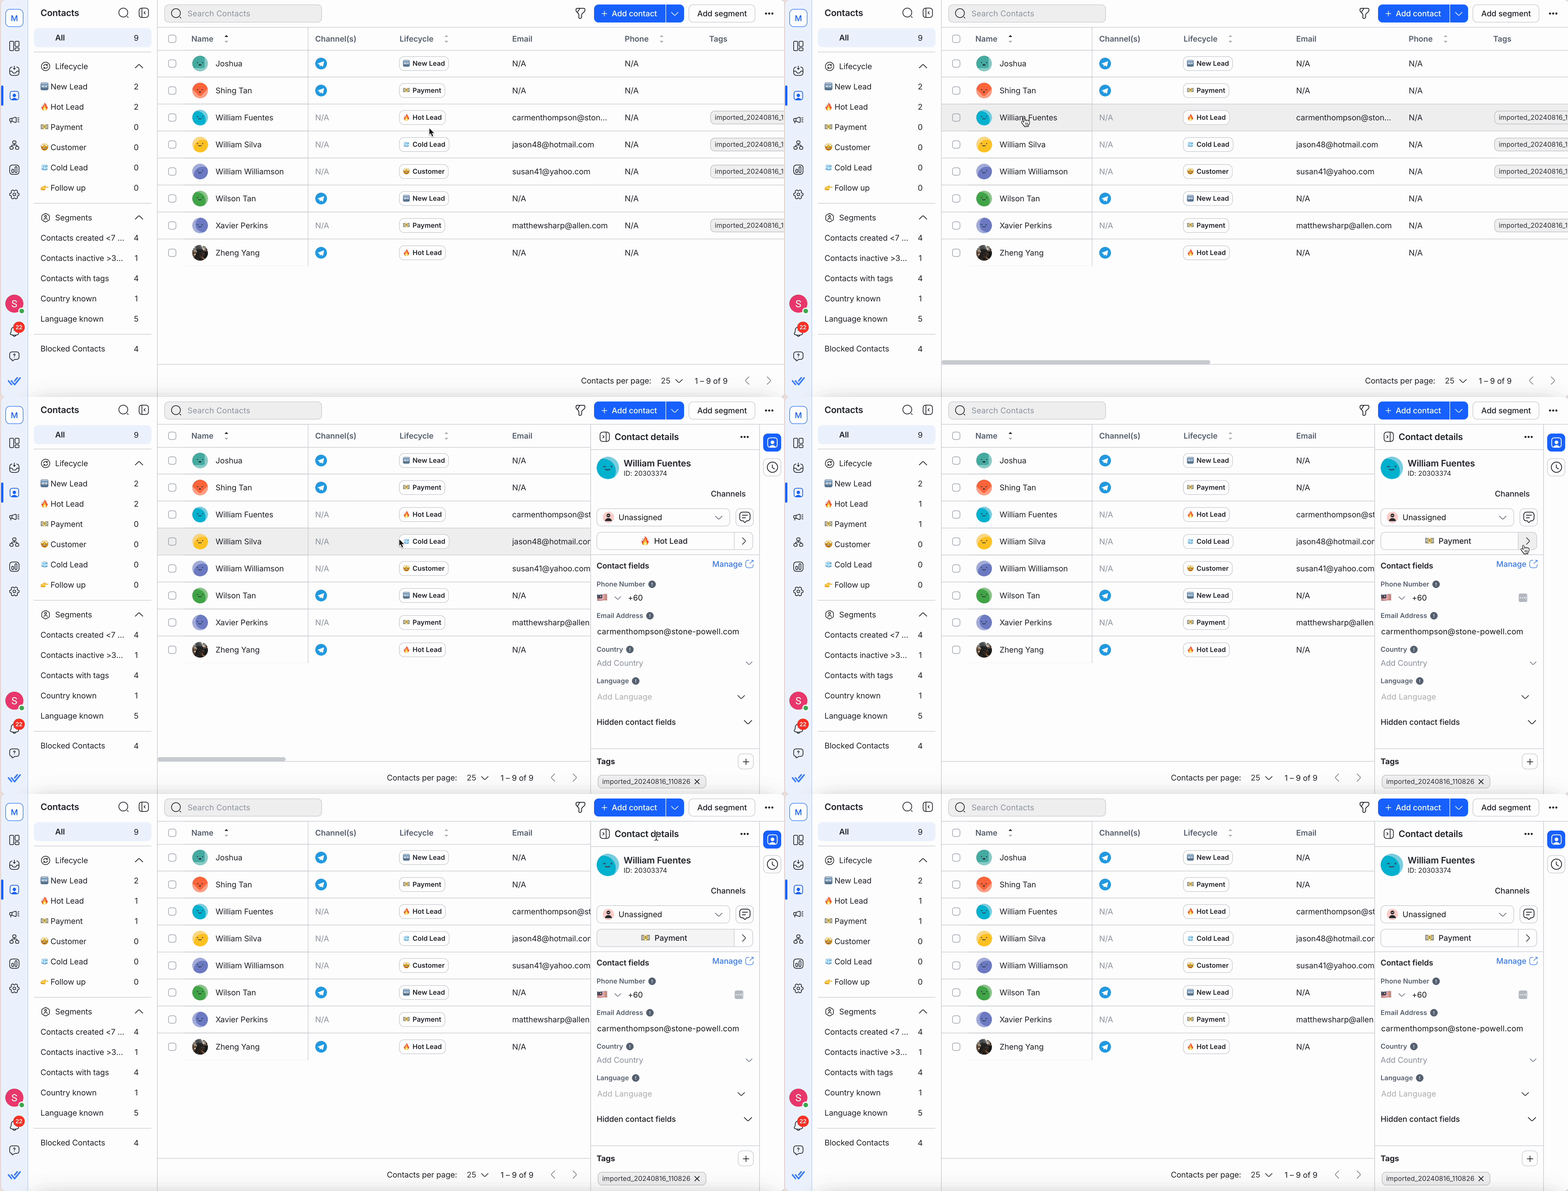
Owners and managers can also segment and filter Contacts by their Lifecycle Stage or Lost Stage, enabling better tracking of drop-offs and opportunities for re-engagement.
To filter, use the filter option to sort and view Contacts based on their current Lifecycle Stage. Using the filter option is a fast, efficient way to search and display Contacts based on their Lifecycle Stage or other criteria.
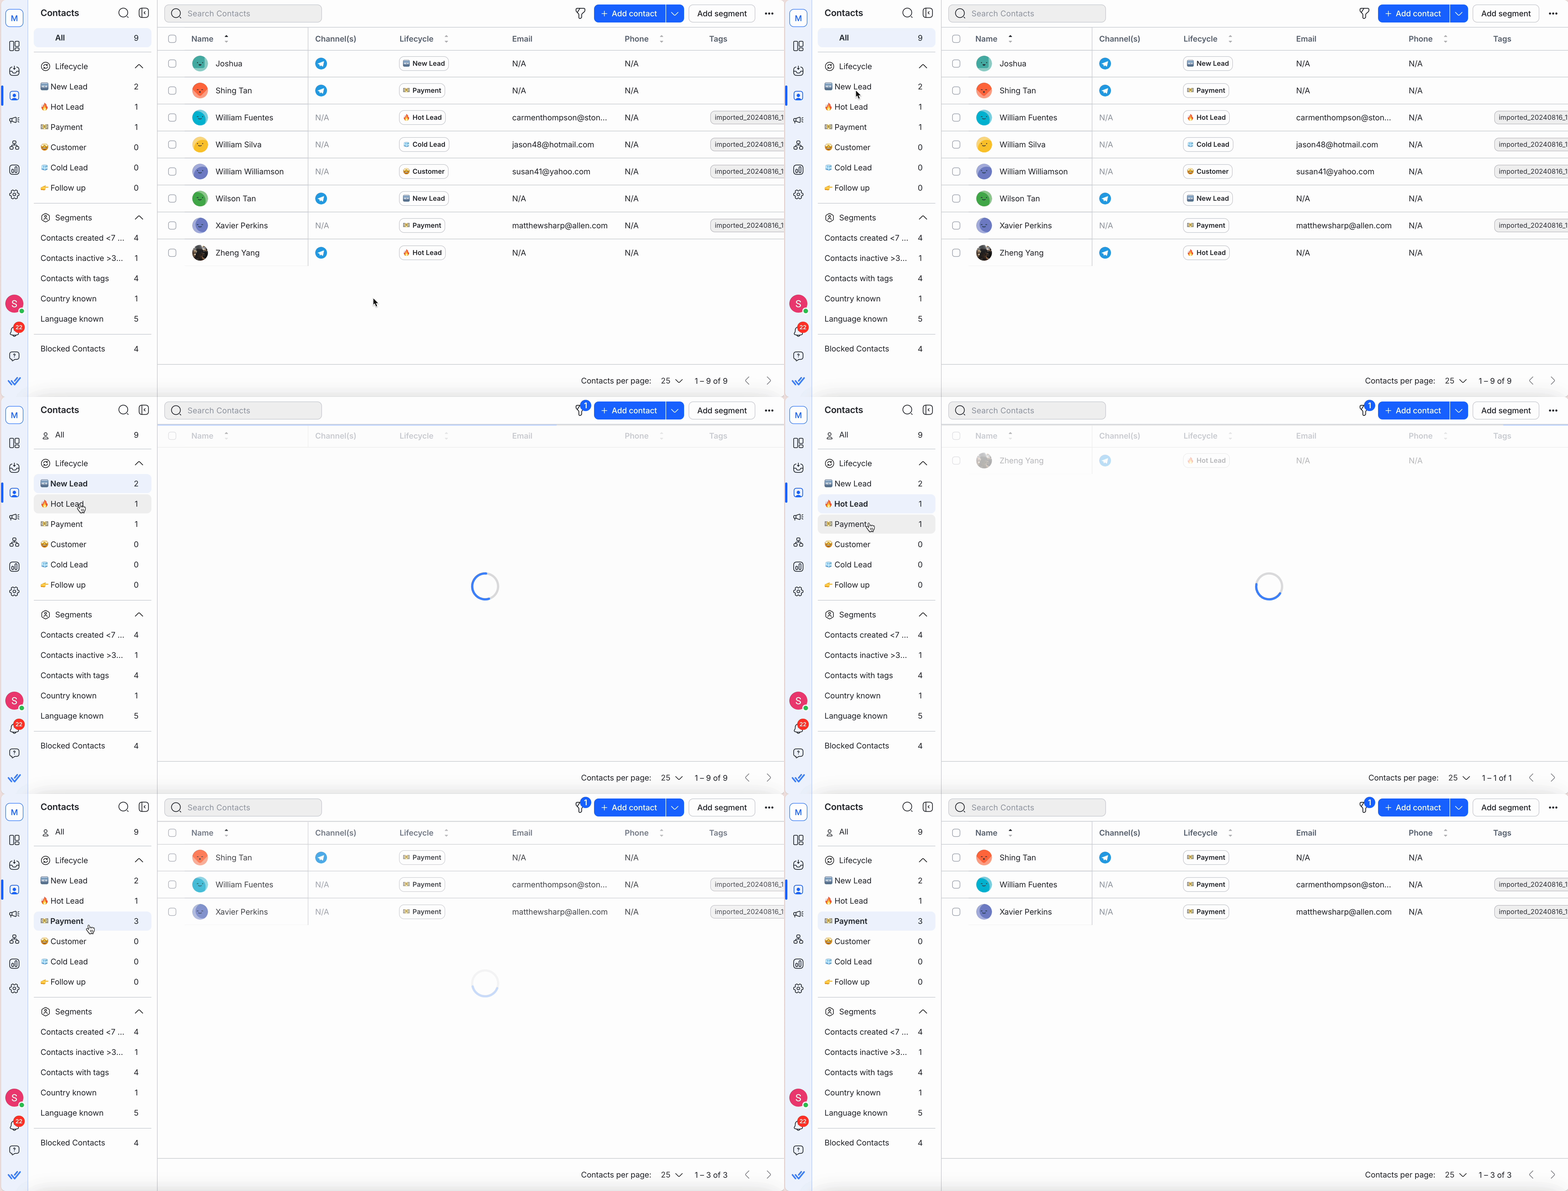
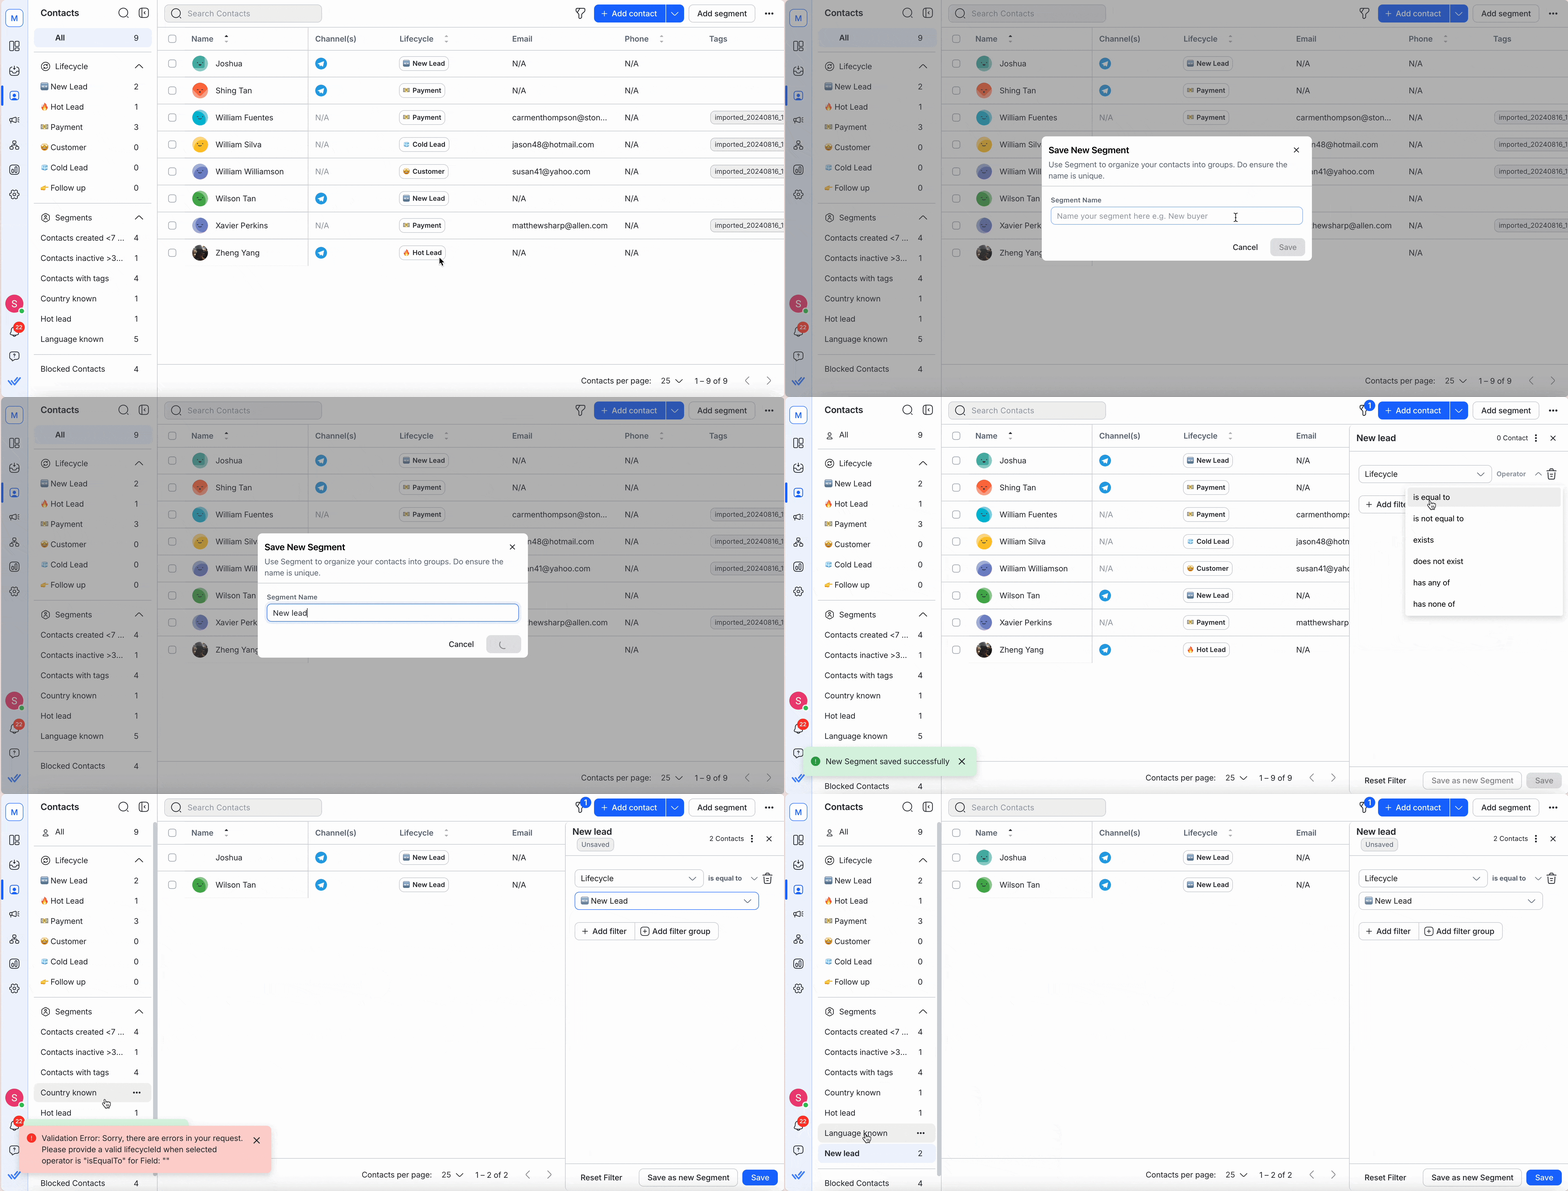
You can also create Lifecycle segments to view and filter Contacts. Segments allow you to group and manage Contacts based on their stage, offering a convenient way to stay on top of your sales pipeline.
Each time a Contact’s Lifecycle Stage is updated, it’s logged as an activity in the Contact’s Activities tab. This provides a clear record of every stage change, helping you track a Contact’s journey over time.
Lifecycle Metrics in the Dashboard
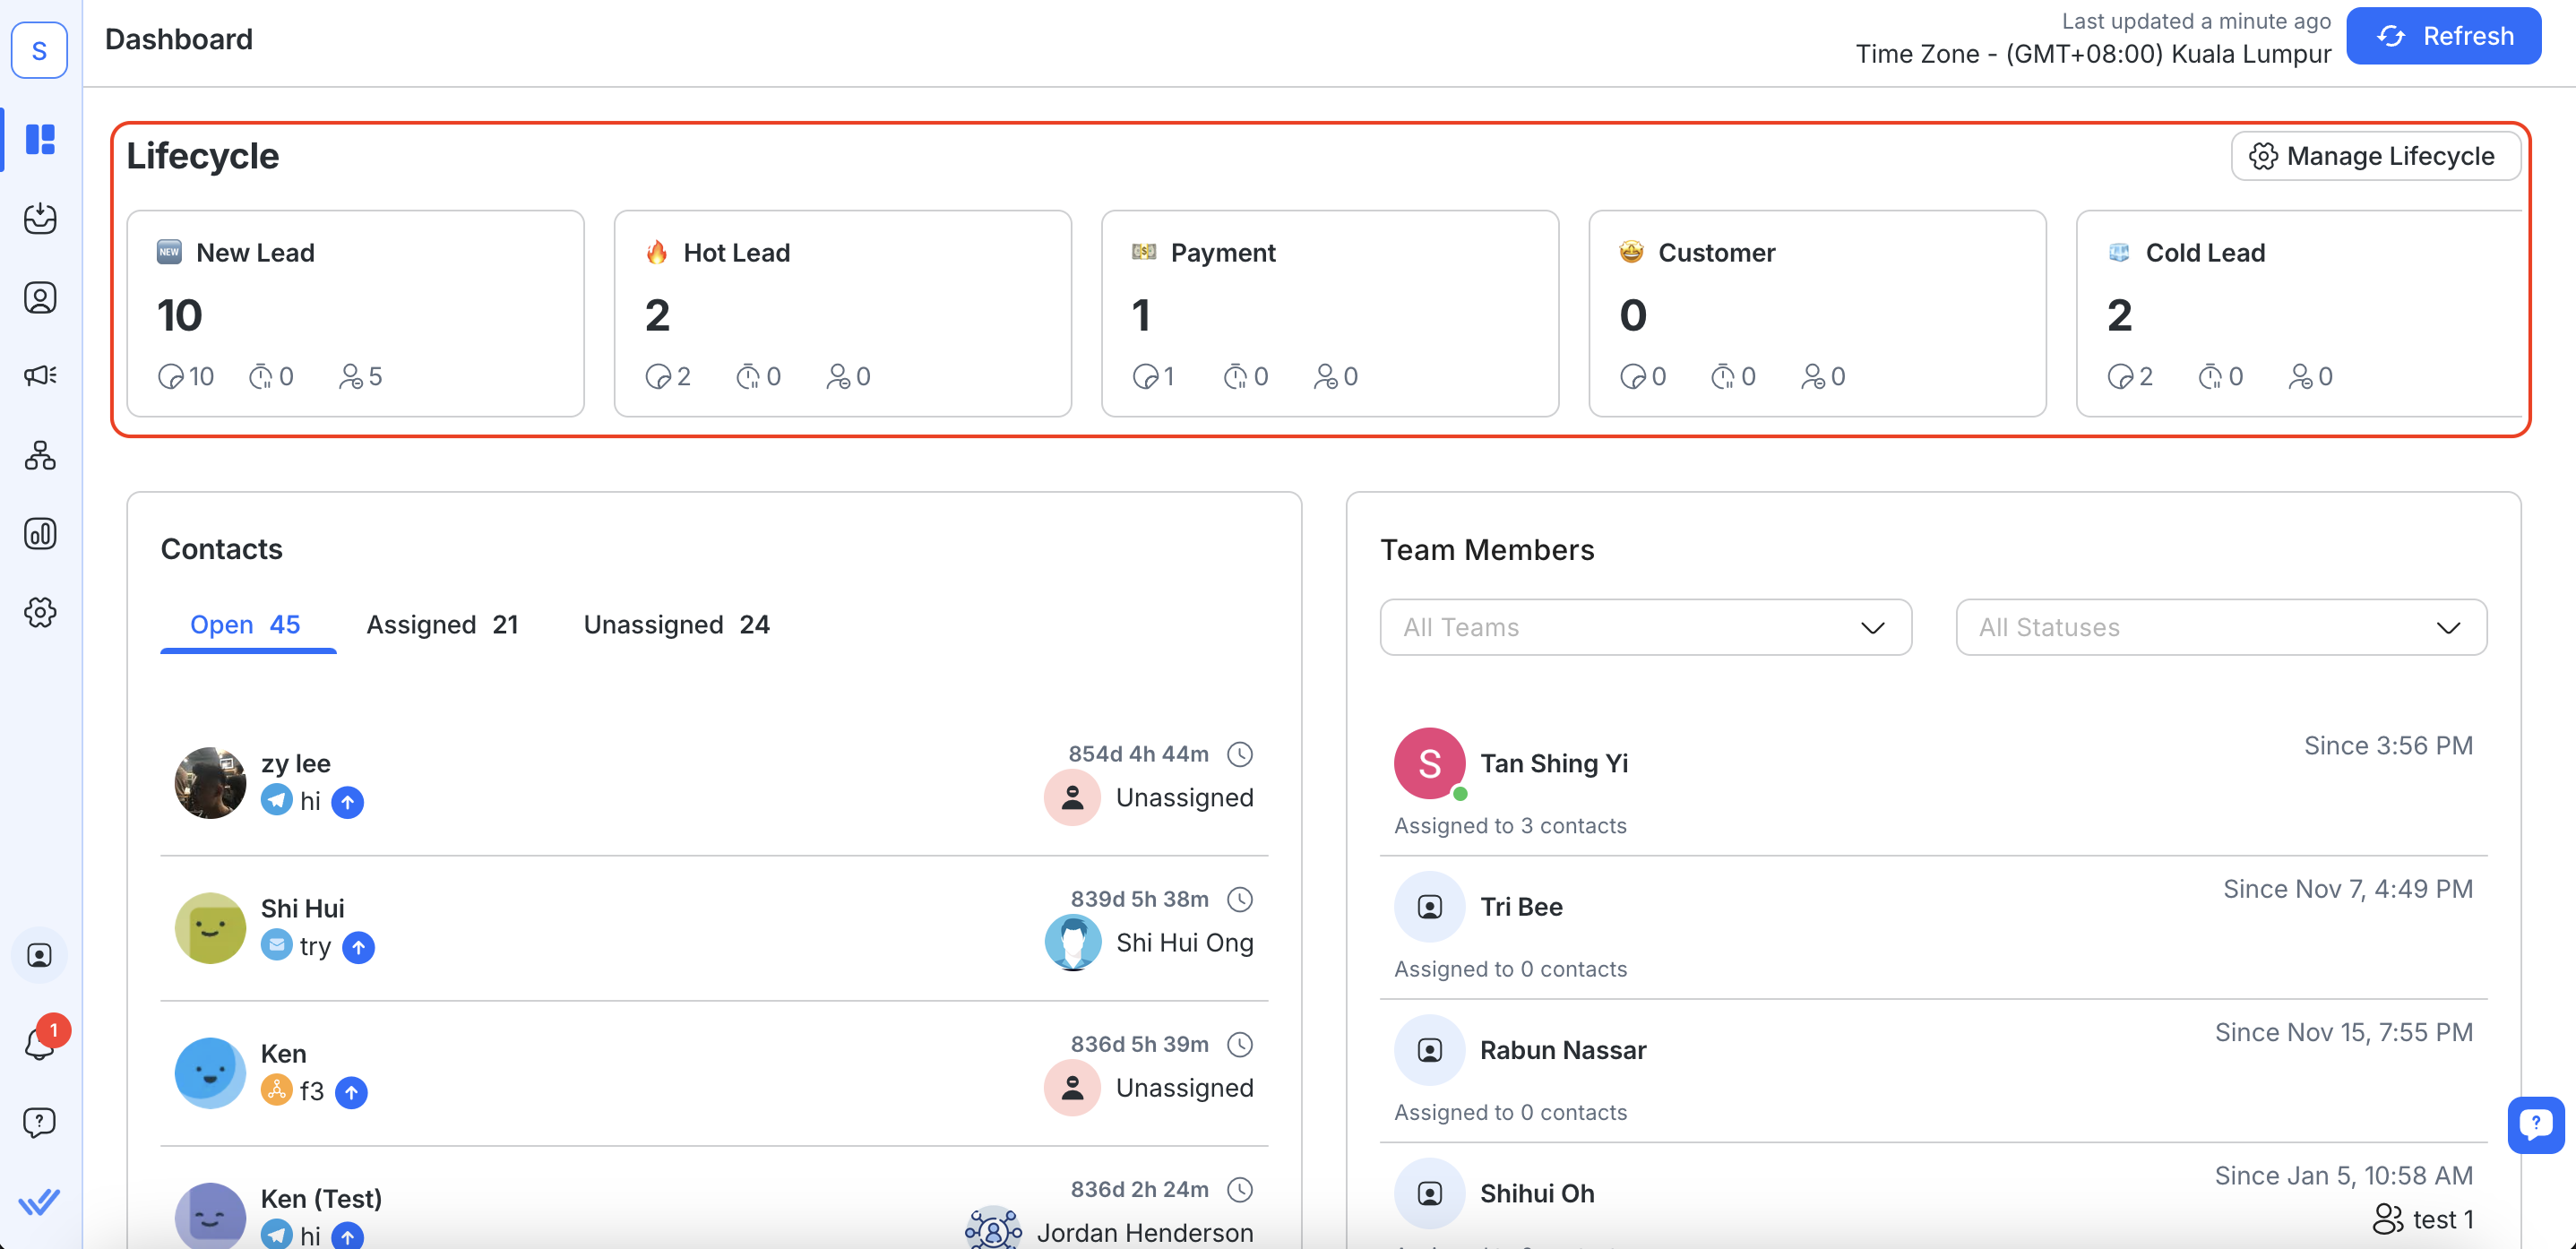
With Lifecycle metrics in the Dashboard, owners and managers can now view the distribution of Contacts across Lifecycle Stages at a glance. This includes real-time counts for each stage (excluding Lost Stages), such as the number of open, snoozed, or unassigned conversations for a given stage.
To view Lifecycle metrics:
- Navigate to the Dashboard.
- Scroll to the Lifecycle section.
- View the metrics cards for each Lifecycle Stage.
Feeling stuck? Do not fear.
Need assistance? Contact us for support. Help is here!This is the text block that will appear when the button is clicked.
Contact Import
Related Articles
Step: Update Lifecycle
Learn about best practices, use cases and how it works when implementing the Update Lifecycle Step.
How to Automate Lifecycle Tracking in Google Sheets
Learn how to track leads and optimize sales with our Lifecycle Google Sheets template.
How to improve lead targeting and automatically send purchase events to Meta when a customer makes a payment
Learn how to automatically send purchase data to Meta to eliminate spam leads, improve ad targeting, and boost ROI, all with a ready-to-use Workflow Template.
