Quick Start
What is respond.io?
Setting Up an Account
Connecting Channels
Inviting Your Teammates
Getting Contacts to Message You
Automated Welcome and Away Messages
Responding to Messages
Glossary of Terms
Channels
WhatsApp Business Platform (API) Quick Start
Getting Ready for Inbound Conversations
Getting Ready for Promotional Messaging
WhatsApp Official Business Account (Blue Tick)
Grow your WhatsApp Audience by Maximizing Entry Points
Get WhatsApp API Account for Government Agencies
WhatsApp Business Calling API
Meta Business Verification
WhatsApp Message Templates
WhatsApp Pricing
WhatsApp Business Platform (API) Channel Configuration
WhatsApp Messaging Limits
Meta Product Catalog
Change Your WhatsApp Business Display Name
Migrating from WhatsApp Personal or WhatsApp Business App
Phone Number Migration to respond.io WhatsApp Business Platform (API)
Turn-off WhatsApp Number Two-Step Verification
WhatsApp Cloud API
360dialog WhatsApp
Twilio WhatsApp
MessageBird WhatsApp
Vonage WhatsApp
Phone Number Migration to WhatsApp Cloud API
TikTok
Facebook Messenger
Facebook Messenger Overview
Facebook Messenger Quick Start
Facebook Chat Plugin
Facebook Private Replies
Facebook Message Tag
LINE
Viber
Telegram
Website Chat Widget
Website Chat Widget Overview
Website Chat Widget Quick Start
Install Website Chat Widget on WordPress
Install Website Chat Widget on Shopify
Install Website Chat Widget on Wix
Install Website Chat Widget on Joomla
Install Website Chat Widget on Squarespace
SMS
Custom Channel
Product
Dashboard & Reporting
Dashboard
Reports Overview
Reports: Conversations
Reports: Responses
Reports: Resolutions
Reports: Messages
Reports: Contacts
Reports: Assignments
Reports: Leaderboard
Reports: Users
Reports: Broadcasts
Inbox
Inbox Overview
Assignment and Closing a Conversation
Custom Inboxes
Interacting with Respond AI Prompts
Using AI Assist
Contacts
Broadcasts Module
Workflows
Workflows Overview
Workflow Triggers
Workflow Steps Overview
Step: AI Agent
Step: Send a Message
Step: Ask a Question
Step: Assign To
Step: Branch
Step: Update Contact Tag
Step: Update Contact Field
Step: Open Conversation
Step: Close Conversation
Step: Add Comment
Step: Jump To
Step: Date & Time
Step: Wait
Step: Trigger Another Workflow
Step: HTTP Request
Step: Add Google Sheets Row
Step: Send TikTok Lower Funnel Event
How to Avoid Workflow Loops
Step: Update Lifecycle
Step: Send Conversions API Event
Dynamic Variables
Workspace Settings
Managing a Workspace
General info (previously General)
User settings (previously Users)
Teams (previously Team Settings)
Channels
Growth Widgets
Contact Fields
Integrations
Respond AI
Closing Notes
Snippets
Tags
Files
Data Export
Contact Import
Lifecycle
Organization Settings
Organization Overview
Account info (previously General)
Admin Settings (previously Users)
Workspaces
WhatsApp Fees
Billing & Usage
Security
User Account
Mobile App
Installing respond.io Mobile App
Messaging From Your Mobile
Managing Notifications On Your Mobile
Configuring mobile app settings
Help Menu
Conversation Led Growth
Capture Leads
How to Collect Contacts’ Emails and Phone Numbers
How to Route Contacts from CTC Ads to Agents
How to Send Outbound Sales Messages
How to Track Conversation Source from Multiple Websites
How to Enrich Customer Data from a CRM or other Business Software
Convert Leads
How to Automate Product Info Sharing in Conversations Initiated via CTC Ads
How to Automatically Qualify Contacts Based on Budget Using AI Agent
Assignment Strategy: How to Automate Contact Distribution & Load Balancing
How to Maximize Customer Service Potential with AI Agent
How to Automate Contact Information Collection with AI
How to Block Contacts and Manage Spam
How to Create Automated Welcome and Away Messages
How to Create Automated Chat Menus
How to Route Contacts to Preferred AI Agent
How to Route Contacts by their Preferred Language
How to Route Contacts by Team Functions
How to Route Contacts by Shifts
Assignment Strategy: How to Unassign Agents after Conversations Closed
How to Get Contacts’ Consent for Personal Data Collection
How to Promptly Transfer Conversation Between Agents
How to Guide Customers from Exploration to Purchase with Engaging Menus
How to Optimize Customer Onboarding with Automated & Customized Welcome Messages
How to Streamline Meeting Scheduling via CTC Ads
How to Get a Complete View of the Customers
How to Simplify Customer Escalation with Automation
How to Transfer Contacts to the Next Shift Automatically
How to Optimize Agents’ Productivity in the Inbox Module
How to Write an Optimal AI Persona (Best Practices)
How to Write the Best Knowledge Sources for AI Agents
How to Align AI Conversations with Your Brand Voice
How to Draft Customer Replies with AI
How to Convert Image to Text Using AI
How to Automate Calculations Using AI
How to Automate Lifecycle Tracking in Google Sheets
Retain Customers
How to Route New and Returning Contacts
How to Route VIP Contacts
How to Send CSAT to Customer and Save Data in Google Sheets or CRMs
How to Send Outbound Support Messages
How to improve lead targeting and automatically send purchase events to Meta when a customer makes a payment
Reporting and Analytics
Broadcasts Use Cases
How to Send a Simple Broadcast
How to Start a Workflow Based on Broadcast Response
How to Import to Broadcast via WhatsApp
How to Troubleshoot a Failed Broadcast
Integrations
Dialogflow
Dialogflow Overview
Dialogflow: Connecting to Dialogflow
Dialogflow: Creating a Chatbot
Dialogflow: Managing Intents
Dialogflow: Parameters
Dialogflow: Events
Dialogflow: Response Templates
Dialogflow: Custom Payloads
Dialogflow: Fulfillment Webhook Request
Zapier
E-Commerce Integration: Shopify
E-Commerce Integration: BigCommerce
E-Commerce Integration: WooCommerce
E-Commerce Integration: Magento
CRM Integration: HubSpot
CRM Integration: Salesforce
CRM Integration: Pipedrive
CRM Integration: ActiveCampaign
Zapier
Make
Meta Business Accounts
TikTok Messaging Ads Integration
Developer API
HubSpot
Webhooks
Salesforce
Table of Contents
- Home
- Conversation Led Growth
- Convert Leads
- How to Automatically Qualify Contacts Based on Budget Using AI Agent
How to Automatically Qualify Contacts Based on Budget Using AI Agent
 Updated
by Sana
For businesses managing a high volume of incoming leads, sales agents may face challenges in promptly identifying those with a higher likelihood of conversion. This may result in agents occasionally investing time in leads that are not viable, potentially missing opportunities with more promising leads. To mitigate this risk, an AI Agent is utilized to promptly qualify leads, allowing for prioritization based on lead quality.
Benefits of Automated Collection of Information
Qualify Contacts by budget via AI Agent because:
- Facilitate contact conversion by automating the qualification process.
- Reduce manual effort required to sort and tag qualified Contacts.
- Handle basic Contact queries using AI.
Workflow Setup
To use the Lead Qualification via AI/Lead Qualification via AI: Click to Chat Ads workflow template, download one of these JSON files:
click + Add Workflow > Click Lead Qualification with AI or Lead Qualification with AI: Click to Chat Ads > Use Template in the Workflows module.
- Trigger: The Workflow starts when a conversation is opened by the Contact by sending a message or by clicking a Click to Chat Ad.
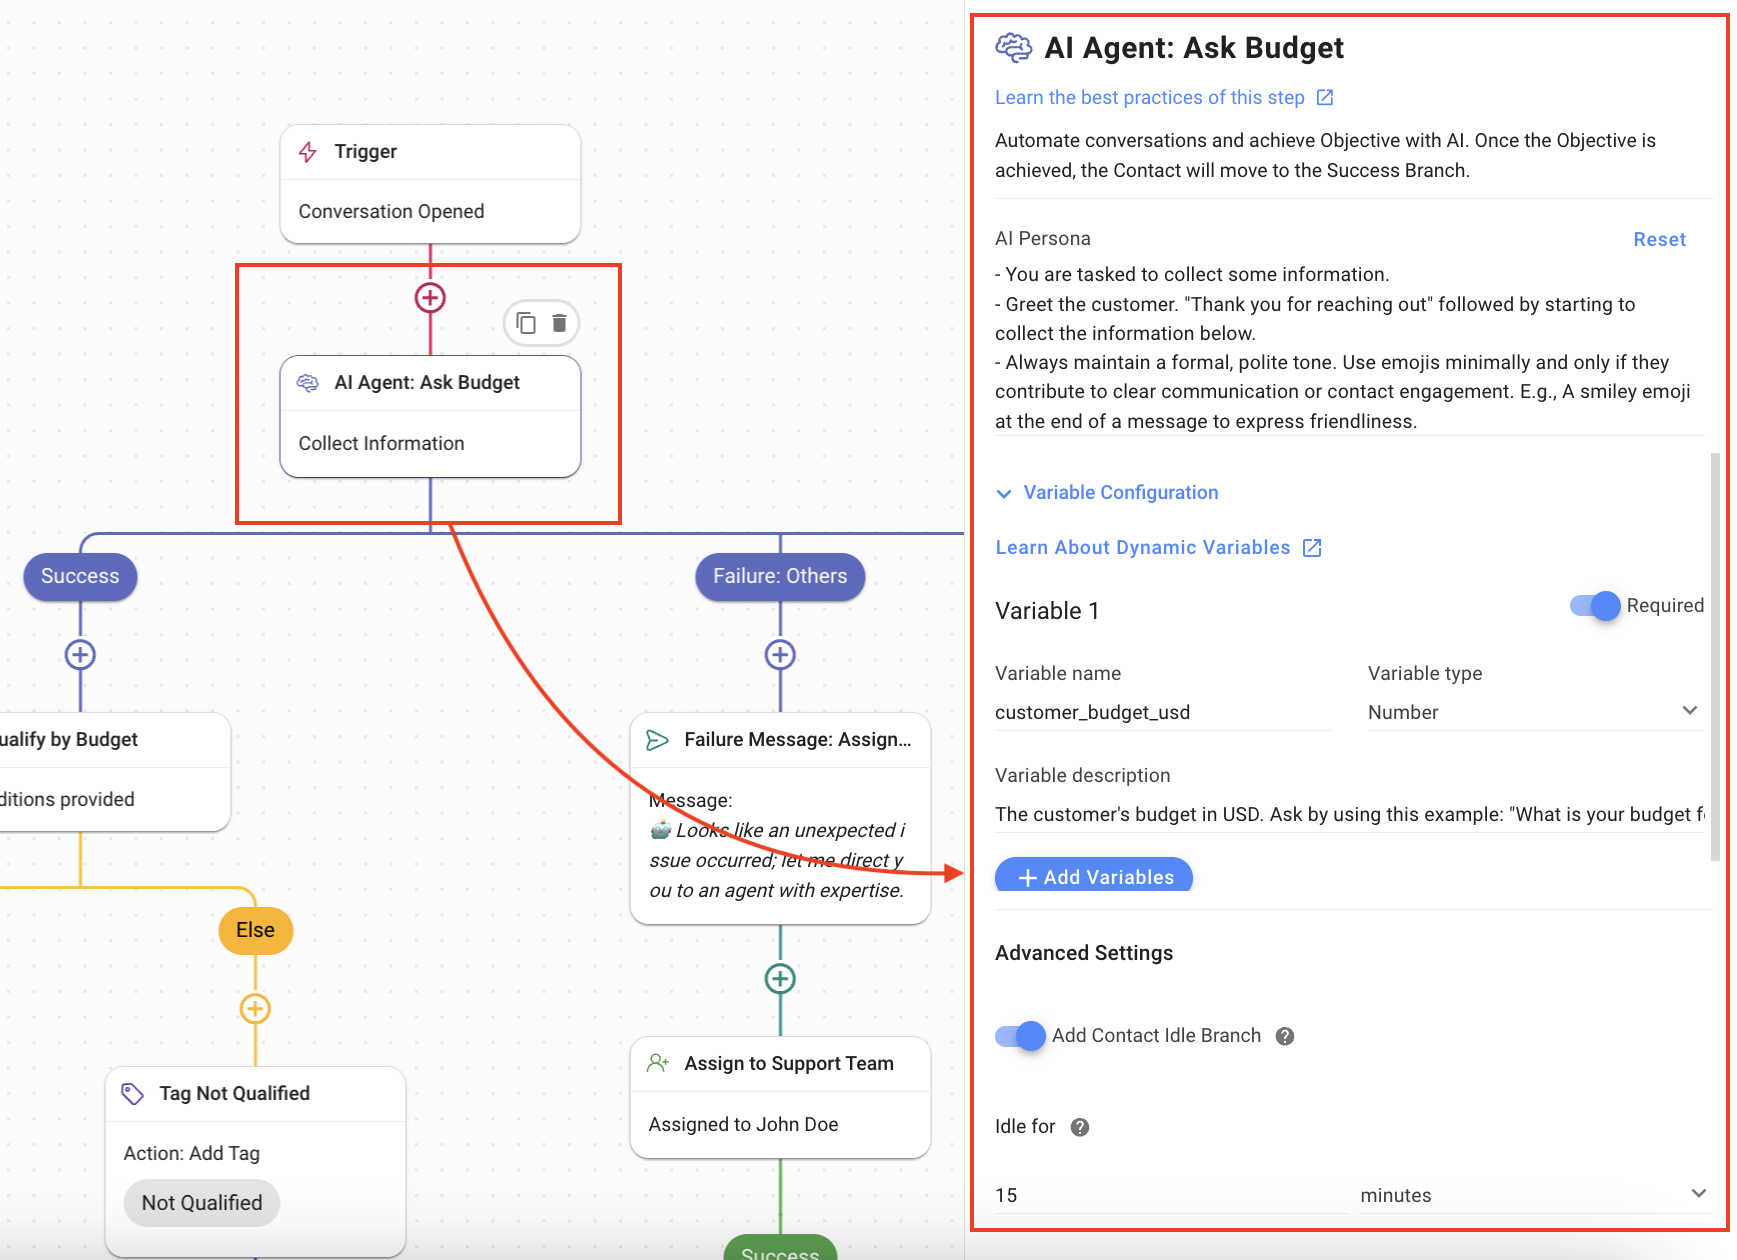
- AI Agent: Ask Budget: The AI Agent Step is used to find out what the Contact’s budget is for the service. The following settings were used:
- AI Persona: The persona ensures that the AI Agent starts the conversation, greets the Contact and then immediately collects the required information. All of this is done while maintaining a formal but polite tone.
- Variable: The Contact’s budget information is saved in a variable, customer_budget_usd.
- Variable name: customer_budget_usd
- Variable type: Number
- Variable description: The budget is in USD.
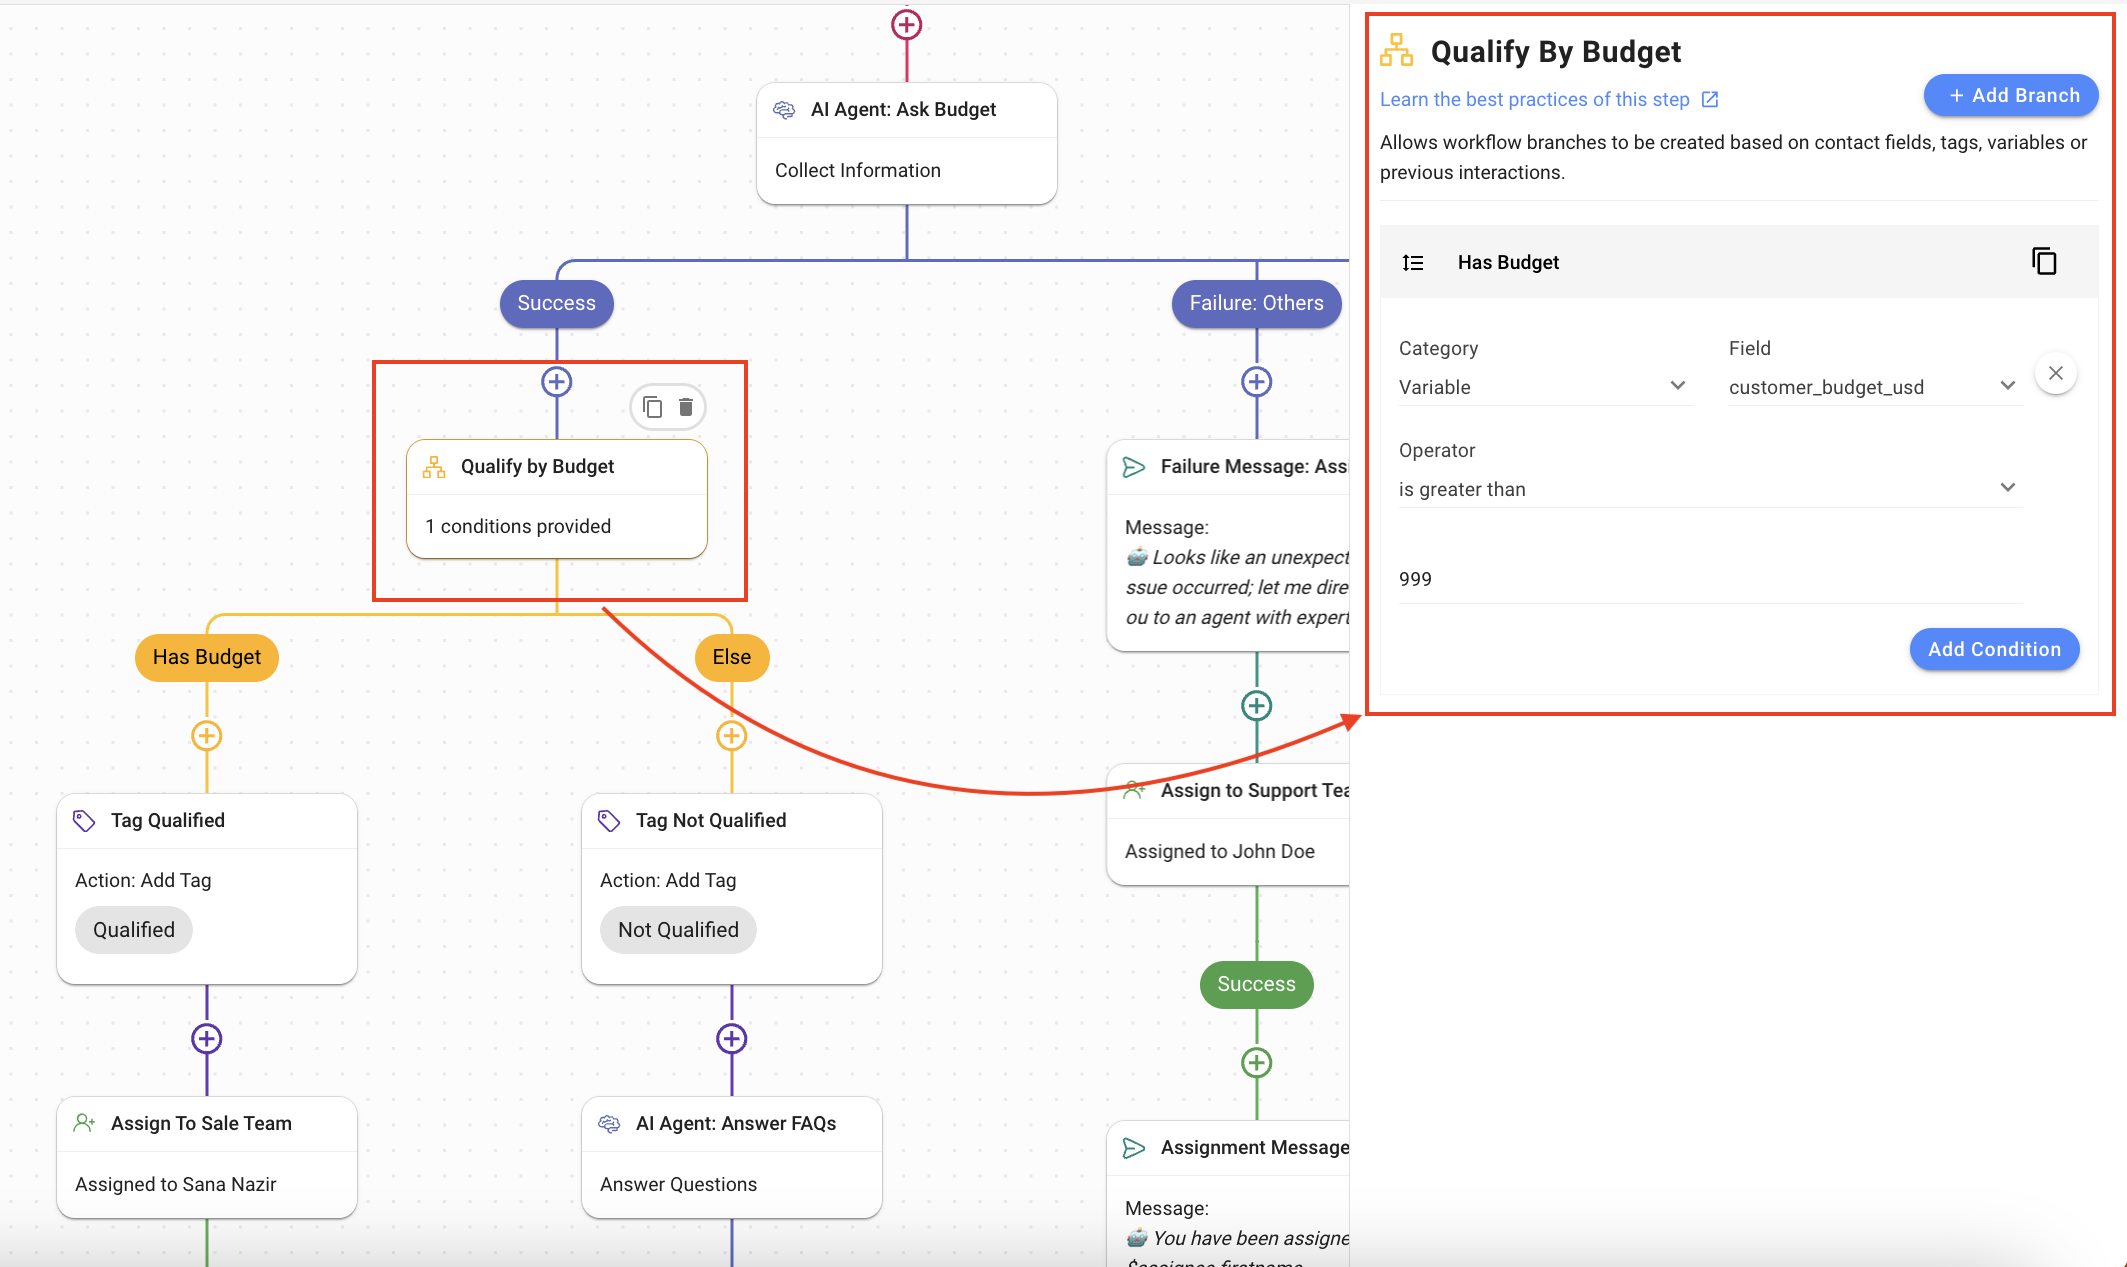
- Qualify by Budget: The Branch Step is used to check if the budget provided is enough for the service. In this workflow template, a minimum budget of 1000 USD is required. The settings used are:
- Category: Variable
- Field: customer_budget_usd
- Operator: is greater than
- the minimum budget required; 1000 USD (and above). You can use the currency and number that best suits your service.
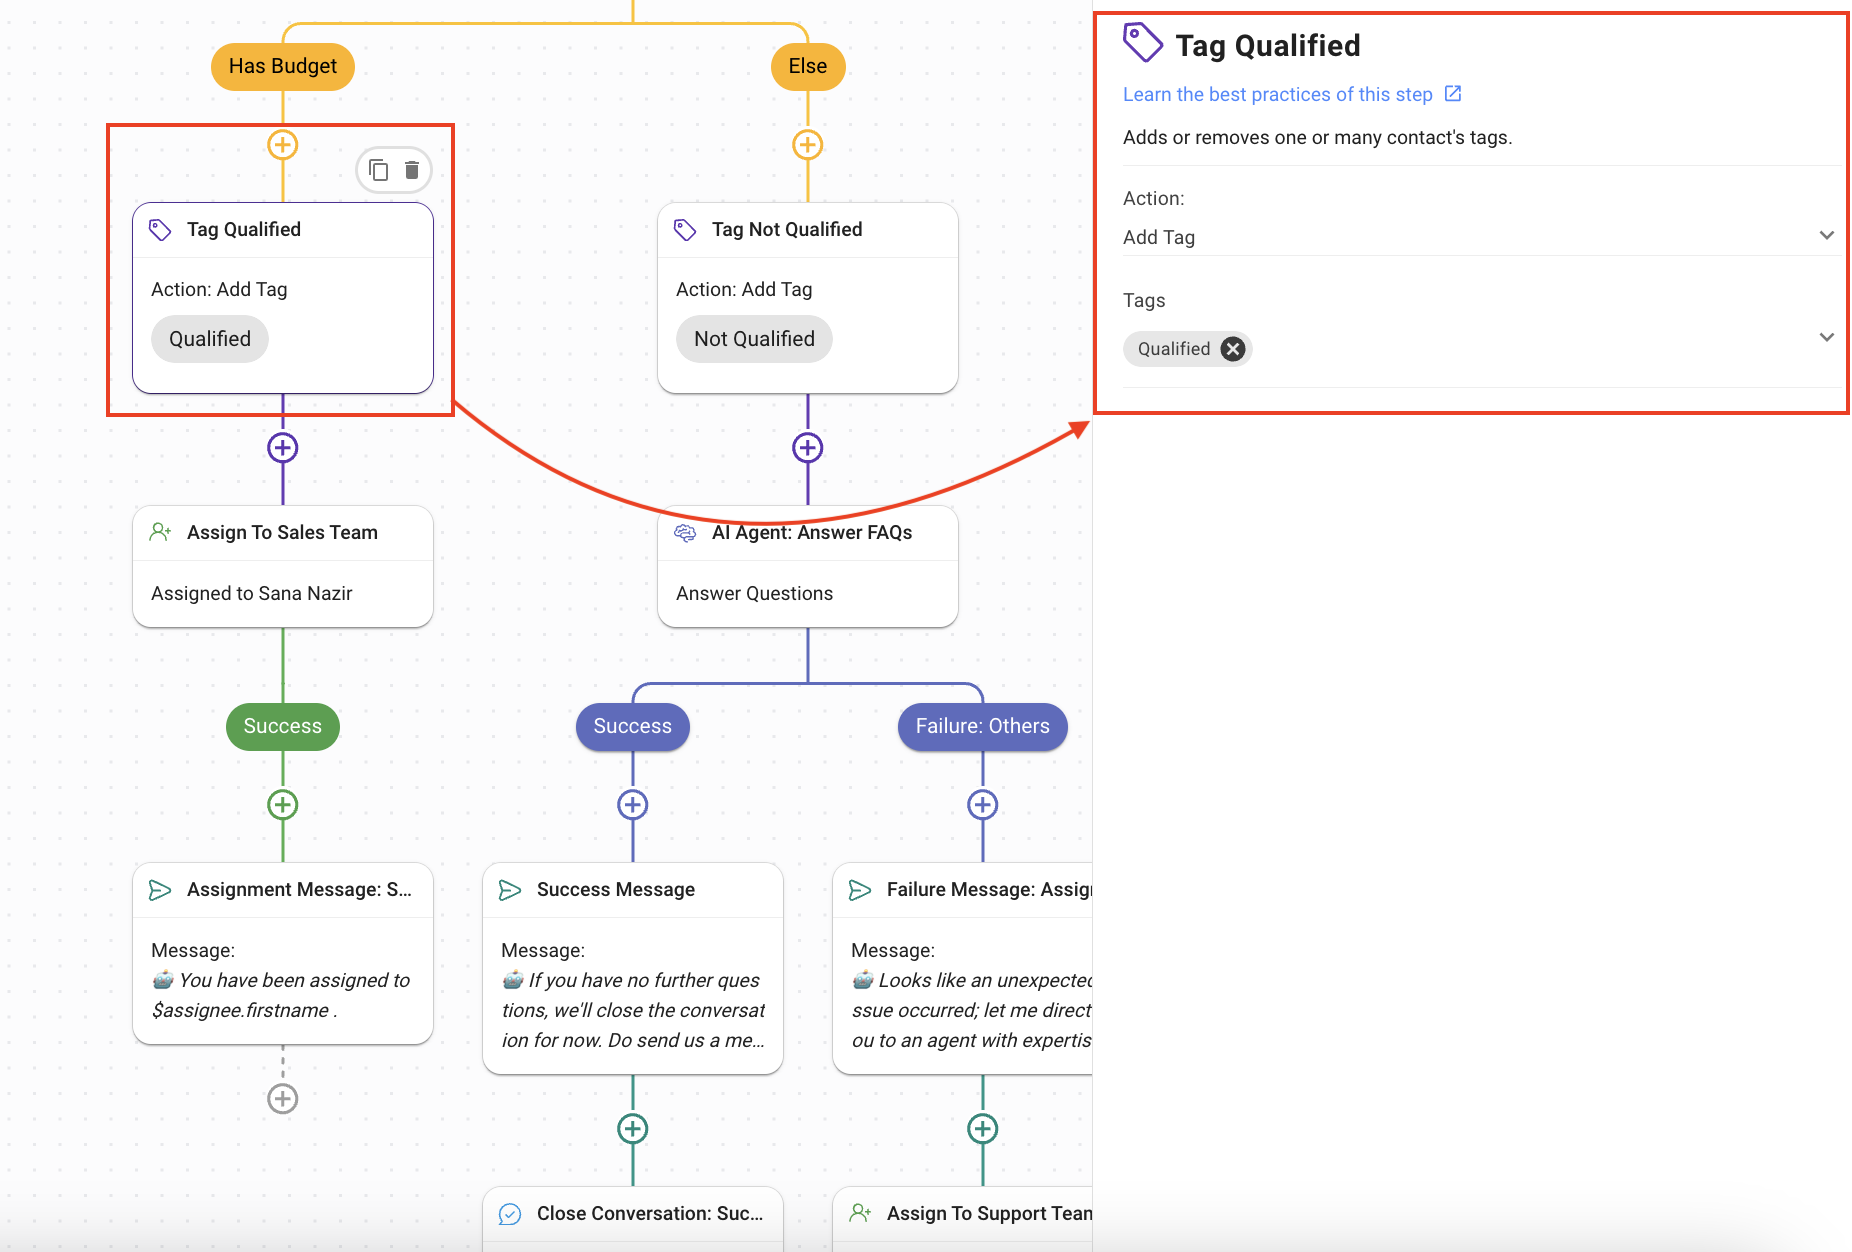
- Has Budget: This branch handles the situation when the budget specified by the Contact is greater than 900 USD.
- Tag Qualified: Using the Update Contact Tag Step, the Contact is tagged as “Qualified”.
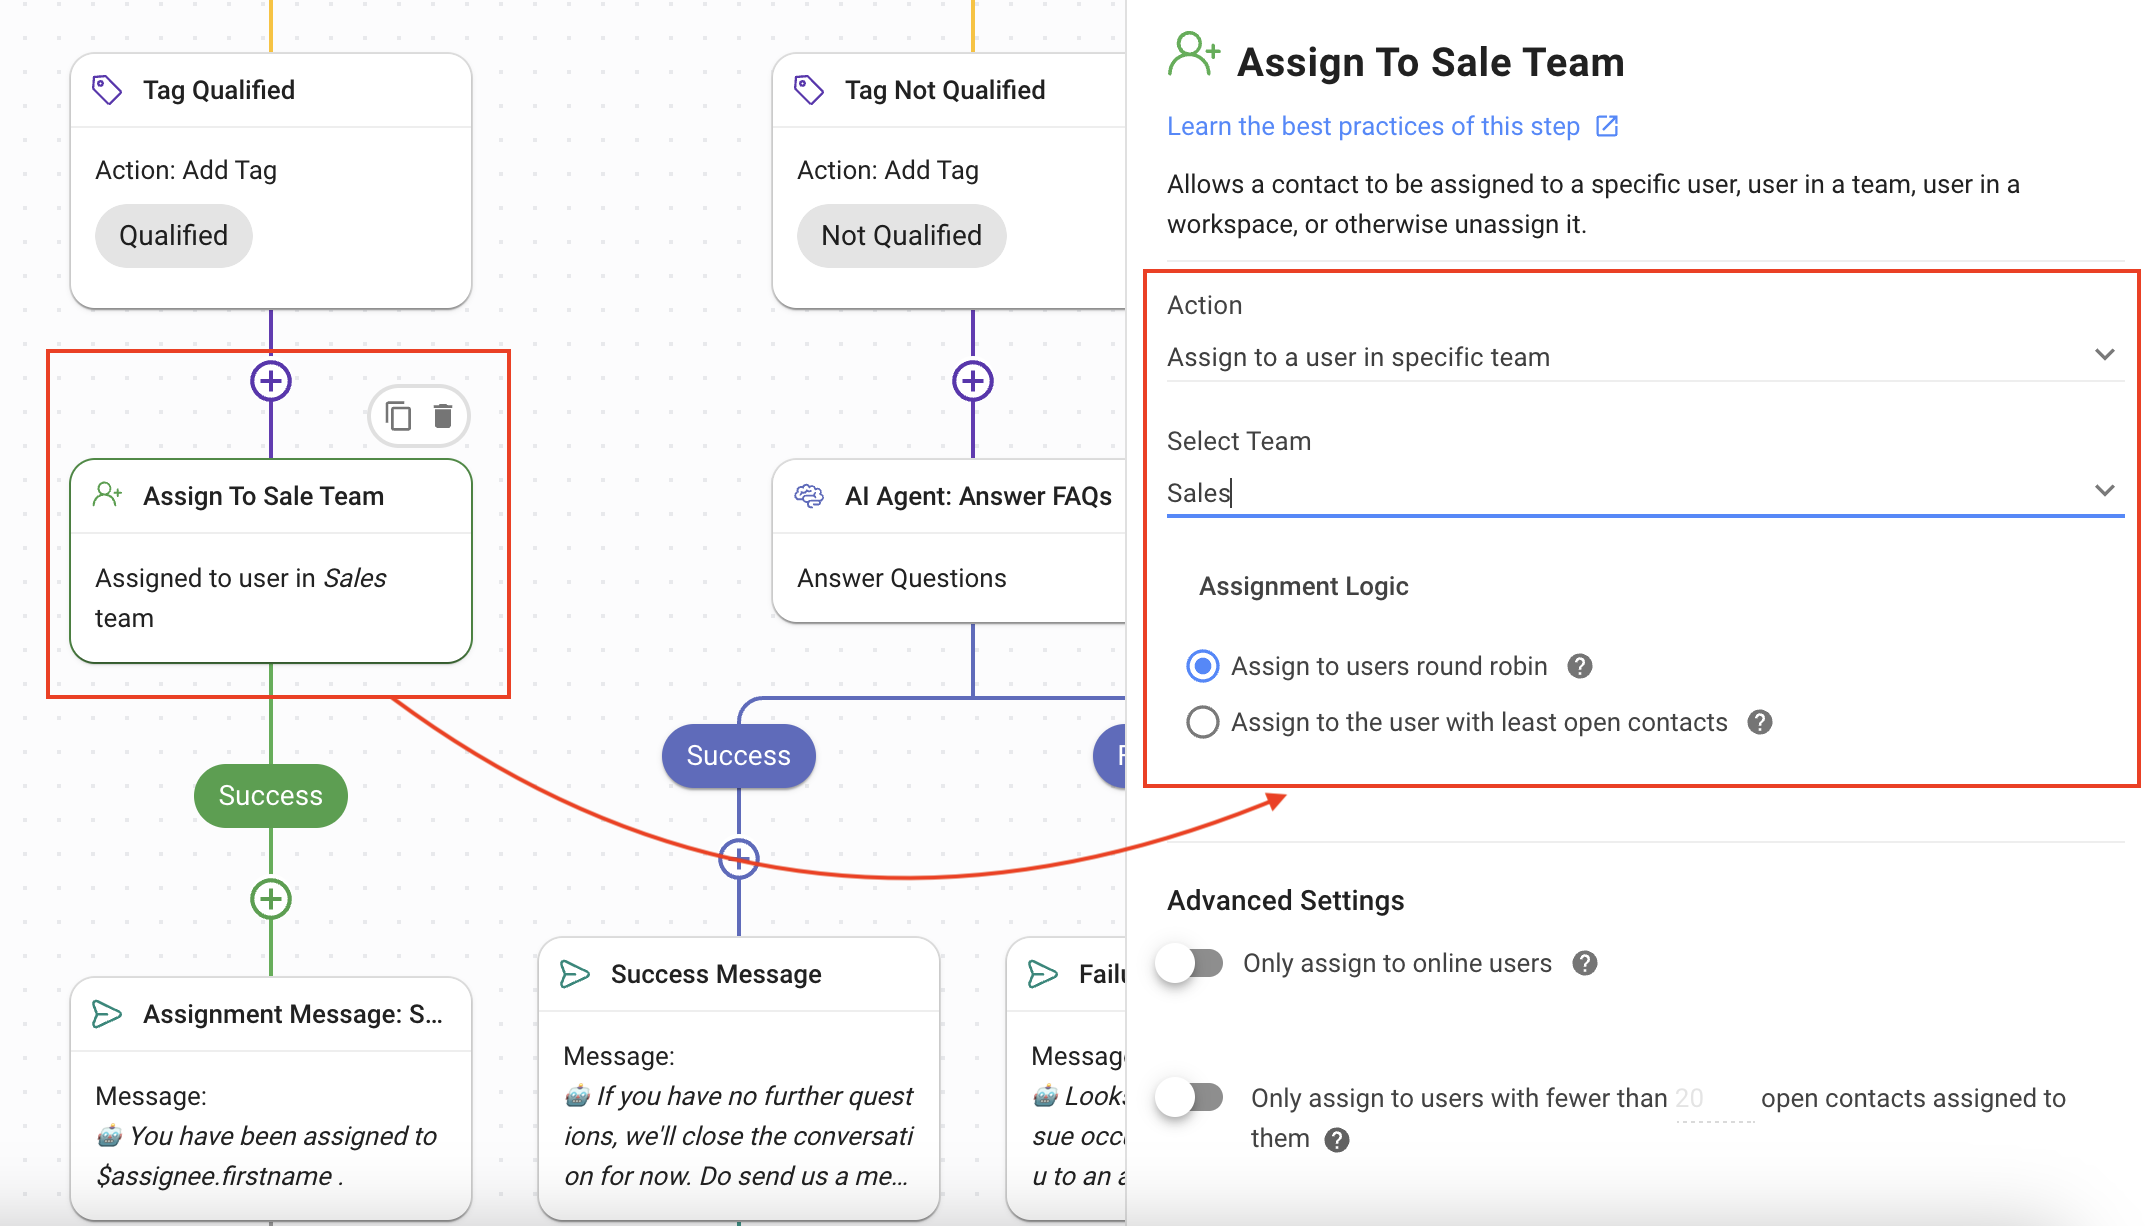
- Assign to Sales Team: Using the Assign To Team step, the Contact is directed to the sales team that can assist the Contact through the sales process.
- Assignment Message: The Contact is informed who they have been assigned to using the Send a Message Step.
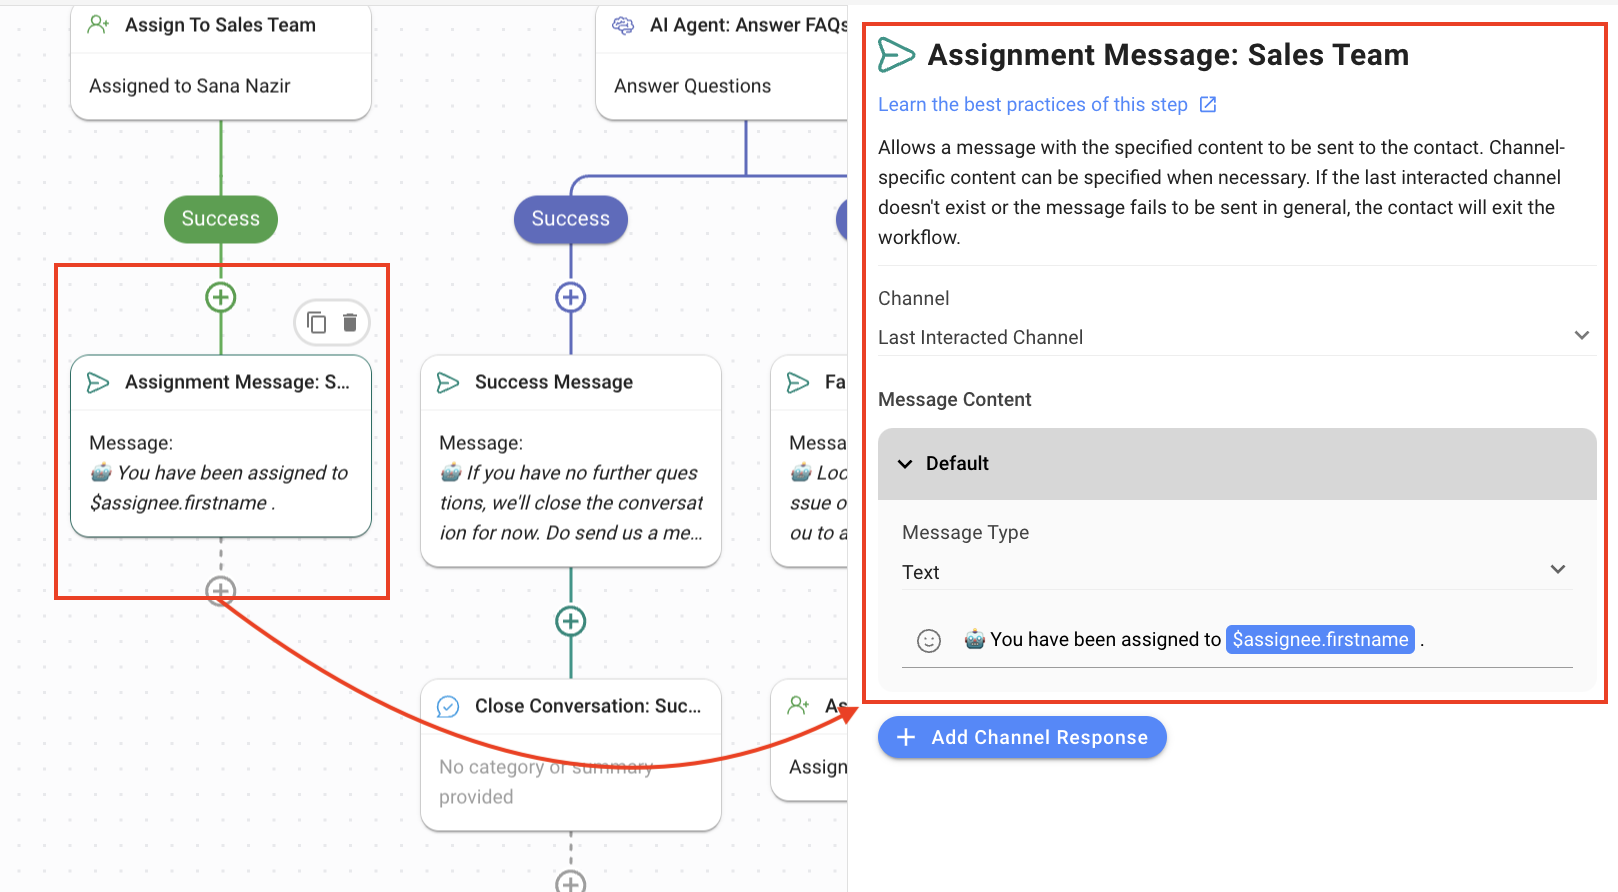
- Else: The default branch handles the scenario when the Contact did not meet the budget requirement (i.e., 1000 USD and above).
- Tag Not Qualified: Using the Update Contact Tag Step, the Contact is tagged as “Not Qualified”.
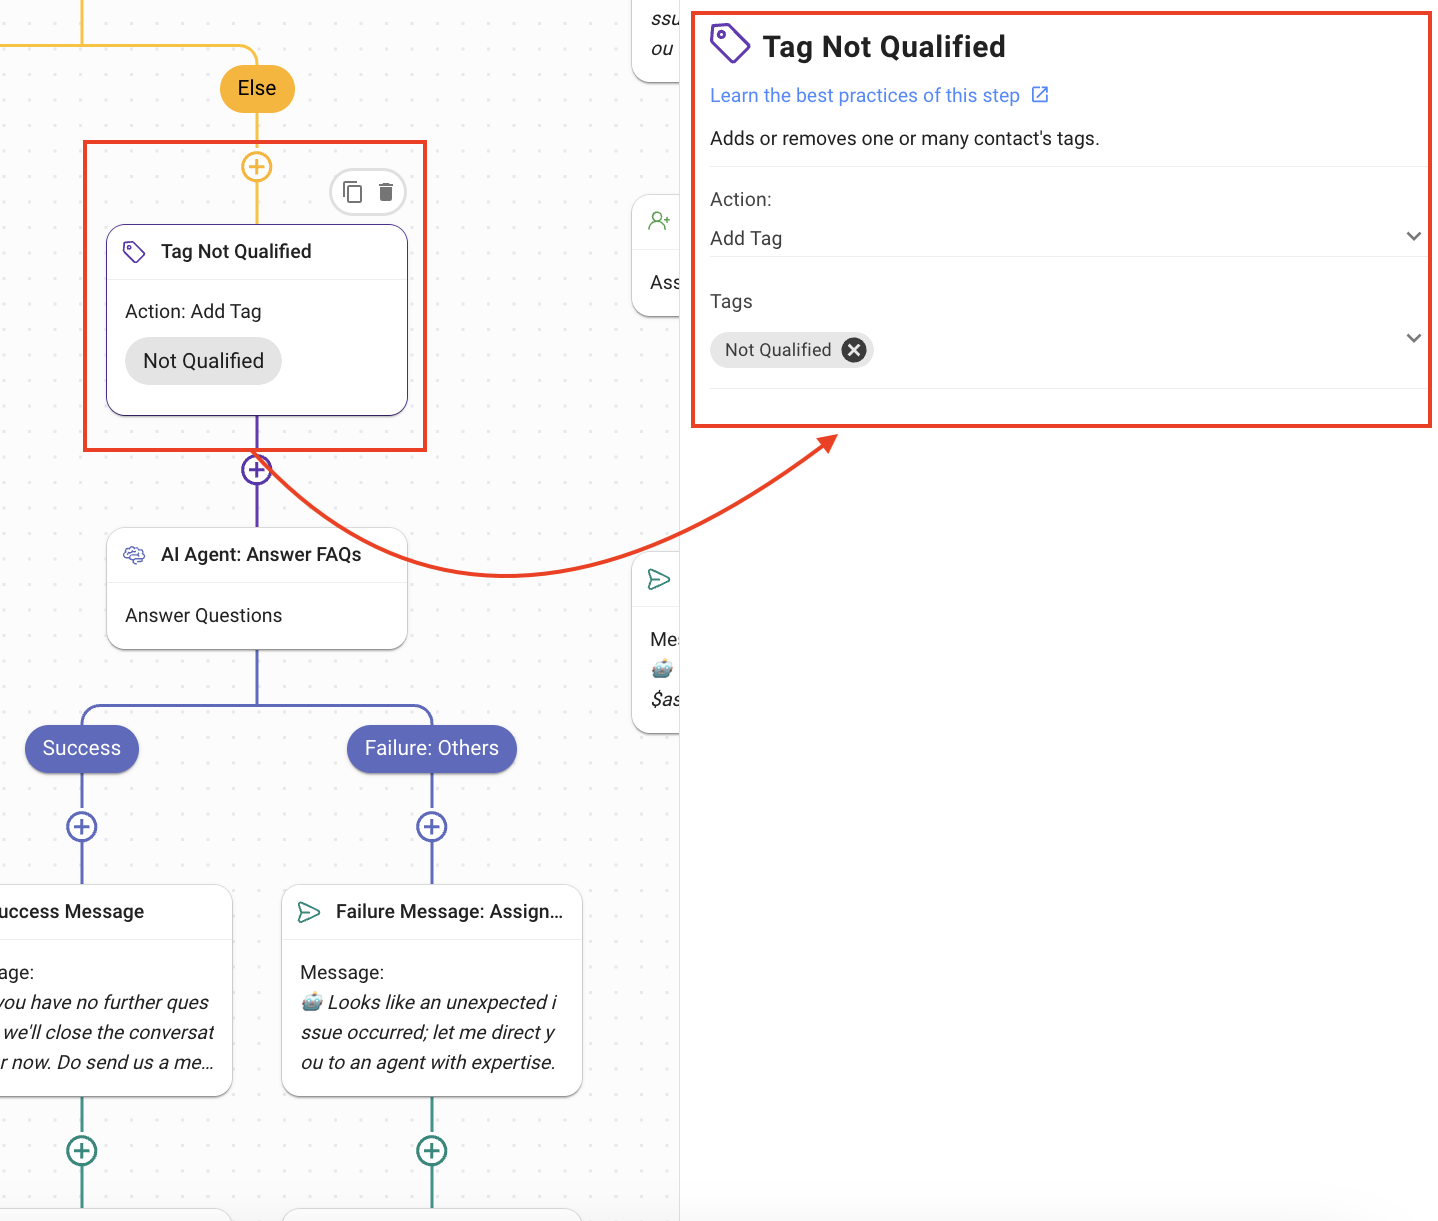
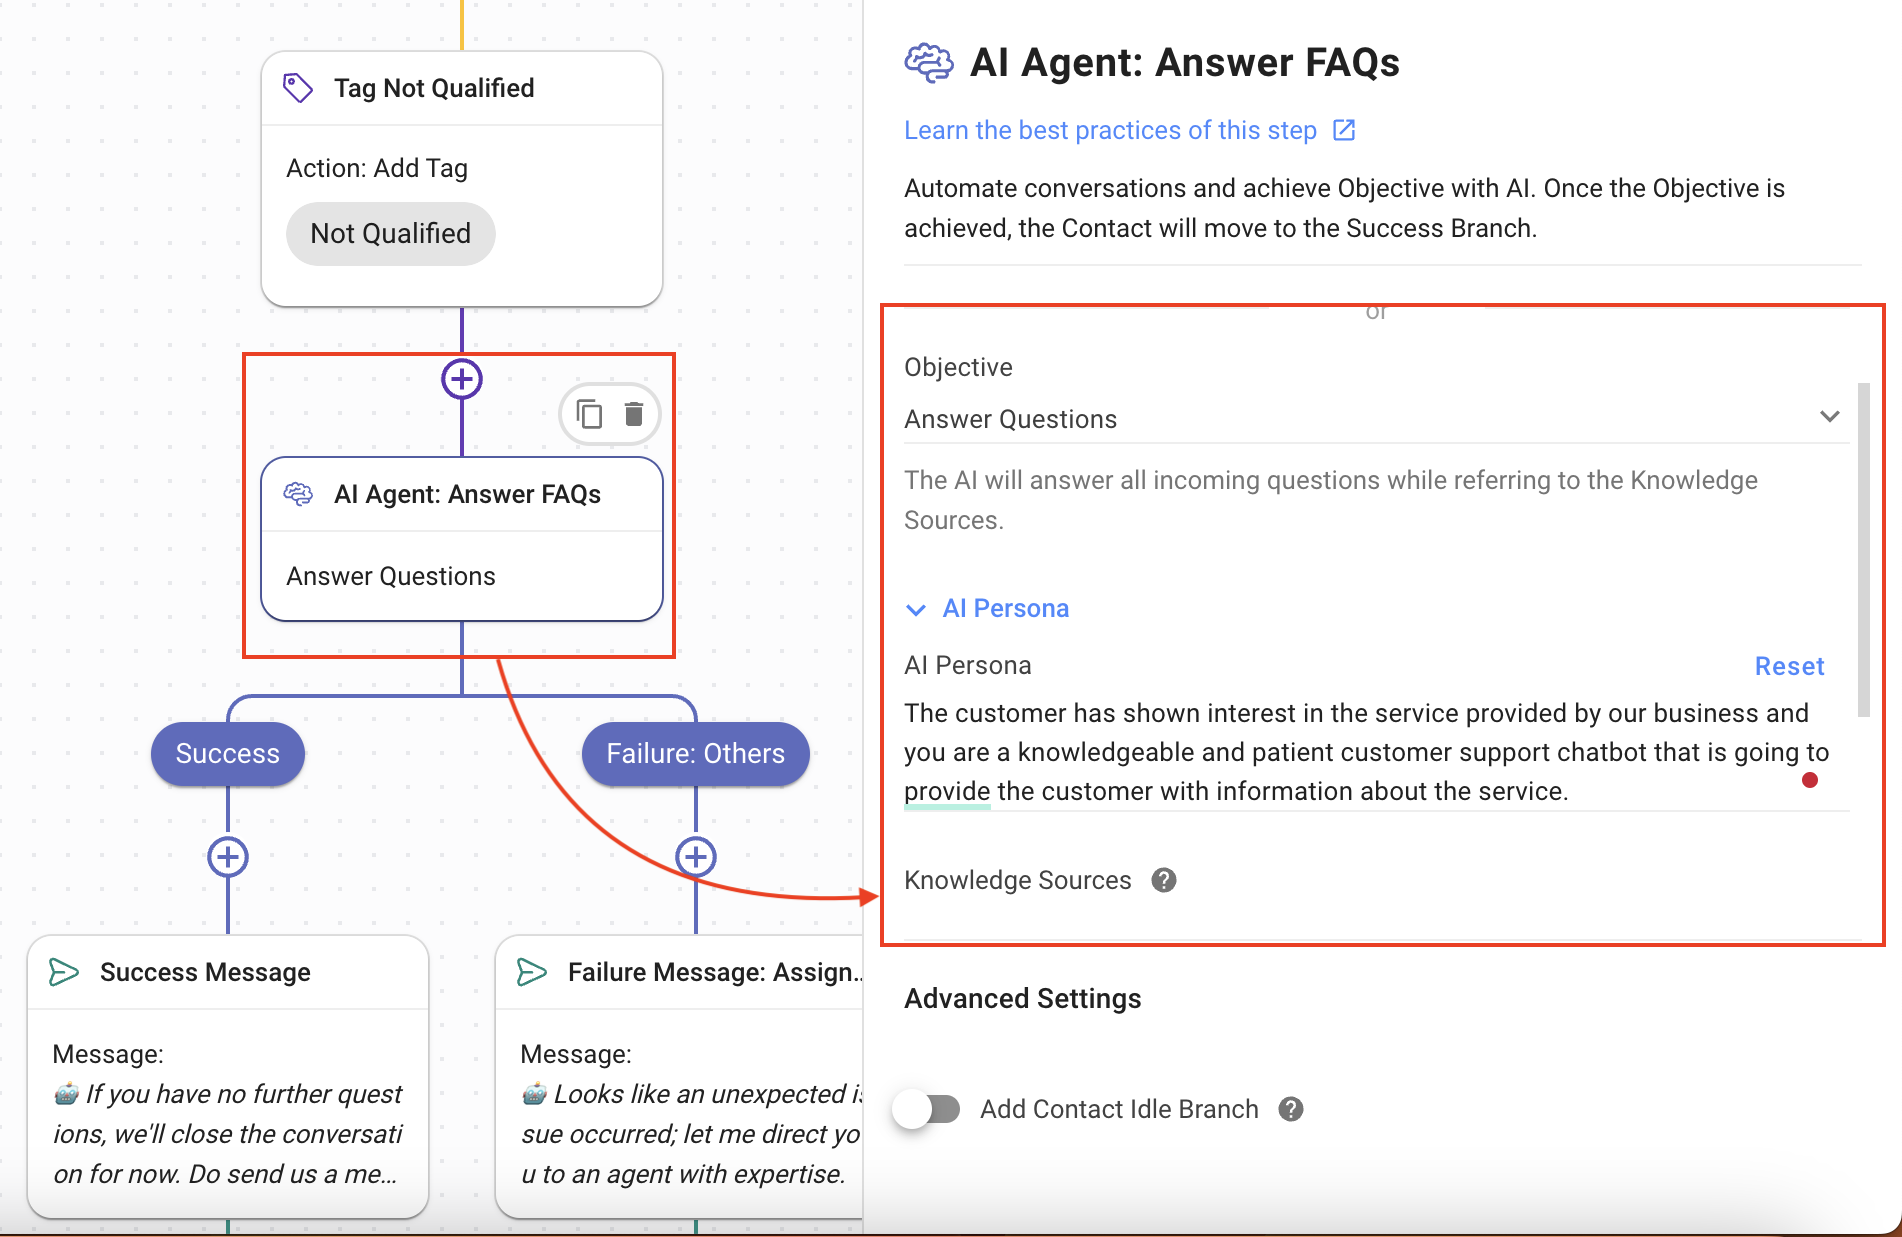
- AI Agent: Answer FAQs: The Contact that does not have the required budget is not directed towards Sales but instead is sent to the Support team to provide clarity regarding the services you offer. This AI Agent handle’s the Contact’s basic queries based on the Knowledge Sources provided to it.
- Objective: The Answer Questions objective is chosen to enable the agent to answer the Contact’s queries.
- AI Persona: The persona is set to provide support to the Contact.
- Knowledge Source: Provide the knowledge source that applies to the business needs.
- Use Snippets as Knowledge Source: Enabling this toggle allows AI Agent to access Snippets for responses.
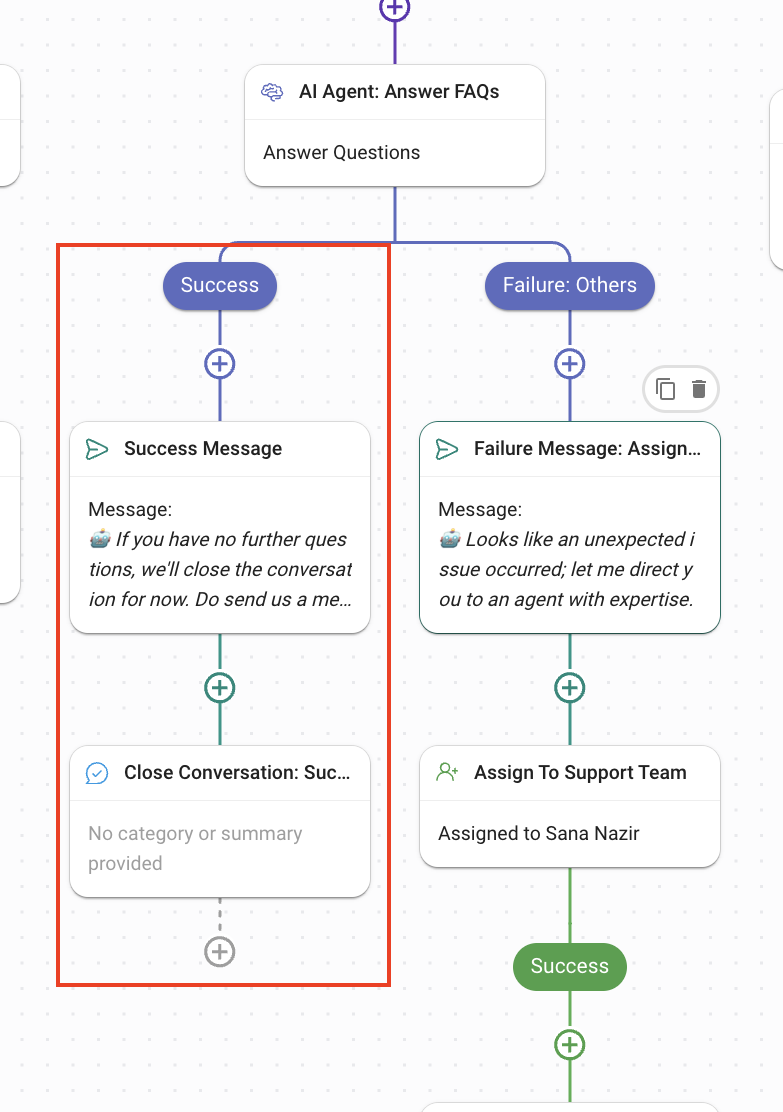
- Success: When the AI Agent has answered all the queries, this is the branch the Contact’s journey follows.
- Assign to Sales Team: Using the Assign To Step, assign the Contact to the Sales team.
- Assignment Message: The Contact is informed that they are being assigned to an agent using the Send a Message Step. The following settings have been used:
- Channel: Last Interacted Channel, to send the message to the channel the Contact is using.
- Message Type: Text
- The message informs the user that the conversation is closing after success.
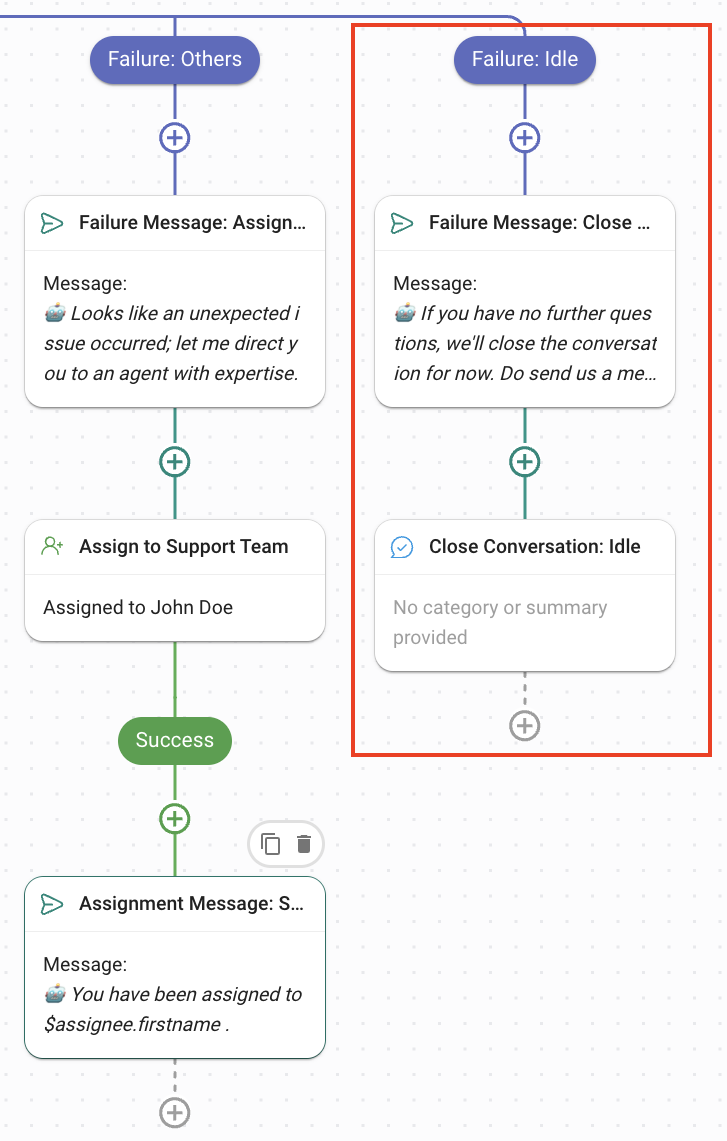
- Failure: Others: If a technical issue occurs, this branch handles the scenario by assigning the Contact a Support agent.
- Failure Message: Assignment: Using the Send a Message Step, the Contact is informed that they are being assigned to an agent with expertise.
- Assign to Support Team: Using the Assign To Step, the Contact is assigned to a support agent.
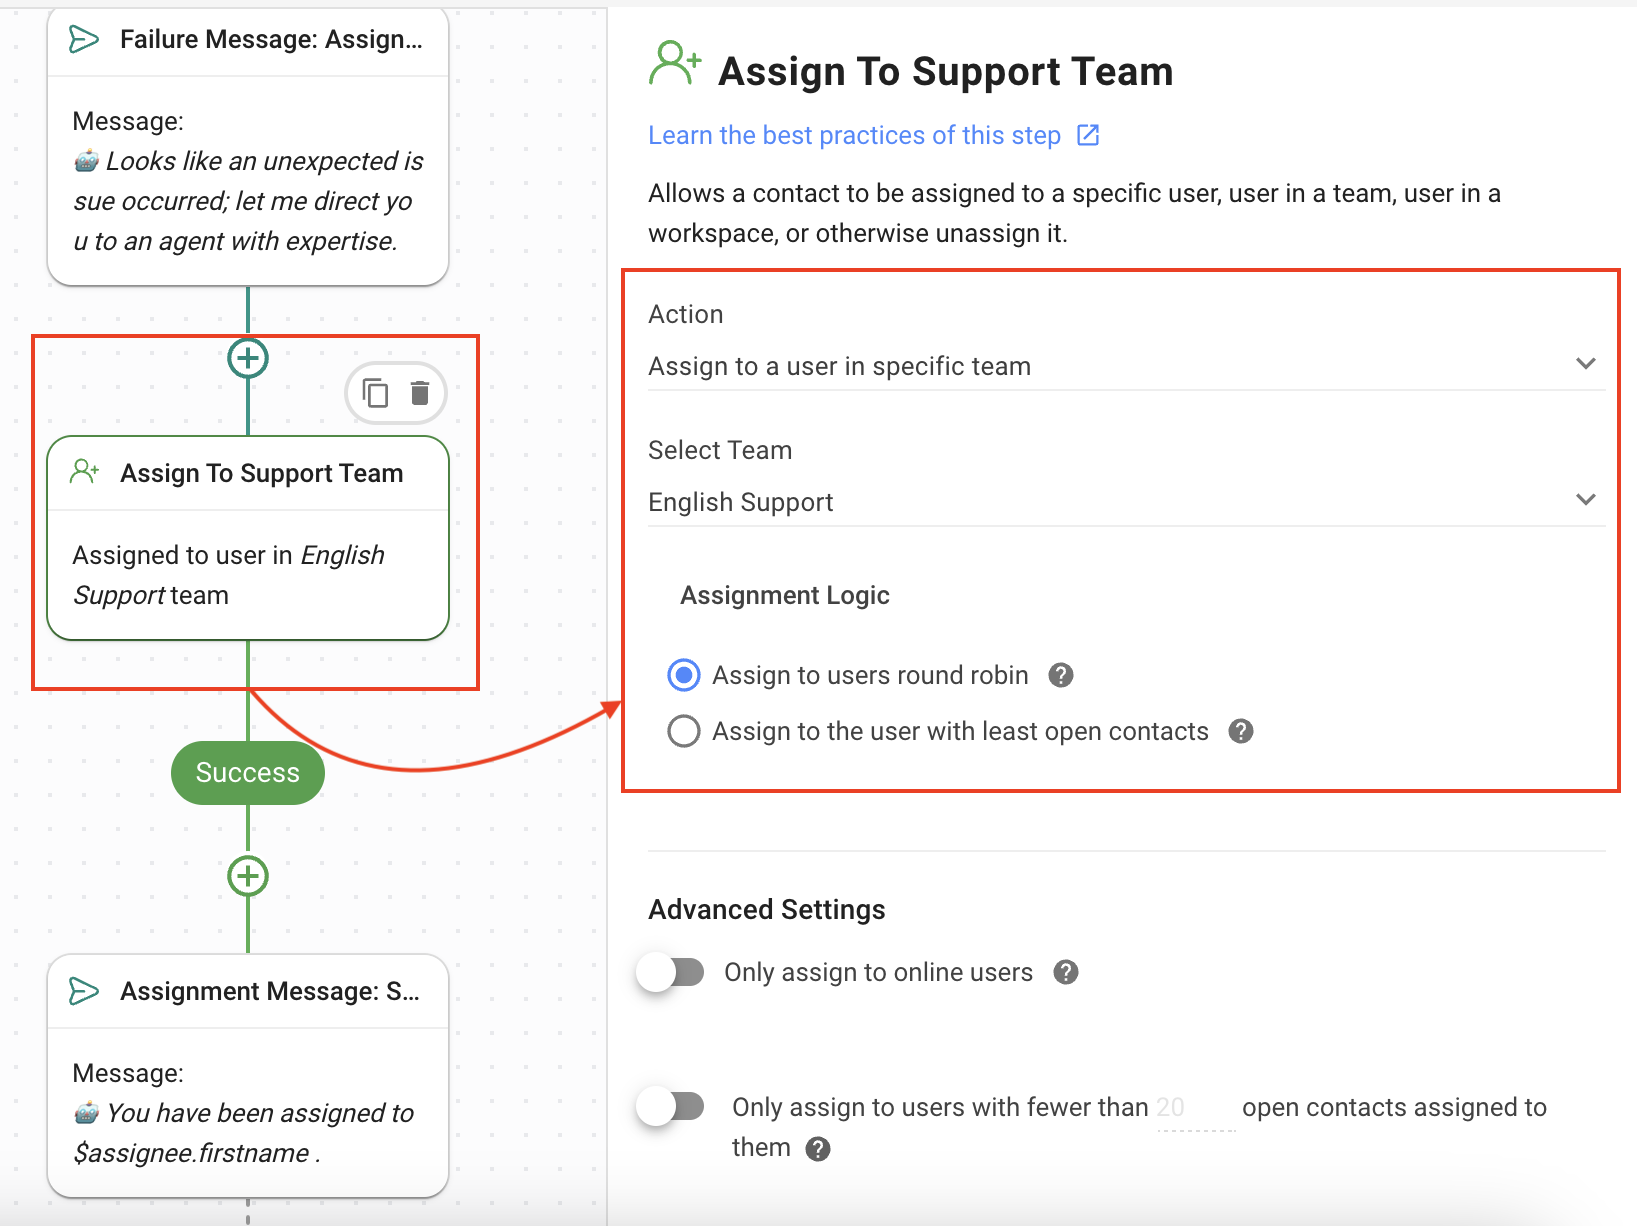
- Failure: Others: The condition for this branch is met when an unexpected technical issue has occurred, e.g., Channel disconnected, Respond AI credits run out, etc. The Contact is sent a message that they are being re-directed to the human agent for further correspondence.
- Failure Message: Assignment: Using the Send a Message Step, the Contact is informed that they are being assigned to an agent with expertise.
- Assign to Support Team: Using the Assign To Step, assign the Contact to the Support team.
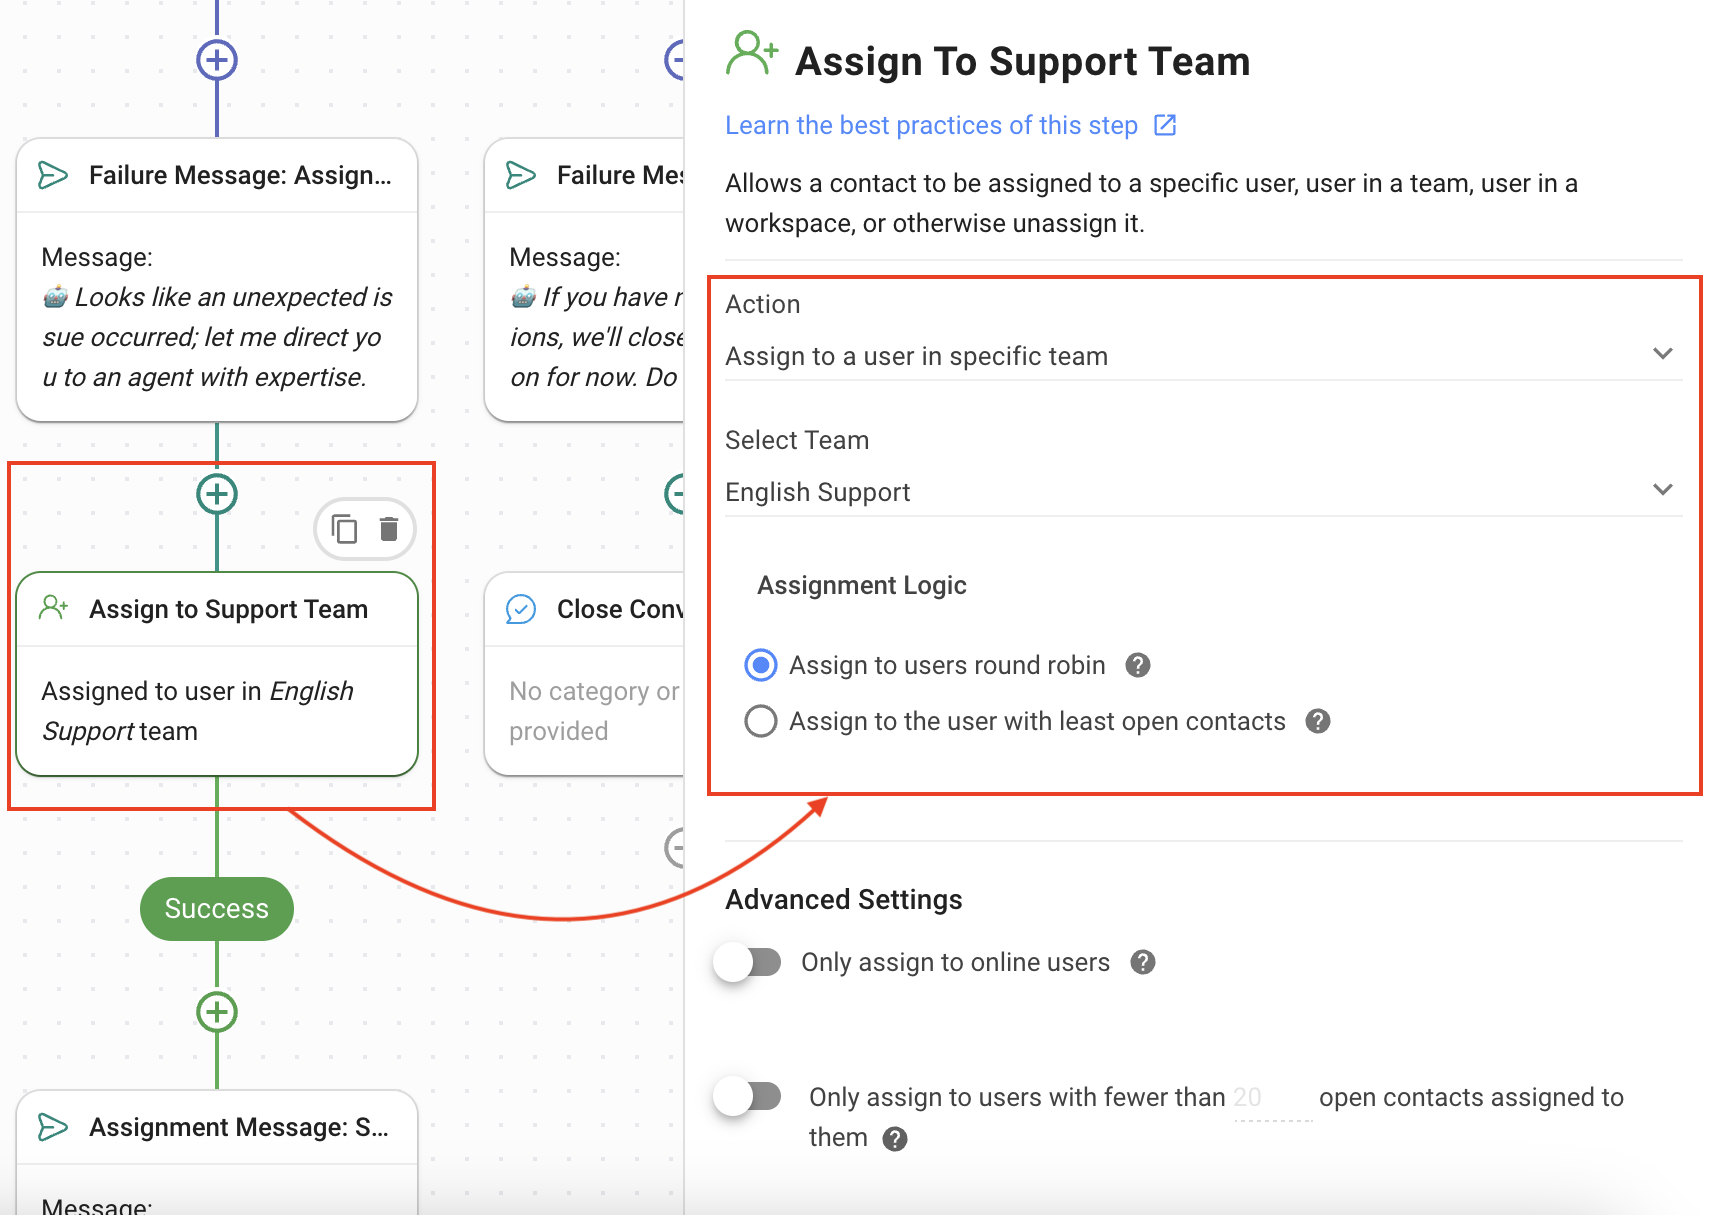
- Assignment Message: Support Team: Using the Assign a Message Step, the Contact is assigned to the available agent.
- Failure: Idle: The condition for this branch is met when the conversation has been idle for more than 15 minutes. The Contact is sent a message that the conversation is closing because it has been idle, but they can open it again by sending a message.
Feeling stuck? Do not fear.
Need assistance? Contact us for support. Help is here!This is the text block that will appear when the button is clicked.
How to Automate Product Info Sharing in Conversations Initiated via CTC Ads
Assignment Strategy: How to Automate Contact Distribution & Load Balancing
Related Articles
How to Route Contacts to Preferred AI Agent
Learn to automatically ask incoming Contacts if they want to talk to a Sales or a Support AI Agent and divert the Contact to the AI Agent of their choice.
How to Transfer Contacts to the Next Shift Automatically
Learn how to route open conversations to the next shift.
How to Route Contacts from CTC Ads to Agents
Learn to automatically assign contacts coming from Click-to-Chat Ads to Agents.
