Quick Start
What is respond.io?
Setting Up an Account
Connecting Channels
Inviting Your Teammates
Getting Contacts to Message You
Automated Welcome and Away Messages
Responding to Messages
Glossary of Terms
Channels
WhatsApp Business Platform (API) Quick Start
Getting Ready for Inbound Conversations
Getting Ready for Promotional Messaging
WhatsApp Official Business Account (Blue Tick)
Grow your WhatsApp Audience by Maximizing Entry Points
Get WhatsApp API Account for Government Agencies
WhatsApp Business Calling API
Meta Business Verification
WhatsApp Message Templates
WhatsApp Pricing
WhatsApp Business Platform (API) Channel Configuration
WhatsApp Messaging Limits
Meta Product Catalog
Change Your WhatsApp Business Display Name
Migrating from WhatsApp Personal or WhatsApp Business App
Phone Number Migration to respond.io WhatsApp Business Platform (API)
Turn-off WhatsApp Number Two-Step Verification
WhatsApp Cloud API
360dialog WhatsApp
Twilio WhatsApp
MessageBird WhatsApp
Vonage WhatsApp
Phone Number Migration to WhatsApp Cloud API
TikTok
Facebook Messenger
Facebook Messenger Overview
Facebook Messenger Quick Start
Facebook Chat Plugin
Facebook Private Replies
Facebook Message Tag
LINE
Viber
Telegram
Website Chat Widget
Website Chat Widget Overview
Website Chat Widget Quick Start
Install Website Chat Widget on WordPress
Install Website Chat Widget on Shopify
Install Website Chat Widget on Wix
Install Website Chat Widget on Joomla
Install Website Chat Widget on Squarespace
SMS
Custom Channel
Product
Dashboard & Reporting
Dashboard
Reports Overview
Reports: Conversations
Reports: Responses
Reports: Resolutions
Reports: Messages
Reports: Contacts
Reports: Assignments
Reports: Leaderboard
Reports: Users
Reports: Broadcasts
Inbox
Inbox Overview
Assignment and Closing a Conversation
Custom Inboxes
Interacting with Respond AI Prompts
Using AI Assist
Contacts
Broadcasts Module
Workflows
Workflows Overview
Workflow Triggers
Workflow Steps Overview
Step: AI Agent
Step: Send a Message
Step: Ask a Question
Step: Assign To
Step: Branch
Step: Update Contact Tag
Step: Update Contact Field
Step: Open Conversation
Step: Close Conversation
Step: Add Comment
Step: Jump To
Step: Date & Time
Step: Wait
Step: Trigger Another Workflow
Step: HTTP Request
Step: Add Google Sheets Row
Step: Send TikTok Lower Funnel Event
How to Avoid Workflow Loops
Step: Update Lifecycle
Step: Send Conversions API Event
Dynamic Variables
Workspace Settings
Managing a Workspace
General info (previously General)
User settings (previously Users)
Teams (previously Team Settings)
Channels
Growth Widgets
Contact Fields
Integrations
Respond AI
Closing Notes
Snippets
Tags
Files
Data Export
Contact Import
Lifecycle
Organization Settings
Organization Overview
Account info (previously General)
Admin Settings (previously Users)
Workspaces
WhatsApp Fees
Billing & Usage
Security
User Account
Mobile App
Installing respond.io Mobile App
Messaging From Your Mobile
Managing Notifications On Your Mobile
Configuring mobile app settings
Help Menu
Conversation Led Growth
Capture Leads
How to Collect Contacts’ Emails and Phone Numbers
How to Route Contacts from CTC Ads to Agents
How to Send Outbound Sales Messages
How to Track Conversation Source from Multiple Websites
How to Enrich Customer Data from a CRM or other Business Software
Convert Leads
How to Automate Product Info Sharing in Conversations Initiated via CTC Ads
How to Automatically Qualify Contacts Based on Budget Using AI Agent
Assignment Strategy: How to Automate Contact Distribution & Load Balancing
How to Maximize Customer Service Potential with AI Agent
How to Automate Contact Information Collection with AI
How to Block Contacts and Manage Spam
How to Create Automated Welcome and Away Messages
How to Create Automated Chat Menus
How to Route Contacts to Preferred AI Agent
How to Route Contacts by their Preferred Language
How to Route Contacts by Team Functions
How to Route Contacts by Shifts
Assignment Strategy: How to Unassign Agents after Conversations Closed
How to Get Contacts’ Consent for Personal Data Collection
How to Promptly Transfer Conversation Between Agents
How to Guide Customers from Exploration to Purchase with Engaging Menus
How to Optimize Customer Onboarding with Automated & Customized Welcome Messages
How to Streamline Meeting Scheduling via CTC Ads
How to Get a Complete View of the Customers
How to Simplify Customer Escalation with Automation
How to Transfer Contacts to the Next Shift Automatically
How to Optimize Agents’ Productivity in the Inbox Module
How to Write an Optimal AI Persona (Best Practices)
How to Write the Best Knowledge Sources for AI Agents
How to Align AI Conversations with Your Brand Voice
How to Draft Customer Replies with AI
How to Convert Image to Text Using AI
How to Automate Calculations Using AI
How to Automate Lifecycle Tracking in Google Sheets
Retain Customers
How to Route New and Returning Contacts
How to Route VIP Contacts
How to Send CSAT to Customer and Save Data in Google Sheets or CRMs
How to Send Outbound Support Messages
How to improve lead targeting and automatically send purchase events to Meta when a customer makes a payment
Reporting and Analytics
Broadcasts Use Cases
How to Send a Simple Broadcast
How to Start a Workflow Based on Broadcast Response
How to Import to Broadcast via WhatsApp
How to Troubleshoot a Failed Broadcast
Integrations
Dialogflow
Dialogflow Overview
Dialogflow: Connecting to Dialogflow
Dialogflow: Creating a Chatbot
Dialogflow: Managing Intents
Dialogflow: Parameters
Dialogflow: Events
Dialogflow: Response Templates
Dialogflow: Custom Payloads
Dialogflow: Fulfillment Webhook Request
Zapier
E-Commerce Integration: Shopify
E-Commerce Integration: BigCommerce
E-Commerce Integration: WooCommerce
E-Commerce Integration: Magento
CRM Integration: HubSpot
CRM Integration: Salesforce
CRM Integration: Pipedrive
CRM Integration: ActiveCampaign
Zapier
Make
Meta Business Accounts
TikTok Messaging Ads Integration
Developer API
HubSpot
Webhooks
Salesforce
- Home
- Conversation Led Growth
- Convert Leads
- How to Automate Lifecycle Tracking in Google Sheets
How to Automate Lifecycle Tracking in Google Sheets
 Updated
by Shing-Yi Tan
Managing leads effectively is crucial for any business aiming to optimize its sales funnel and increase conversion rates. With our Lifecycle feature, you can track and manage Contacts through every stage of your sales process. To gain deeper insights and make data-driven decisions, you can automatically log your Contacts’ data, including names and Lifecycle Stages, into Google Sheets.
In this guide, you’ll learn how to:
- Automatically capture and log conversion data in Google Sheets.
- Analyze key metrics like conversion rates and drop-off rates to optimize your sales process.
- Leverage insights from your data to improve your sales strategies.
Learn how to use the Google Sheet template by watching this video, or read on for a step-by-step guide:
Benefits of Tracking Lead Data Automatically
- Automate the process of capturing Contact names, Lifecycle Stages, and timestamps.
- Monitor how individual Contacts move through different Lifecycle Stages with historical timestamps.
- Analyze conversion and drop-off rates to improve your sales process in real-time.
- Keep all critical Contact data in one place for easy access and analysis.
Understanding Key Metrics
Conversion Rate
The conversion rate measures the percentage of Contacts who progress from one Lifecycle Stage to the next, indicating the effectiveness of your sales process at each Stage.
Why It’s Important: A higher conversion rate means your strategies are effectively moving leads toward becoming customers.
Example: If 100 Contacts are in the “New Lead” stage and 40 move to “Hot Lead,” your conversion rate between these stages is 40%.
Drop-off Rate
The drop-off rate indicates the percentage of Contacts who do not move to the next stage, highlighting potential bottlenecks or issues in your sales funnel.
Why It’s Important: Identifying stages with high drop-off rates allows you to investigate and address underlying problems.
Example: If 60 out of 100 “New Leads” change to “Cold Leads,” your drop-off rate is 60%.
Step-by-Step Guide
Step 1: Download the Google Sheets Template
To get started, download our Google Sheets template designed for tracking lifecycle data.
- Download Template: Download Google Sheets Template
- Template Features:
- Pre-defined columns for Contact ID, Contact Name, Lifecycle Stage, and Timestamps.
- A pivot table for analyzing conversion and drop-off rates across stages.
Note: Copy the template to your Google Drive and adjust headings and columns as needed, ensuring they match for workflow setup. Remember to delete any pre-filled data before using it for your own use.
Step 2: Create a Workflow to Log Data
Option 1: Using the Lifecycle Updated Trigger
- Navigate to Workflows:
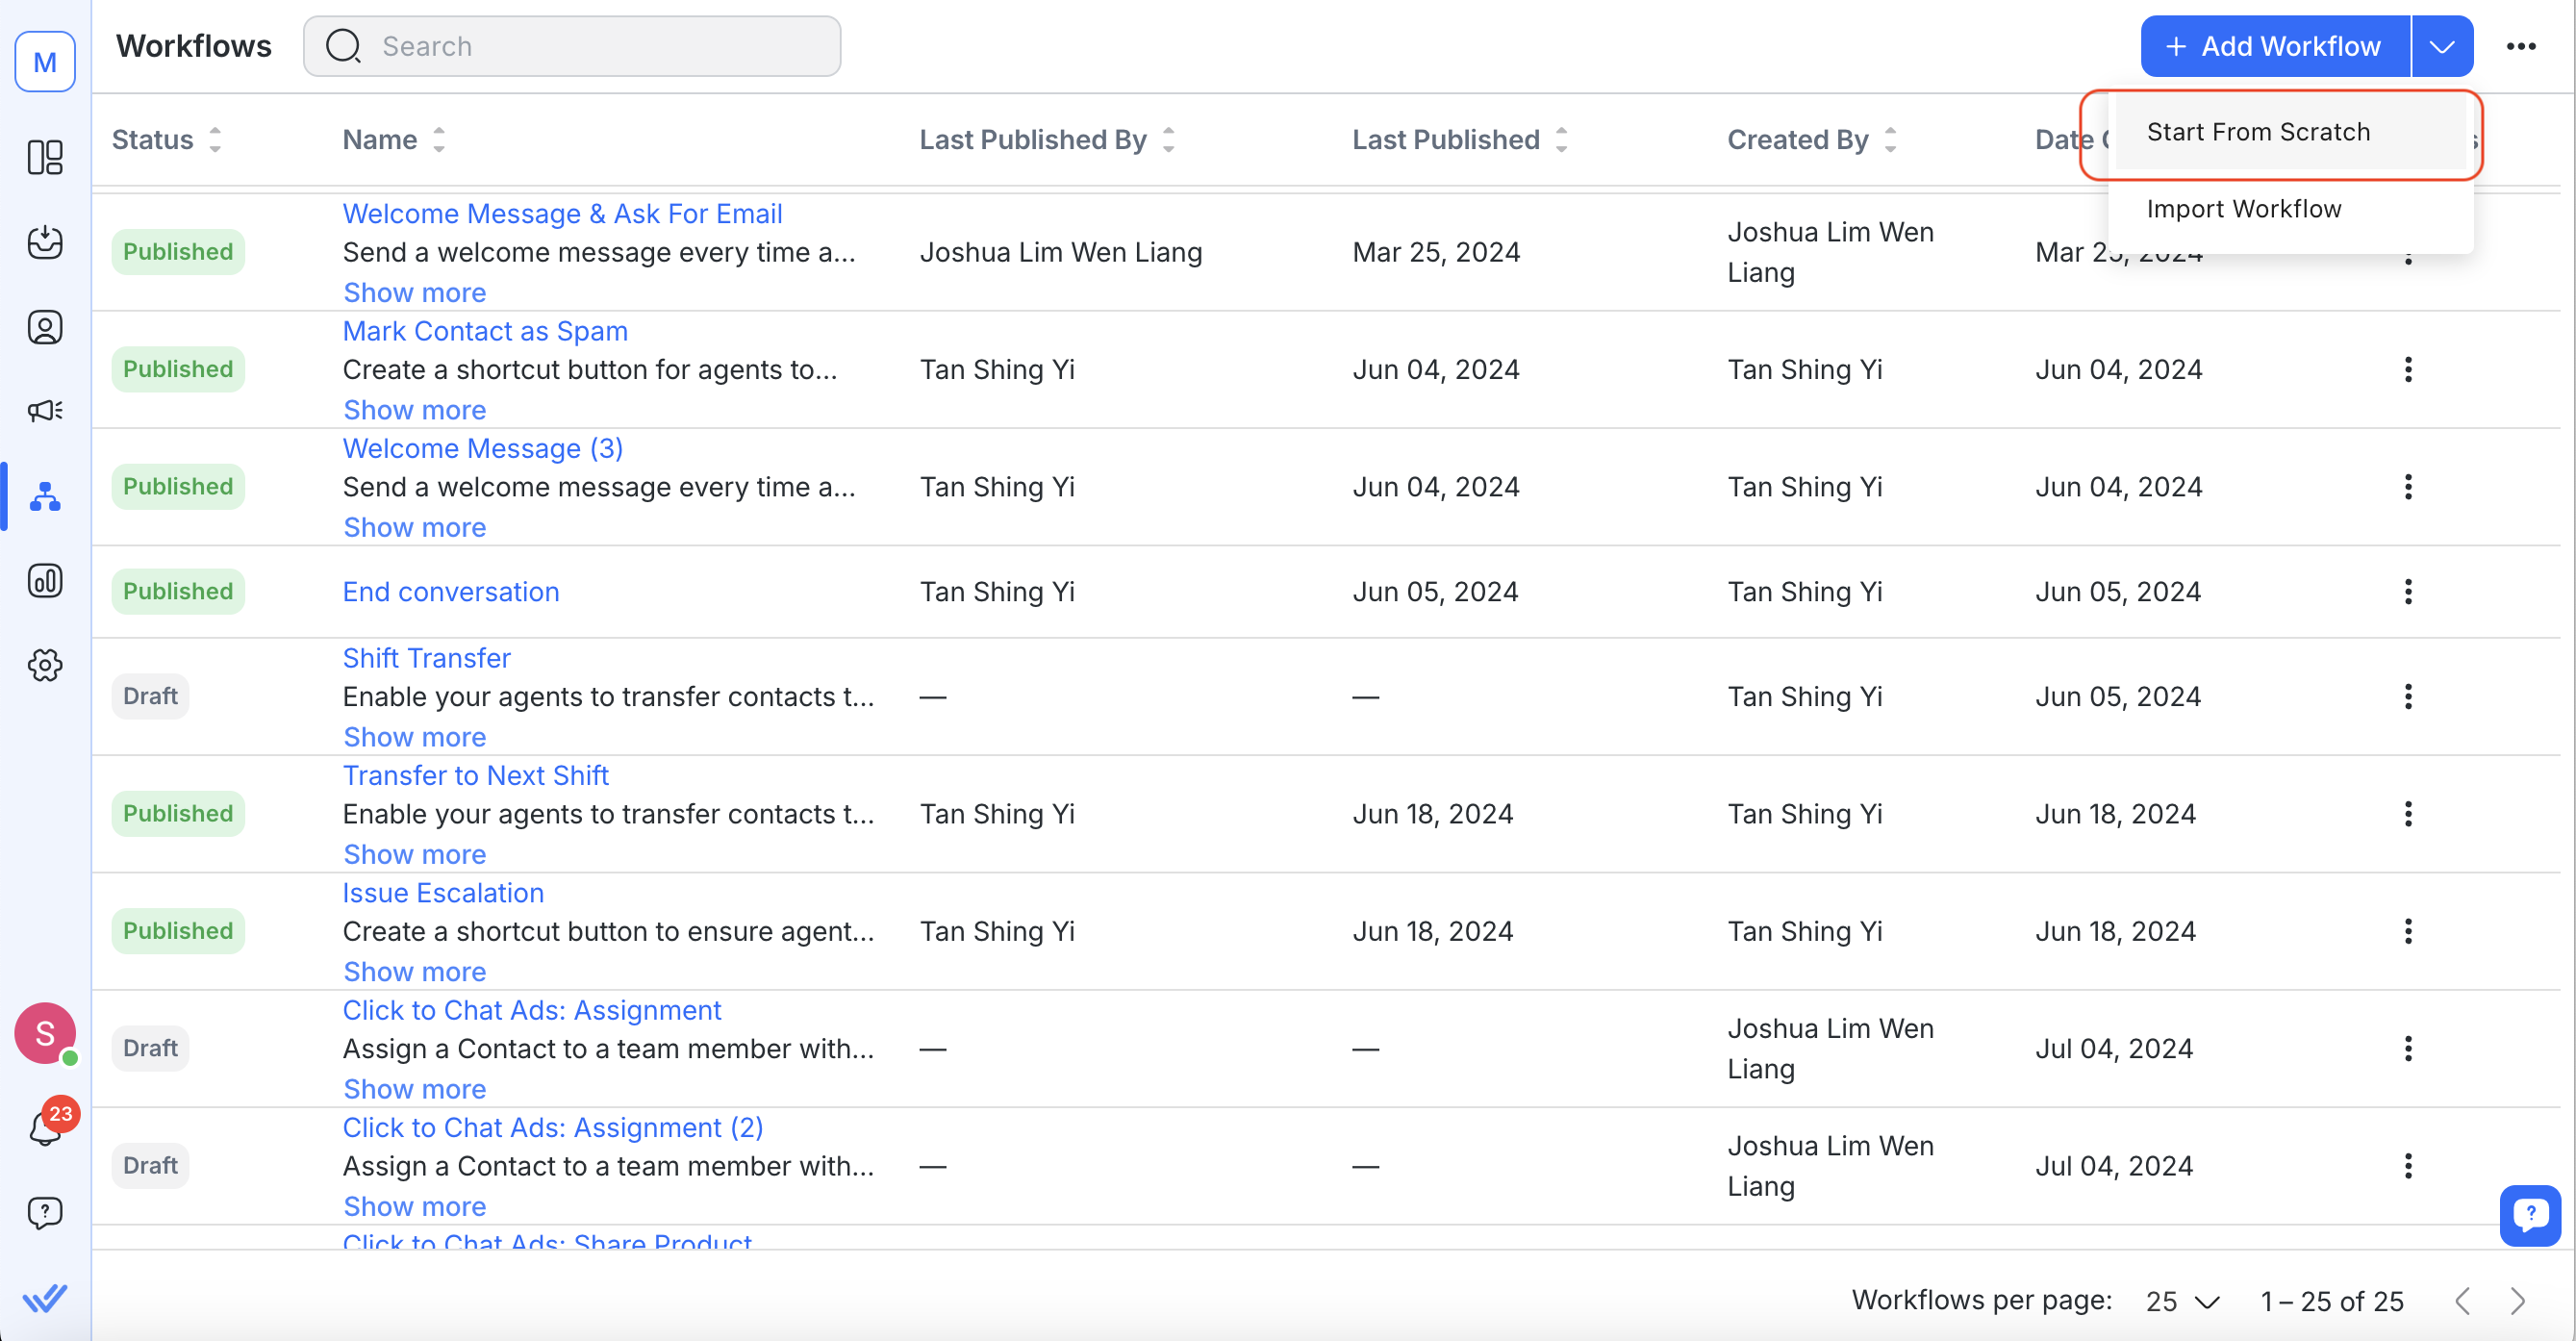
- On your dashboard, go to Workflows > + Add Workflow.
- Select Start from Scratch.
- Set Up the Trigger:
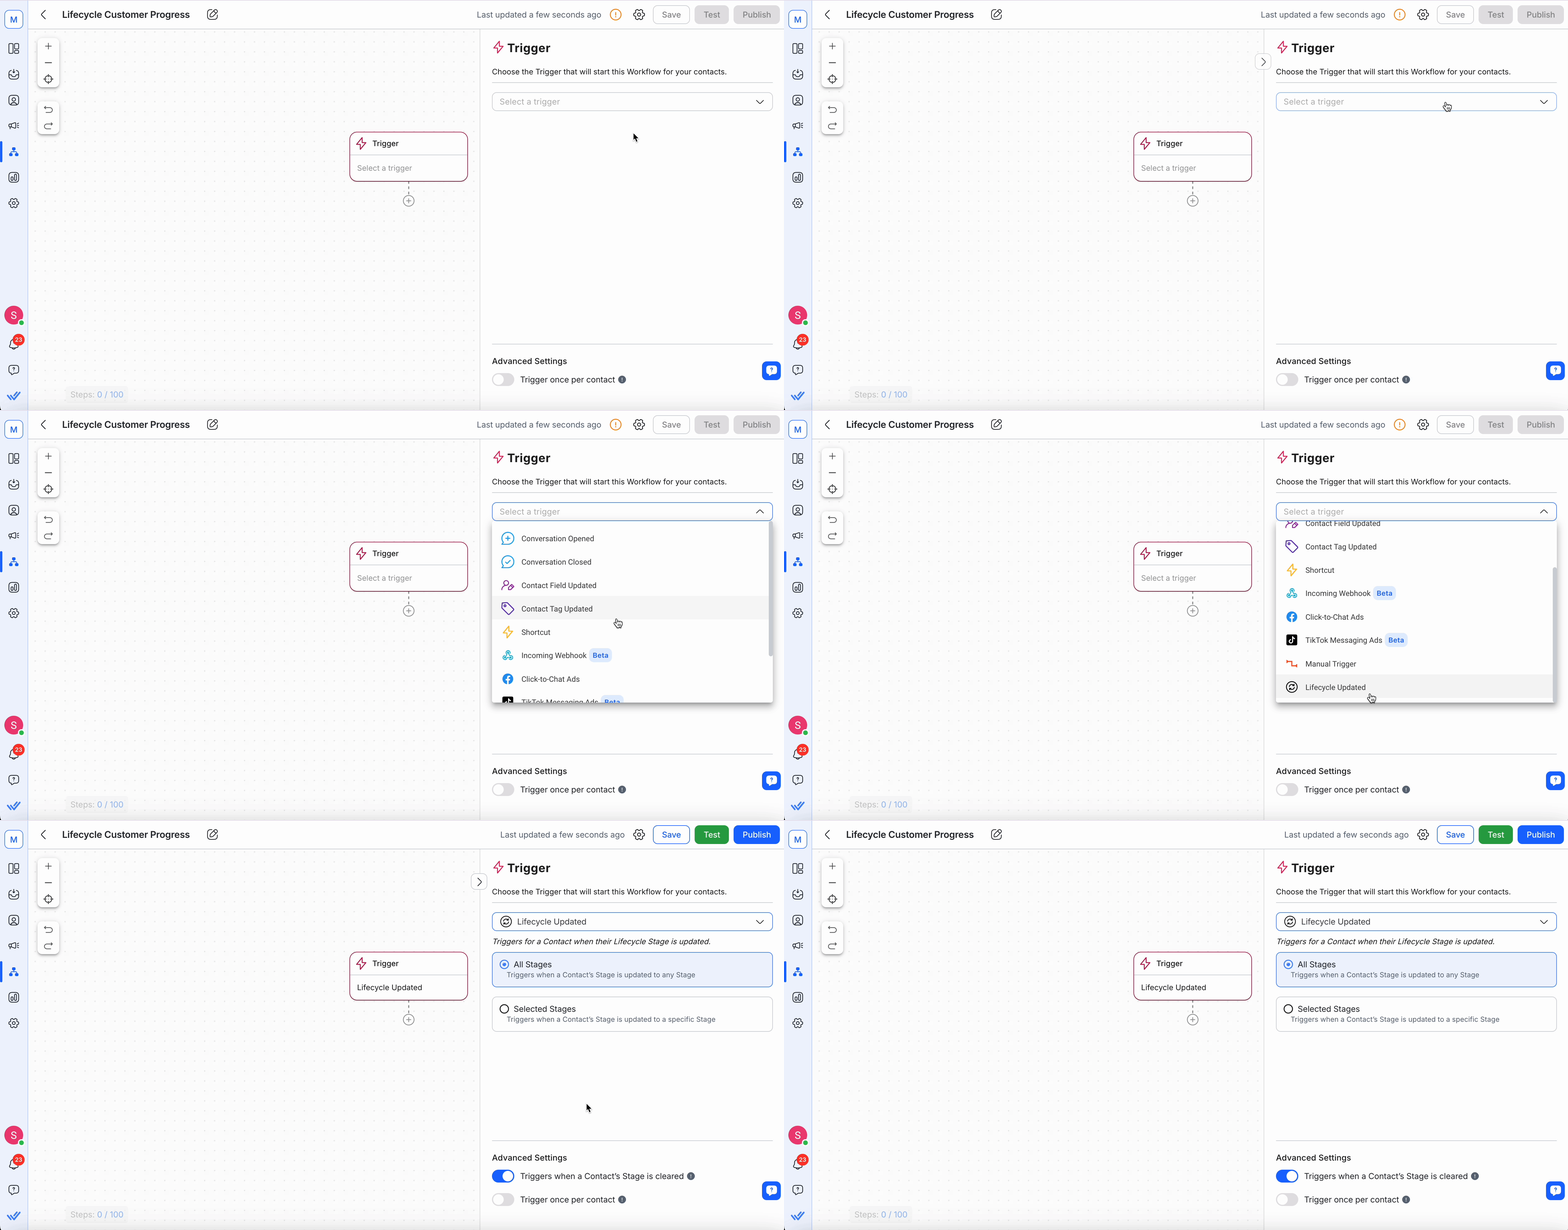
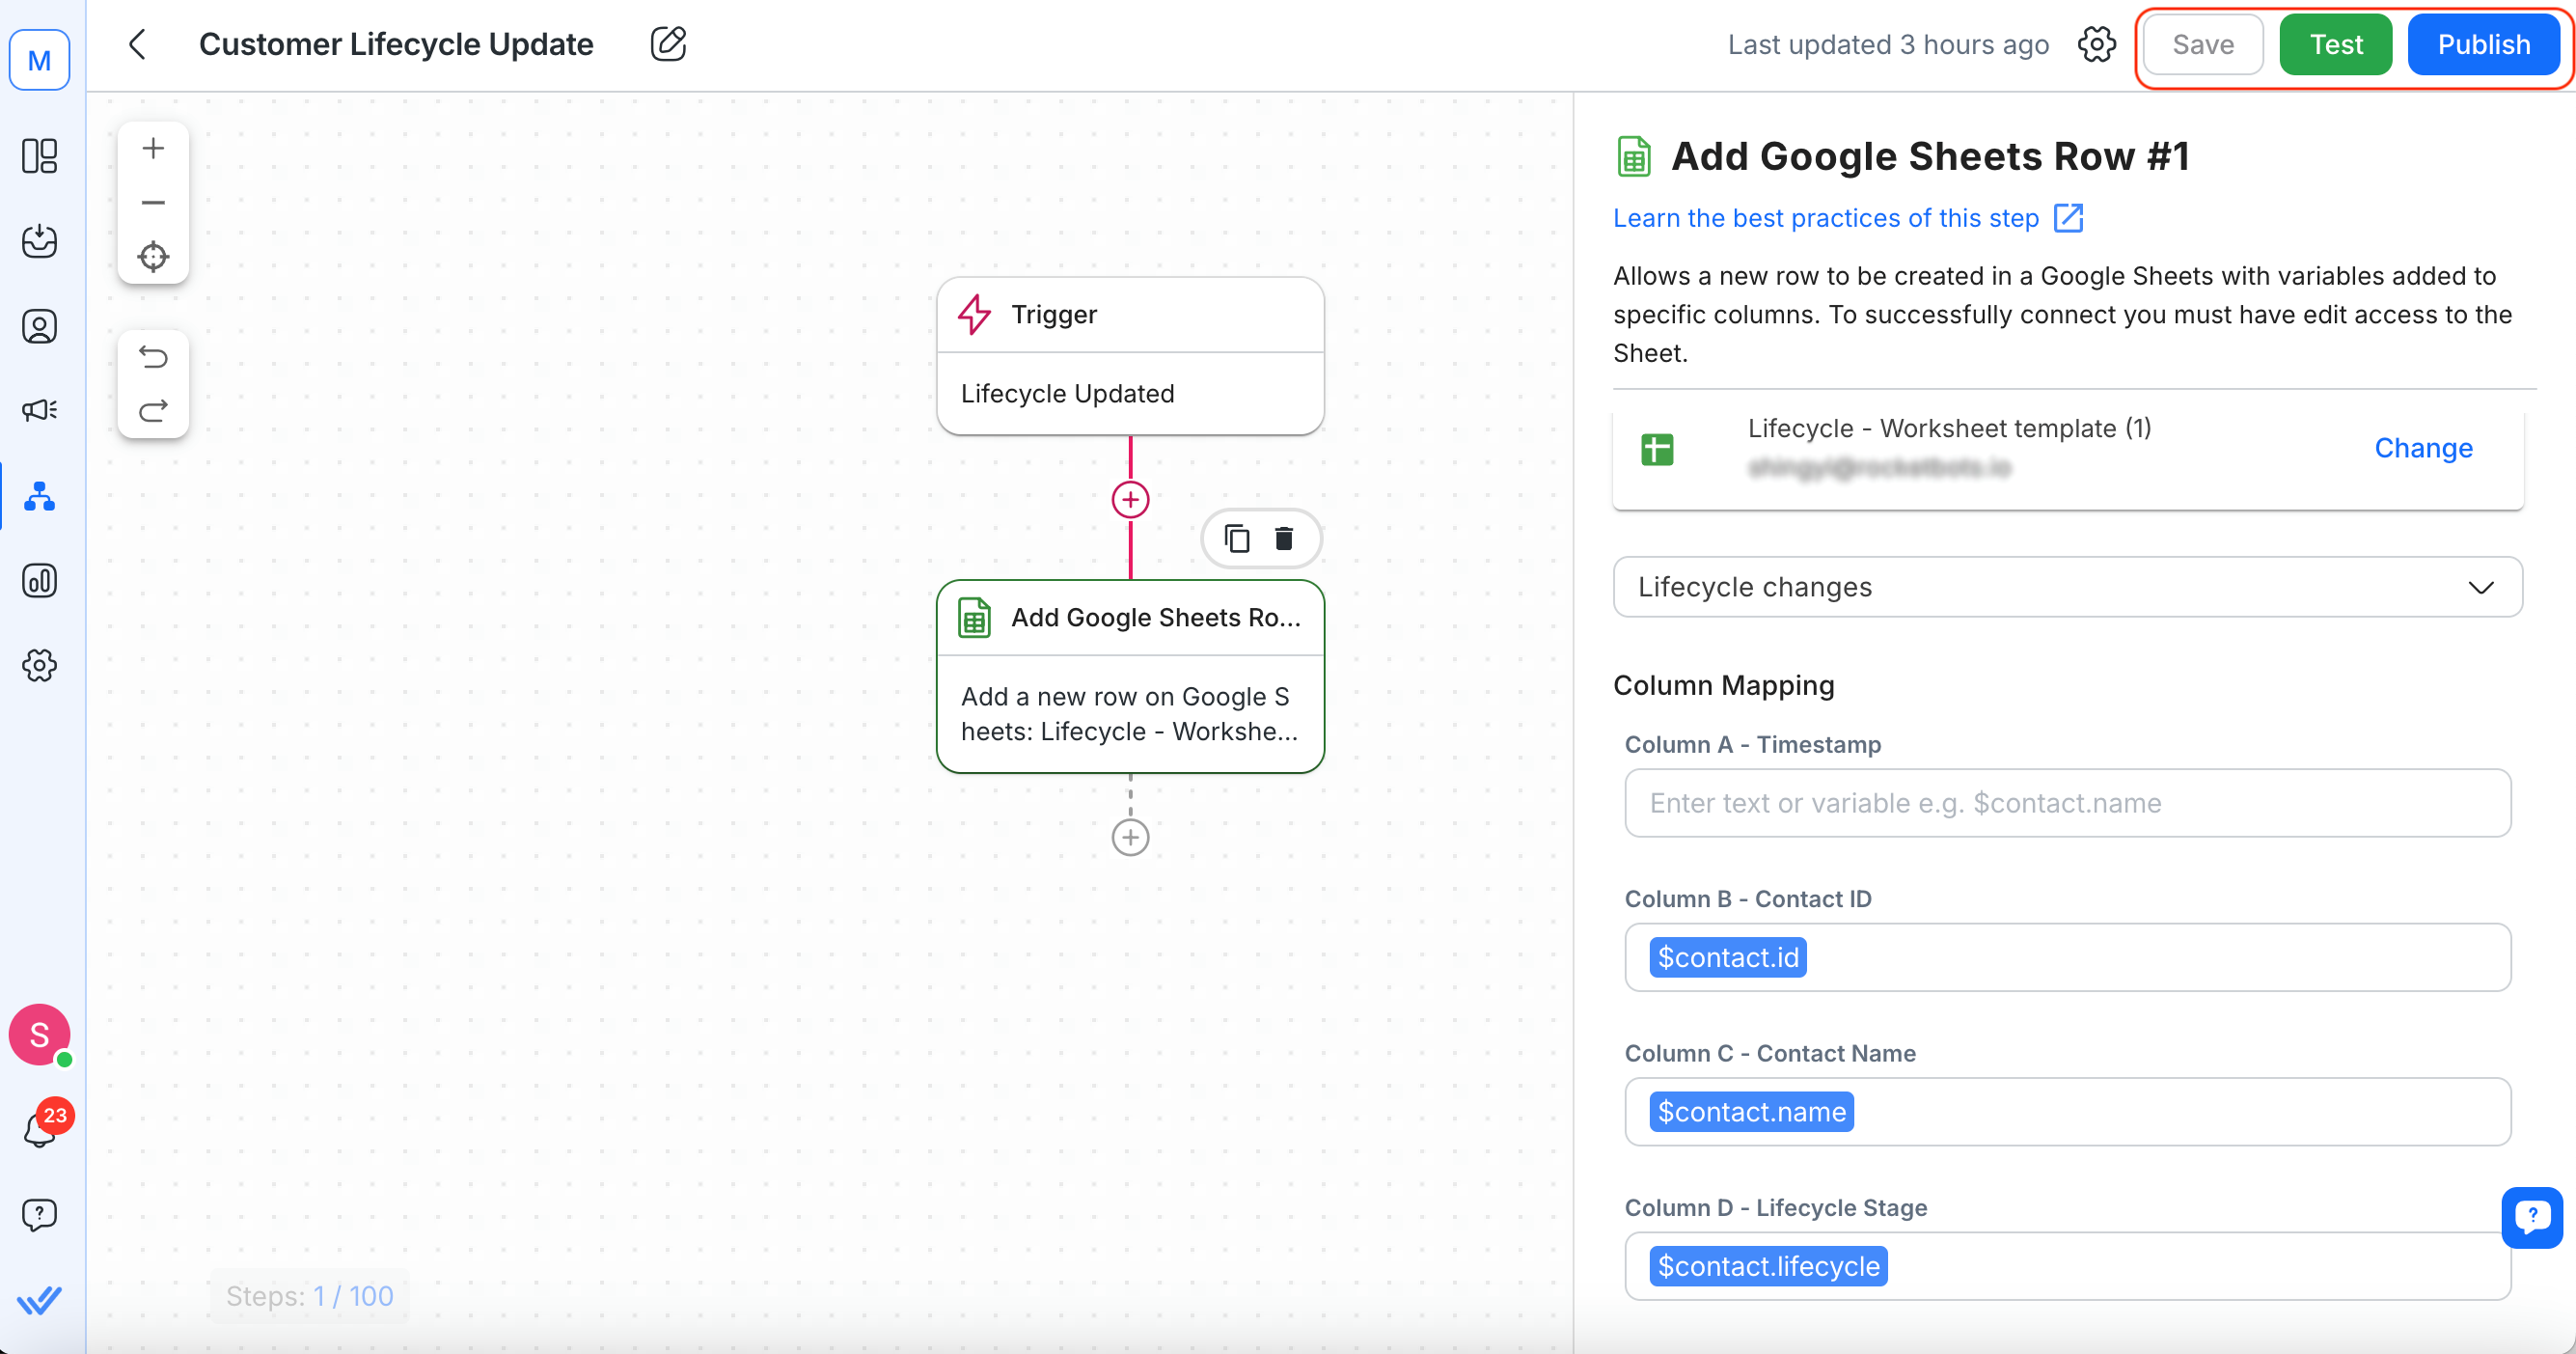
- Choose the Lifecycle Updated Trigger.
- This will initiate the workflow whenever a Contact’s Lifecycle Stage changes.
- Add the Google Sheets Step:
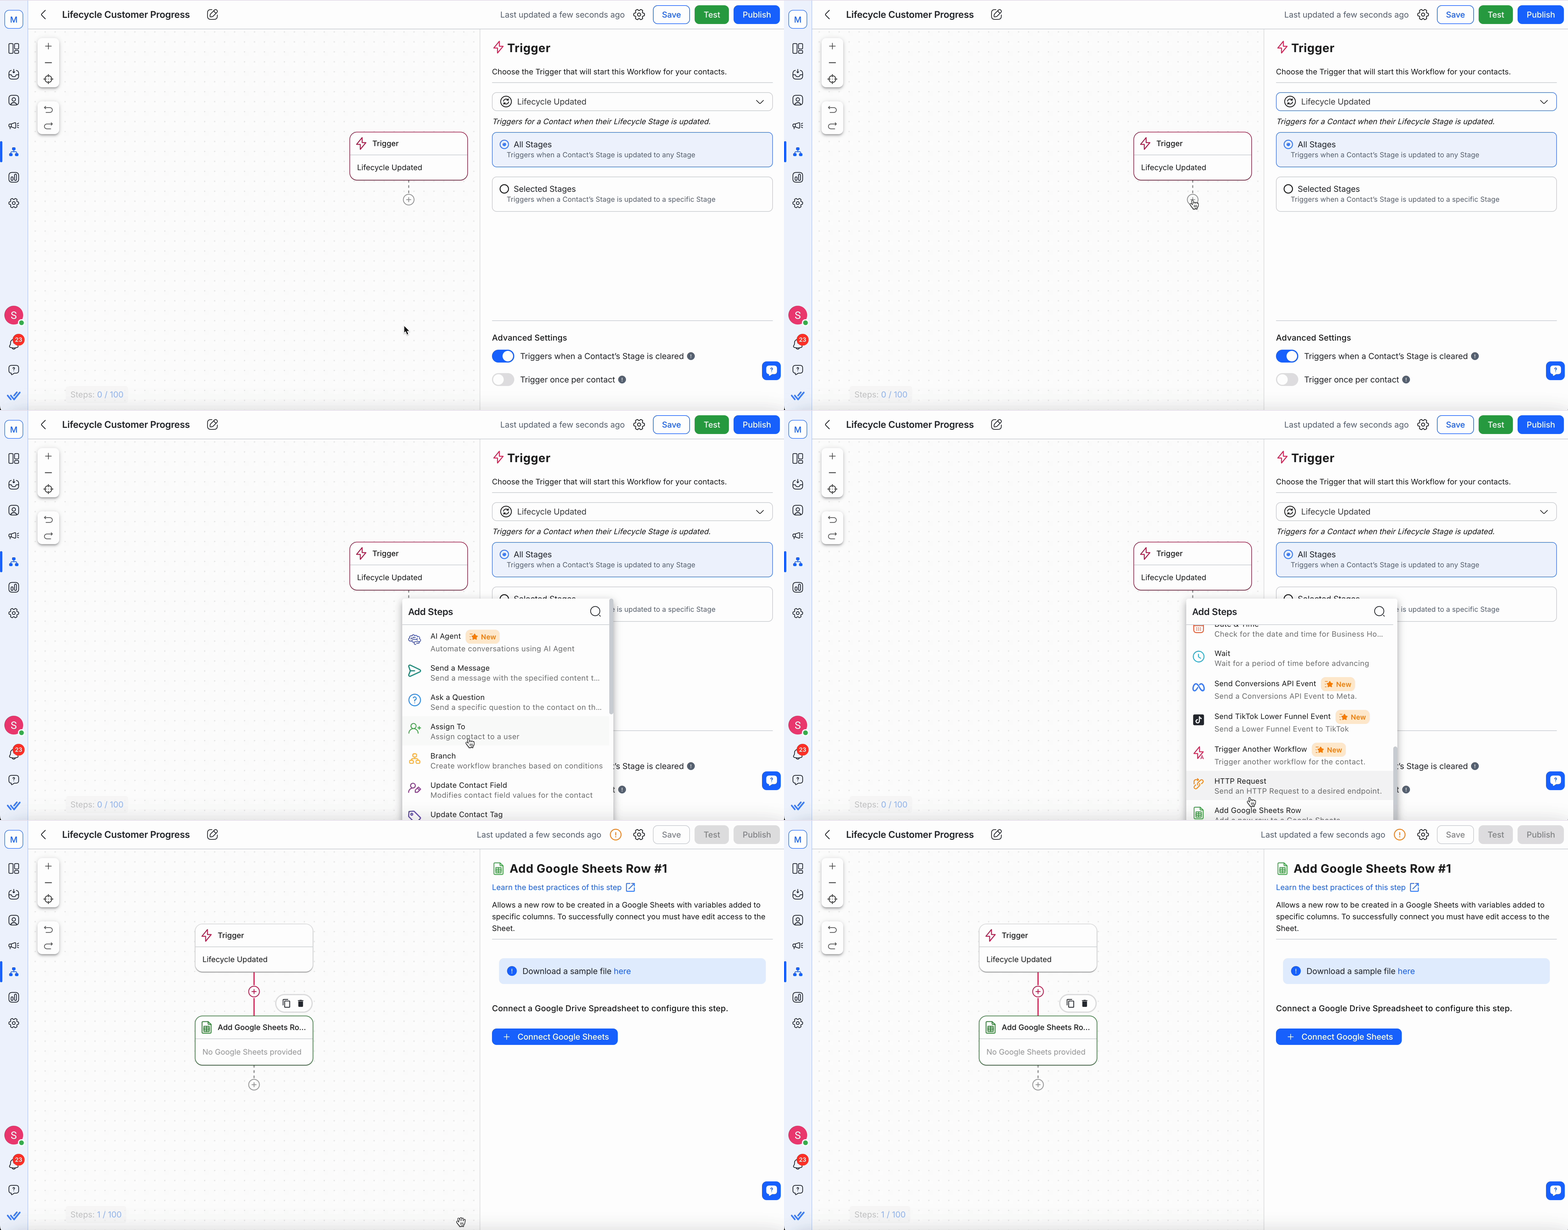
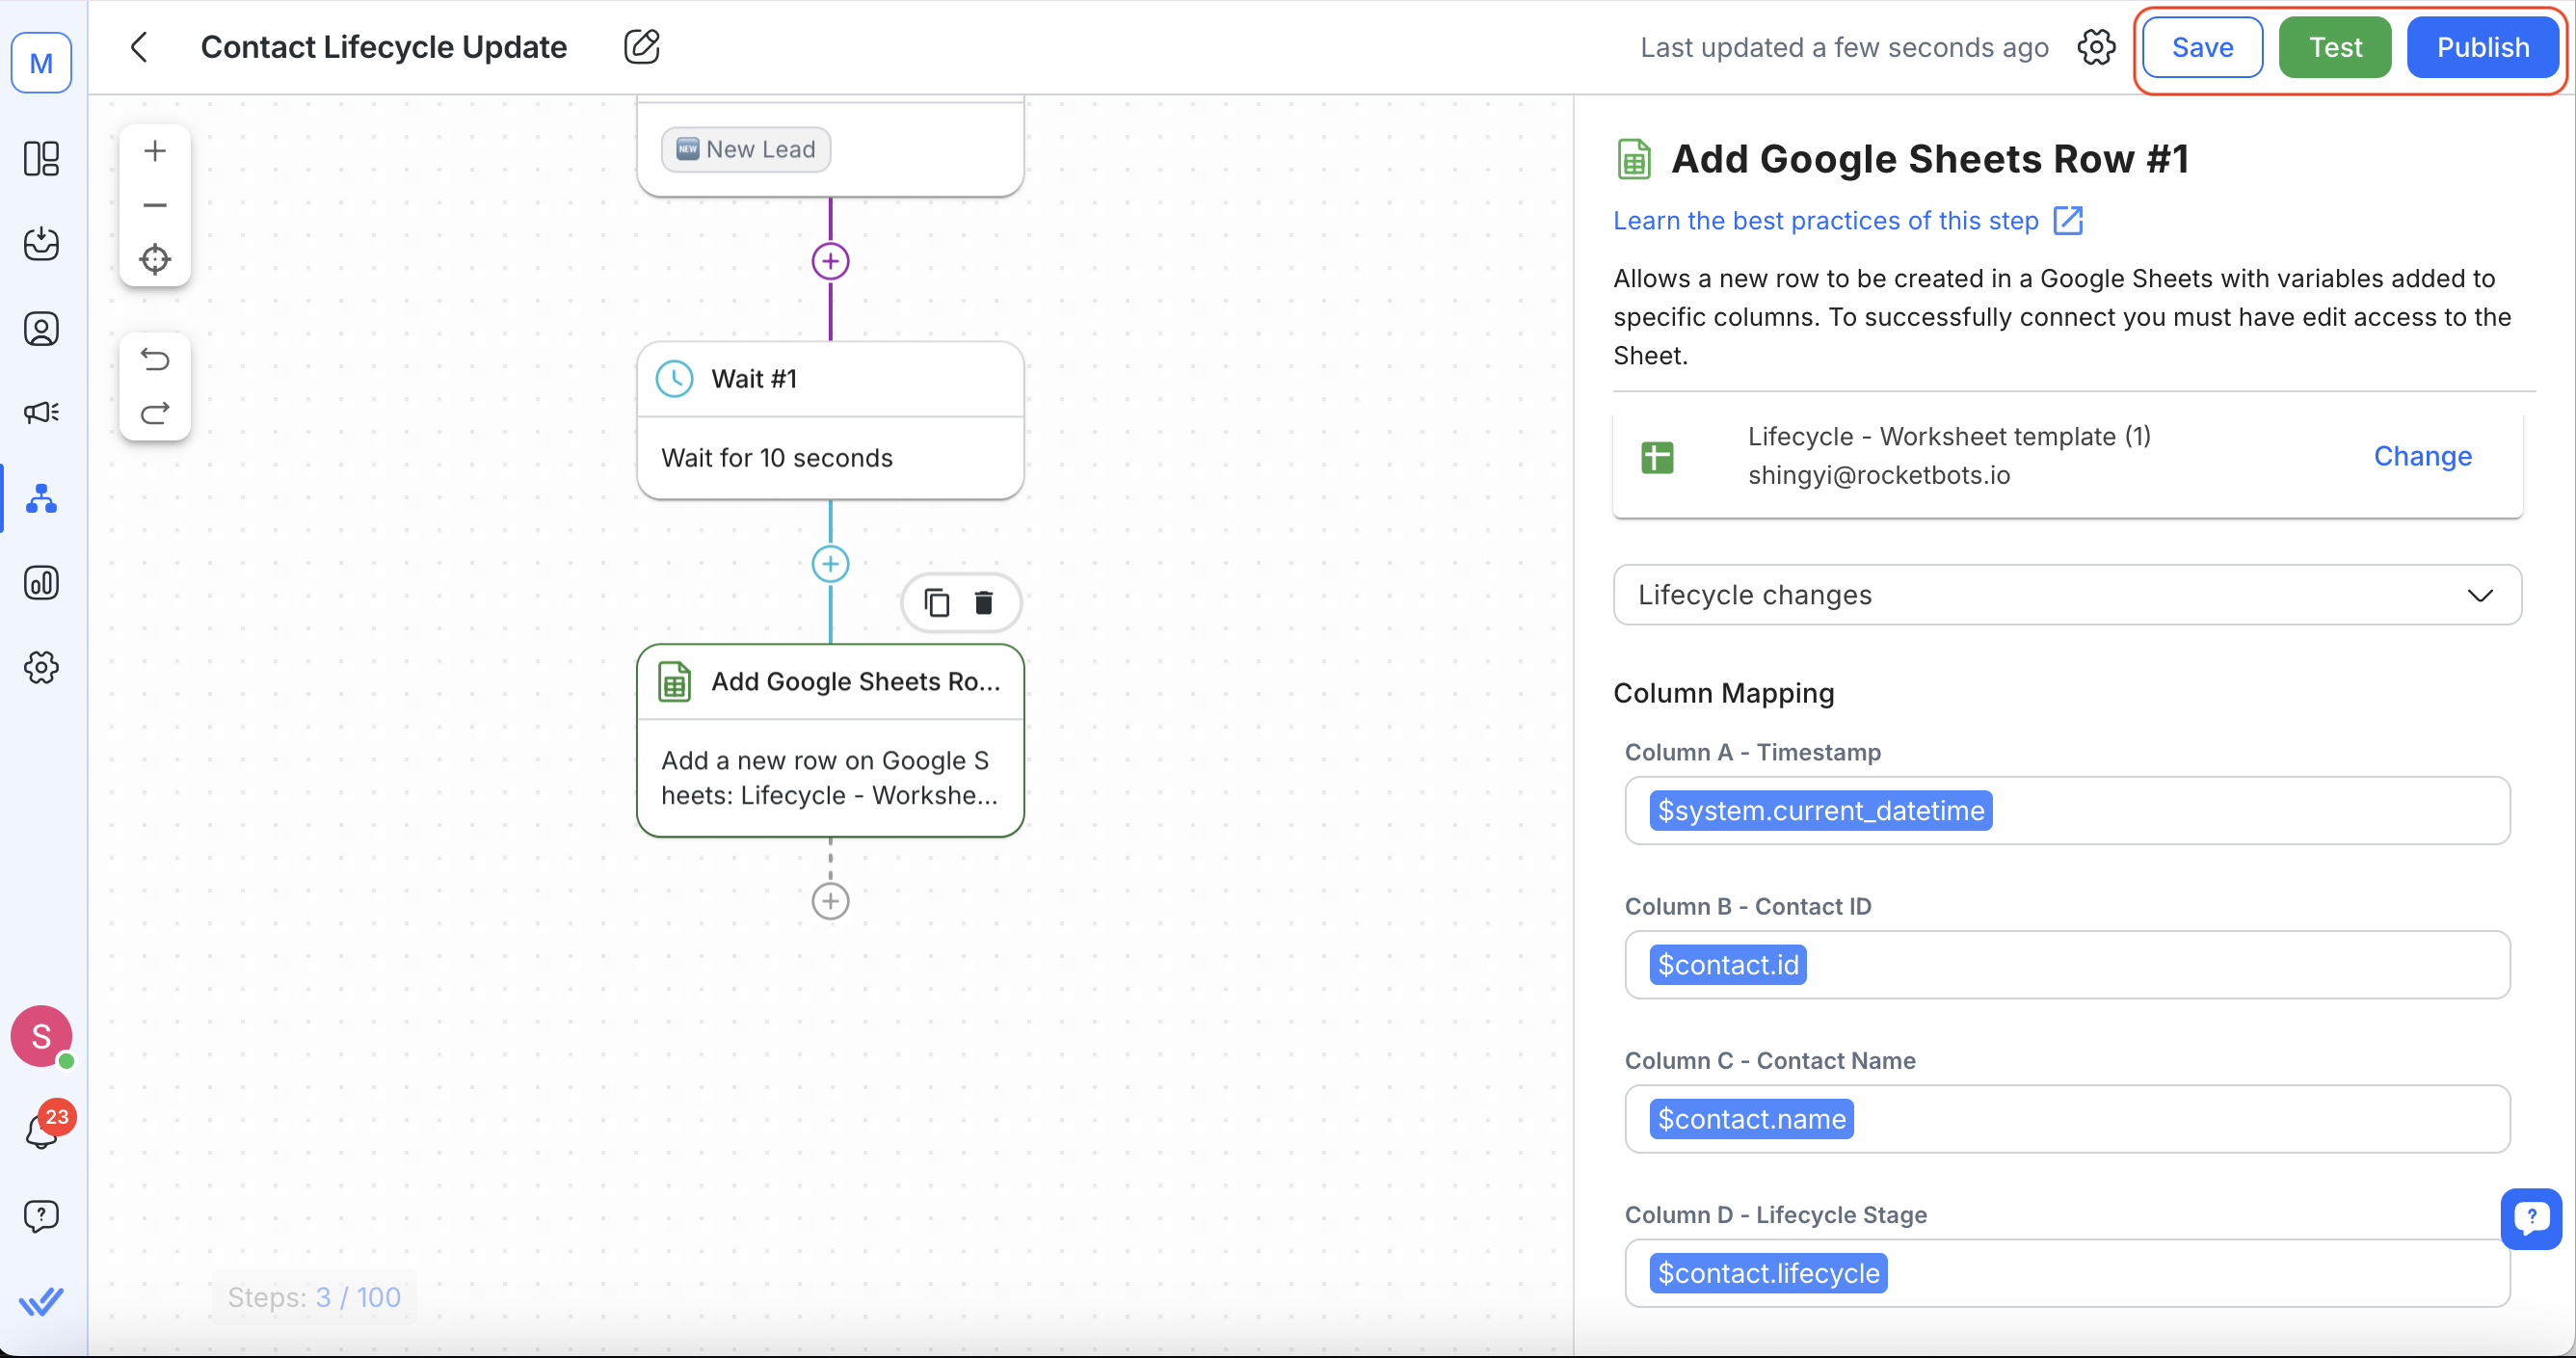
- Click on + Add Step and select Add Google Sheets Row.
- Connect your Google account and select the spreadsheet and worksheet where you want to log the data.
- Map the Data Fields:
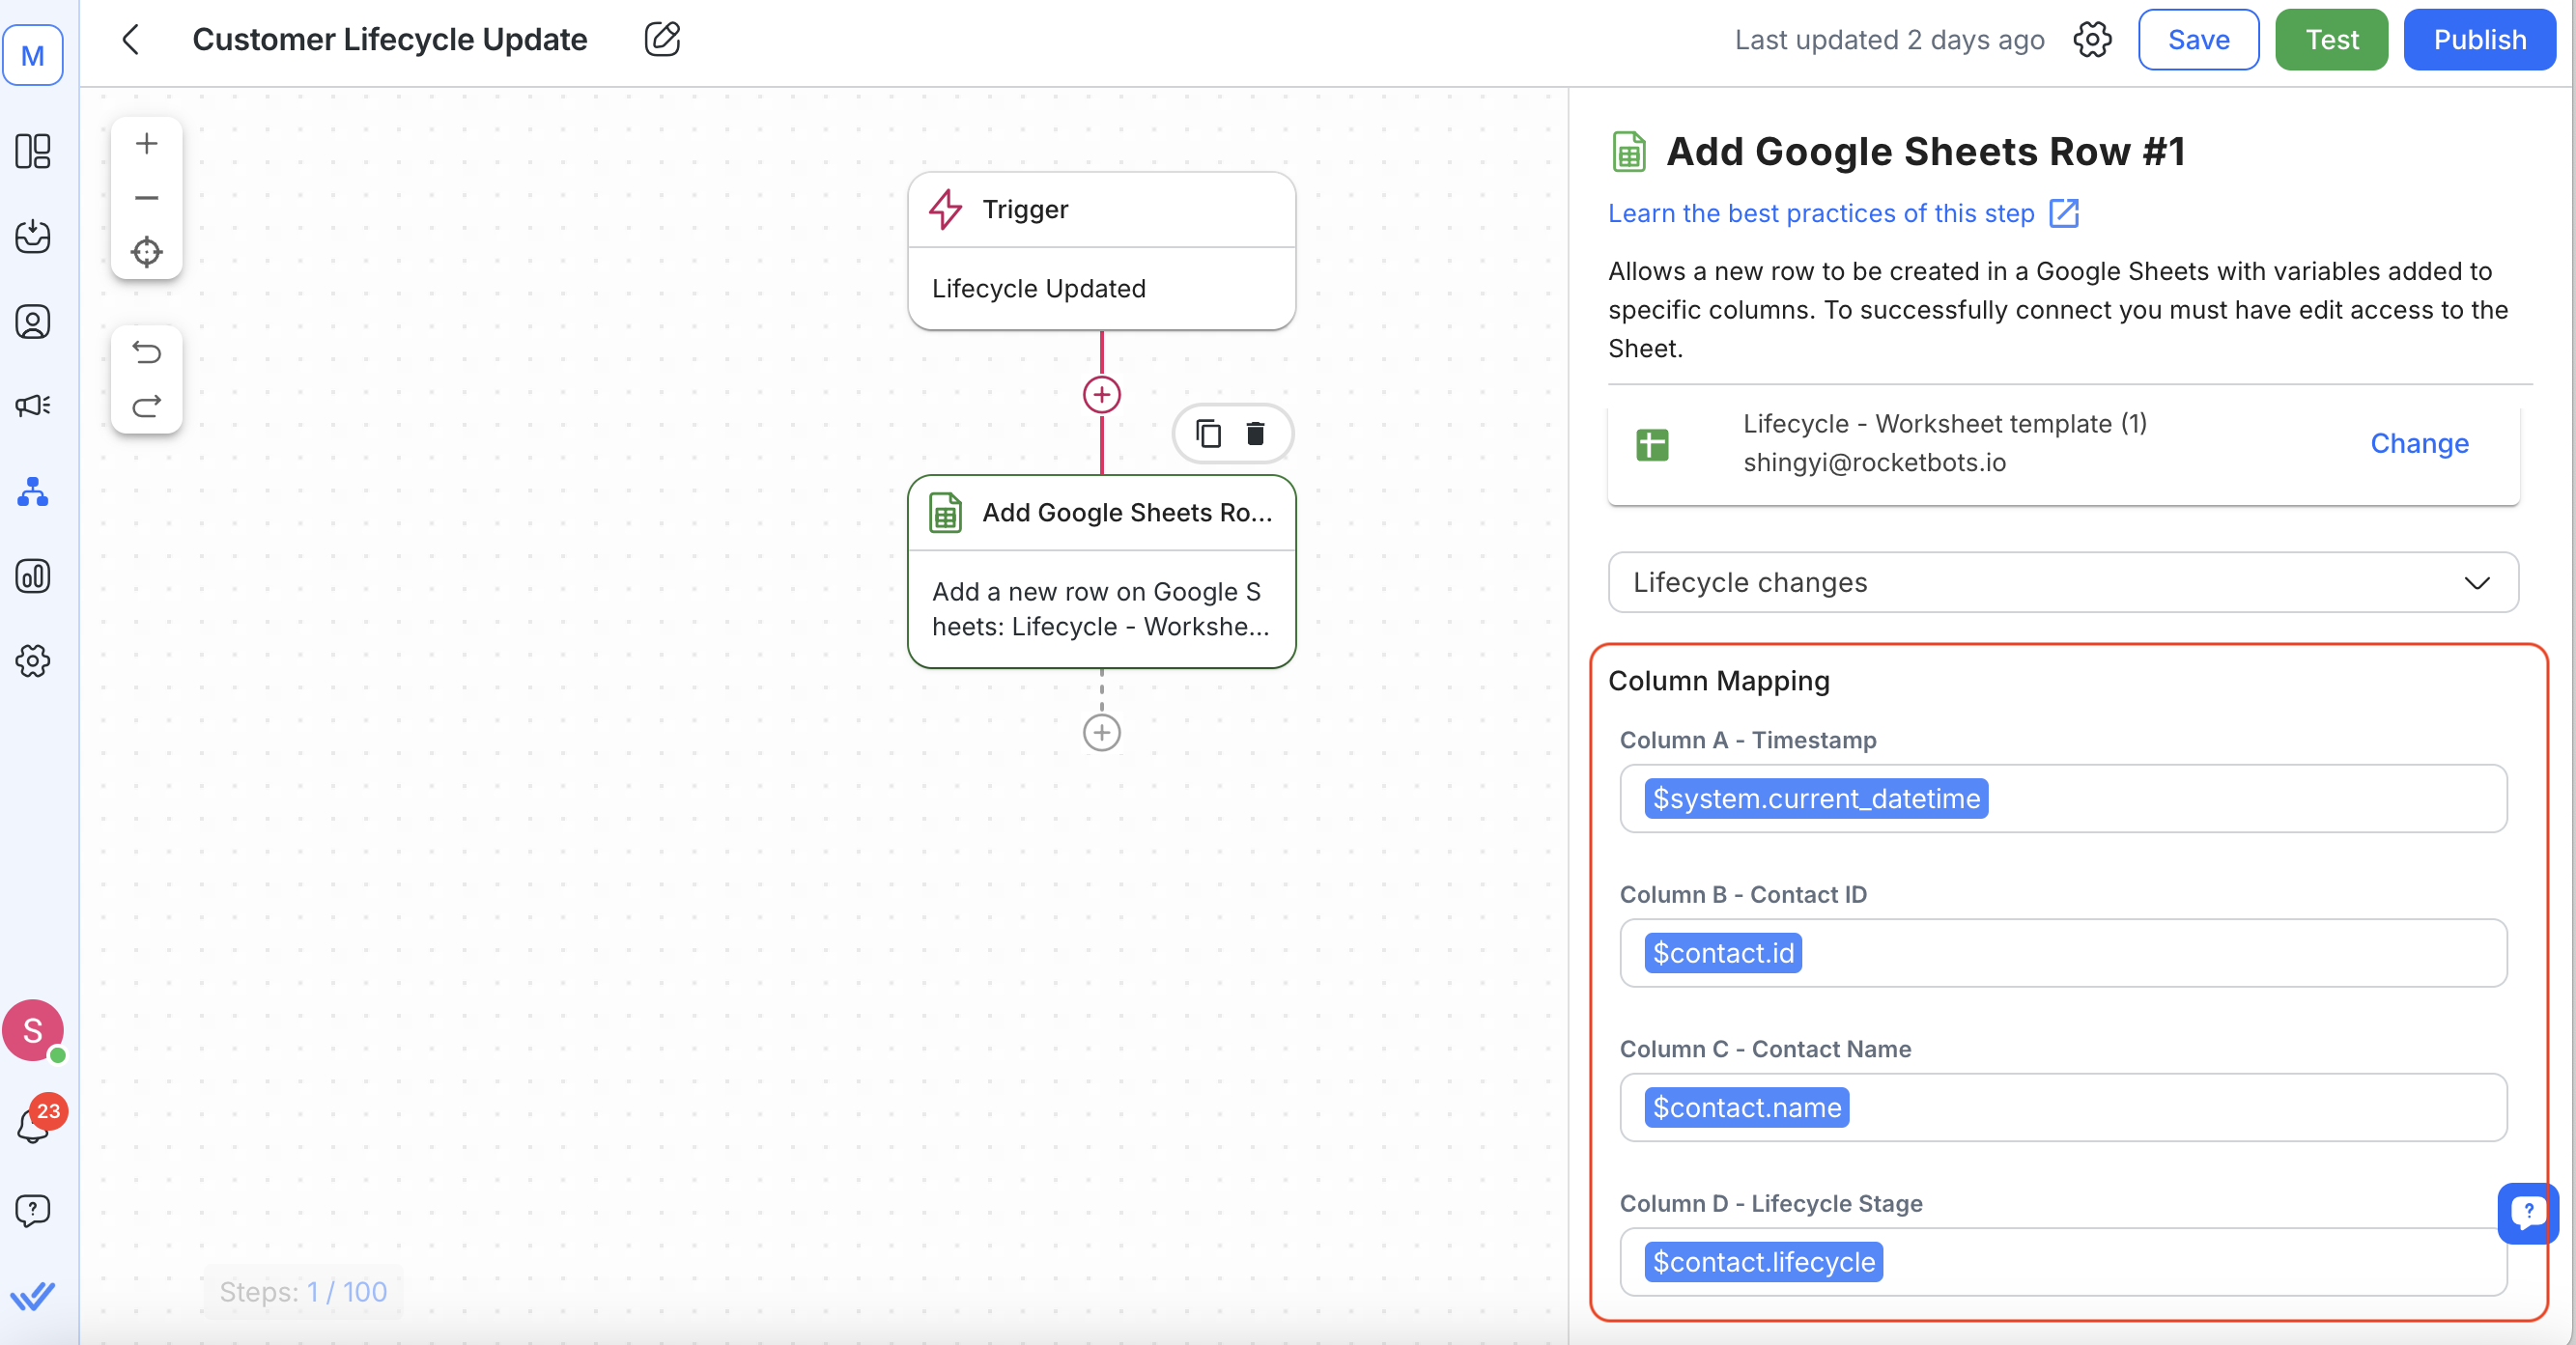
Map the Contact’s information to the corresponding columns in your Google Sheet:
- Contact ID: $contact.id
- Contact Name: $contact.name
- Lifecycle Stage: $contact.lifecycle
- Timestamp: $system.current_datetime
- Save and Activate the Workflow:
- Review your workflow settings.
- Click Save and Publish the workflow.
Option 2: Using the Update Lifecycle Step
If you have specific triggers based on your business objectives, you can use other triggers and include the Update Lifecycle Step.
- Choose a Trigger:
Select a trigger that suits your needs, such as Contact Field Updated.
- Add the Update Lifecycle Step:
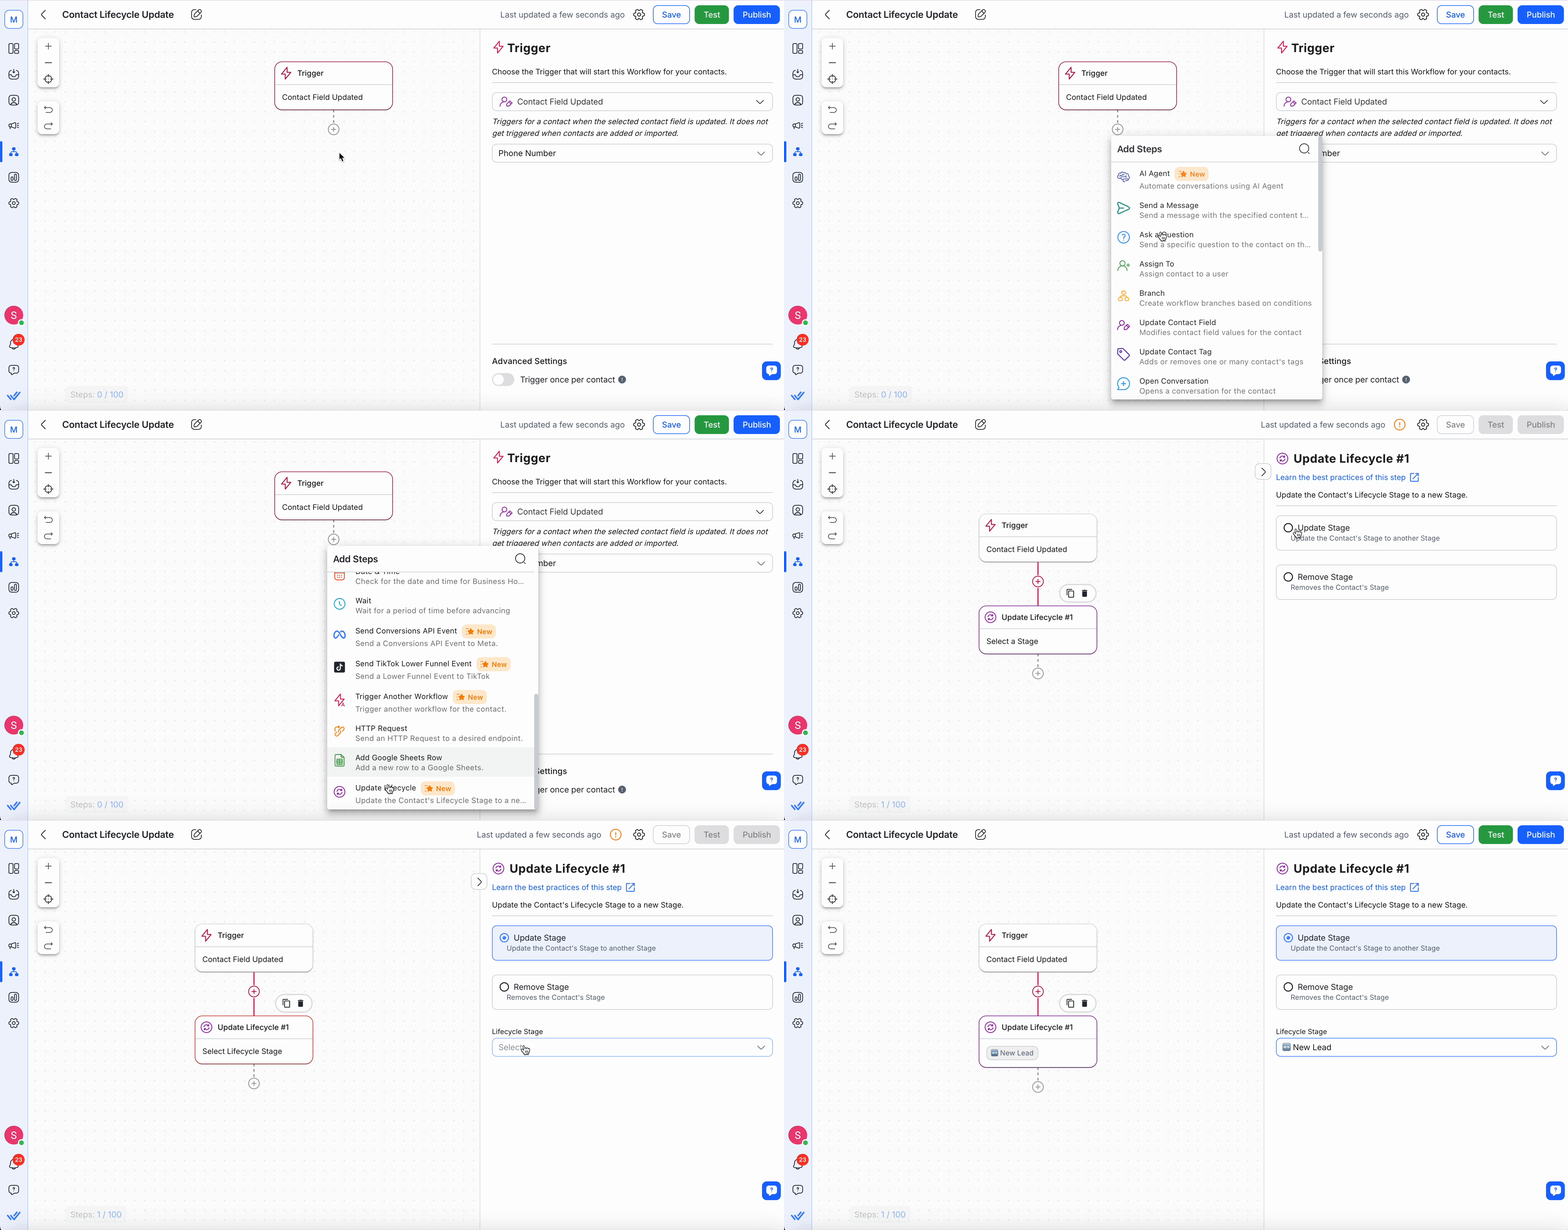
- Click on + Add Step and select Update Lifecycle.
- Choose the Lifecycle Stage you want to assign to the Contact.
- Add the Wait Step:
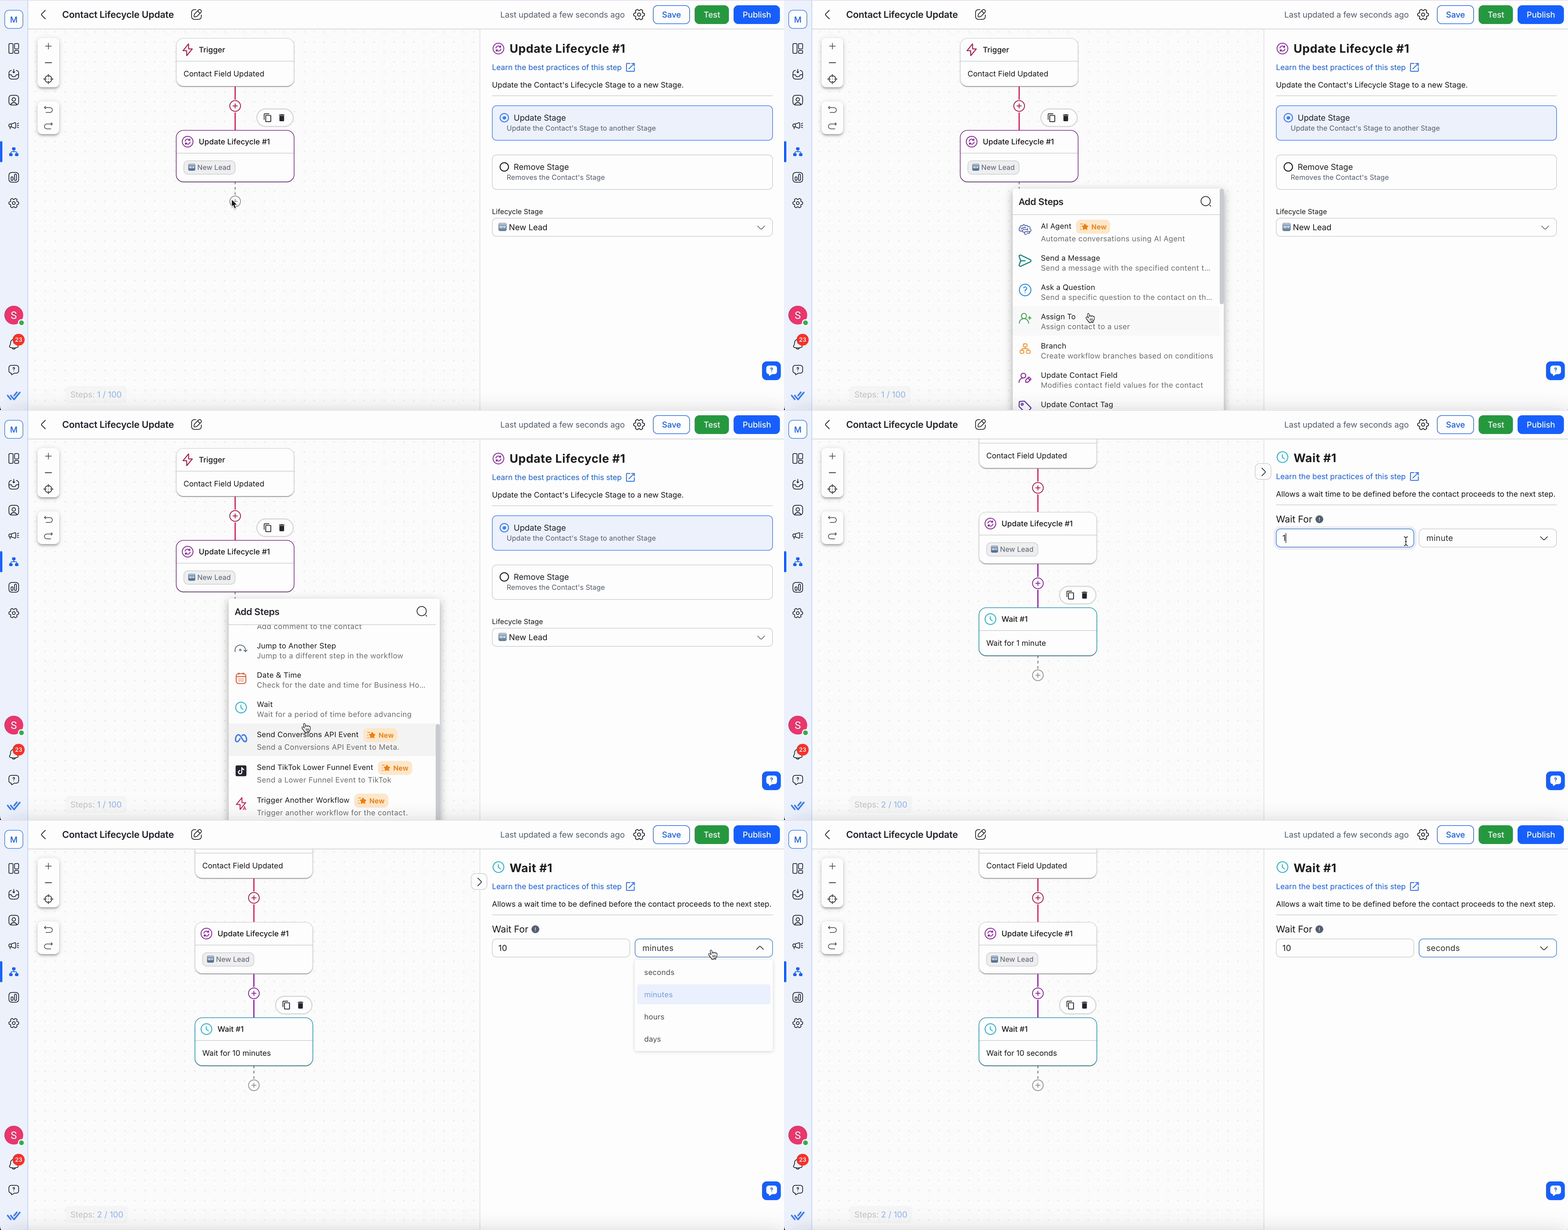
- Add a 10-second waiting period between steps to allow data to be collected and updated. Learn more
- Add the Google Sheets Step:
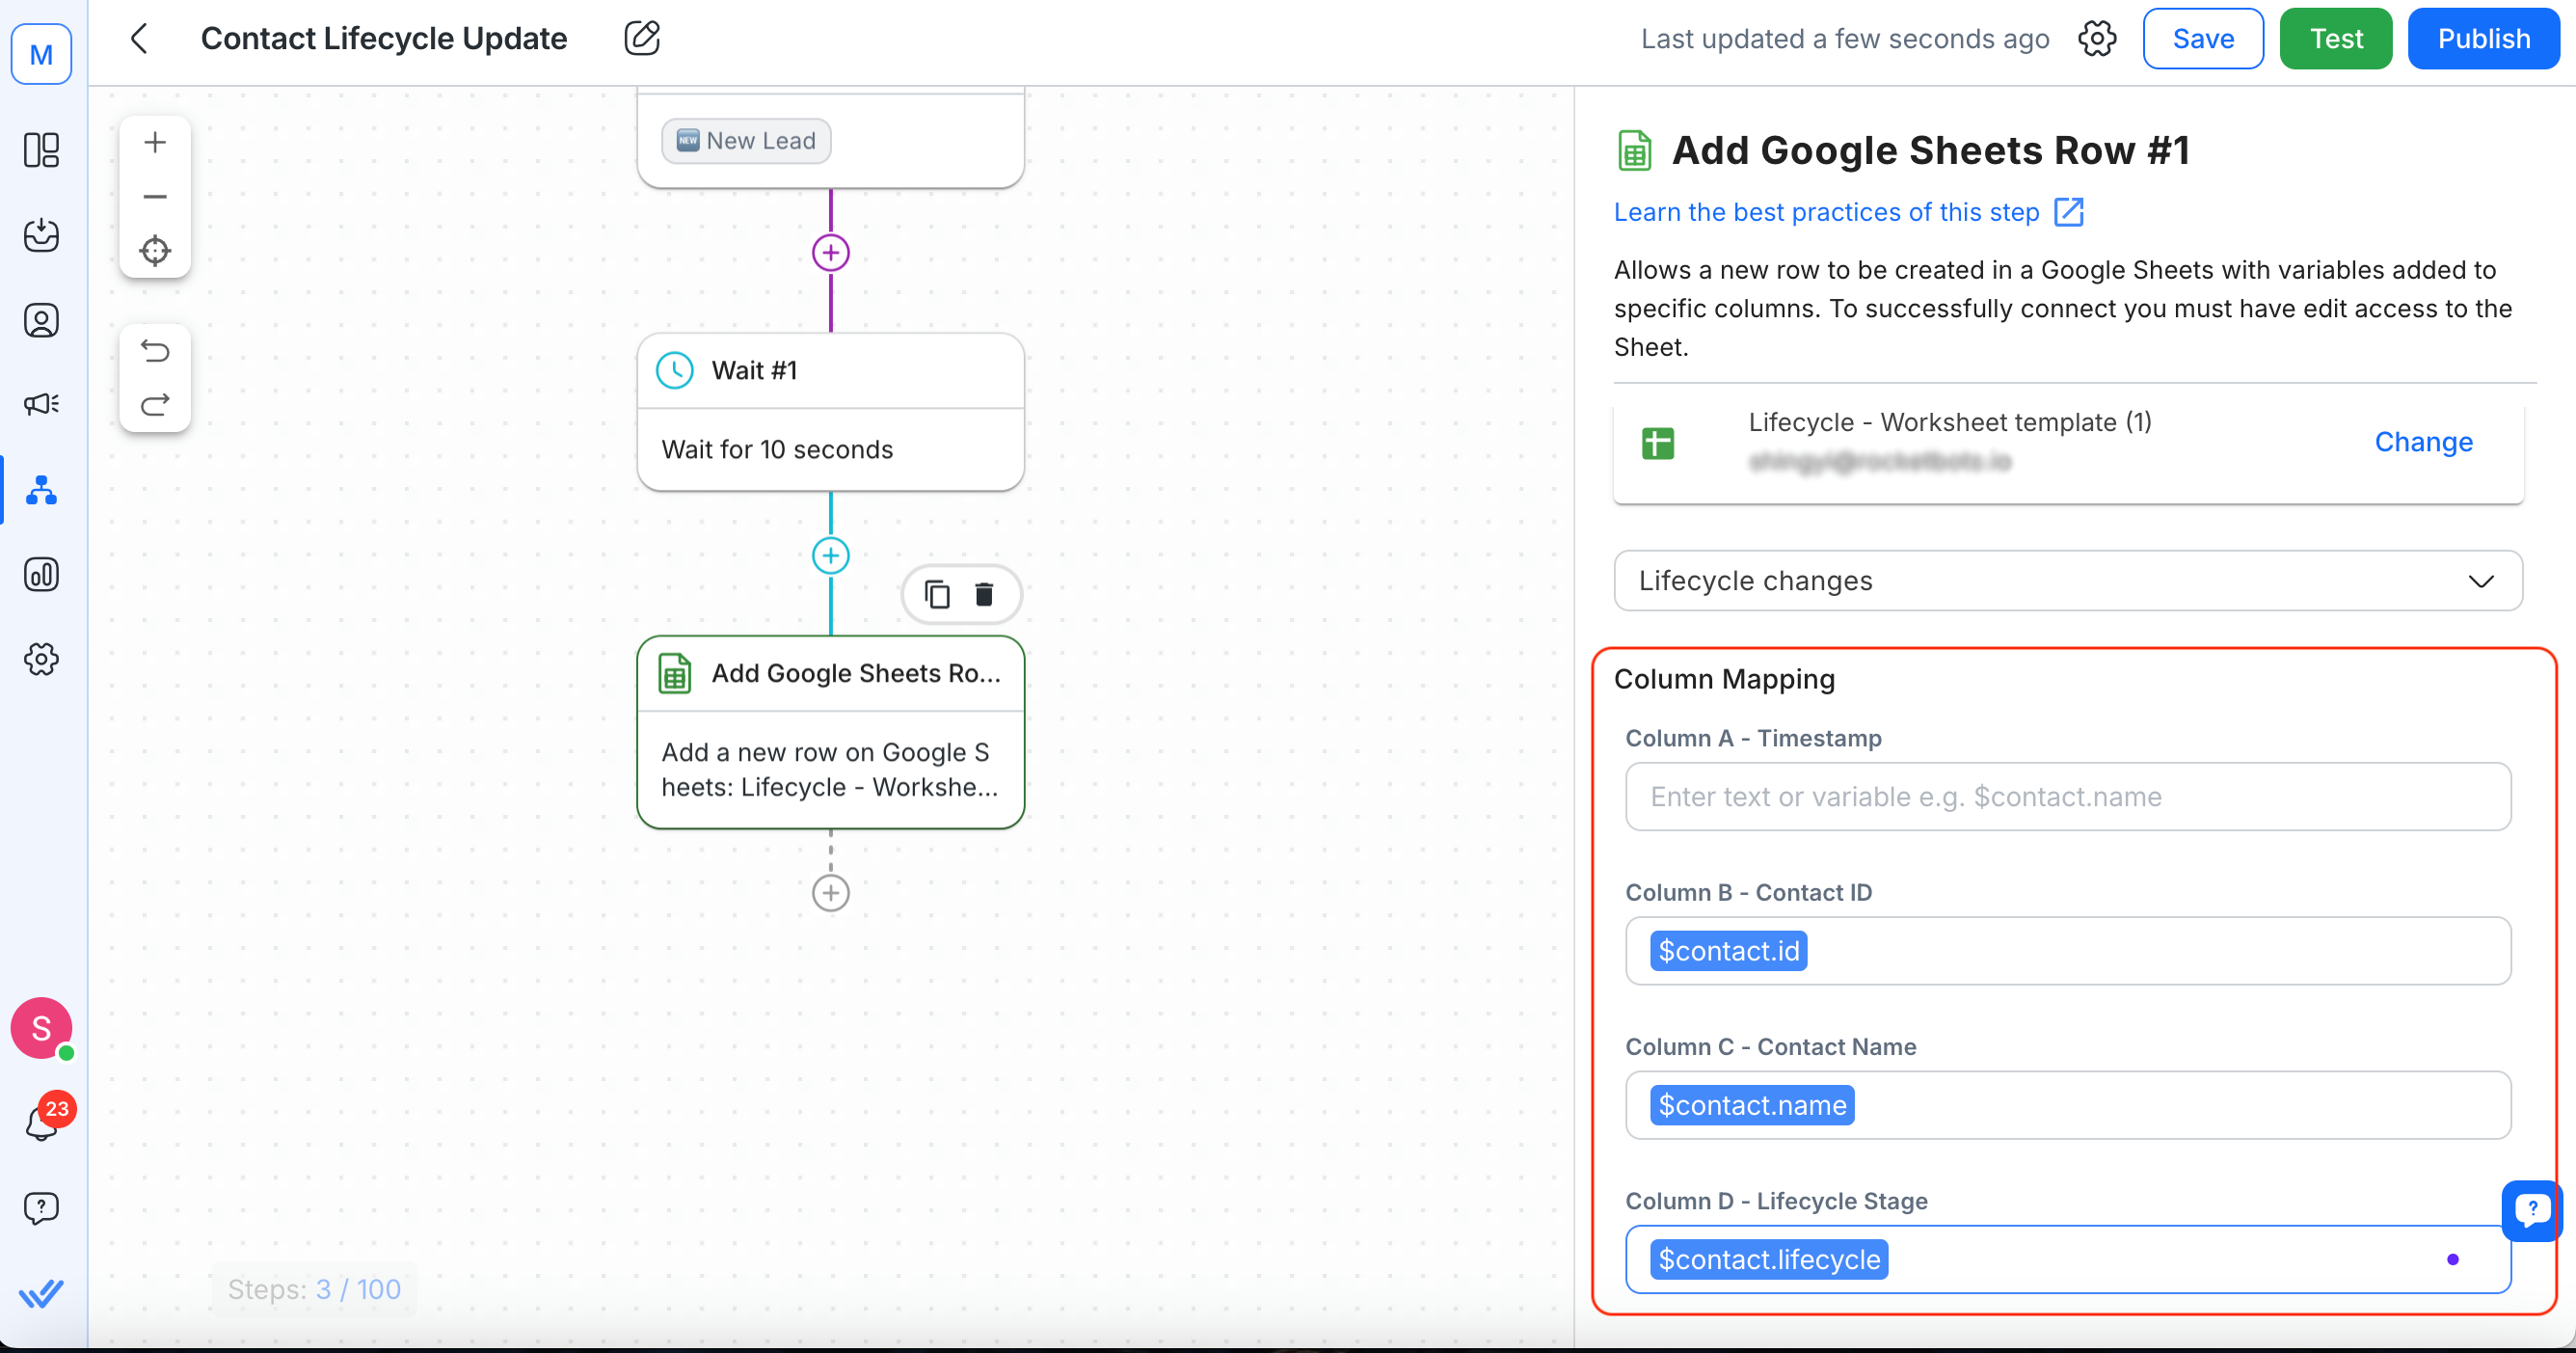
- As in Option 1, add the Add Google Sheets Row Step and map the data fields.
- Save and Activate the Workflow:
- Review all steps.
- Click Save and Publish the workflow.
Step 3: Test the Workflow
Before rolling it out, test the workflow to ensure data is correctly captured and logged:
- Simulate a Lifecycle Stage Change:
Manually change a Contact’s Lifecycle Stage to trigger the workflow.
- Verify Google Sheets Entry:
Check your Google Sheet to confirm that a new row has been added with the correct data.
Analyzing the Data
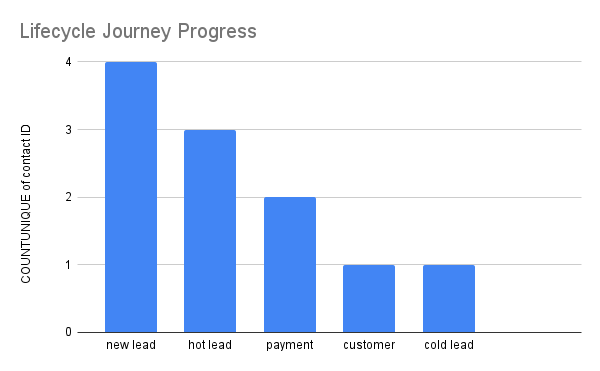
With your data automatically logging into Google Sheets, you can use the built-in pivot table or create your own to analyze key metrics.
The pivot table helps visualize how Contacts move through each stage of your sales funnel.
You can access it in the Pivot Table tab in your Google Sheet.
Use it to analyze the following metrics:
- Total Contacts at Each Stage: See how many Contacts are currently in each Lifecycle Stage.
- Conversion Rates Between Stages: View the percentage of Contacts moving from one Stage to the next using the inbuilt table.
- Drop-off Rates: Identify Stages where Contacts are not progressing.
Interpreting the Data
Identify Bottlenecks:
High drop-off rates at a particular Stage may indicate issues that need addressing.
Monitor Conversion Rates:
Analyze the percentage of Contacts moving from one Stage to the next to understand how effectively your sales funnel is performing at each Stage.
Improve Sales Strategies:
Use insights to train your sales team on best practices for moving Contacts through the funnel.
Understanding the Impact on Your Business
By tracking and analyzing Lifecycle data, you can make informed decisions that positively impact your business:
- Refine marketing and sales strategies with data-driven insights.
- Identify and address drop-off points that can lead to more efficient sales funnels.
- Focus efforts and resources on stages in your sales process that yield the best results.
- Monitor and make adjustments based on current data trends.
Conclusion
Automating the tracking of Contacts and logging data into Google Sheets empowers your team with valuable insights to optimize the sales process. By leveraging our Lifecycle feature and workflows, you eliminate manual data entry, allowing your team to focus on engaging with Contacts and closing deals.
Feeling stuck? Do not fear.
Need assistance? Contact us for support. Help is here!This is the text block that will appear when the button is clicked.
How to Automate Calculations Using AI
Related Articles
Step: Add Google Sheets Row
Learn about the configuration, best practices and use cases for implementing the Add Google Sheets Row Step.
How to Send CSAT to Customer and Save Data in Google Sheets or CRMs
Use a Workflow Template to automatically send CSAT surveys to customers with closed conversations and save data in Google Sheets, CRMs or other data warehouse.
How to Automate Calculations Using AI
Learn how AI Assist can resolve customer queries that involve calculations.
