Quick Start
What is respond.io?
Setting Up an Account
Connecting Channels
Inviting Your Teammates
Getting Contacts to Message You
Automated Welcome and Away Messages
Responding to Messages
Glossary of Terms
Channels
WhatsApp Business Platform (API) Quick Start
Getting Ready for Inbound Conversations
Getting Ready for Promotional Messaging
WhatsApp Official Business Account (Blue Tick)
Grow your WhatsApp Audience by Maximizing Entry Points
Get WhatsApp API Account for Government Agencies
WhatsApp Business Calling API
Meta Business Verification
WhatsApp Message Templates
WhatsApp Pricing
WhatsApp Business Platform (API) Channel Configuration
WhatsApp Messaging Limits
Meta Product Catalog
Change Your WhatsApp Business Display Name
Migrating from WhatsApp Personal or WhatsApp Business App
Phone Number Migration to respond.io WhatsApp Business Platform (API)
Turn-off WhatsApp Number Two-Step Verification
WhatsApp Cloud API
360dialog WhatsApp
Twilio WhatsApp
MessageBird WhatsApp
Vonage WhatsApp
Phone Number Migration to WhatsApp Cloud API
TikTok
Facebook Messenger
Facebook Messenger Overview
Facebook Messenger Quick Start
Facebook Chat Plugin
Facebook Private Replies
Facebook Message Tag
LINE
Viber
Telegram
Website Chat Widget
Website Chat Widget Overview
Website Chat Widget Quick Start
Install Website Chat Widget on WordPress
Install Website Chat Widget on Shopify
Install Website Chat Widget on Wix
Install Website Chat Widget on Joomla
Install Website Chat Widget on Squarespace
SMS
Custom Channel
Product
Dashboard & Reporting
Dashboard
Reports Overview
Reports: Conversations
Reports: Responses
Reports: Resolutions
Reports: Messages
Reports: Contacts
Reports: Assignments
Reports: Leaderboard
Reports: Users
Reports: Broadcasts
Inbox
Inbox Overview
Assignment and Closing a Conversation
Custom Inboxes
Interacting with Respond AI Prompts
Using AI Assist
Contacts
Broadcasts Module
Workflows
Workflows Overview
Workflow Triggers
Workflow Steps Overview
Step: AI Agent
Step: Send a Message
Step: Ask a Question
Step: Assign To
Step: Branch
Step: Update Contact Tag
Step: Update Contact Field
Step: Open Conversation
Step: Close Conversation
Step: Add Comment
Step: Jump To
Step: Date & Time
Step: Wait
Step: Trigger Another Workflow
Step: HTTP Request
Step: Add Google Sheets Row
Step: Send TikTok Lower Funnel Event
How to Avoid Workflow Loops
Step: Update Lifecycle
Step: Send Conversions API Event
Dynamic Variables
Workspace Settings
Managing a Workspace
General info (previously General)
User settings (previously Users)
Teams (previously Team Settings)
Channels
Growth Widgets
Contact Fields
Integrations
Respond AI
Closing Notes
Snippets
Tags
Files
Data Export
Contact Import
Lifecycle
Organization Settings
Organization Overview
Account info (previously General)
Admin Settings (previously Users)
Workspaces
WhatsApp Fees
Billing & Usage
Security
User Account
Mobile App
Installing respond.io Mobile App
Messaging From Your Mobile
Managing Notifications On Your Mobile
Configuring mobile app settings
Help Menu
Conversation Led Growth
Capture Leads
How to Collect Contacts’ Emails and Phone Numbers
How to Route Contacts from CTC Ads to Agents
How to Send Outbound Sales Messages
How to Track Conversation Source from Multiple Websites
How to Enrich Customer Data from a CRM or other Business Software
Convert Leads
How to Automate Product Info Sharing in Conversations Initiated via CTC Ads
How to Automatically Qualify Contacts Based on Budget Using AI Agent
Assignment Strategy: How to Automate Contact Distribution & Load Balancing
How to Maximize Customer Service Potential with AI Agent
How to Automate Contact Information Collection with AI
How to Block Contacts and Manage Spam
How to Create Automated Welcome and Away Messages
How to Create Automated Chat Menus
How to Route Contacts to Preferred AI Agent
How to Route Contacts by their Preferred Language
How to Route Contacts by Team Functions
How to Route Contacts by Shifts
Assignment Strategy: How to Unassign Agents after Conversations Closed
How to Get Contacts’ Consent for Personal Data Collection
How to Promptly Transfer Conversation Between Agents
How to Guide Customers from Exploration to Purchase with Engaging Menus
How to Optimize Customer Onboarding with Automated & Customized Welcome Messages
How to Streamline Meeting Scheduling via CTC Ads
How to Get a Complete View of the Customers
How to Simplify Customer Escalation with Automation
How to Transfer Contacts to the Next Shift Automatically
How to Optimize Agents’ Productivity in the Inbox Module
How to Write an Optimal AI Persona (Best Practices)
How to Write the Best Knowledge Sources for AI Agents
How to Align AI Conversations with Your Brand Voice
How to Draft Customer Replies with AI
How to Convert Image to Text Using AI
How to Automate Calculations Using AI
How to Automate Lifecycle Tracking in Google Sheets
Retain Customers
How to Route New and Returning Contacts
How to Route VIP Contacts
How to Send CSAT to Customer and Save Data in Google Sheets or CRMs
How to Send Outbound Support Messages
How to improve lead targeting and automatically send purchase events to Meta when a customer makes a payment
Reporting and Analytics
Broadcasts Use Cases
How to Send a Simple Broadcast
How to Start a Workflow Based on Broadcast Response
How to Import to Broadcast via WhatsApp
How to Troubleshoot a Failed Broadcast
Integrations
Dialogflow
Dialogflow Overview
Dialogflow: Connecting to Dialogflow
Dialogflow: Creating a Chatbot
Dialogflow: Managing Intents
Dialogflow: Parameters
Dialogflow: Events
Dialogflow: Response Templates
Dialogflow: Custom Payloads
Dialogflow: Fulfillment Webhook Request
Zapier
E-Commerce Integration: Shopify
E-Commerce Integration: BigCommerce
E-Commerce Integration: WooCommerce
E-Commerce Integration: Magento
CRM Integration: HubSpot
CRM Integration: Salesforce
CRM Integration: Pipedrive
CRM Integration: ActiveCampaign
Zapier
Make
Meta Business Accounts
TikTok Messaging Ads Integration
Developer API
HubSpot
Webhooks
Salesforce
Table of Contents
- Home
- Quick Start
- Automated Welcome and Away Messages
Automated Welcome and Away Messages
Updated
by Joshua Lim
When someone messages your business, you’ll want to respond to them as soon as possible. Automated welcome and away messages allow an immediate response and can be used to manage Contacts’ expectations.
Benefits of Welcome and Away Messages
Use welcome and away messages to:
- Provide a standard greeting and introduction to your business.
- Respond to Contacts immediately.
- Let Contacts know when they can expect a reply.
Methods for Sending Welcome and Away Messages
1. Send a basic automated reply when a Contact opens a conversation.
2. Send welcome and away messages based on business hours.
Send a basic automated reply when a Contact opens a conversation
Method Objectives
- Set up the Workflow templates to send a welcome or away message.
Workflow Setup
There are Workflow templates set up by our team that you can use immediately. These templates can be edited to fit your business needs.
Set up the Workflow templates to send a welcome or away message
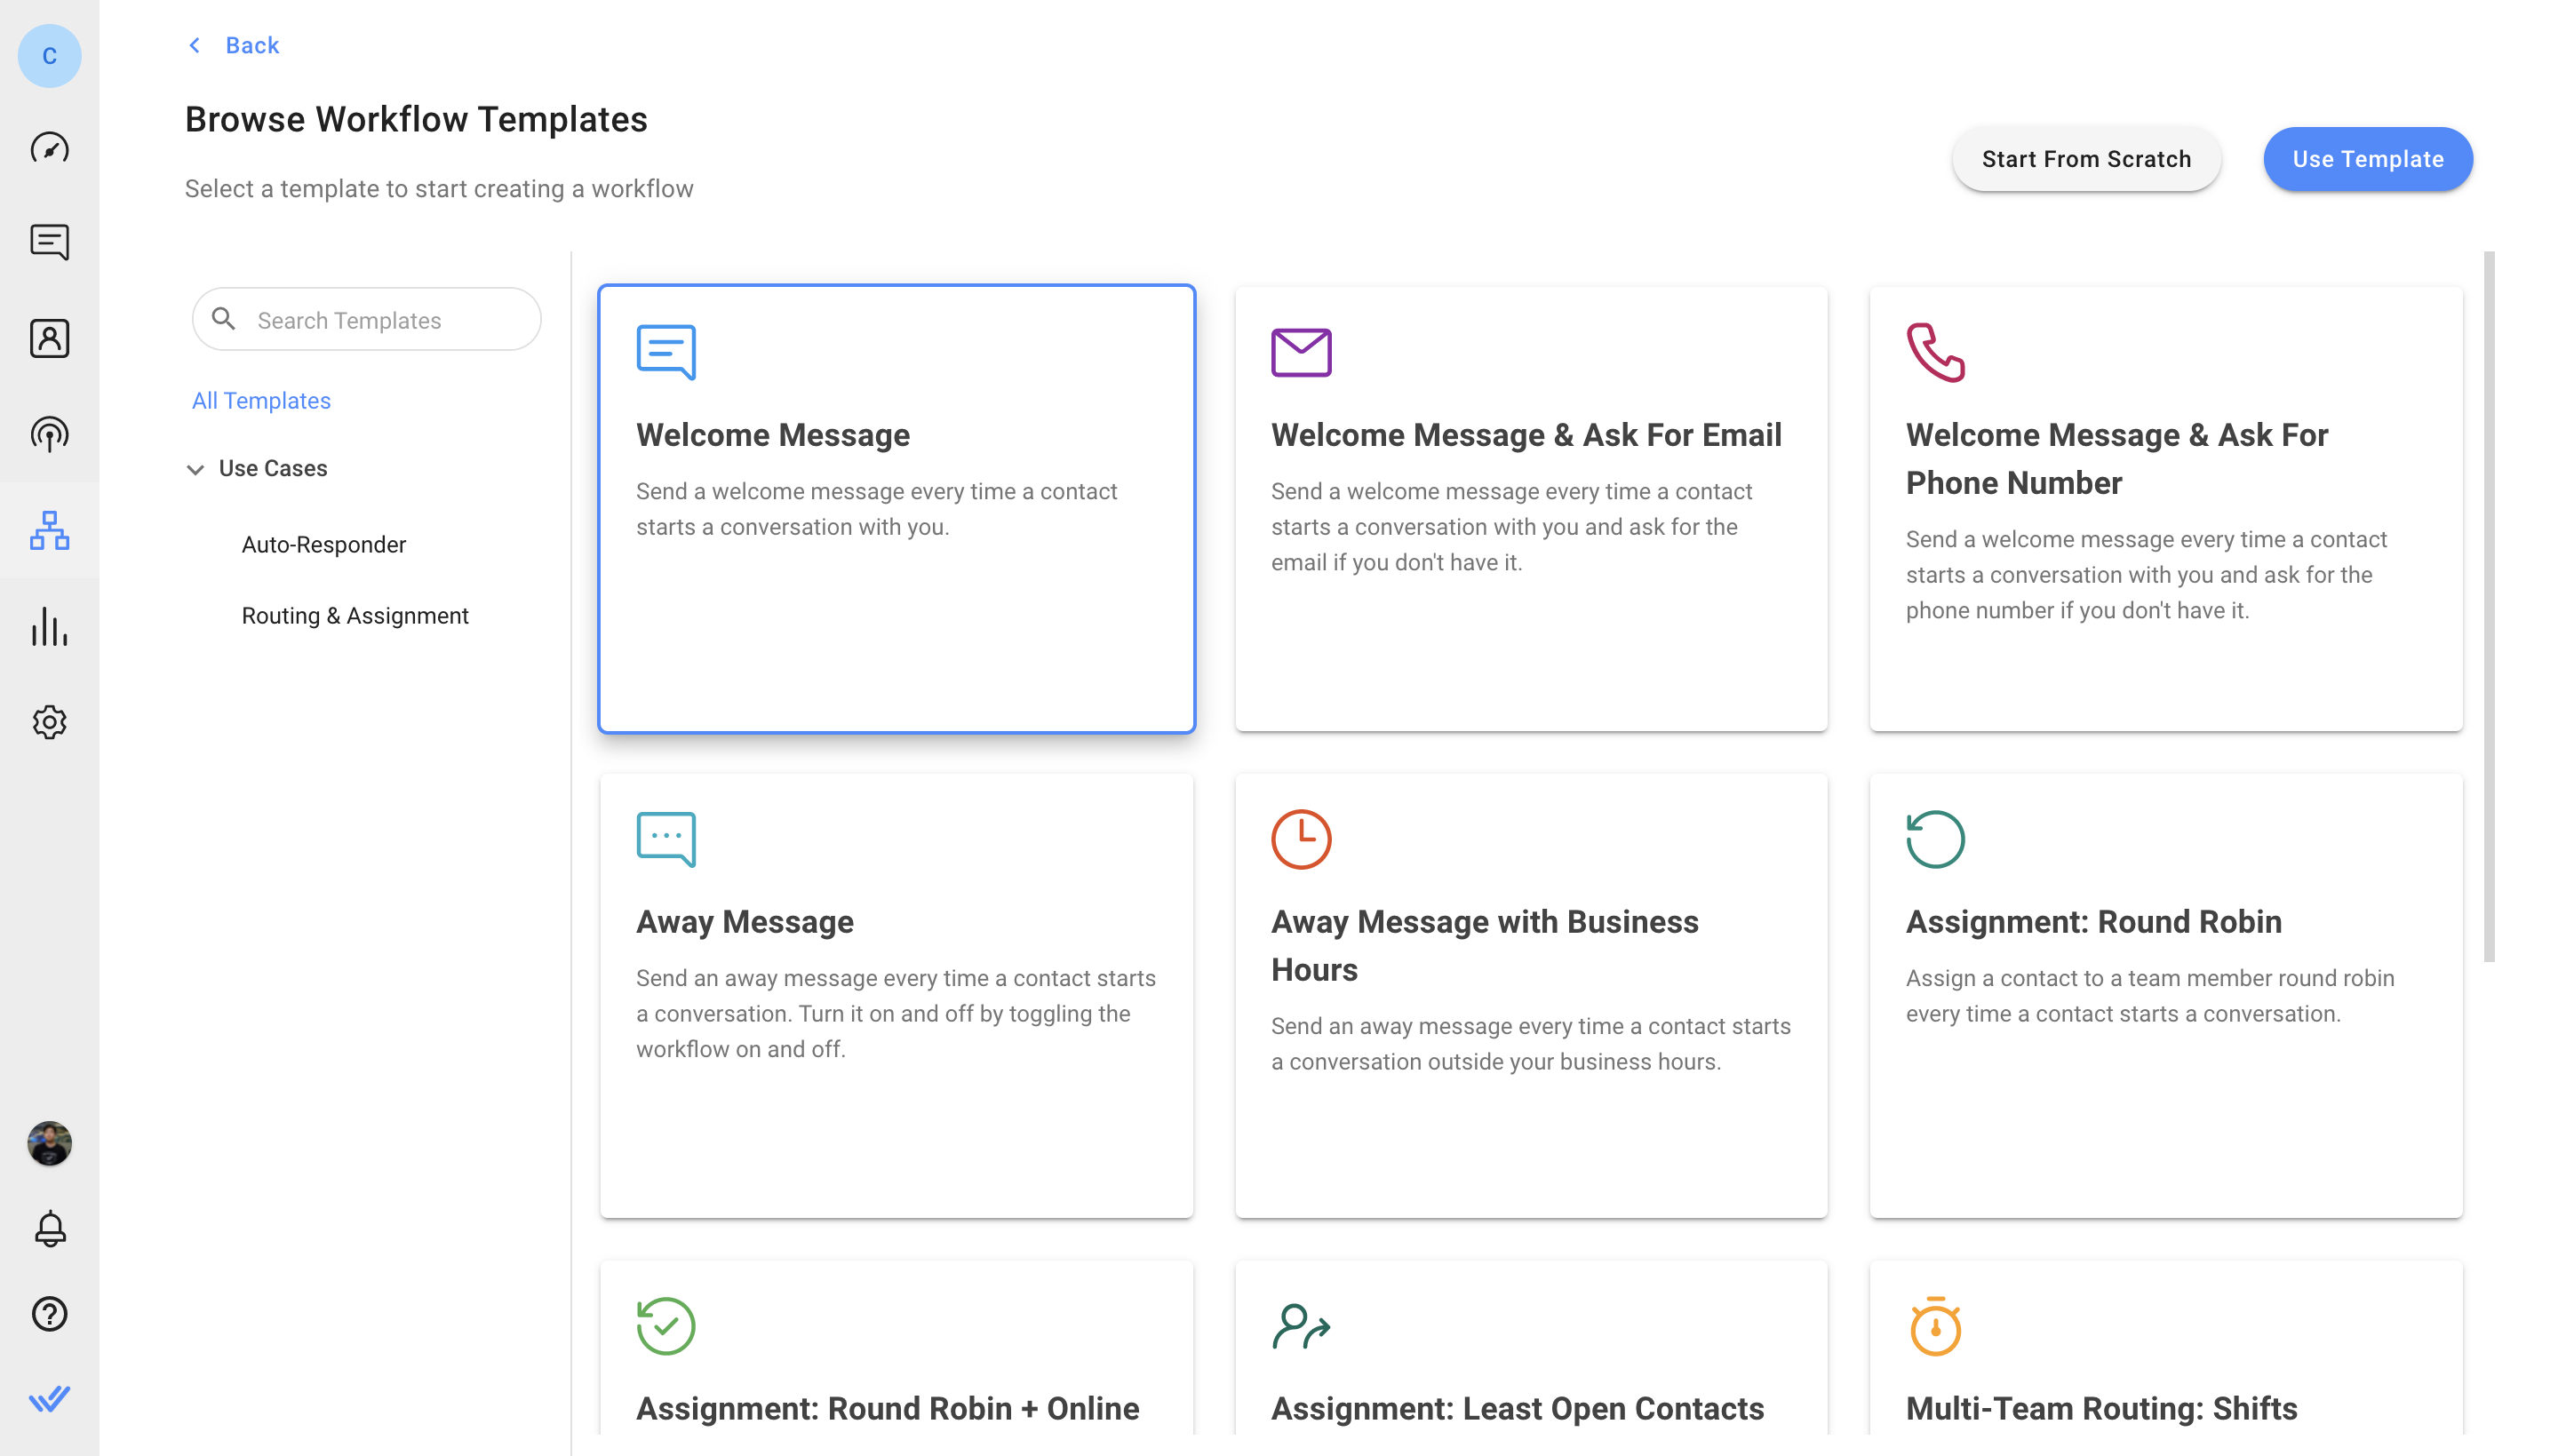
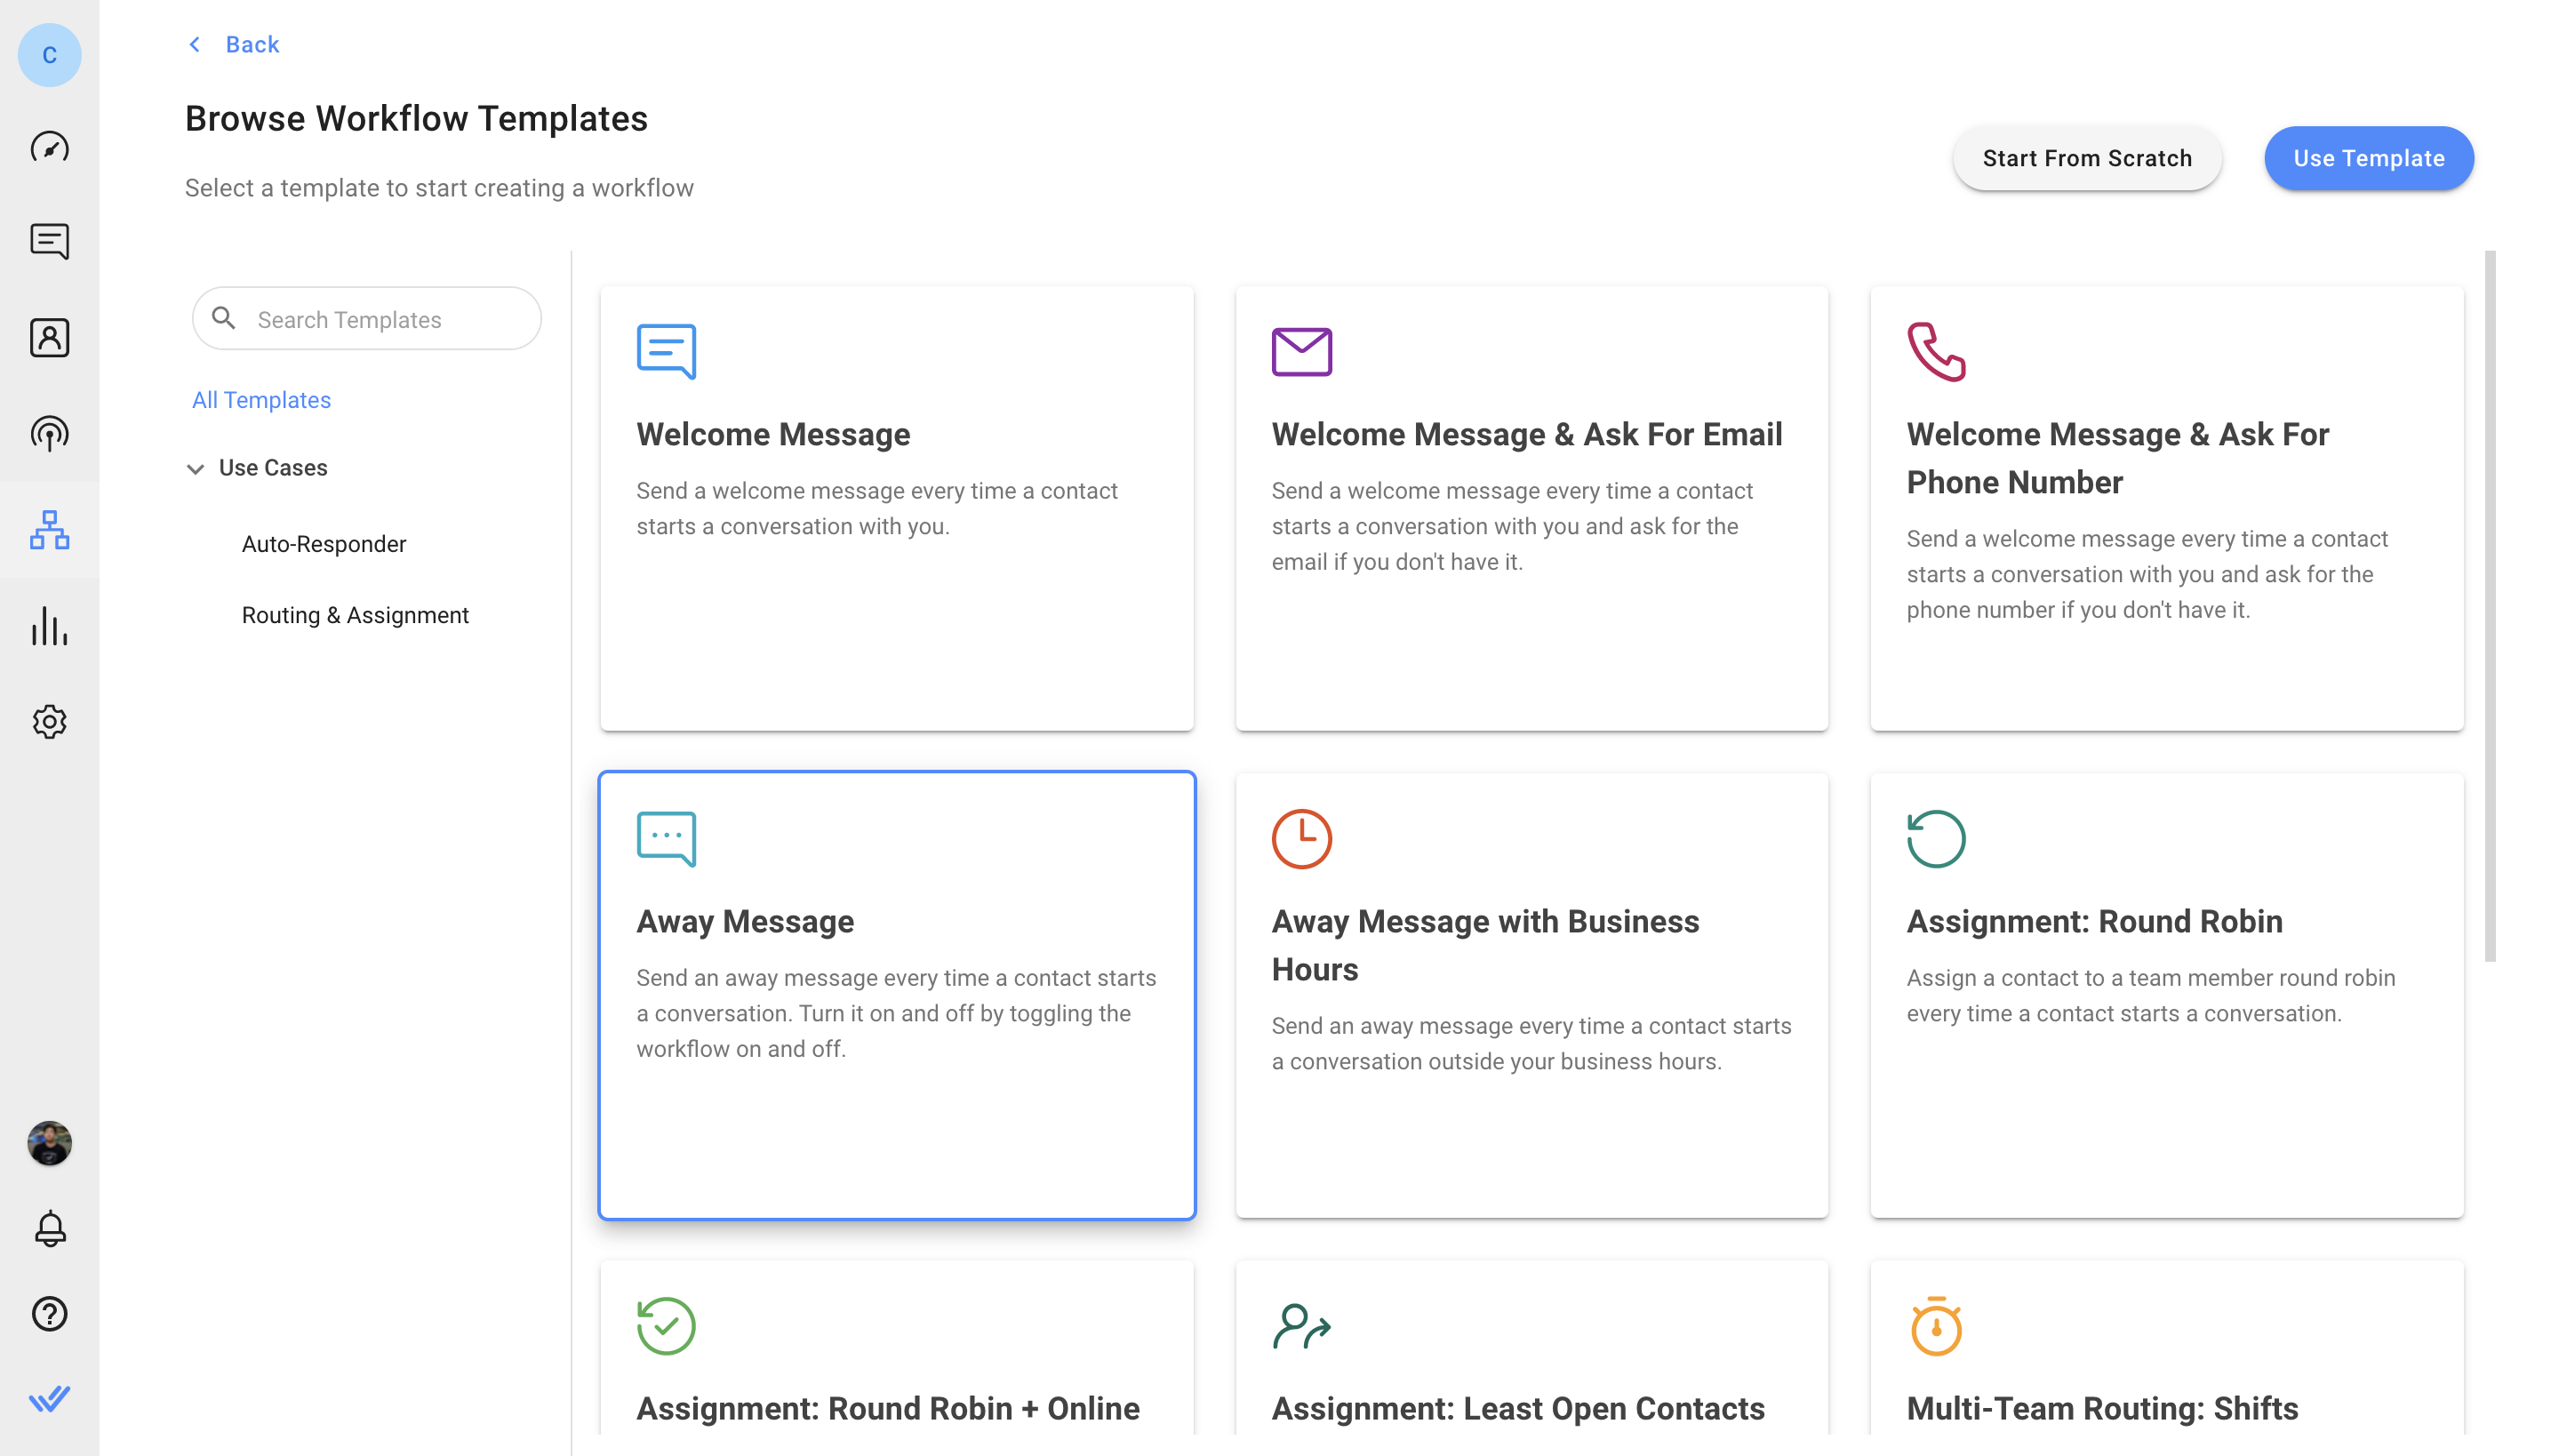
On the respond.io platform menu, click Workflows > + Add Workflow and choose your templates.
To send a welcome message, click Welcome Message > Use Template
To send an away message, click Away Message > Use Template
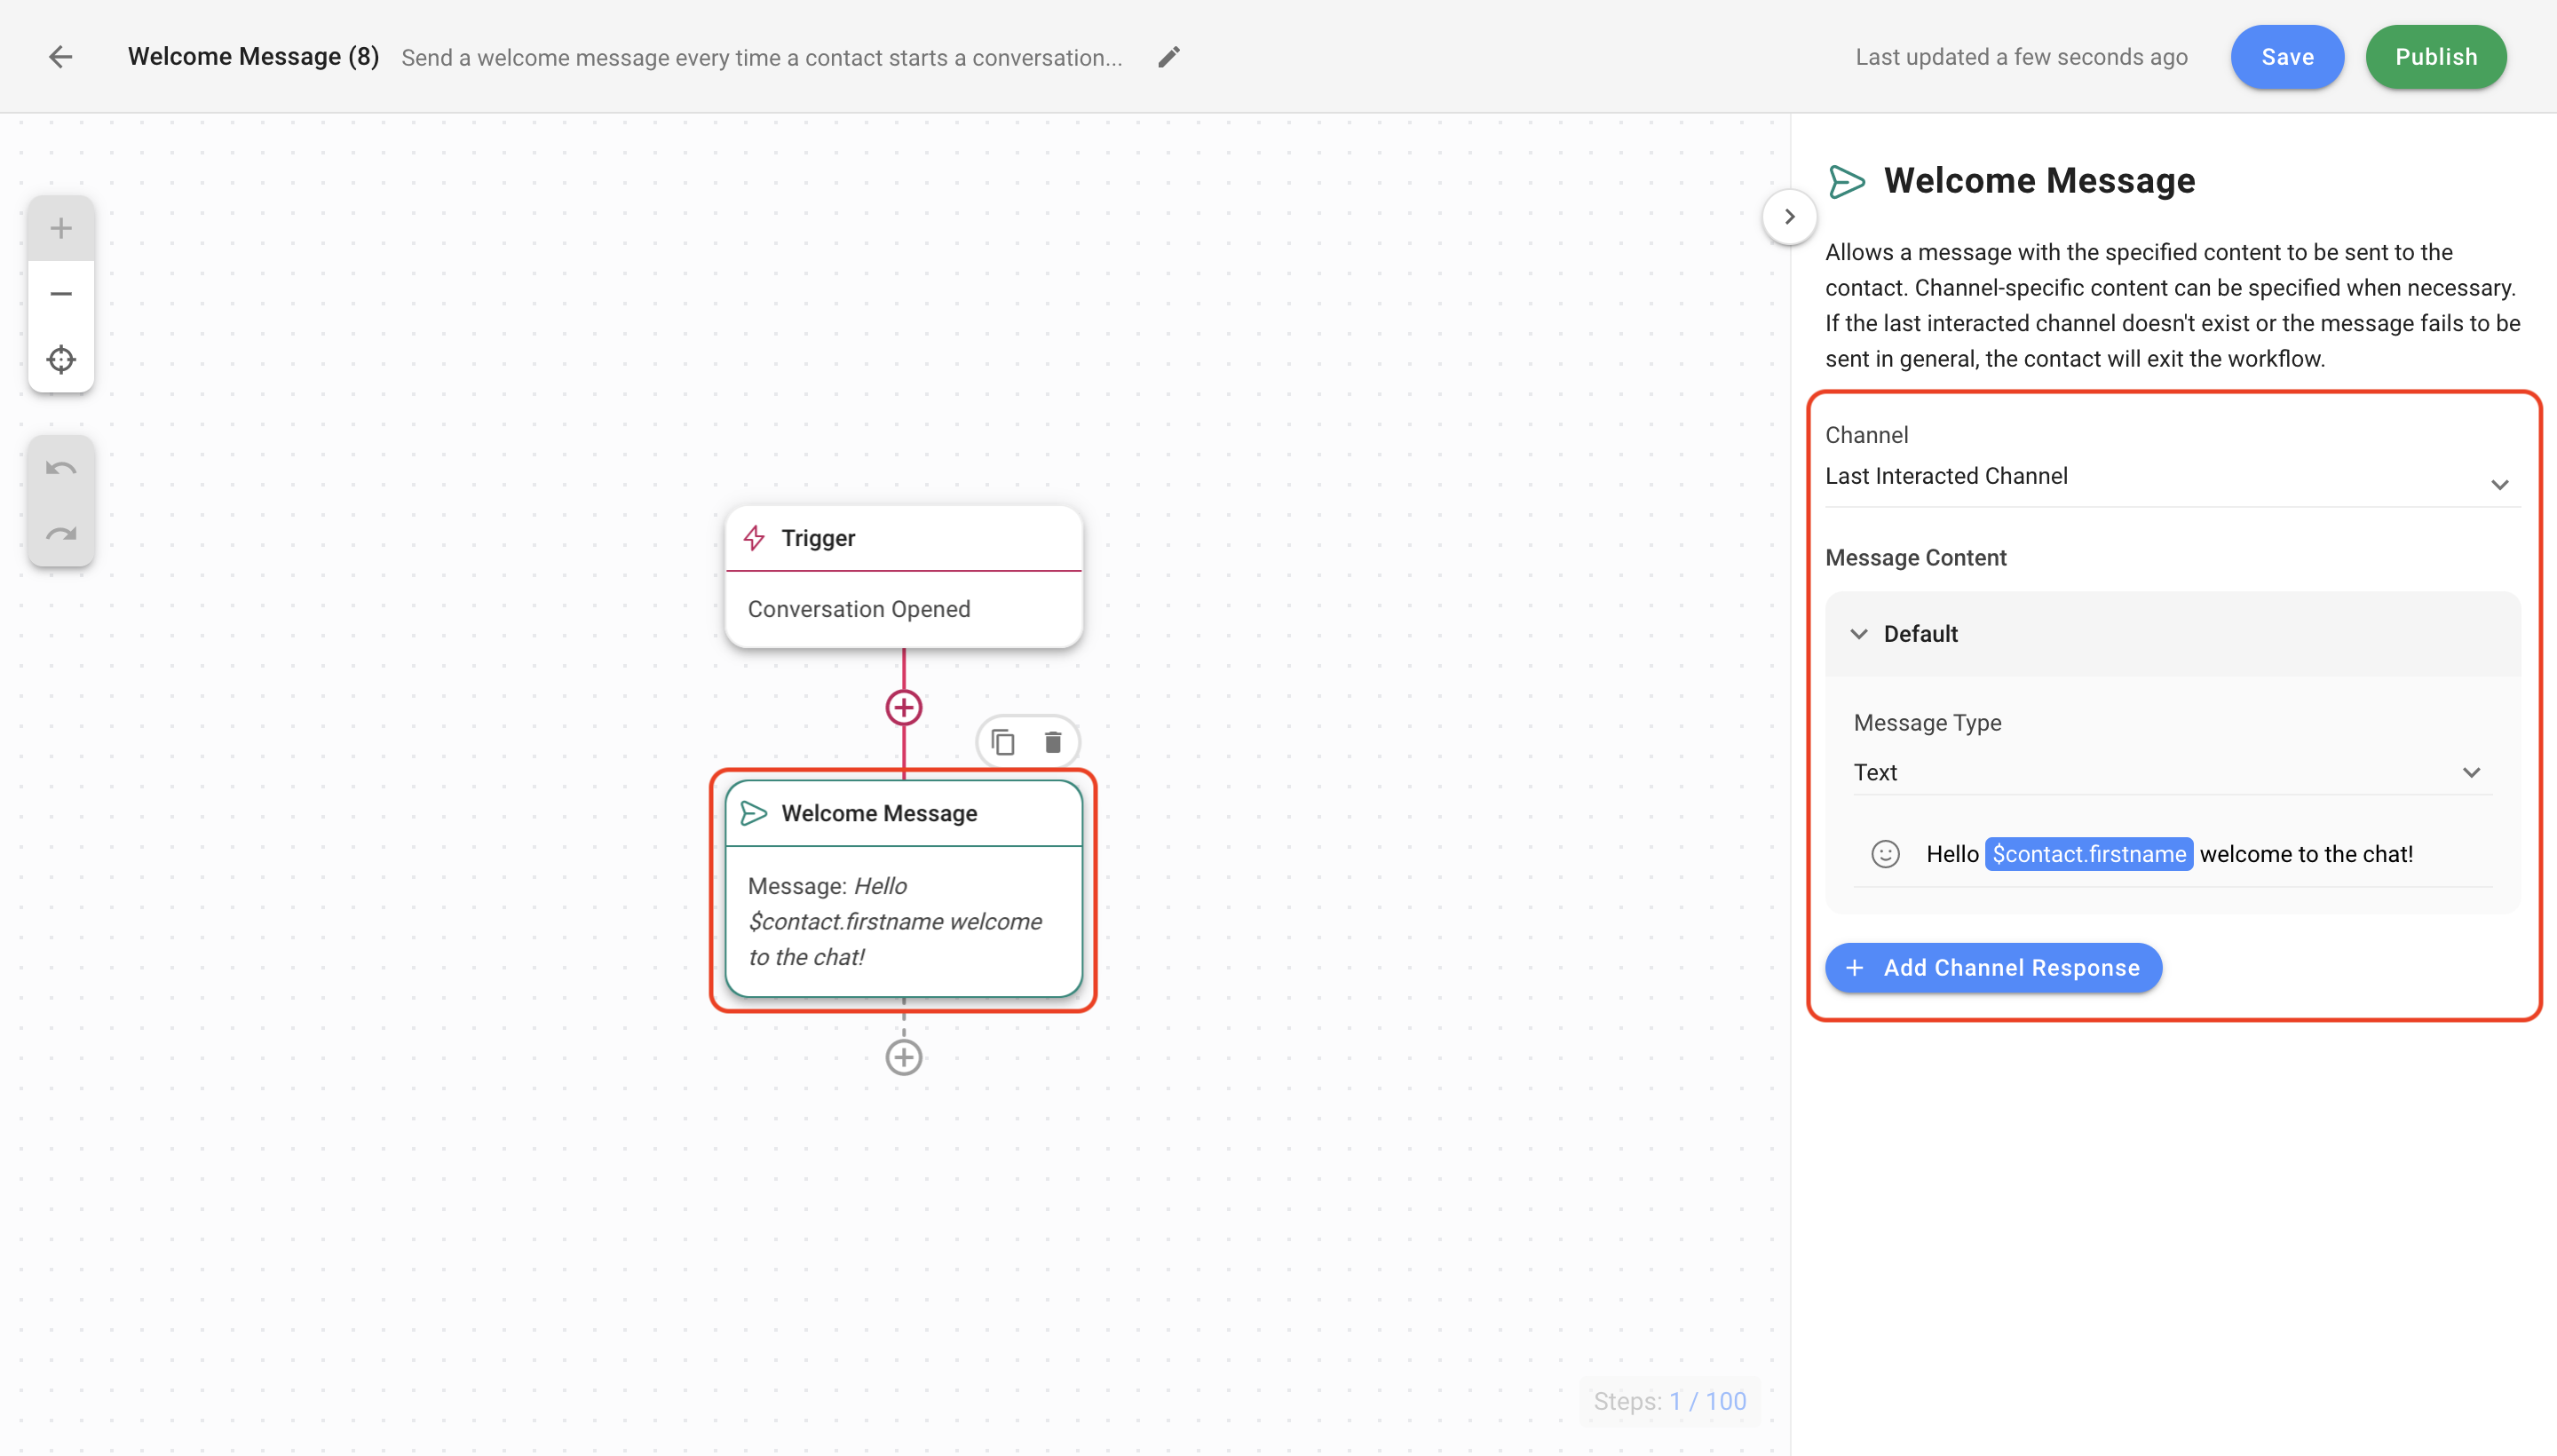
The Workflow template is set up with a Trigger and the Send a Message step. This sends an automated reply to Contacts when a conversation is opened.

Edit the welcome and away messages to send an automated reply
Send a Message step configuration for Welcome Message
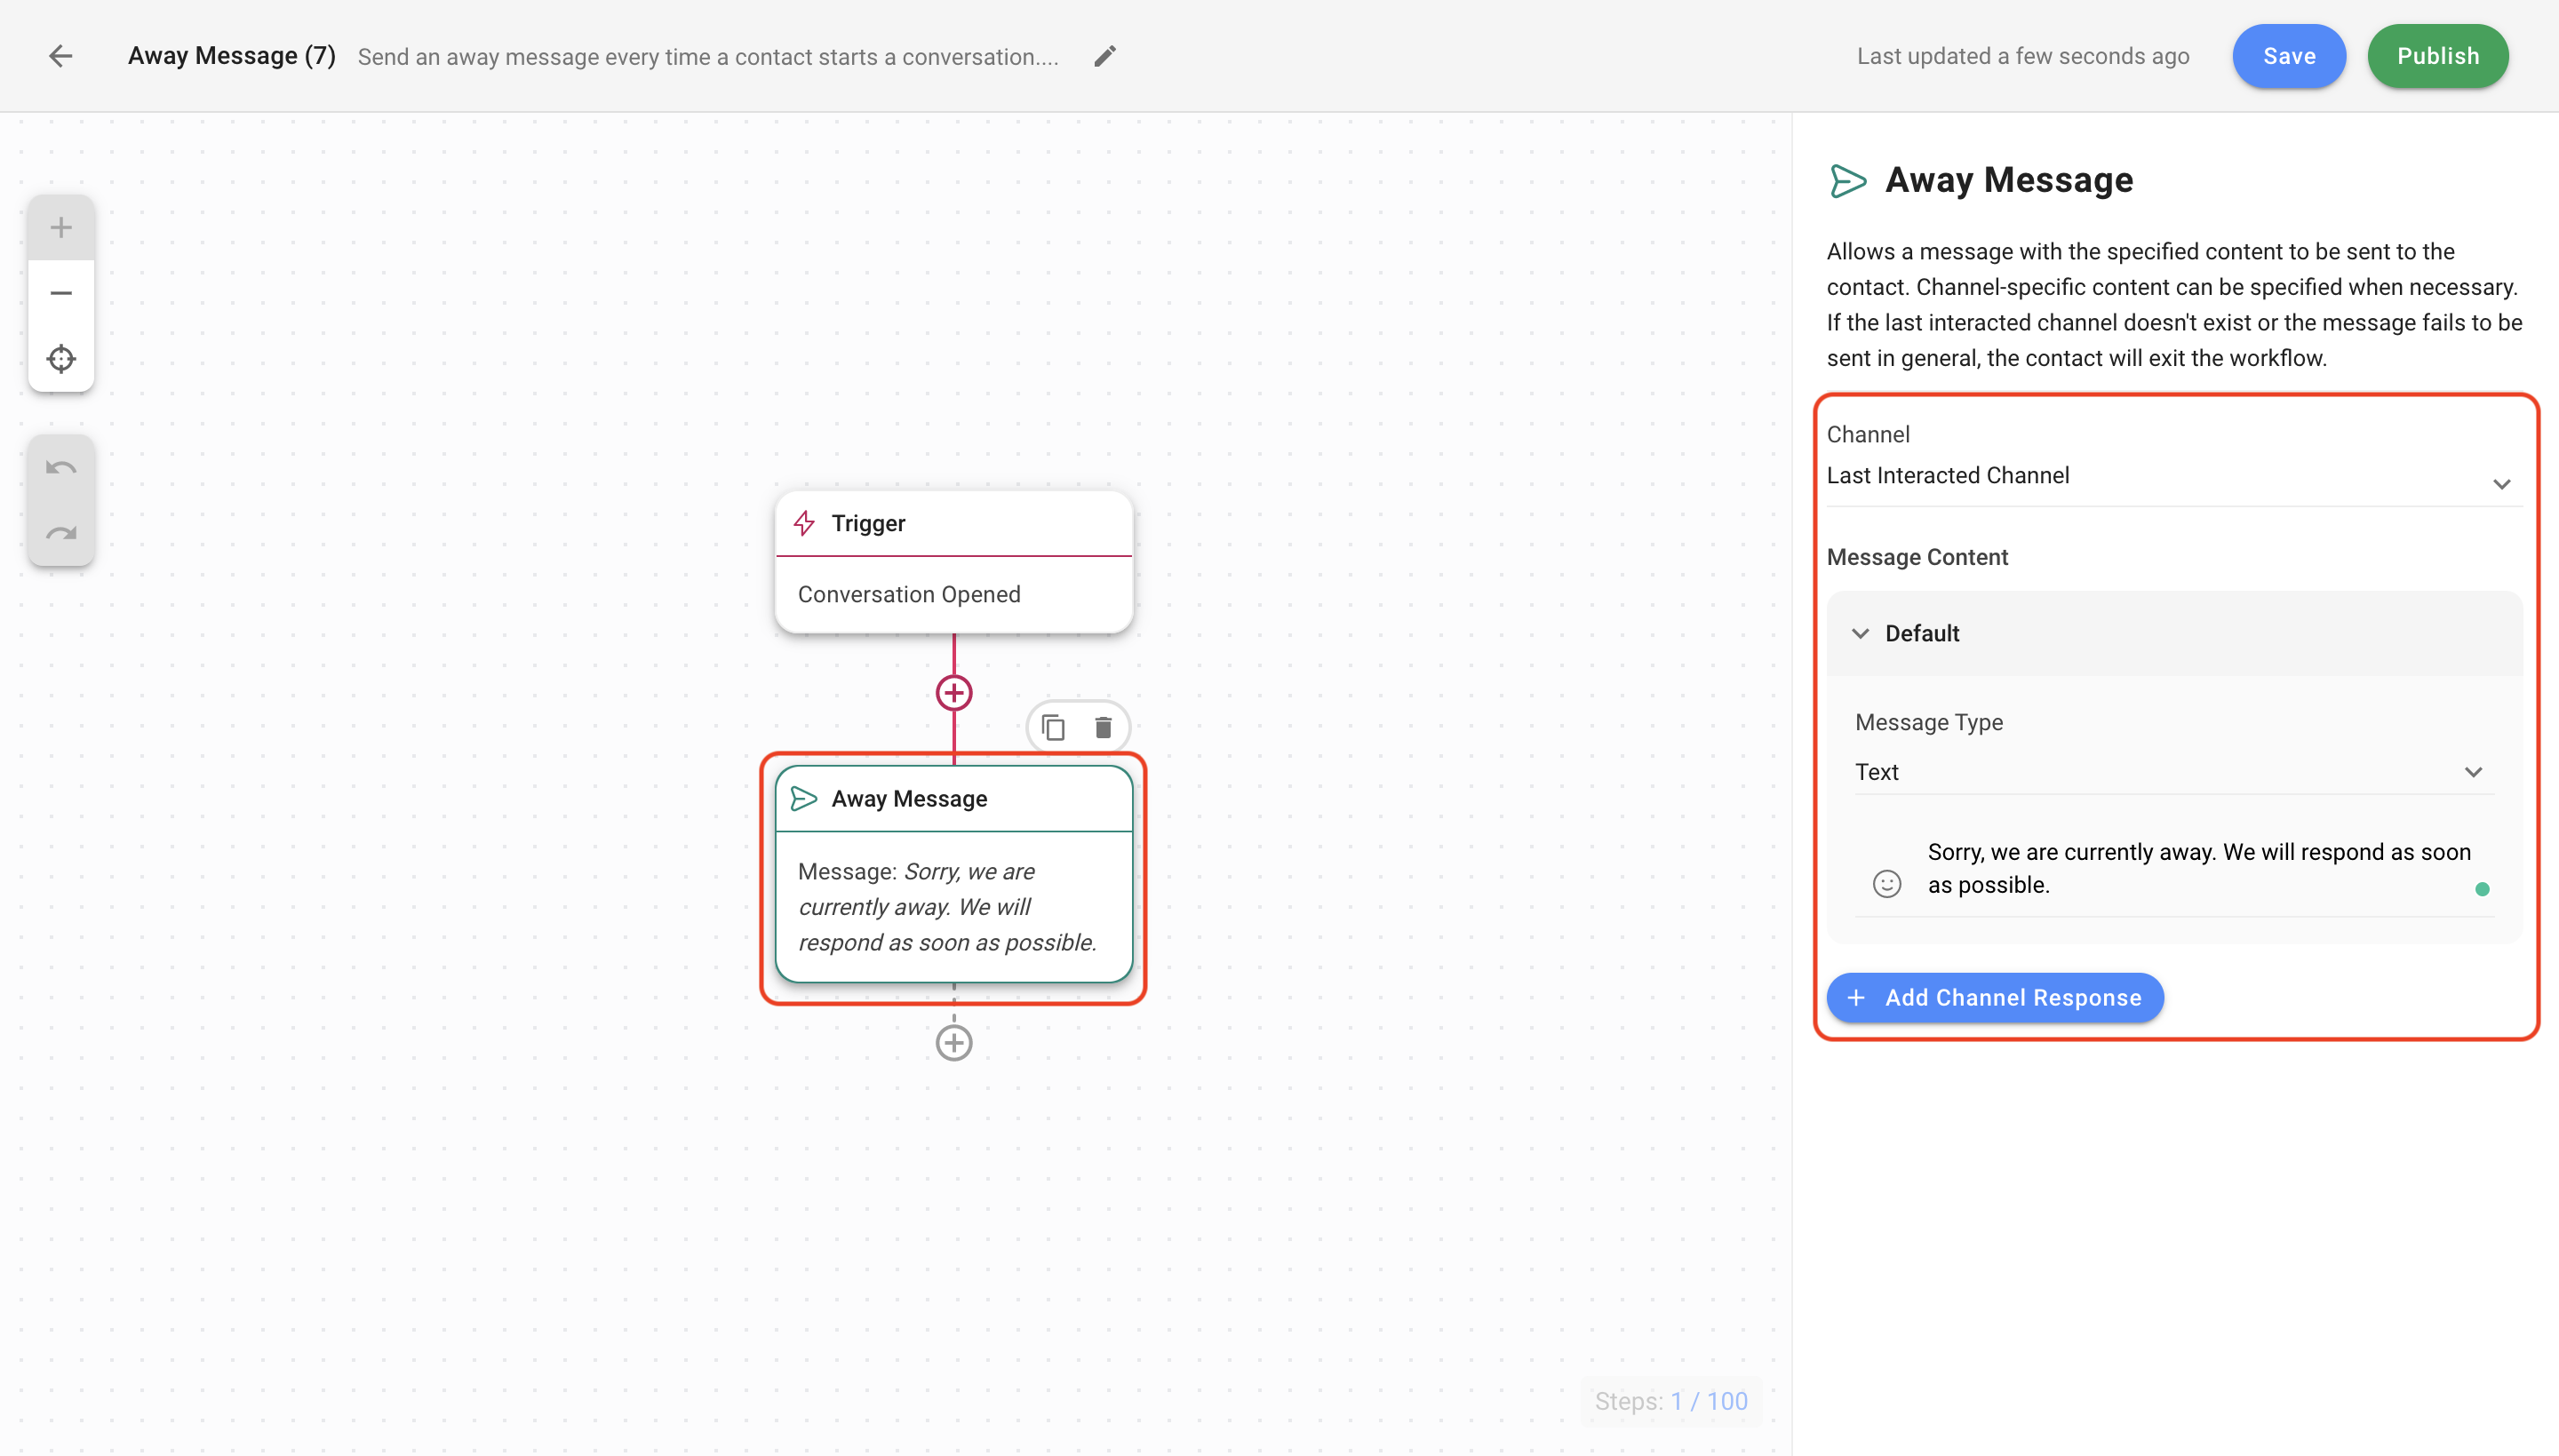
Send a Message step configuration for Away Message
A basic Away Message lets Contacts know that no one is currently available. Turn this Workflow on when agents are all away and turn it off when they’re back online.
Send welcome and away messages based on business hours
Method Objectives
- Set up the Workflow templates to send a welcome or away message based on business hours
- Configure business hours to send an automated reply
- Configure Welcome and Away message steps if needed
Workflow Setup
There are Workflow templates set up by our team that you can use immediately. You can edit the templates to fit your business needs.
Set up the Workflow templates to send a welcome or away message based on business hours
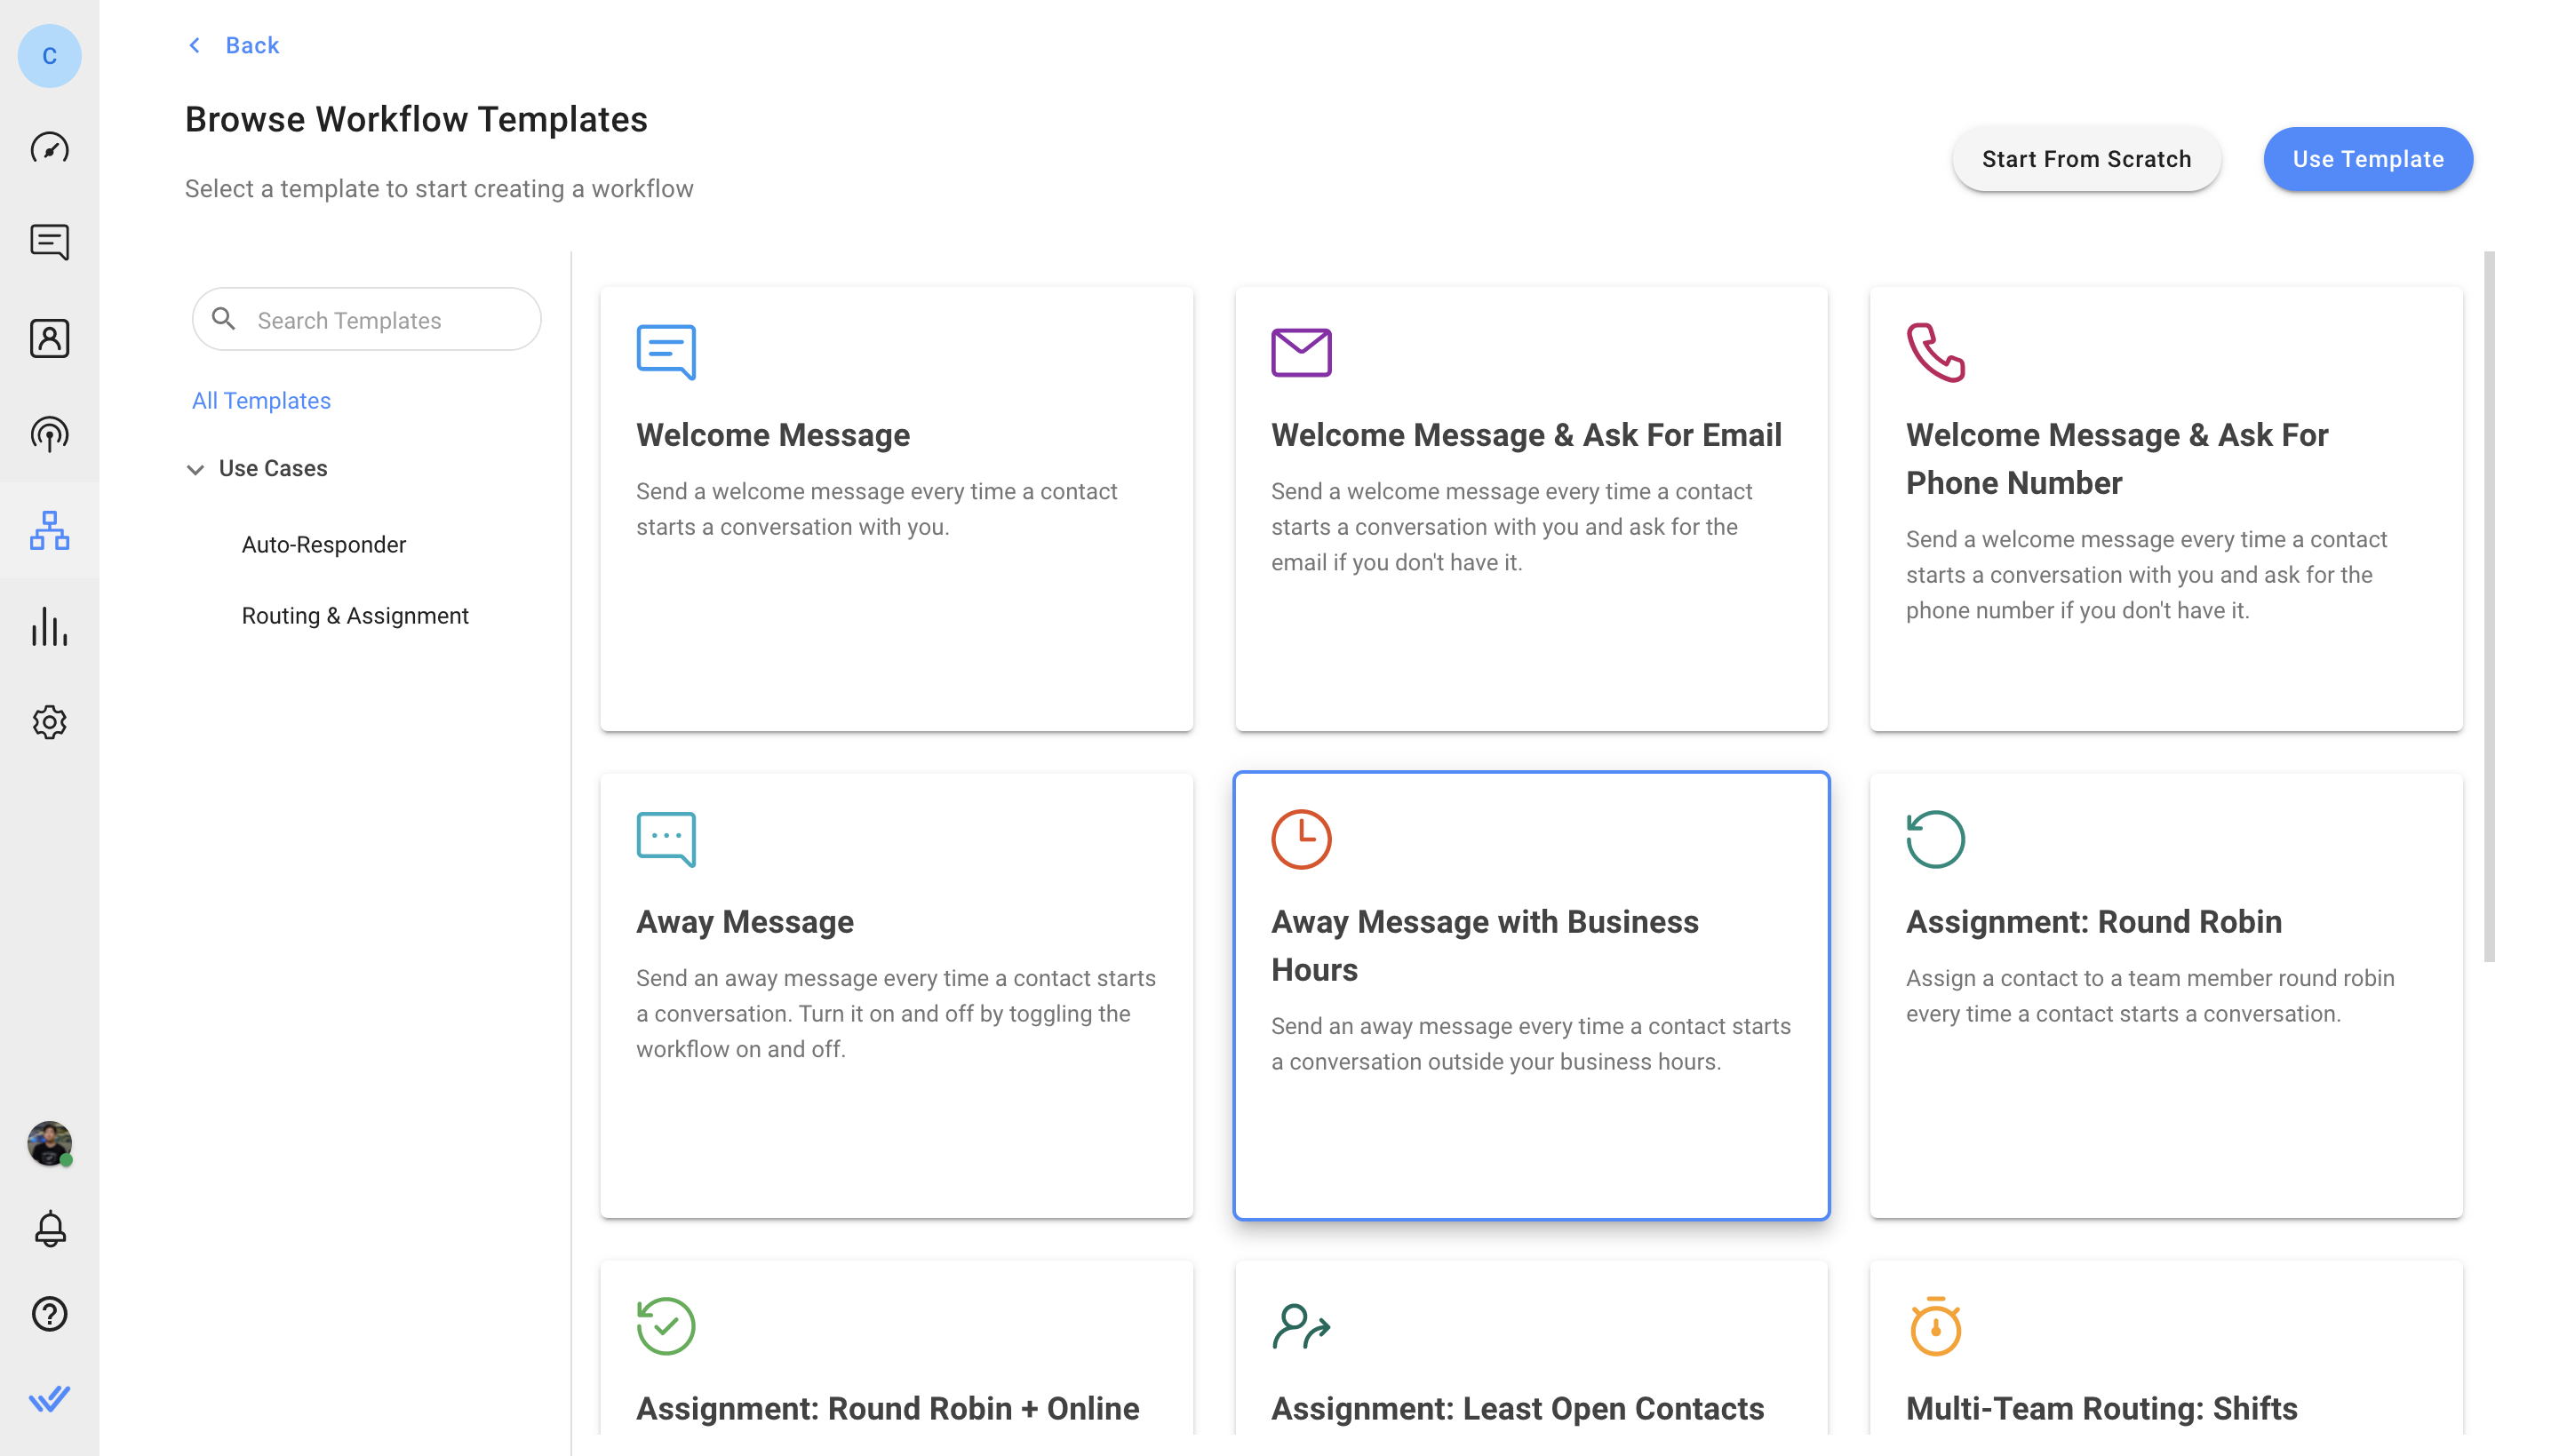
On the respond.io platform menu, click Workflows > + Add Workflow. Then, Click Away Message with Business Hours > Use Template.
To send an away message based on business hours, click Away Message with Business Hours > Use Template
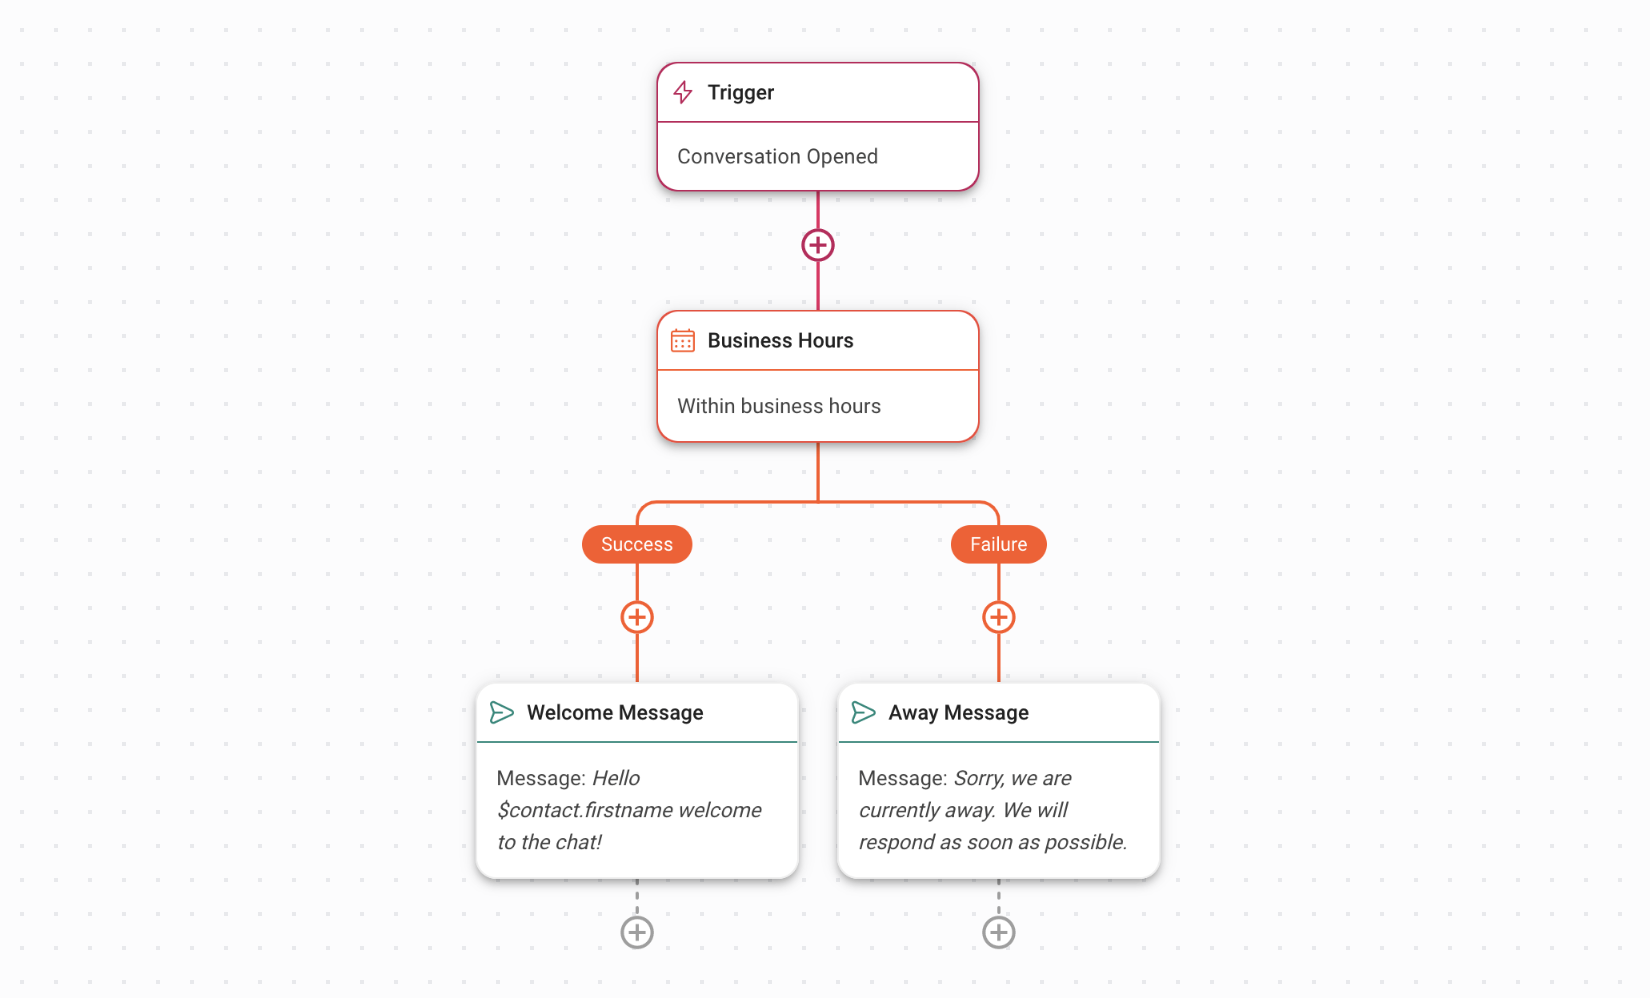
The Workflow template is set up with a Trigger, Date & Time step and the Send a Message step. This sends an automated reply to Contacts when a conversation is opened based on business hours.
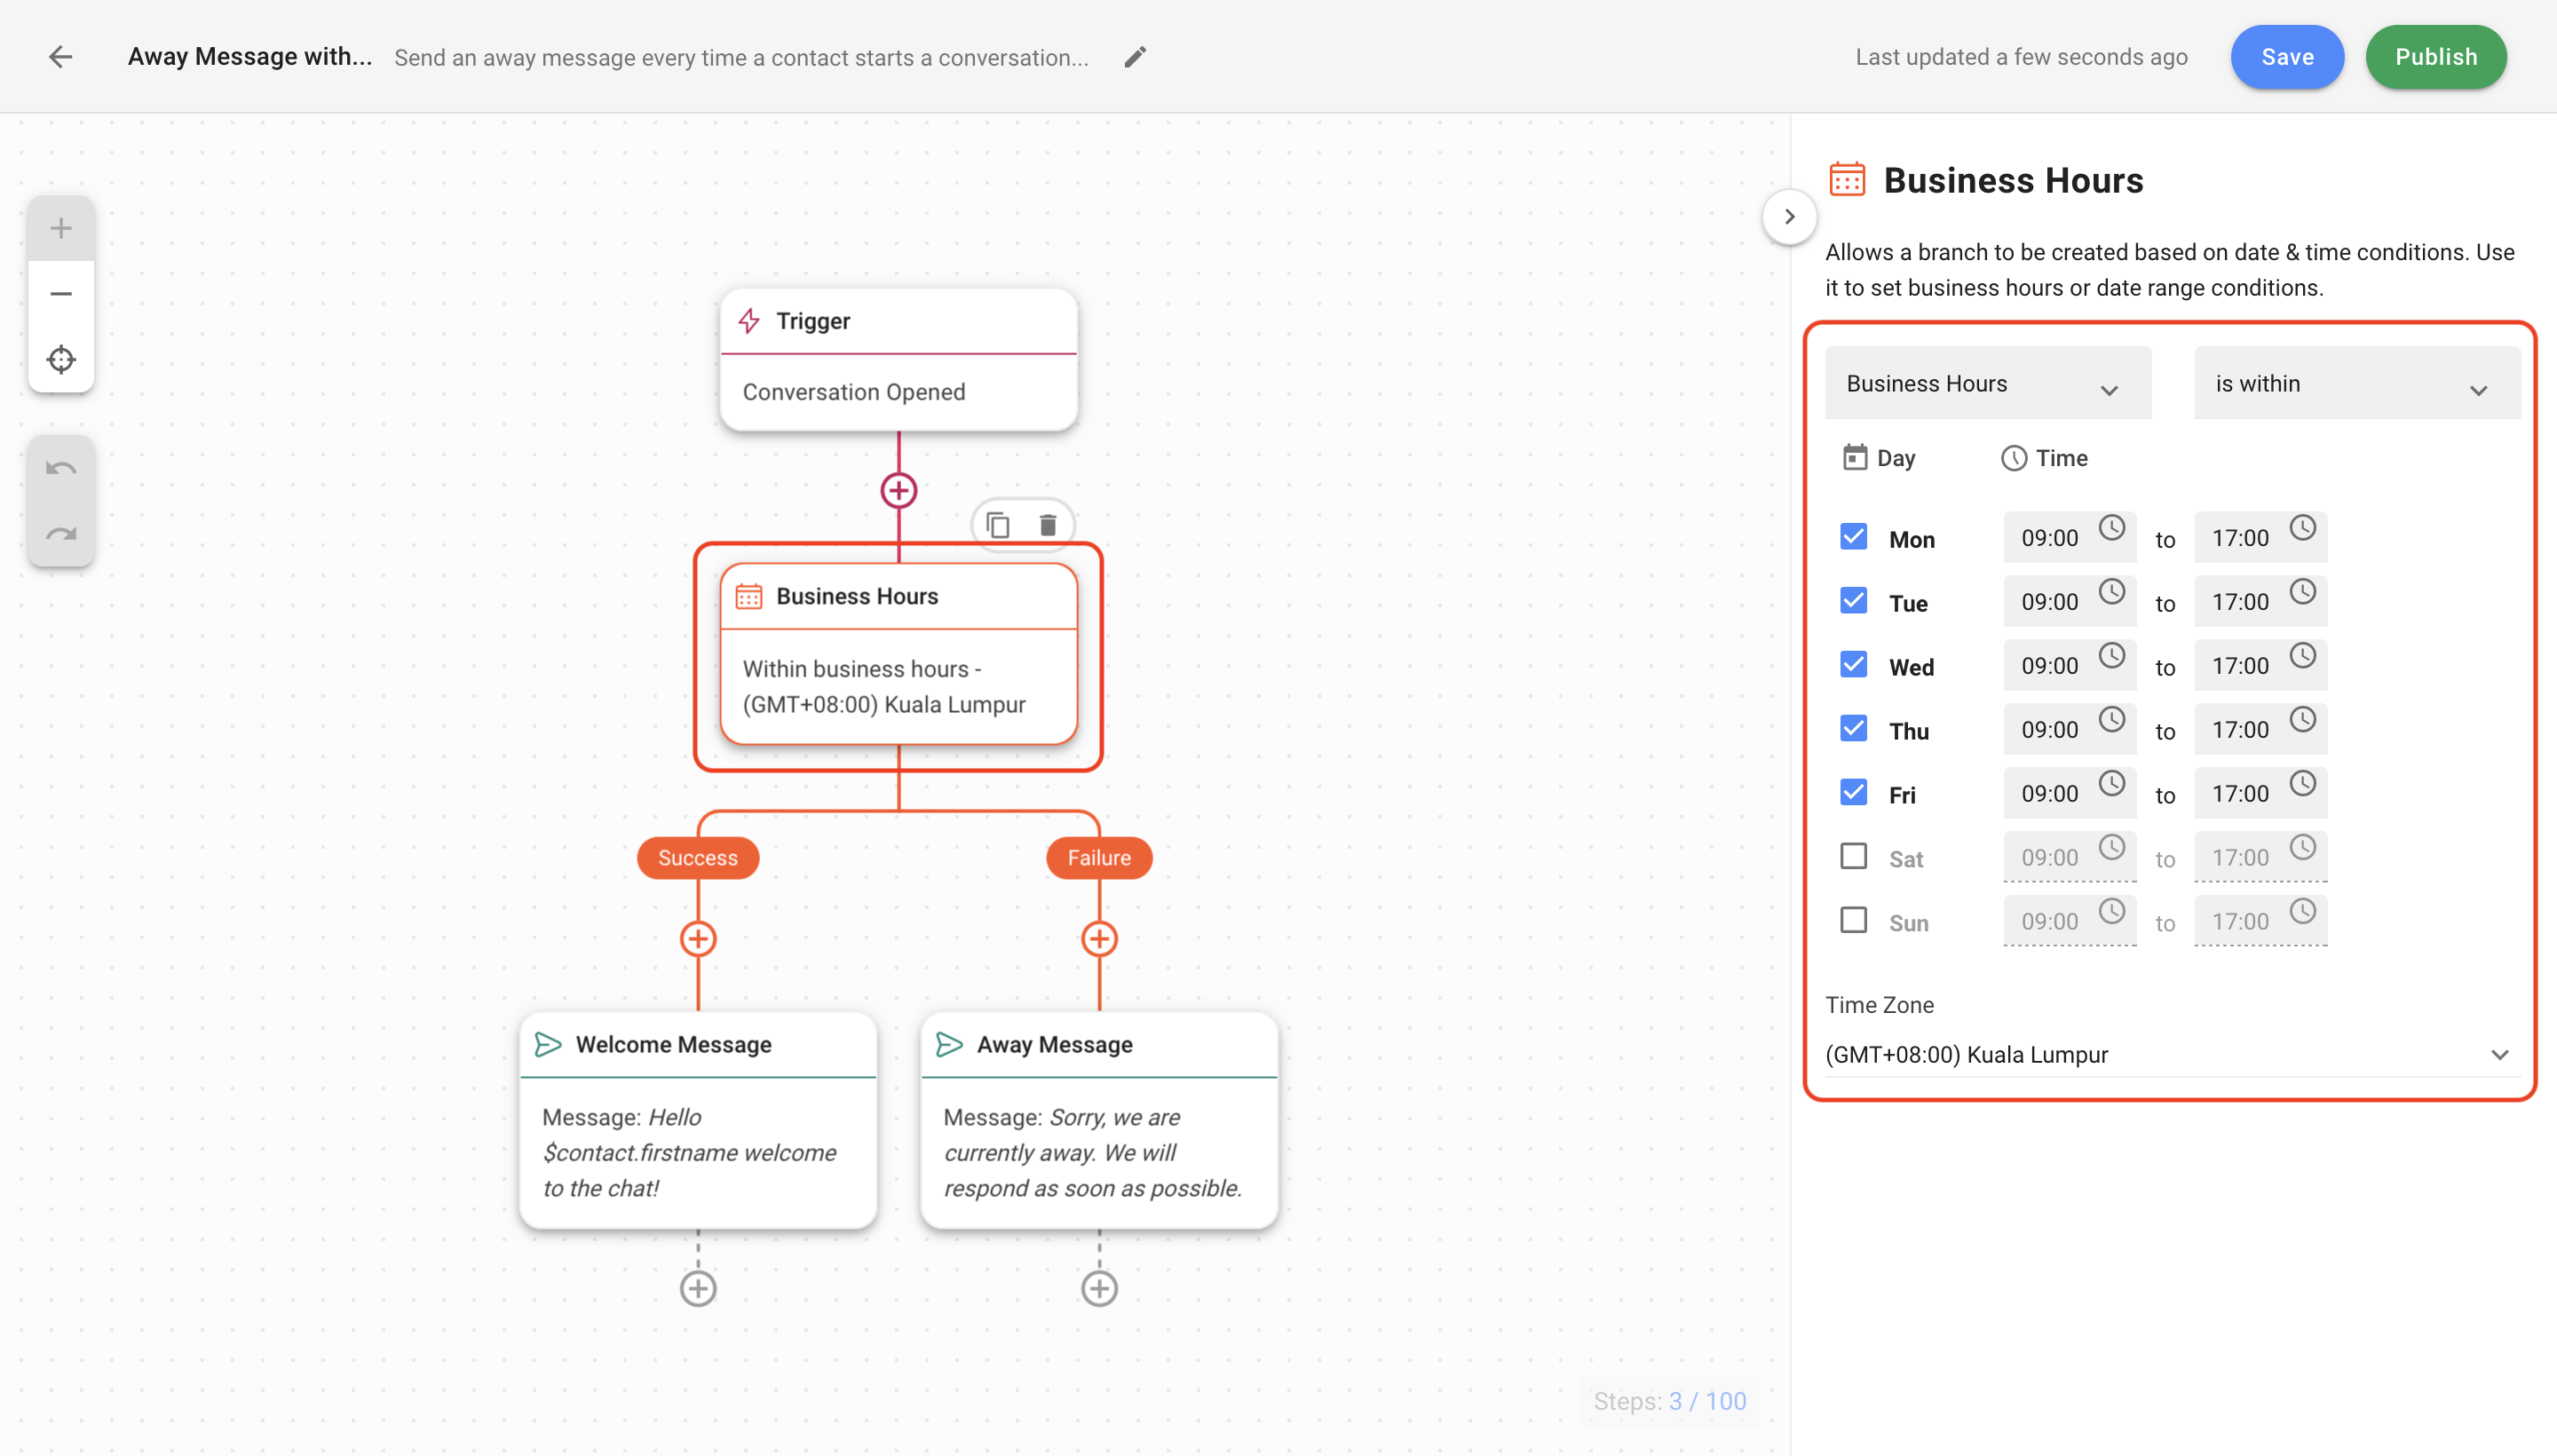
Configure business hours to send an automated reply
Use the Date & Time Step to set your business hours.
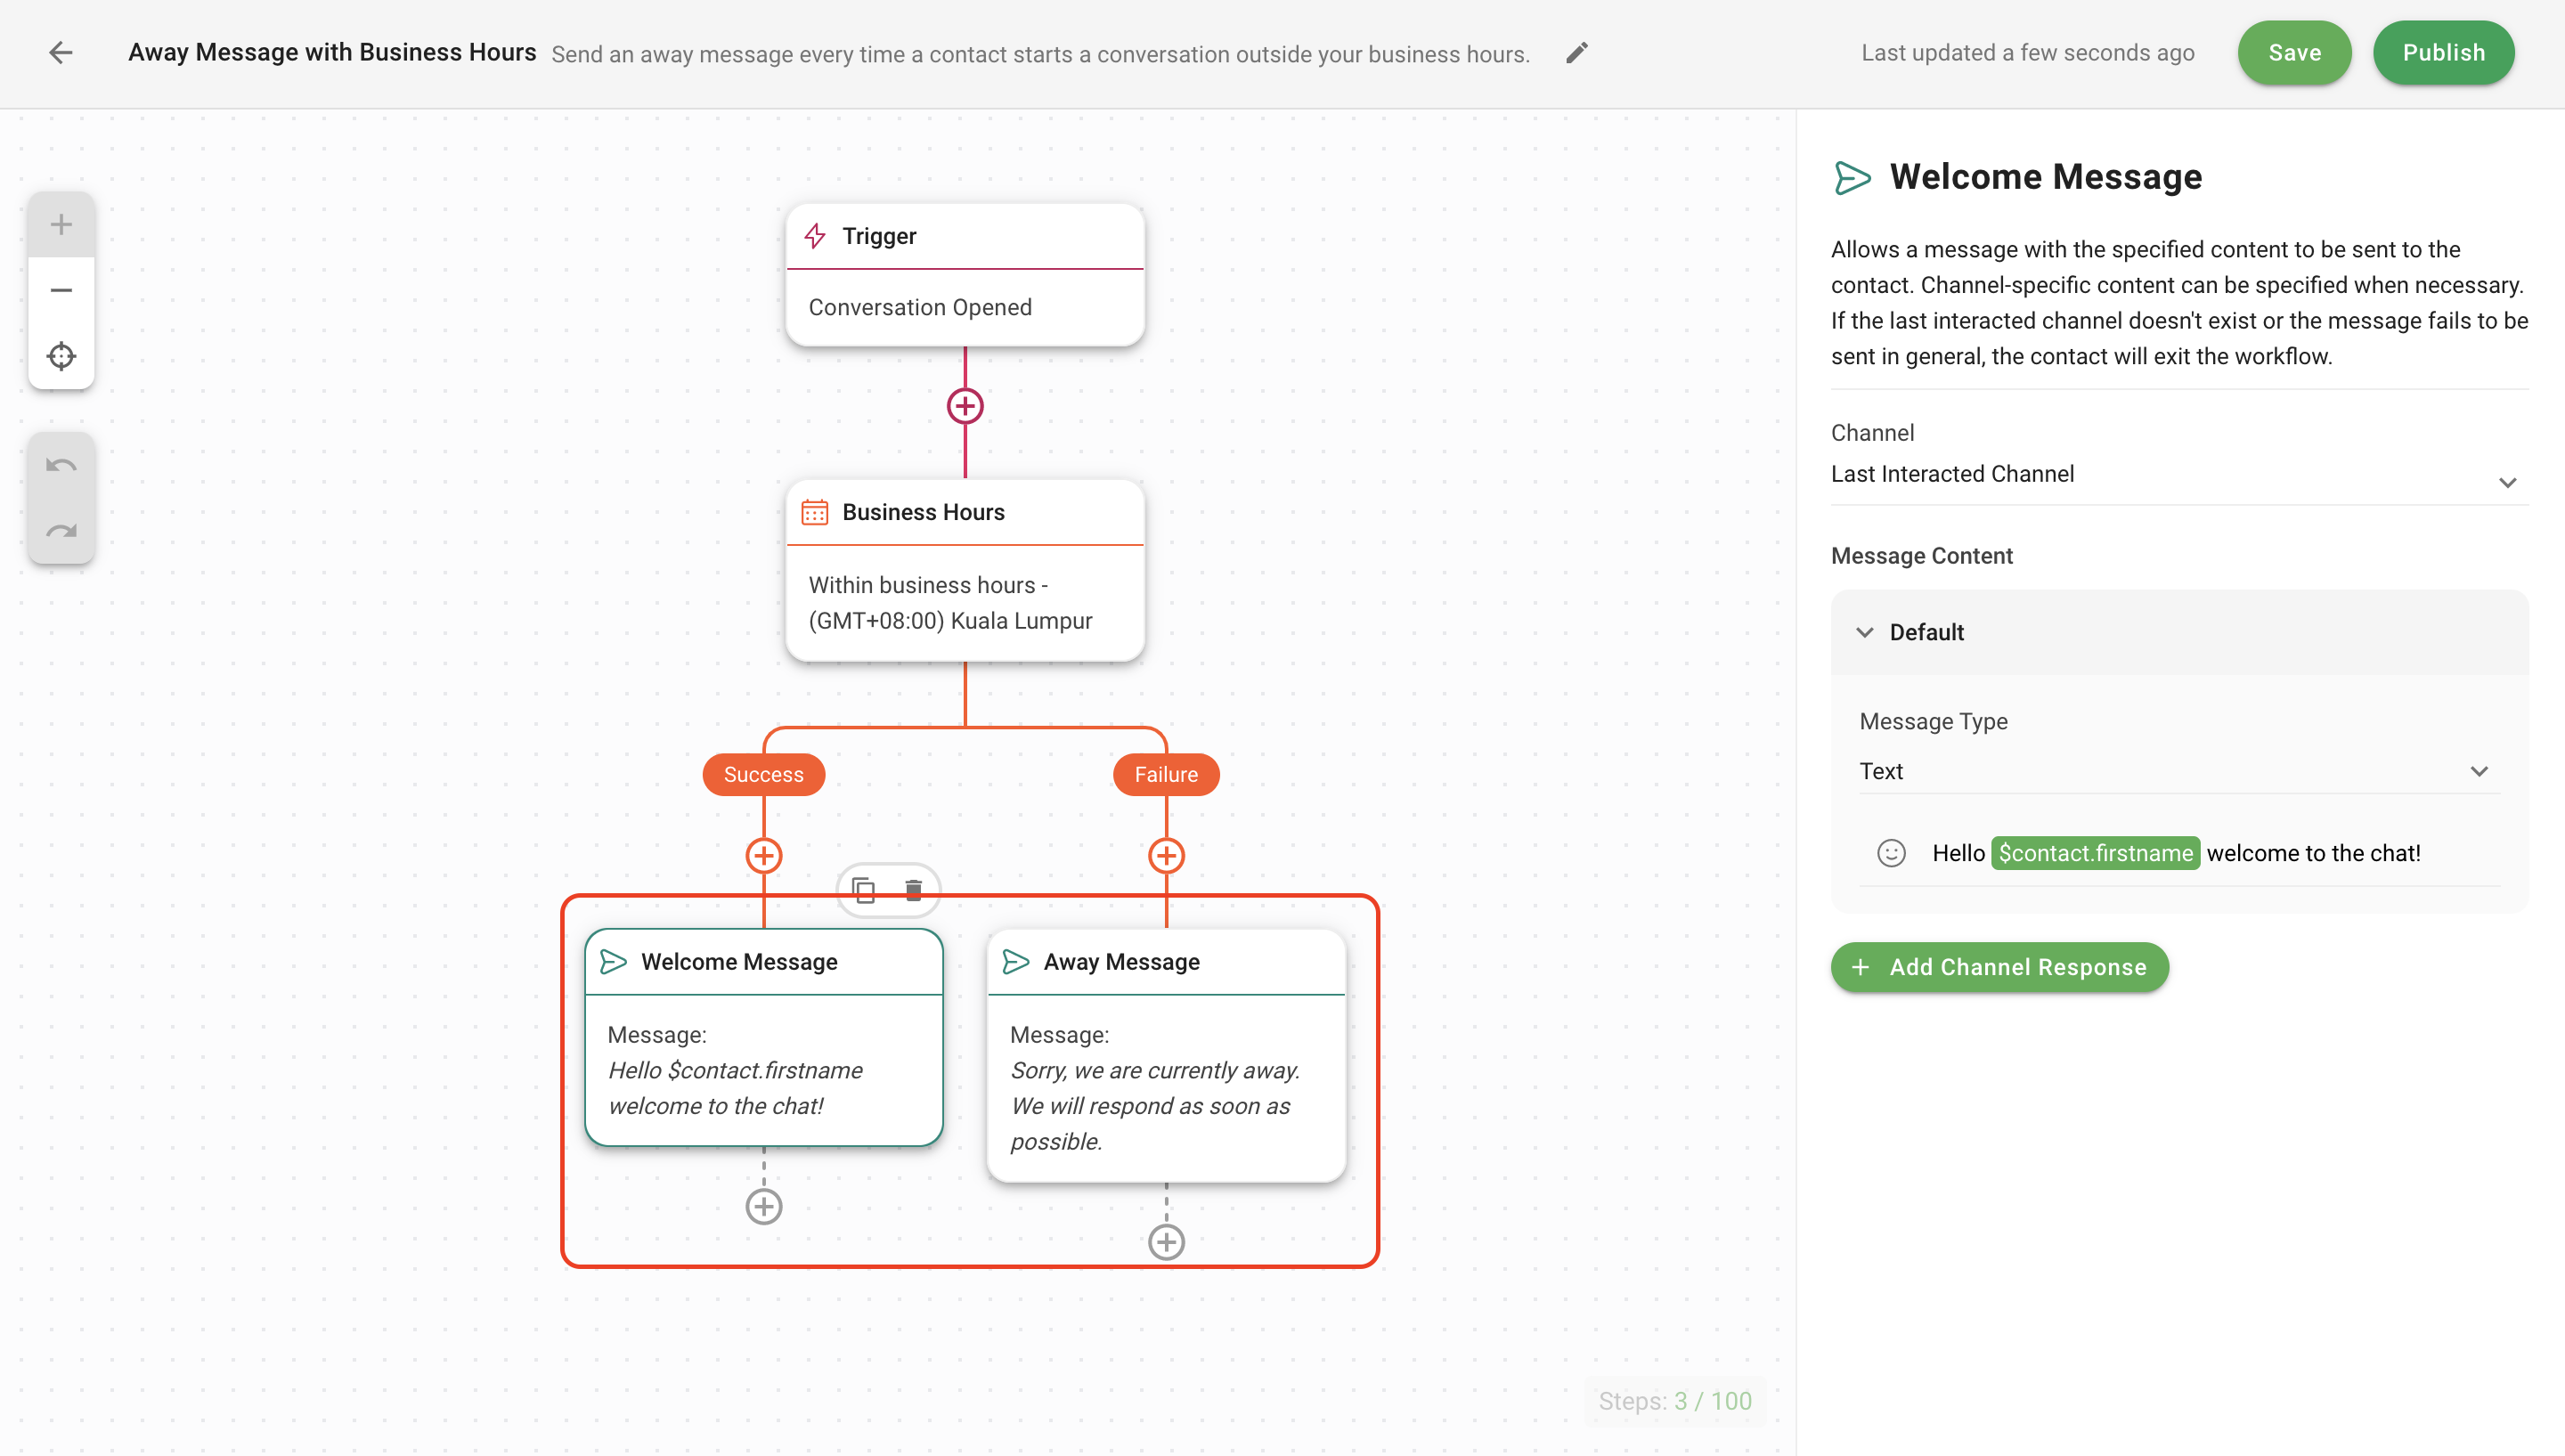
Configure Welcome and Away message steps if needed
Use the Send a Message Step to send an automatic welcome or away message.
Click the Welcome Message or Away Message step to edit the Message Content. The Message Type should remain as Text. Finally, click Save and Publish to activate the Workflow.
Feeling stuck? Do not fear.
Need assistance? Contact us for support. Help is here!This is the text block that will appear when the button is clicked.
Getting Contacts to Message You
Responding to Messages
Related Articles
How to Create Automated Welcome and Away Messages
Learn how to set up automated welcome and away messages to respond to customers immediately.
Step: Send a Message
Learn about the configuration, best practices and use cases when implementing the Send a Message Step.
How to Optimize Customer Onboarding with Automated & Customized Welcome Messages
Learn how to automatically send customized welcome messages to Contacts coming from various messaging channels and assign them to relevant agents with whom they have interacted earlier.
