Table of Contents
- Getting Here
- Navigation
- Sidebar
- Chats and Calls view
- Add Contact and Search
- Filter and Sort
- Conversation List
Inbox Overview

- Getting Here
- Navigation
- Sidebar
- Chats and Calls view
- Add Contact and Search
- Filter and Sort
- Conversation List
Getting Here
This module can be accessed from the side navigation menu under the menu item, Inbox.
Navigation
The Inbox module has the following components:
- Sidebar
- Chats and Calls view
- Add Contact and Search
- Filter and Sort
- Conversation List
- Messaging Console
- Conversation Actions
- Contact Drawer
- Contact Overview
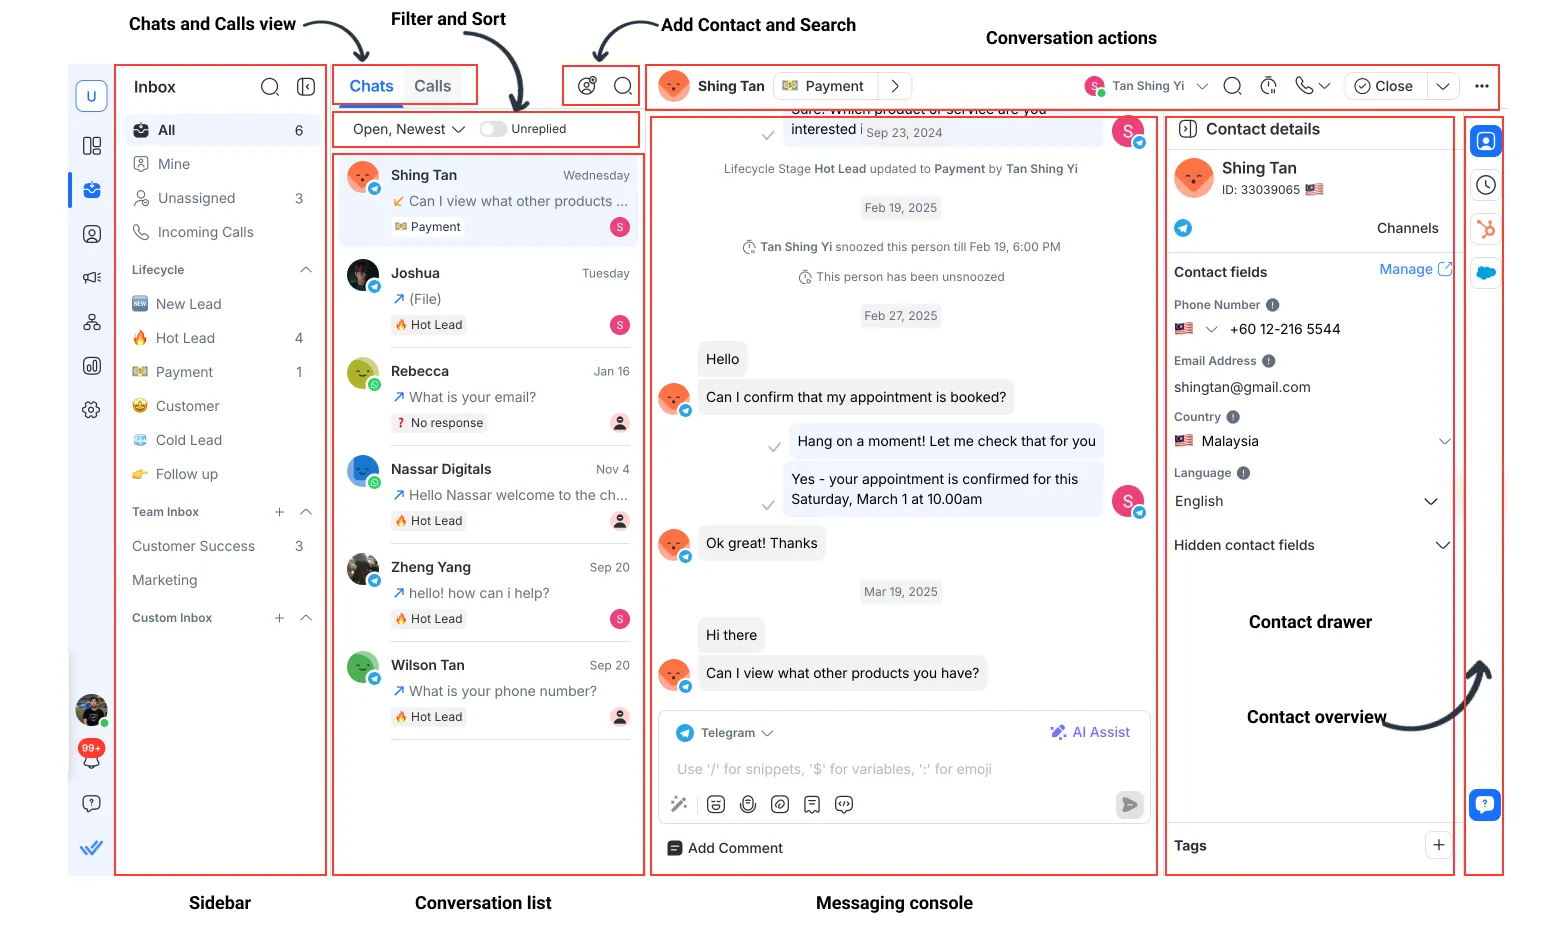
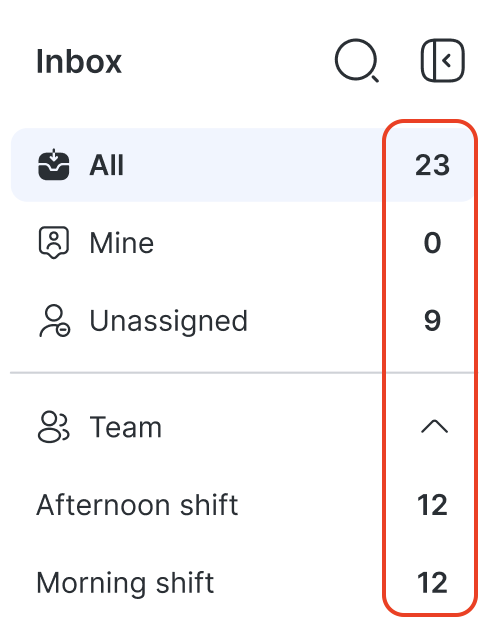
Sidebar
This is where you can search for an inbox or select your preferred inbox view.
There are 4 inboxes to choose from:
Standard inbox
There are 3 displays within the Standard inbox:
- All: Shows all conversations on the platform.
- Mine: Shows Contacts and conversations assigned to the User only.
- Unassigned: Shows conversations that haven’t been assigned.
Team inbox
This displays the inboxes of the various Teams in your Workspace, such as Sales, Marketing and Support.
Access to the Team inbox is granted as below:
- Agents with the “View Contacts assigned to User only” restriction are not able to view any Team inbox.
- Agents with unrestricted access or with the “View Contacts assigned to User’s team” restriction are able to view their own Team inbox.
- Owners and Managers are able to view all Team inboxes.
Custom inbox
This section shows all the Custom Inboxes created by the User or shared by other Users. There are three sub-sections:
- All: Shows all Custom Inboxes created and shared with the Users.
- By me: Shows all Custom Inboxes created by the User.
- By others: Shows all Custom Inboxes shared with the User.
Blocked Contacts inbox
This displays the conversations of Contacts that have been blocked.
Access to this inbox is granted to Agents, Owners and Managers. This inbox will be displayed only if you have access to view conversations of blocked Contacts and there is at least 1 blocked Contact in the Workspace.
New Message Indicator
The blue dot indicator indicates a new incoming message in the relevant inbox. It disappears when the inbox is opened.
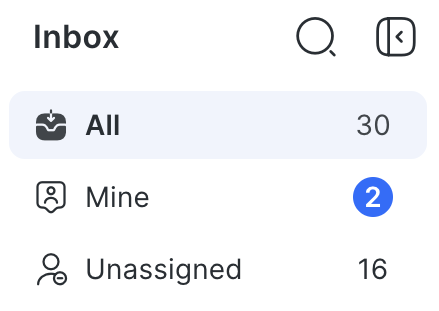
The blue dot indicator prioritizes inboxes as below for specificity:
Mine > Team > Unassigned > All
When a new message arrives in the Mine inbox, the blue dot will mark it accordingly without alerting the Team or All inboxes. The same principle applies throughout using this hierarchy.
Open Conversation Count
The Open Conversation Count indicates the number of open conversations in an inbox.
Chats and Calls view
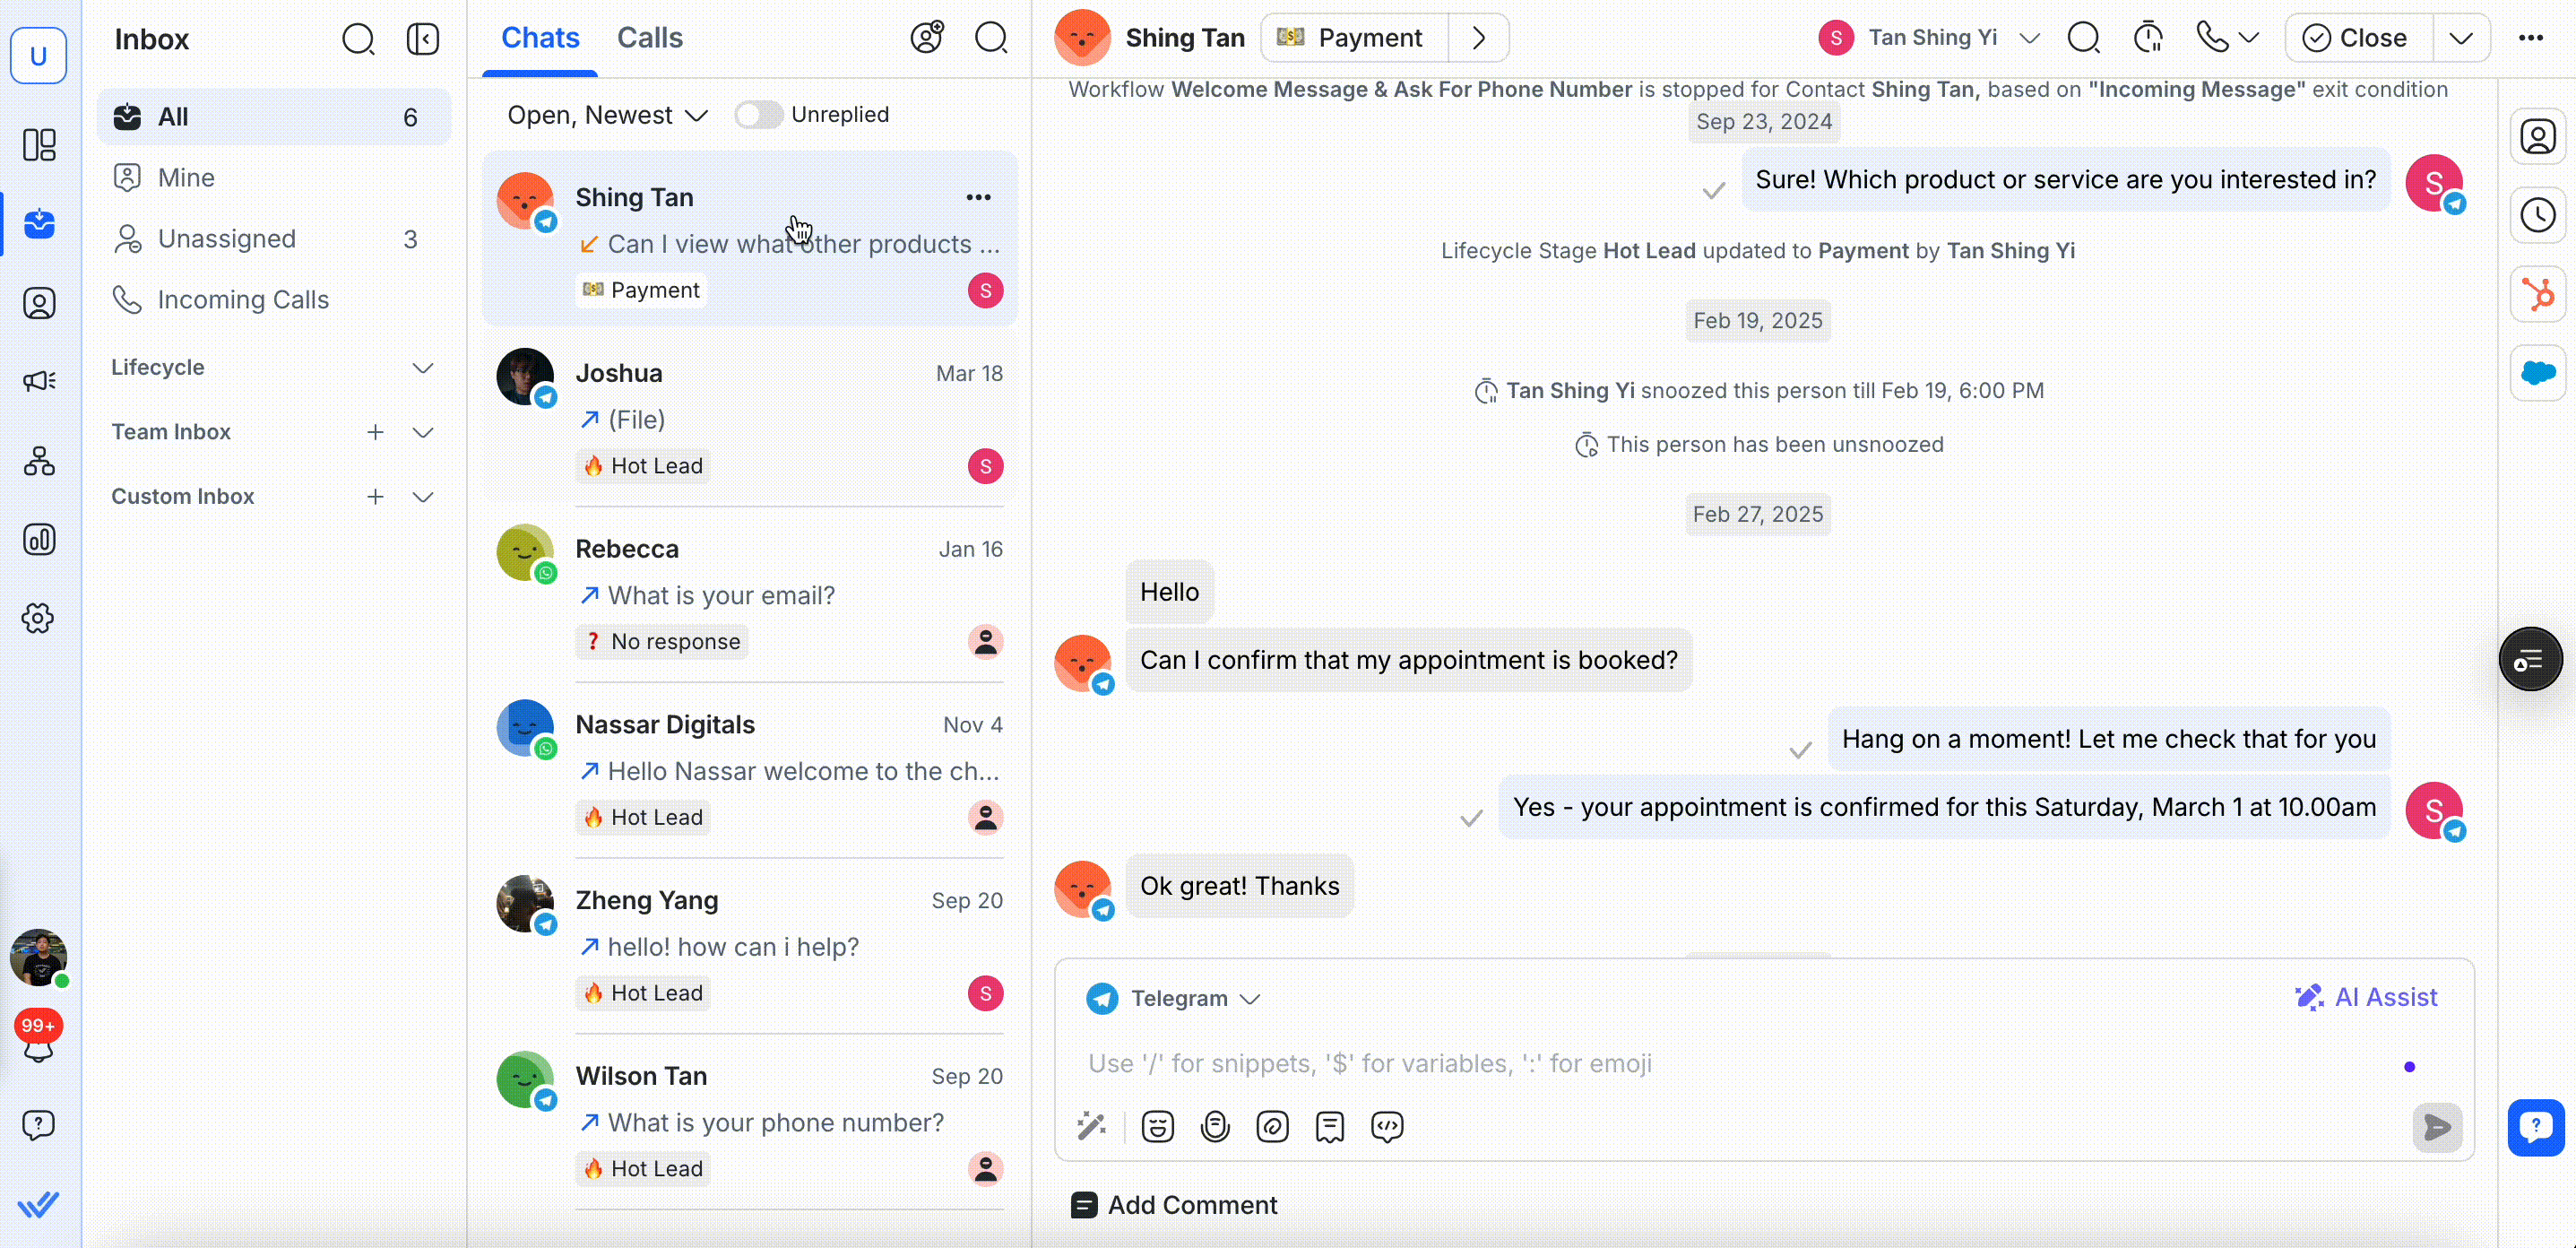
You can now switch between Chats and Calls using the tabs above the Conversation List.
- Chats view shows your ongoing conversations.
- Calls view displays call logs from your connected channels.
Use these tabs to quickly toggle between messaging and calling without leaving the Inbox.
Add Contact and Search
- Click the add Contact button to add a new Contact directly from the Conversation List.
- Fill in basic information such as name, phone number, and email.
- You can assign the Contact to a specific team or inbox.
- Next to the add Contact button, click the search icon to search for Contacts, Messages and Comments.
Search Behavior
- Your recent searches are listed in the same dropdown.
- You cannot search for Broadcasted Messages.
- The search results are not case sensitive. For example, the search result for
SAMANTHAincludessamantha,SAmaand SAM.
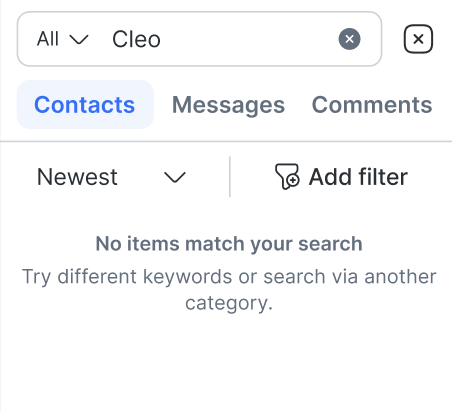
Search for Contacts
To search for a particular Contact, click the Contacts button bellow the search bar.
- Partial or wildcard search: The search results include Contacts that are a partial match to the search query. Example: The search result for
carincludesCarlosandCarter, but notScarletandOscar. Here are the Contact details that are included in the search:- First name
- Last name
- Phone number
- Strict-searching: Only Contacts that are an exact match of the search query will be included in the search result.
- Custom fields, except for checkbox type, date type and time type.
- Contact fields that cannot be searched:
- Country
- Language
- Gender
- Assignee
- Conversation Status
- Checkbox type (custom field)
- Date type (custom field)
- Time type (custom field)
- Tags
Search for Messages or Comments from All Contact Conversations
To search for a Message or Comment, click the Messages or Comments button, under the search bar. The search automatically begins once 3 characters are provided in the search bar with the recent messages/comments listed first.
- Basic match: Search for 1 keyword. Example: the search results for “fox” returns all the conversations with messages/comments with the word “fox” in them.
- Exact match: Searching for exact words. Example: the search result for “quick brown” returns conversations with an exact match ("quick brown") in them. This helps narrow down your search to most relevant conversations.
- Emoji: Search for any emoji. 1 emoji equals a single character, so the search starts after 3 emojis are entered.
- Email address: When searching for email addresses, messages/comments that have the exact match, partial match, or domain-specific match are included in the search results. Example: the search for the domain “@gmail” returns all email addresses of the specified domain.
- Numbers: When searching for numbers, messages/comments that have the exact match or multi-number match will be included in the search results. Example: the search result for “016 014”, includes “…your number start with 016…” and/or “…your number starts with 014…”.Message/Comment search is not filtered based on inbox, sorting, or conversation status.
Search for Messages and Comments from a Single Contact’s Conversation
You can also search for a message or comment inside a Contact’s conversation. Select the Contact and click the search icon on top to open the search bar. Enter the keyword that you want to search.

You can use the arrows or the search results dropdown to navigate through the search results in the Contact’s conversation.
Filter and Sort
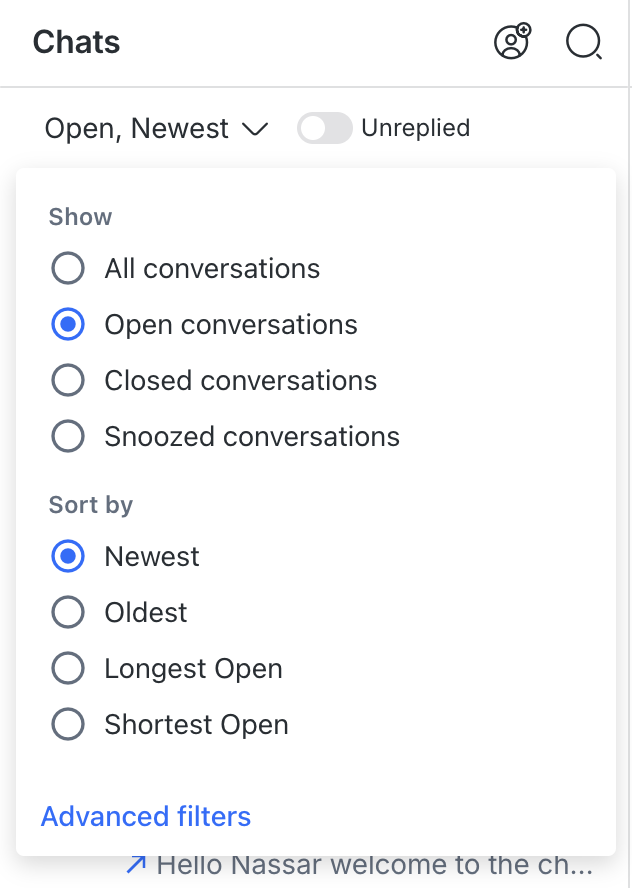
By default, the Conversation List is filtered by Open Status and sorted by Newest message first.
The filter options are:
- All status: Shows all conversations in the Conversation List of the selected inbox.
- Open: Only shows conversations that are open in the Conversation List of the selected inbox.
- Closed: Only shows conversations in the selected inbox that are closed.
- Snoozed: Only shows conversations that are snoozed in the Conversation List of the selected inbox.
- Unreplied: Shows only conversations that you or your team have not yet replied to. This is displayed as a toggle next to the search and filter dropdown.
The sorting options are:
- Newest: Sorts Contacts by newest messages to oldest messages. This sorting does not take broadcast messages into account. Where a Contact receives a broadcast message and it is the newest message, this will not move the conversation to the top of the list.
- Oldest: Sorts Contacts by oldest messages to newest messages. This sorting does not take broadcast messages into account.
- Longest (Open/Closed/Snoozed): Depending on which filter is chosen, conversations are sorted from the longest to the shortest conversation duration that were opened, closed or snoozed.
- For conversations that have been unsnoozed, the conversation status time before the snooze occurred will be applied.
- Contacts without conversation closed data will be displayed on top of the list.
- Shortest (Open/Close/Snoozed): Depending on which filter is chosen, conversations are sorted from the shortest to the longest duration that were opened, closed or snoozed.
- For conversations that have been unsnoozed, the conversation status time before the snooze occurred will be applied.
- Contacts without conversation closed data will be displayed at the bottom of the list.
- The filter option will be defaulted to All Status and disabled for Blocked Contacts inbox.
- Conversations for blocked Contacts will only be displayed in the Blocked Contacts inbox, regardless of the filter option selected.
In the same dropdown, there’s the advanced filters option. It helps you create tailored lists of Contacts. You can save these lists as Custom Inboxes for quick access.

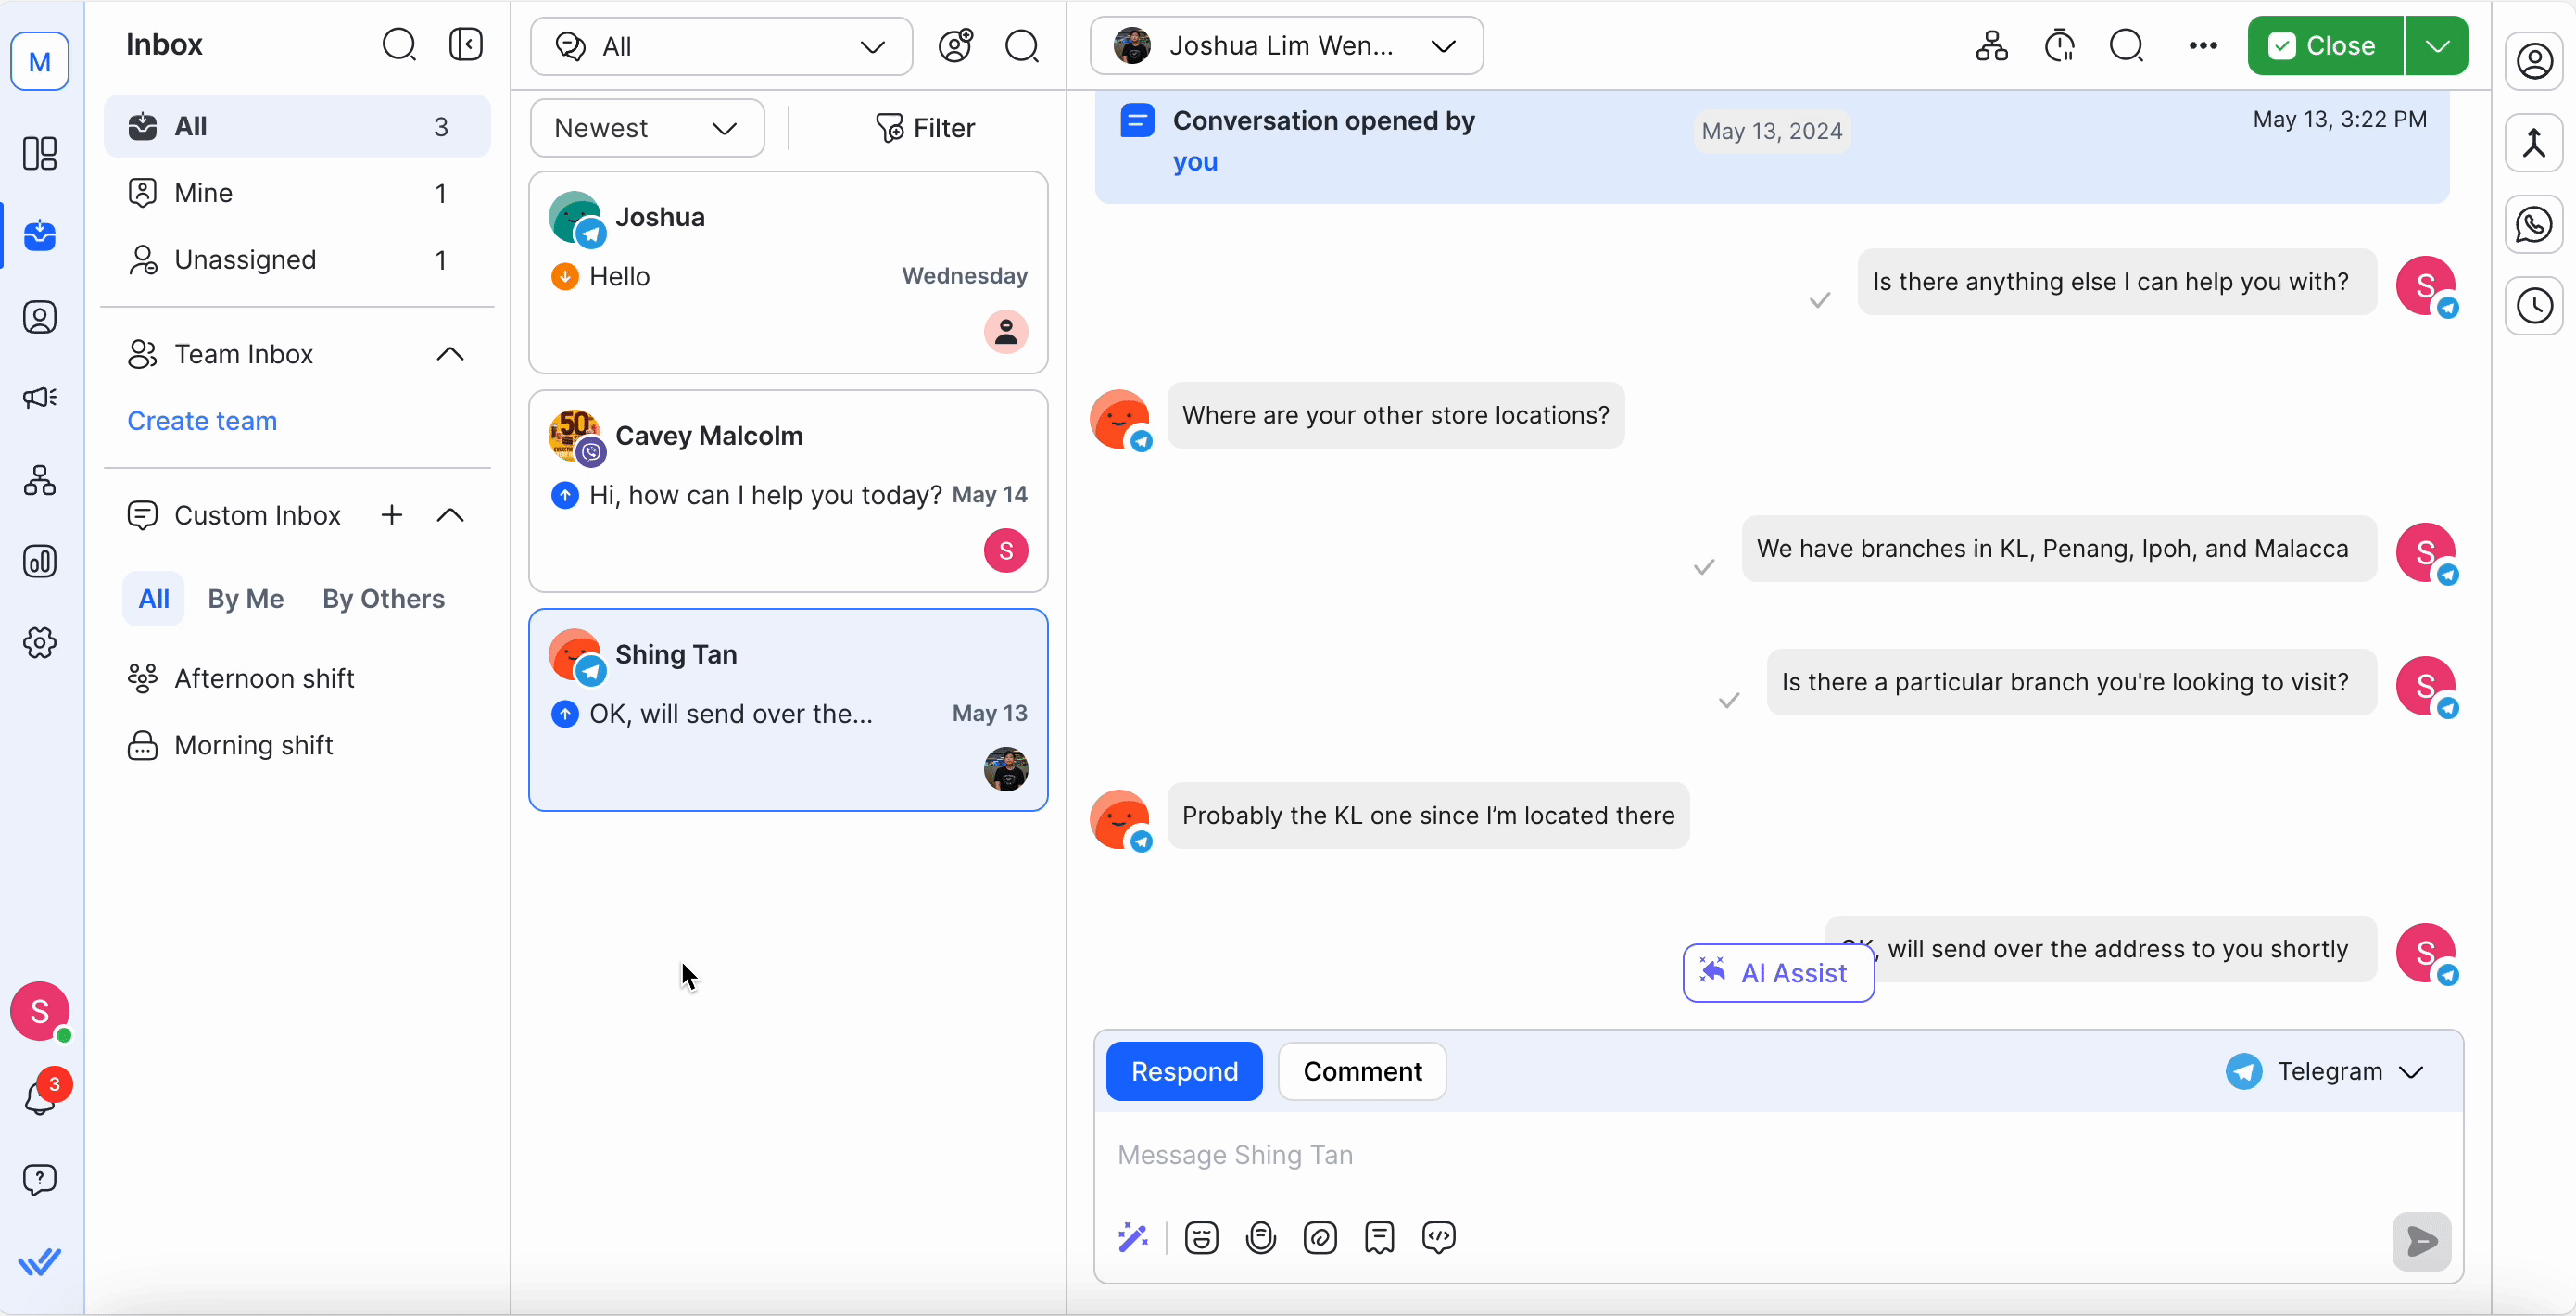
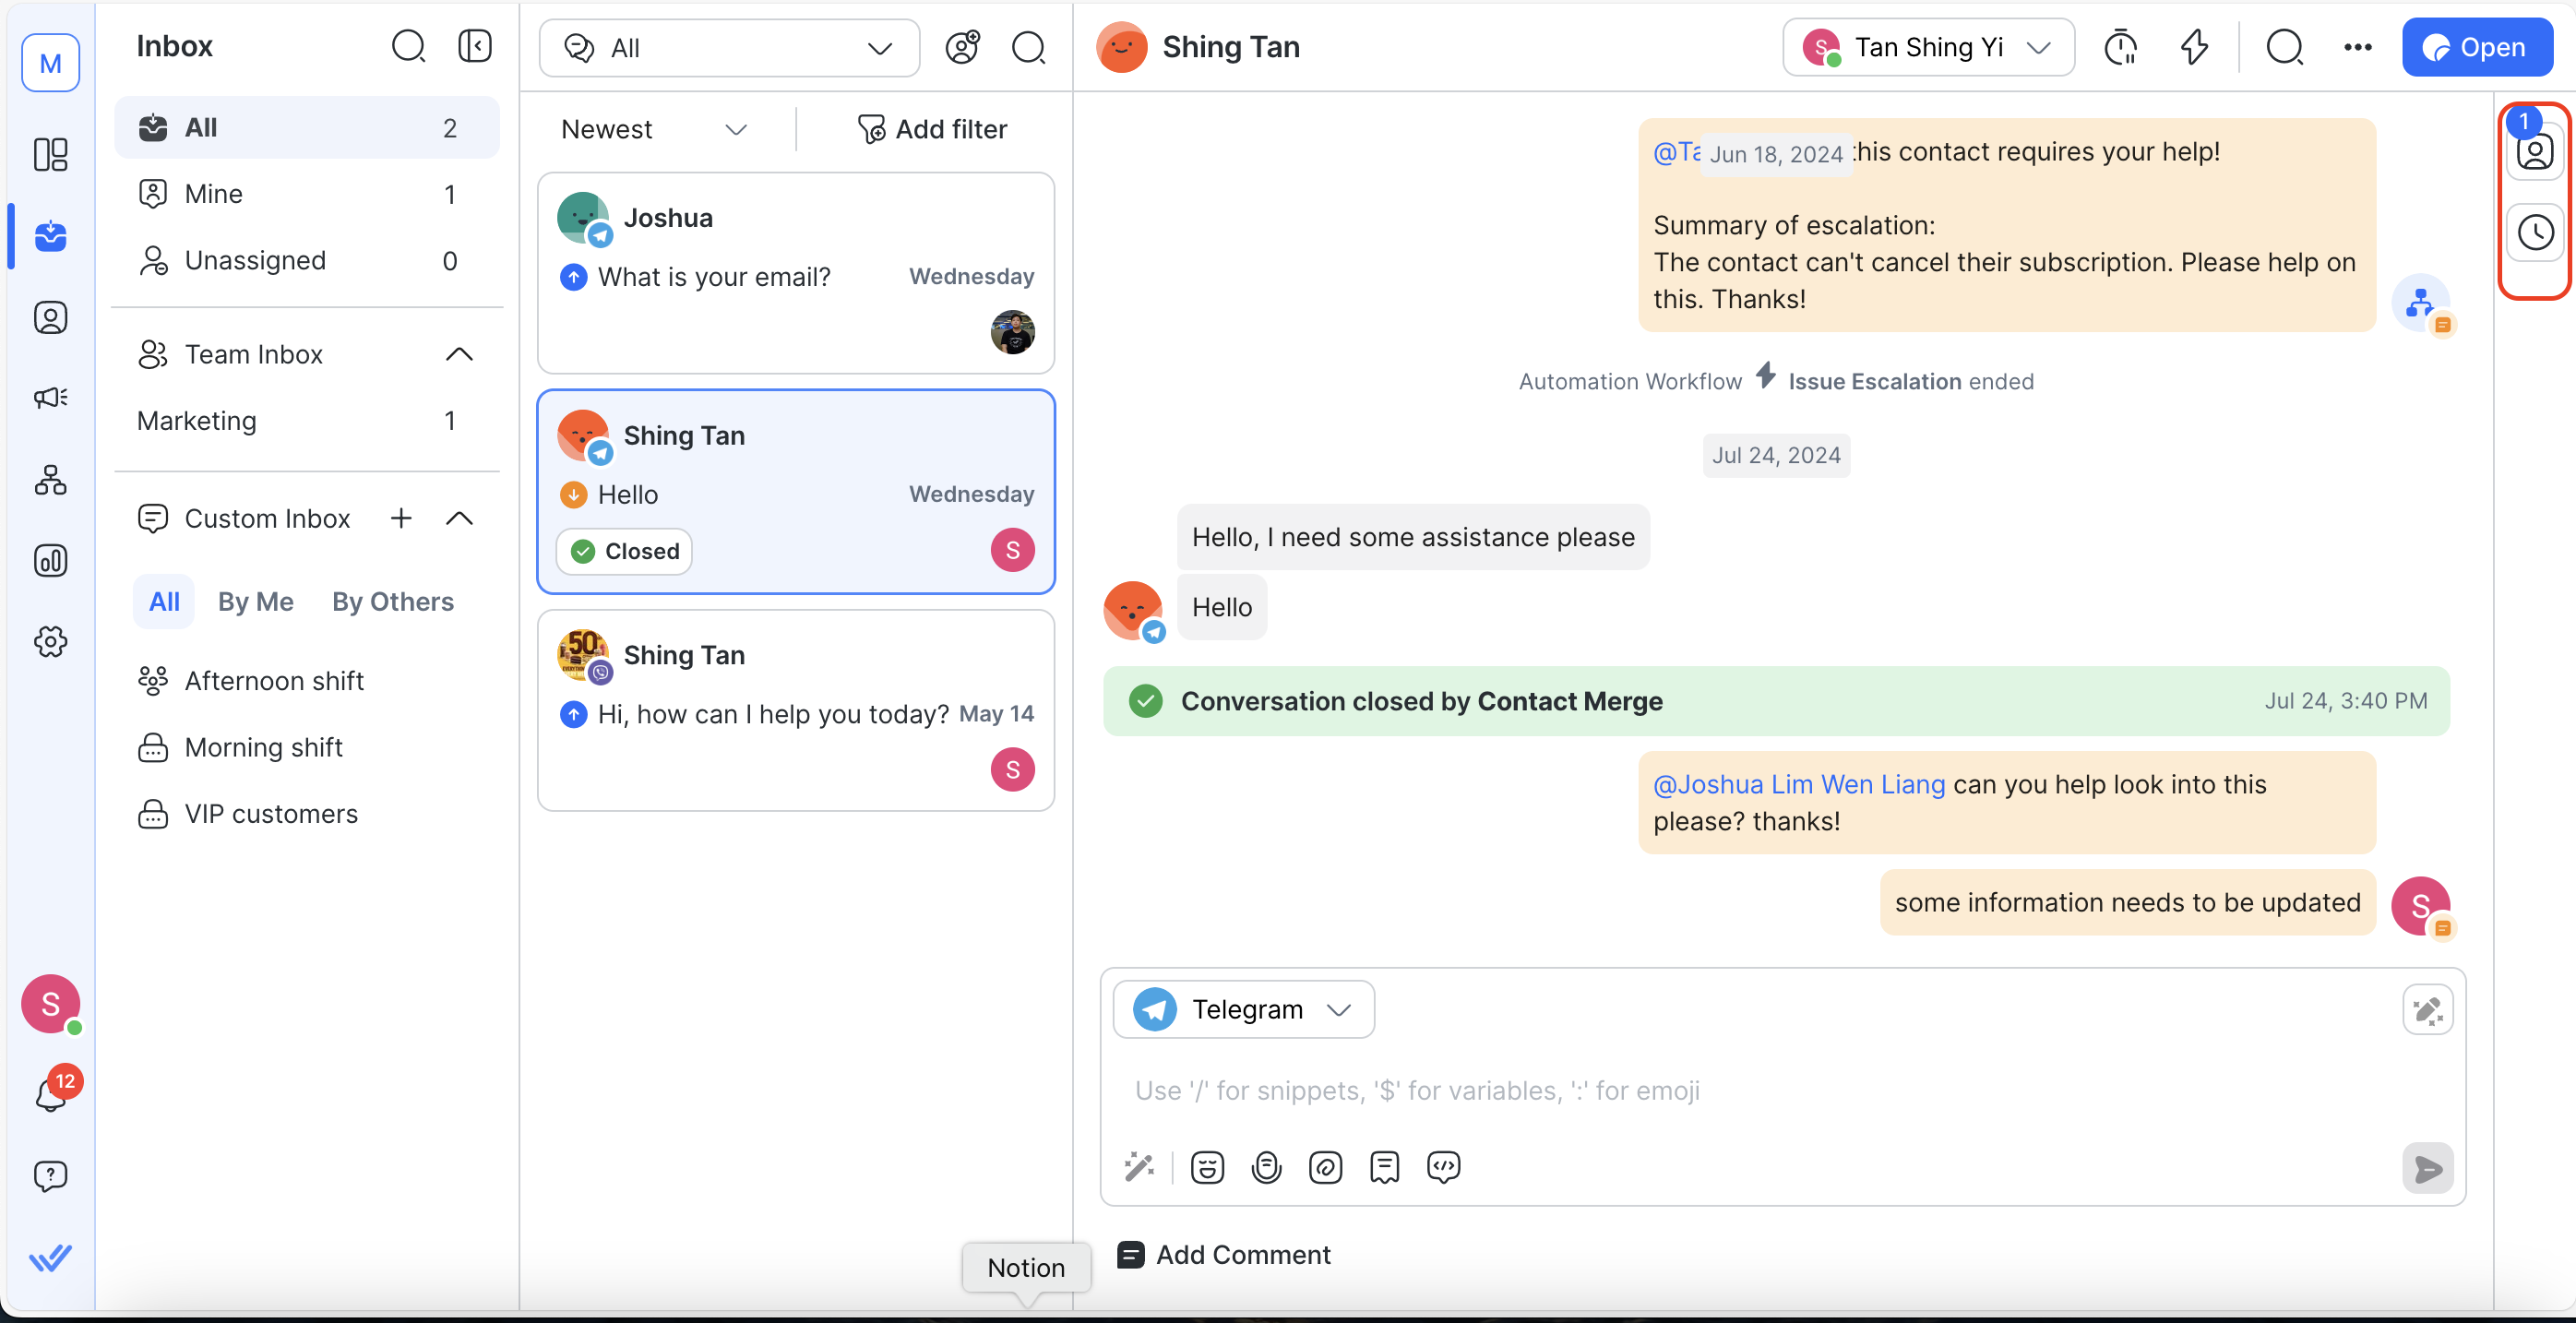
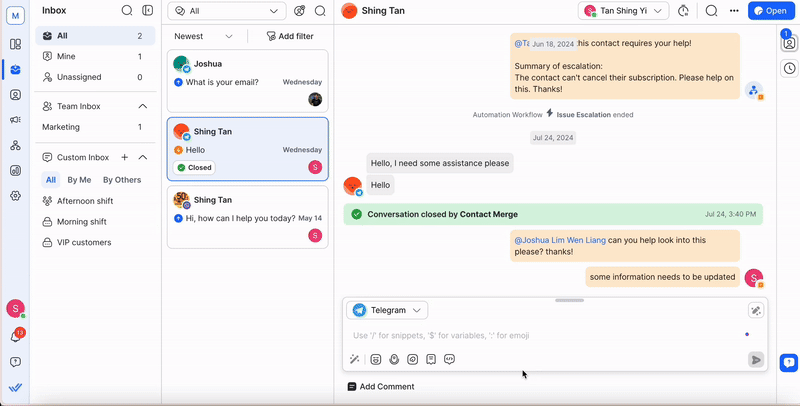
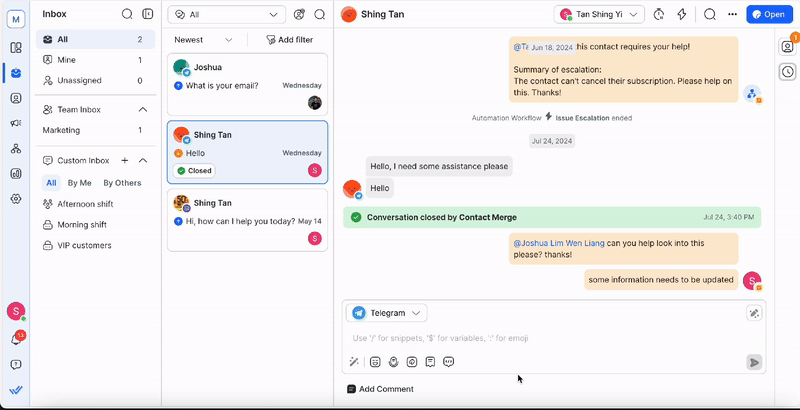
Conversation List
The Conversation list shown is based on the selected inbox. Standard and Team inboxes refresh in real-time when the inbox is selected or a new message is received. Custom inboxes have to be manually refreshed by clicking the refresh button on the “Last updated X time ago” banner at the top of the list.
Selecting a Conversation
By default, the Conversation List is filtered by “All” and sorted by the newest messages first. Selected conversations are highlighted in blue.
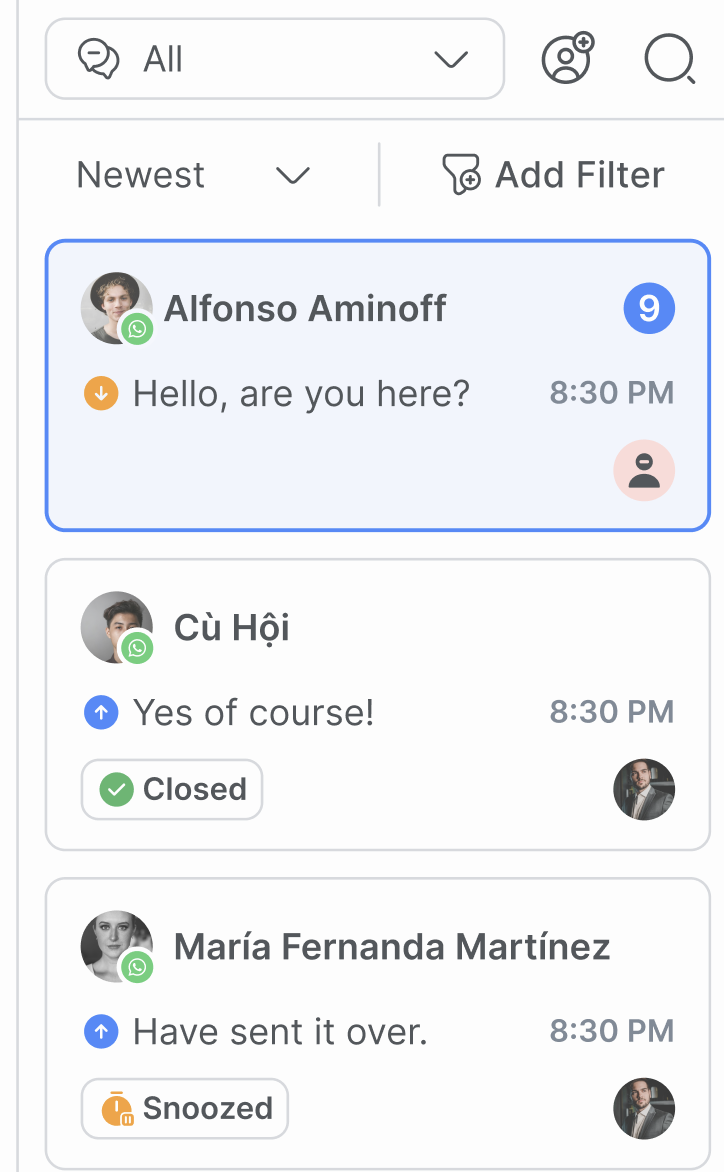
Conversation Indicators
Indicator | Description |
Conversation Status | This label is displayed on the bottom left of each conversation in the Conversation List. It shows ‘Closed’ and ‘Snoozed’ statuses. No label is shown if the conversation is open. |
Channel | The channel icon is located at the bottom right of the Contact profile photo icon. |
Unread Count | If there are unread messages, there will be a count highlighted in a blue box besides the Contact's name. |
Last Message | The date on the top right of the Contact record shows the last message sent or received. The arrow indicates if the most recent message was outgoing or incoming. |
Assignee | The initial or User avatar on the bottom right indicates which User this contact is assigned to. |
Quick actions
You can use quick actions to manage and organize conversations more efficiently.
With quick actions, you can:
- Close a conversation
- Open a conversation
- Snooze ongoing conversations
- Select predefined Shortcuts
- Assign conversations to team members
Adding a Contact
Agents can add individual Contacts from the Inbox module. To add a new Contact, click on the Add new contact icon next to the search and filter bar.
Add in the contact details and select Save.
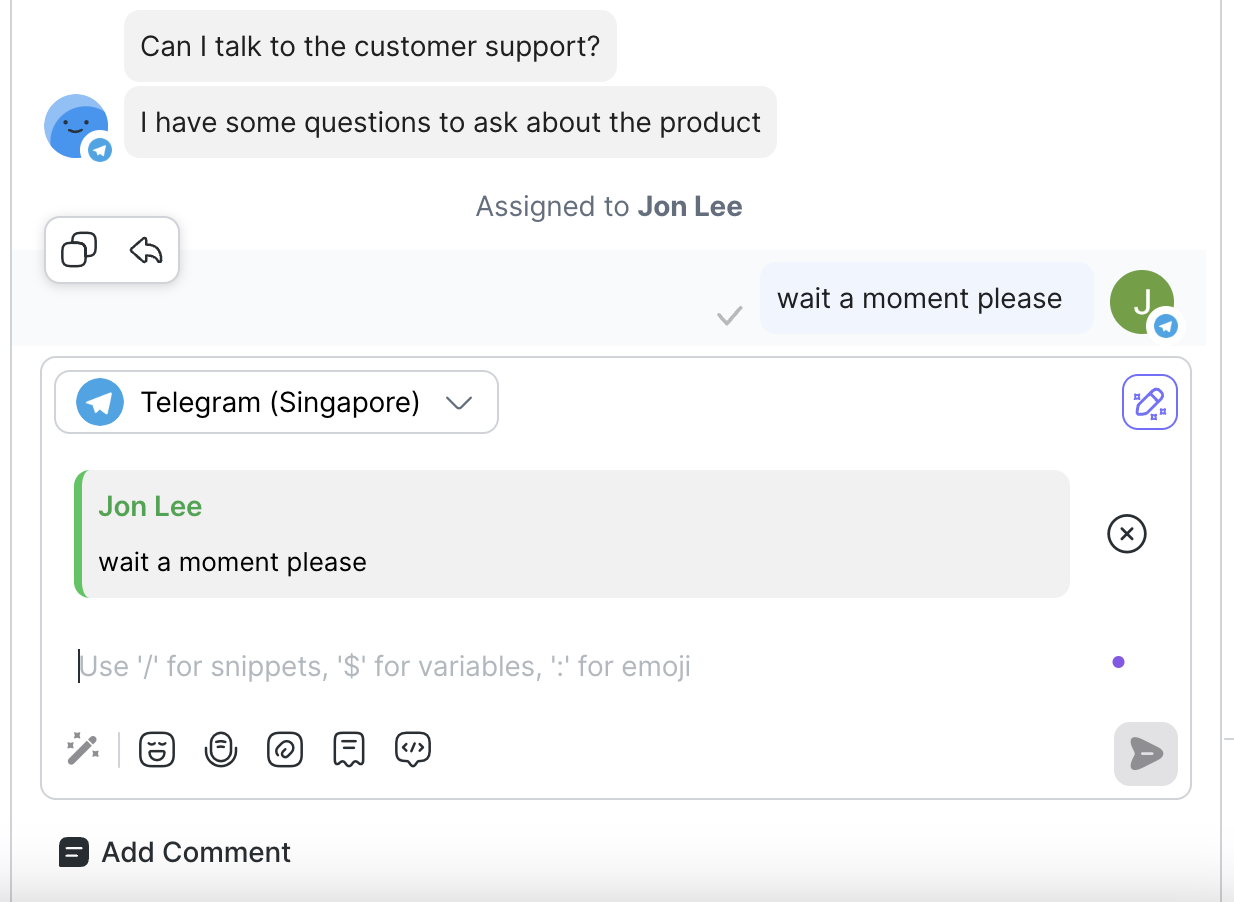
Messaging Console
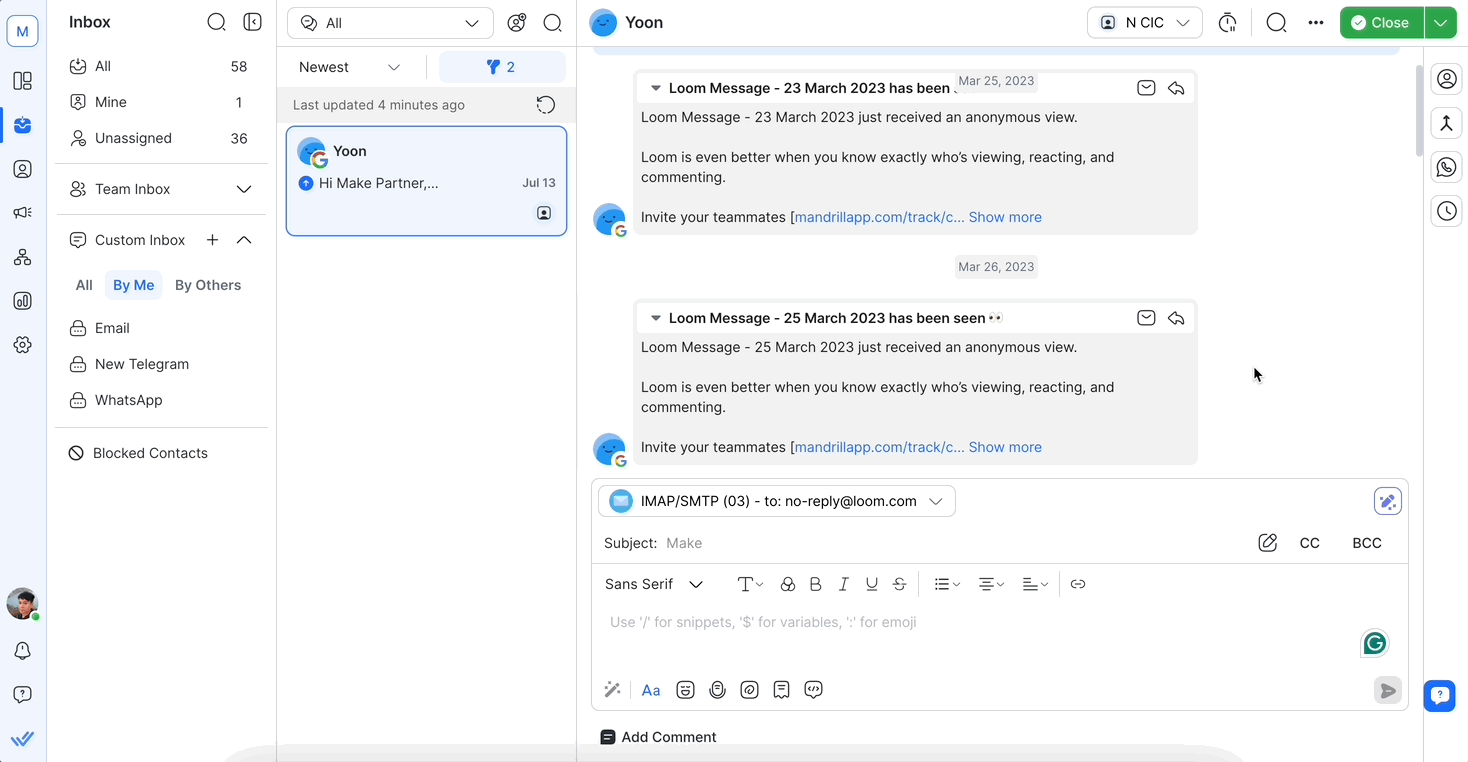
This is where you can view, draft and compose messages to communicate with Contacts. When a Contact is selected from the Conversation List, their conversation history, inclusive of Message Metadata and Contact Events, will load here.
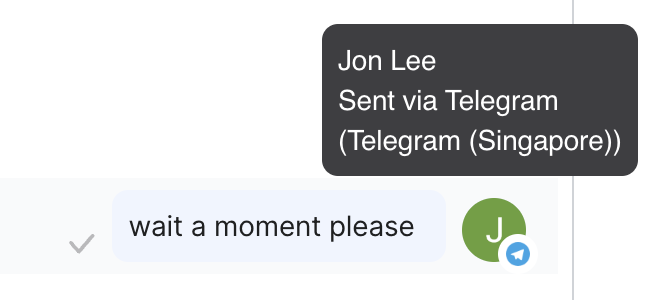
Message Metadata
Message metadata, including the sender, status, and timestamp, is displayed in a callout next to a message.
Refer to Message Status for more information on the different message statuses.
The message sender indicates how the message was sent.
Category | Sender |
Platform | Workflows |
Integration | Dialogflow |
Provider | Facebook Inbox WhatsApp Echo Facebook Messenger Message Tag |
Human | User Name (Regular Outgoing Message) |
API | API |
Messages Action Menu
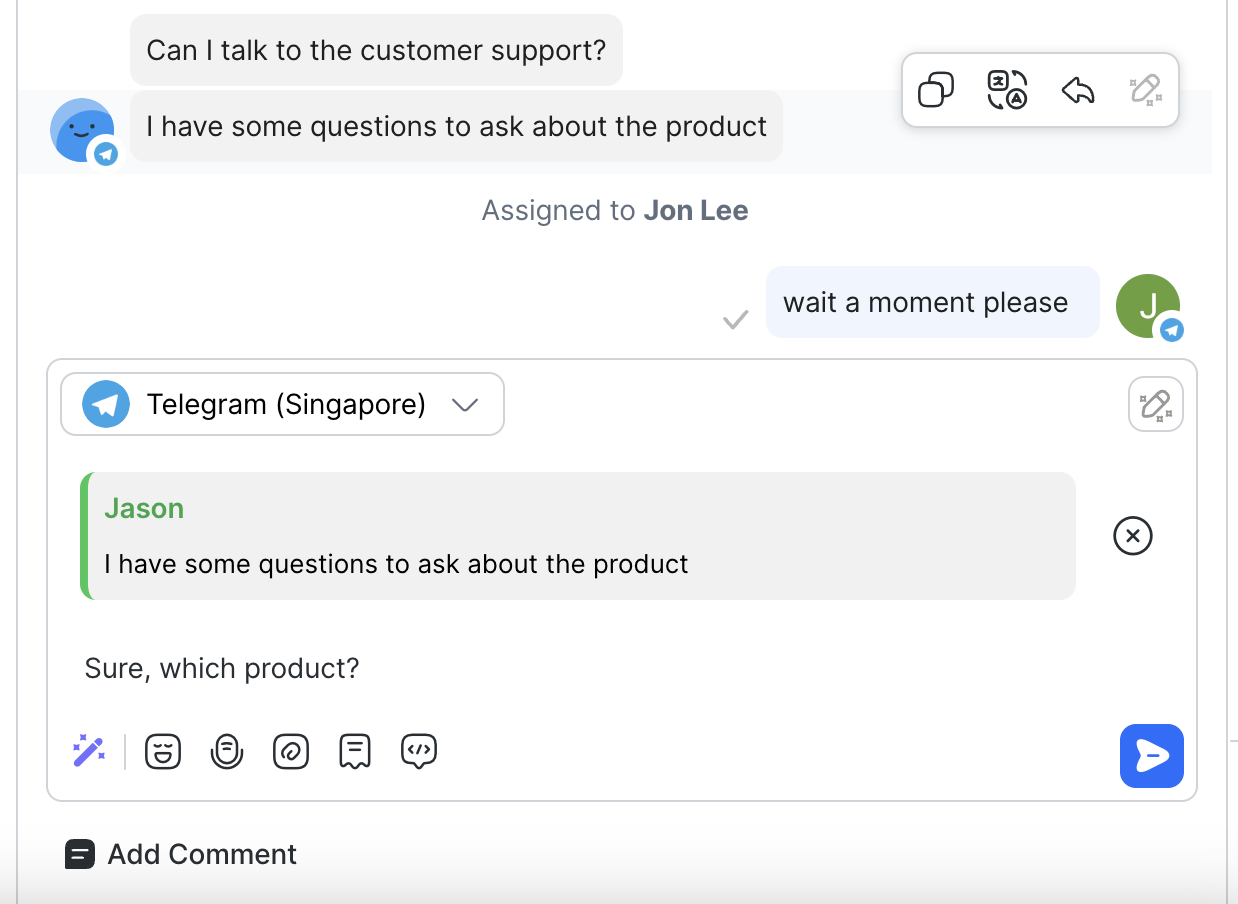
Use the messages action menu to reply to specific messages in a conversation, generate replies using AI and translate messages using AI. The reply action menu consists of 4 options:
- Copy (to copy a message)
- Reply
- Reply with AI Assist
- Translate with Respond AI

Reply
When a Contact replies to one of your messages, the Inbox module will indicate the exact message they are referring to for context. It's important to note that the Reply-To Context feature is available for both incoming and outgoing messages.
Reply to incoming message
Reply to outgoing message
- WhatsApp Business Platform (API)
- WhatsApp Cloud API
- Telegram
Reply with AI Assist
In the reply action menu, select Reply with AI Assist to draft a response using AI Assist when replying to a specific message.
Translate with Respond AI
In the reply action menu, select Translate with Respond AI to translate specific messages using Respond AI.
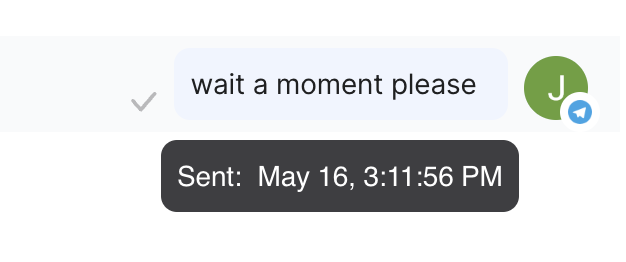
Message Status
When you send a message to a Contact, you can check its delivery status by hovering your mouse over the message.

For each message sent to the Contact, there will be an indicator that indicates the status of the message. The statuses are described as followed:
Status | Icon | Description |
Sent | The message has been successfully sent. | |
Delivered | The message has been successfully delivered. | |
Read | The message has been read. | |
Failed | There was a failure in sending the message. |
- If a message fails to be sent to a Contact, hover over the message to view the error message from the platform or the Channel source.
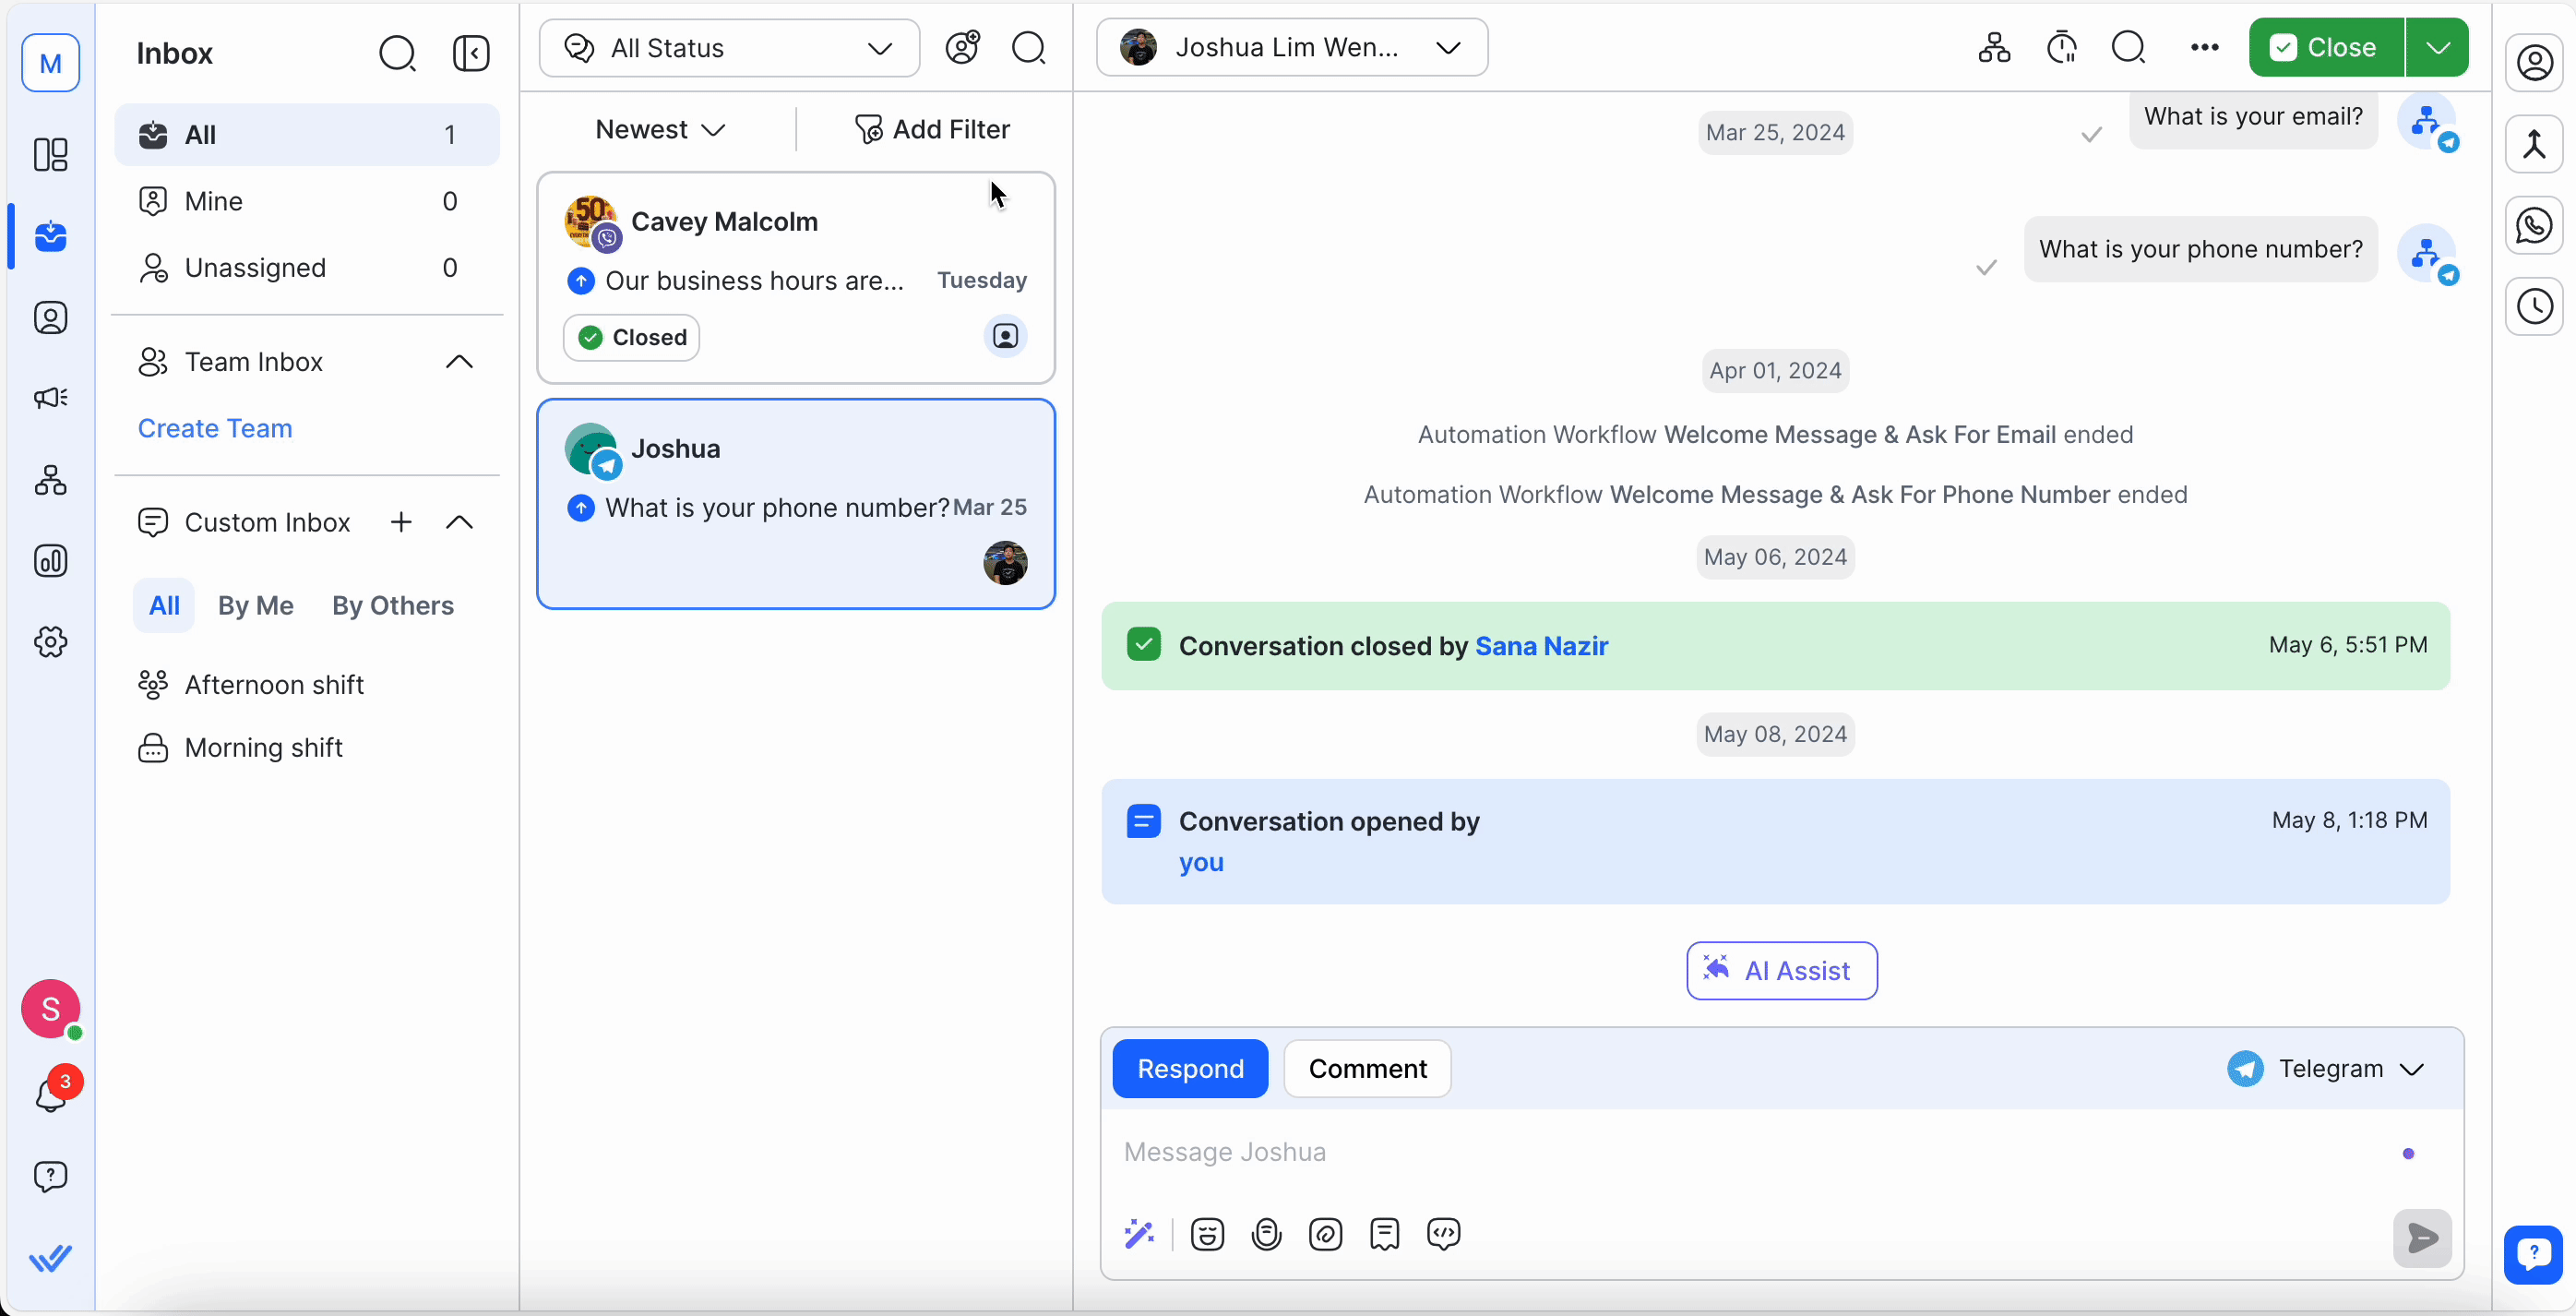
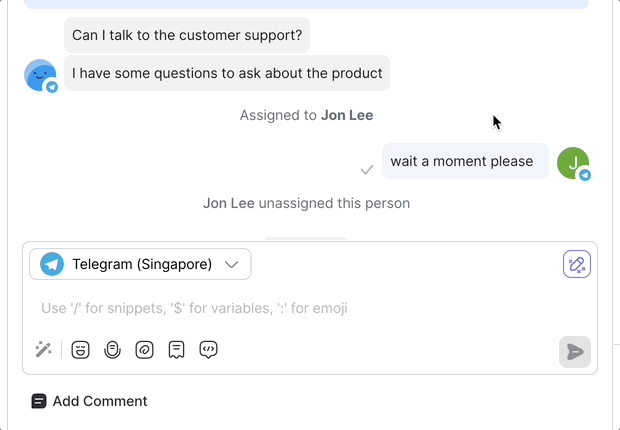
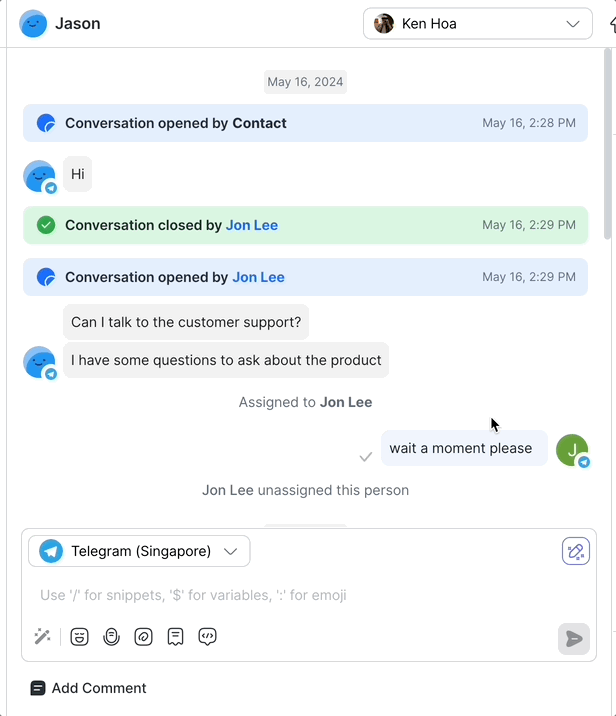
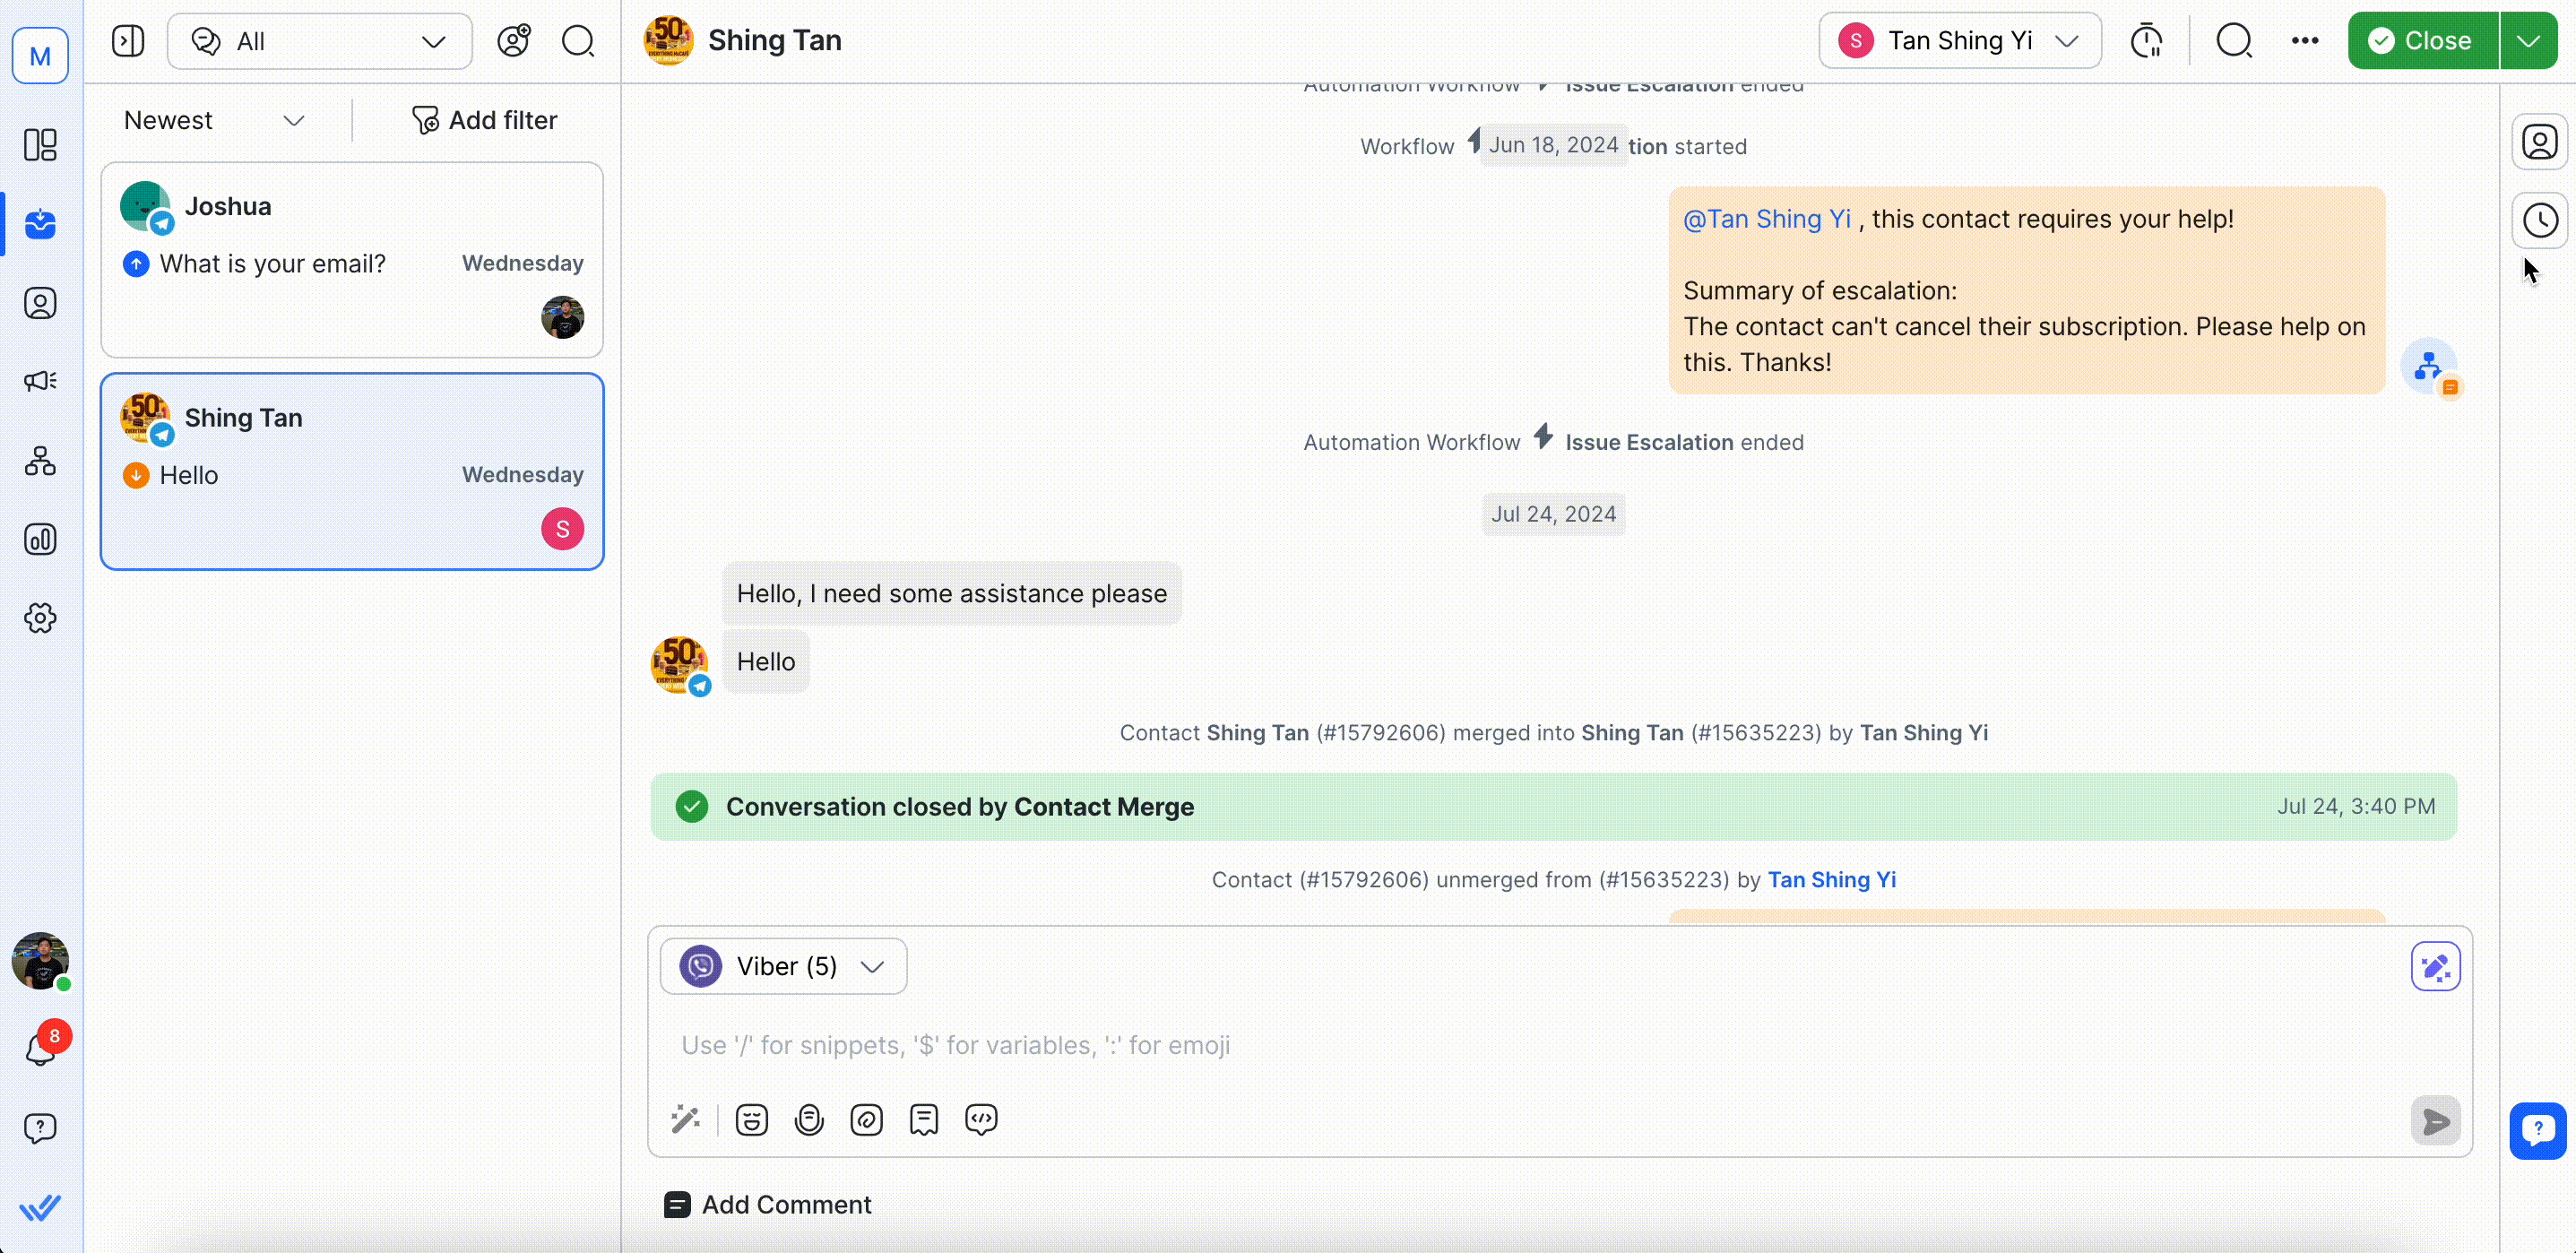
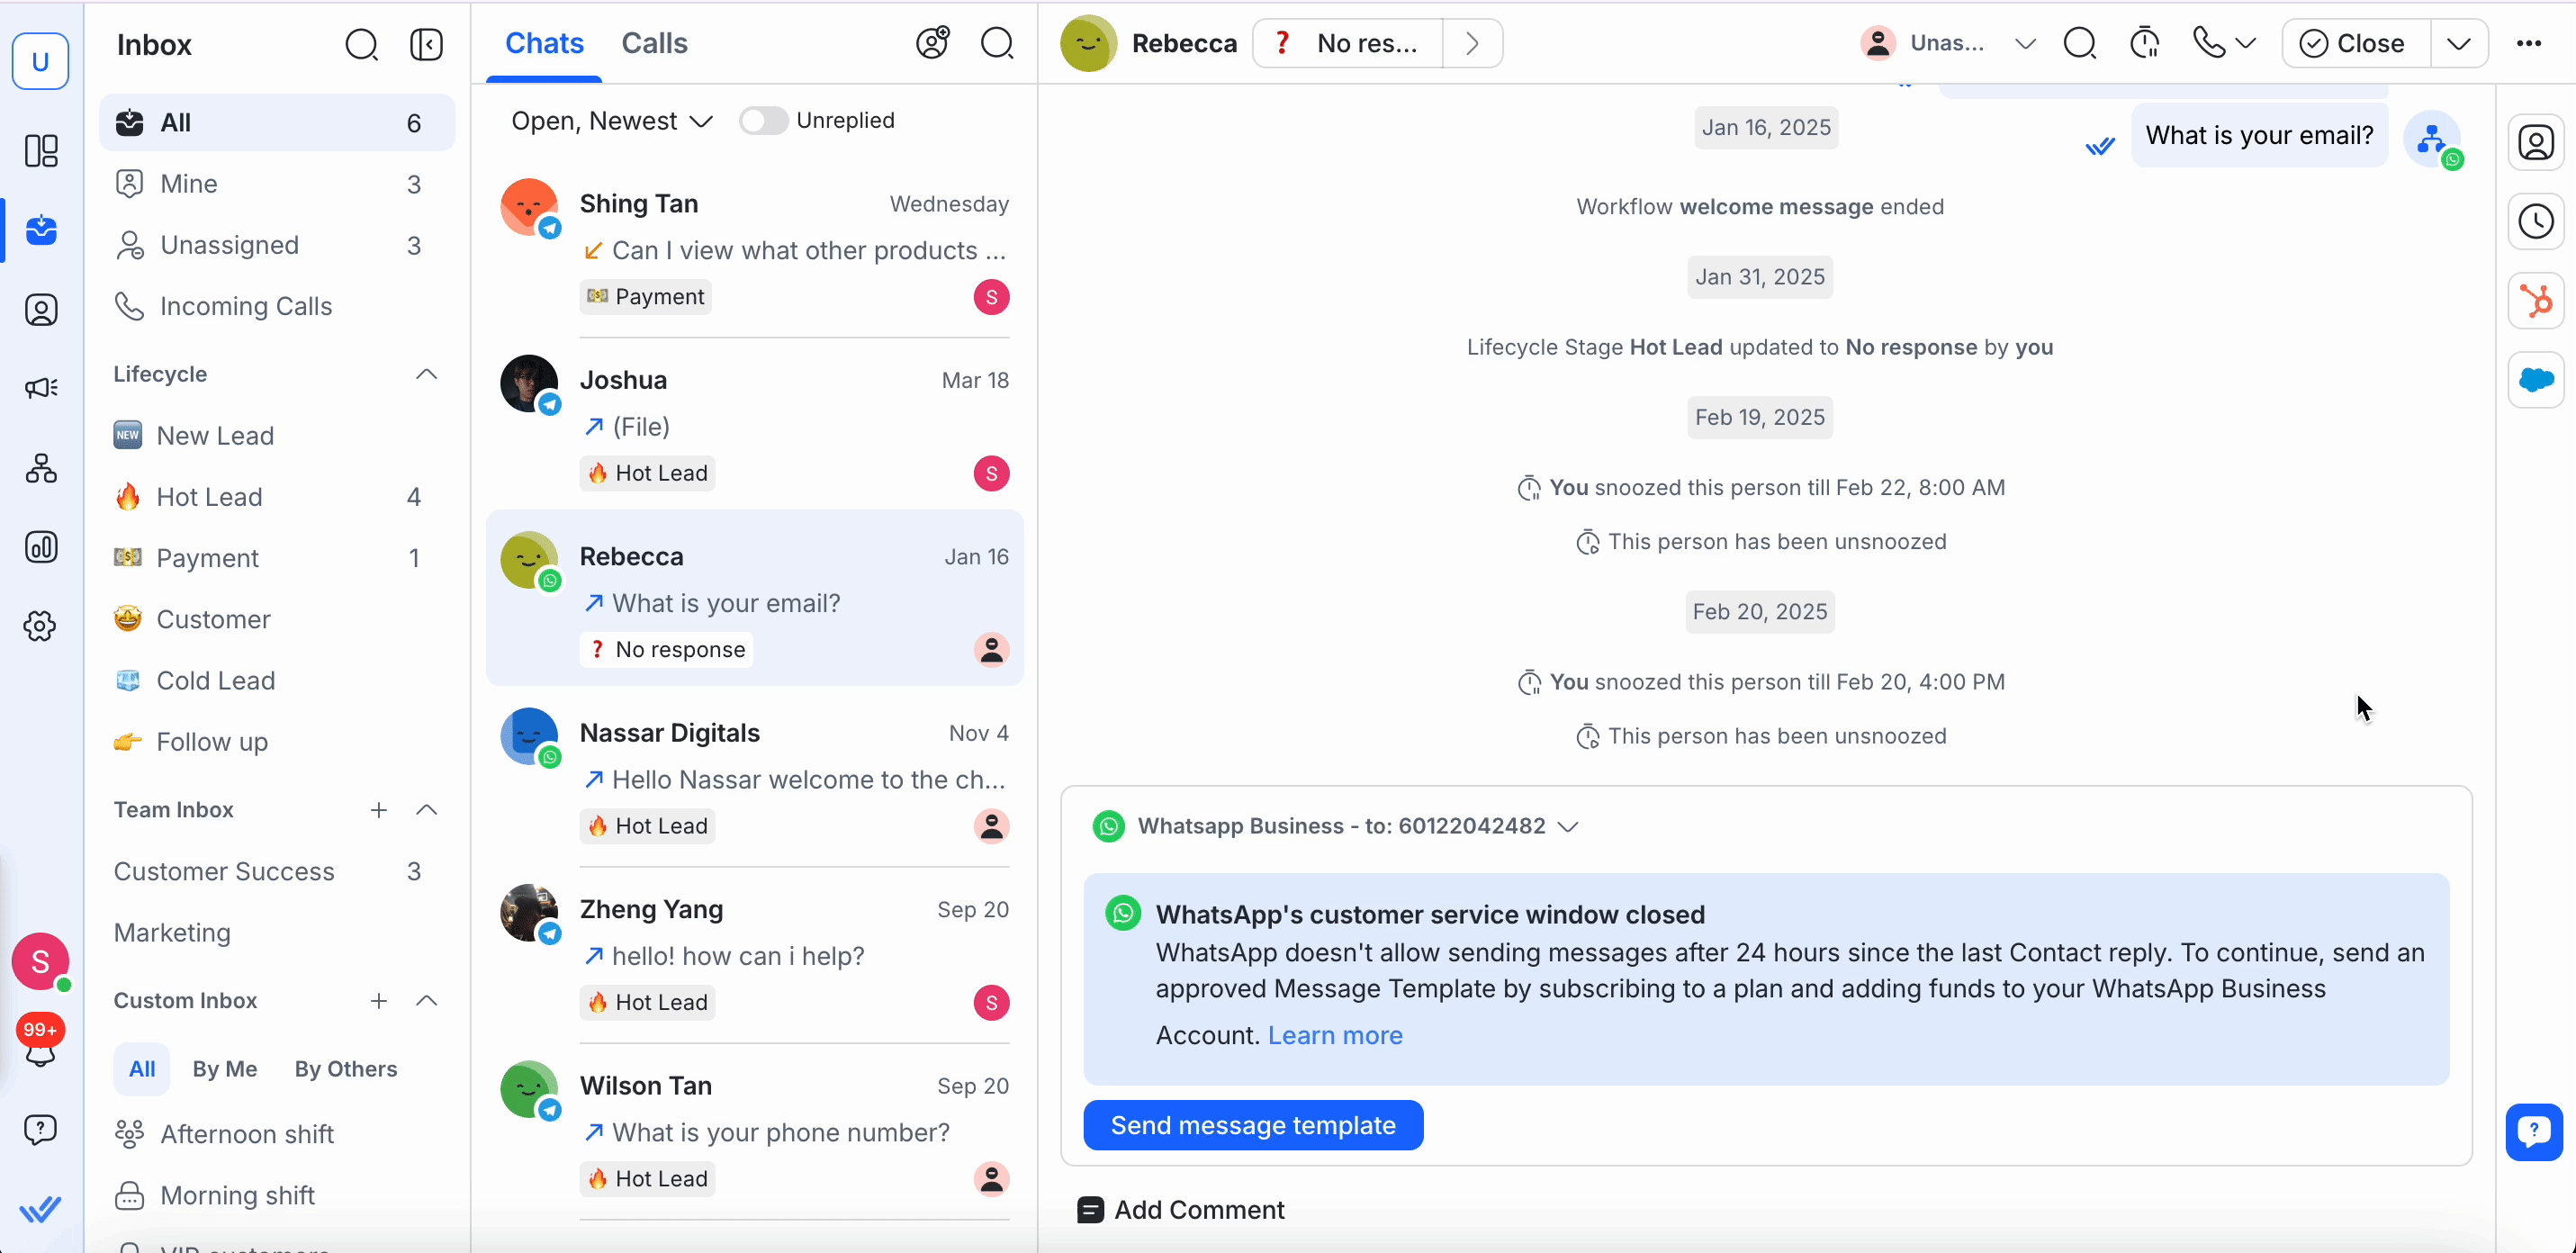
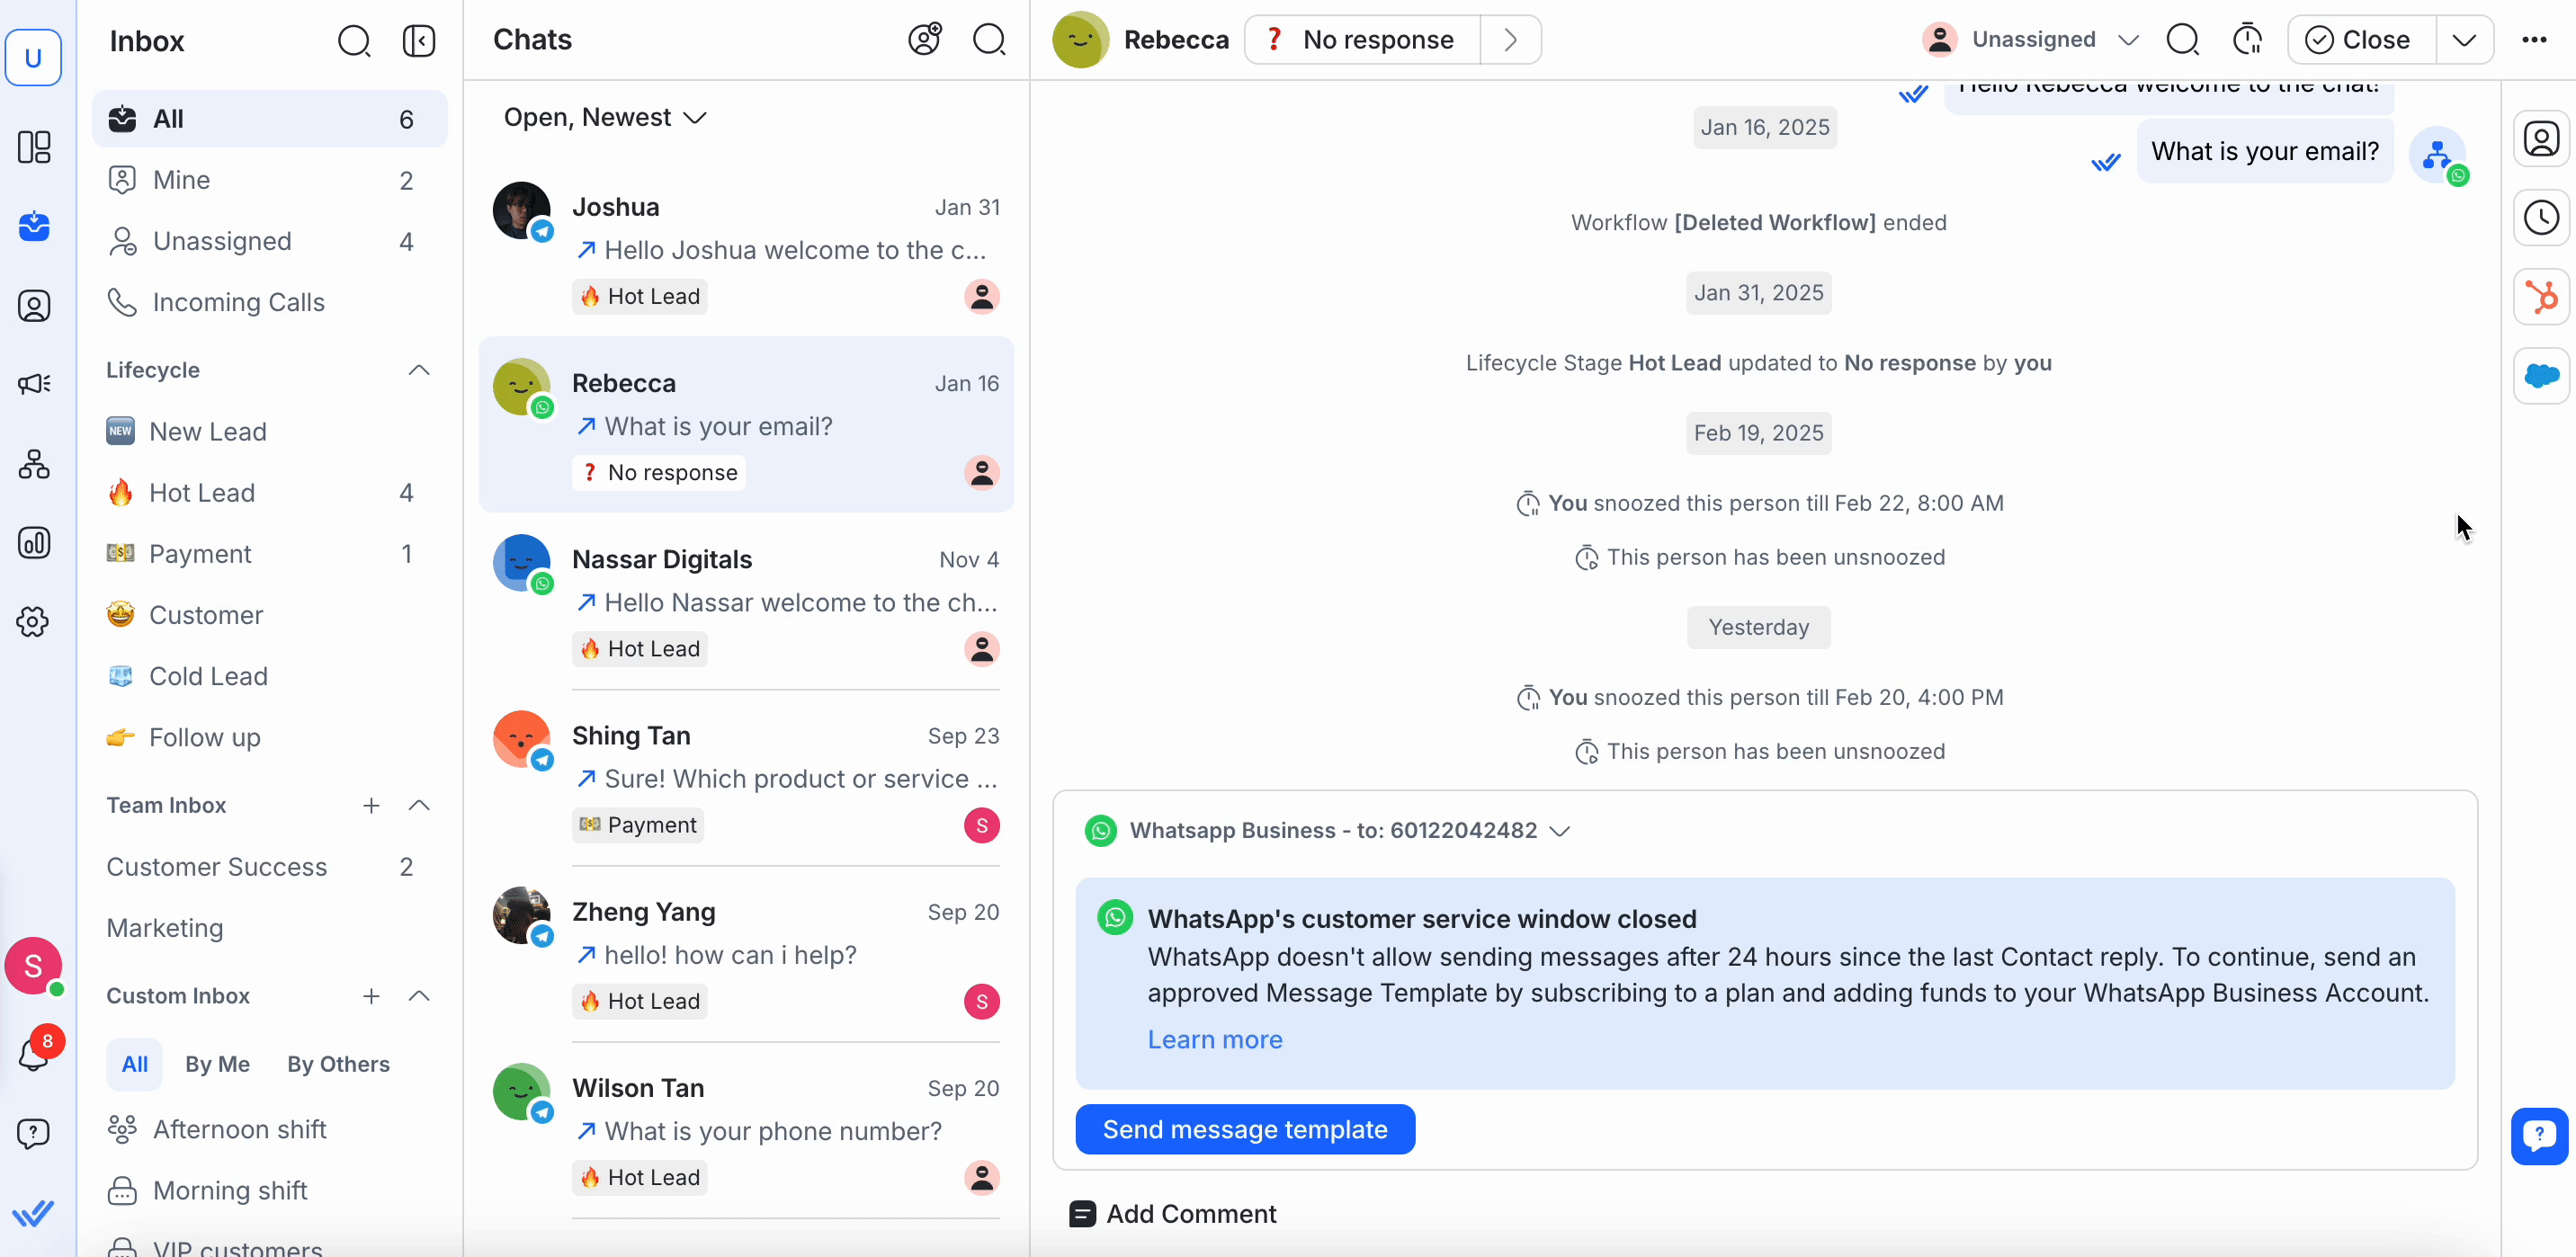
Conversation Events
Message History will also keep track of important events, such as when a conversation was closed and by which source.

Event Category | Event |
Assignment |
|
Unassignment |
|
Conversation Closed |
|
Conversation Opened |
|
Snooze |
|
Broadcasts |
|
Workflows |
|
Bot Status Update |
|
Channel |
|
Page Change |
|
Contact |
|
Conversation Events with Reference
It is possible to trigger an event with a reference on supported Channels (Facebook, WhatsApp). References include tracking different links placed in different Channels or tying a Channel user to a session or account in an external app. A Conversation Opened or a Channel event can be triggered with a reference and the reference code will be stored with the event. For events that contain URLs as sources, the URL will also be stored and shown in the Inbox module.
Sending Messages
Refer to this quick guide on how to send messages to your Contacts.
- Some messaging channels have a limited messaging window. Be sure to plan your replies ahead of time to ensure your message is delivered. Refer to the overview page of the respective channel to learn more about the channel's messaging window.
- You cannot send any messages to Contacts that have been blocked. The messaging console will be disabled for blocked Contacts.
Receiving Messages
New messages will appear in the contact list of the Inbox module. New Contacts will be unassigned by default.
Link Previews
The Link Preview feature involves displaying link previews in messages, enabling users to remove these previews from the message console.
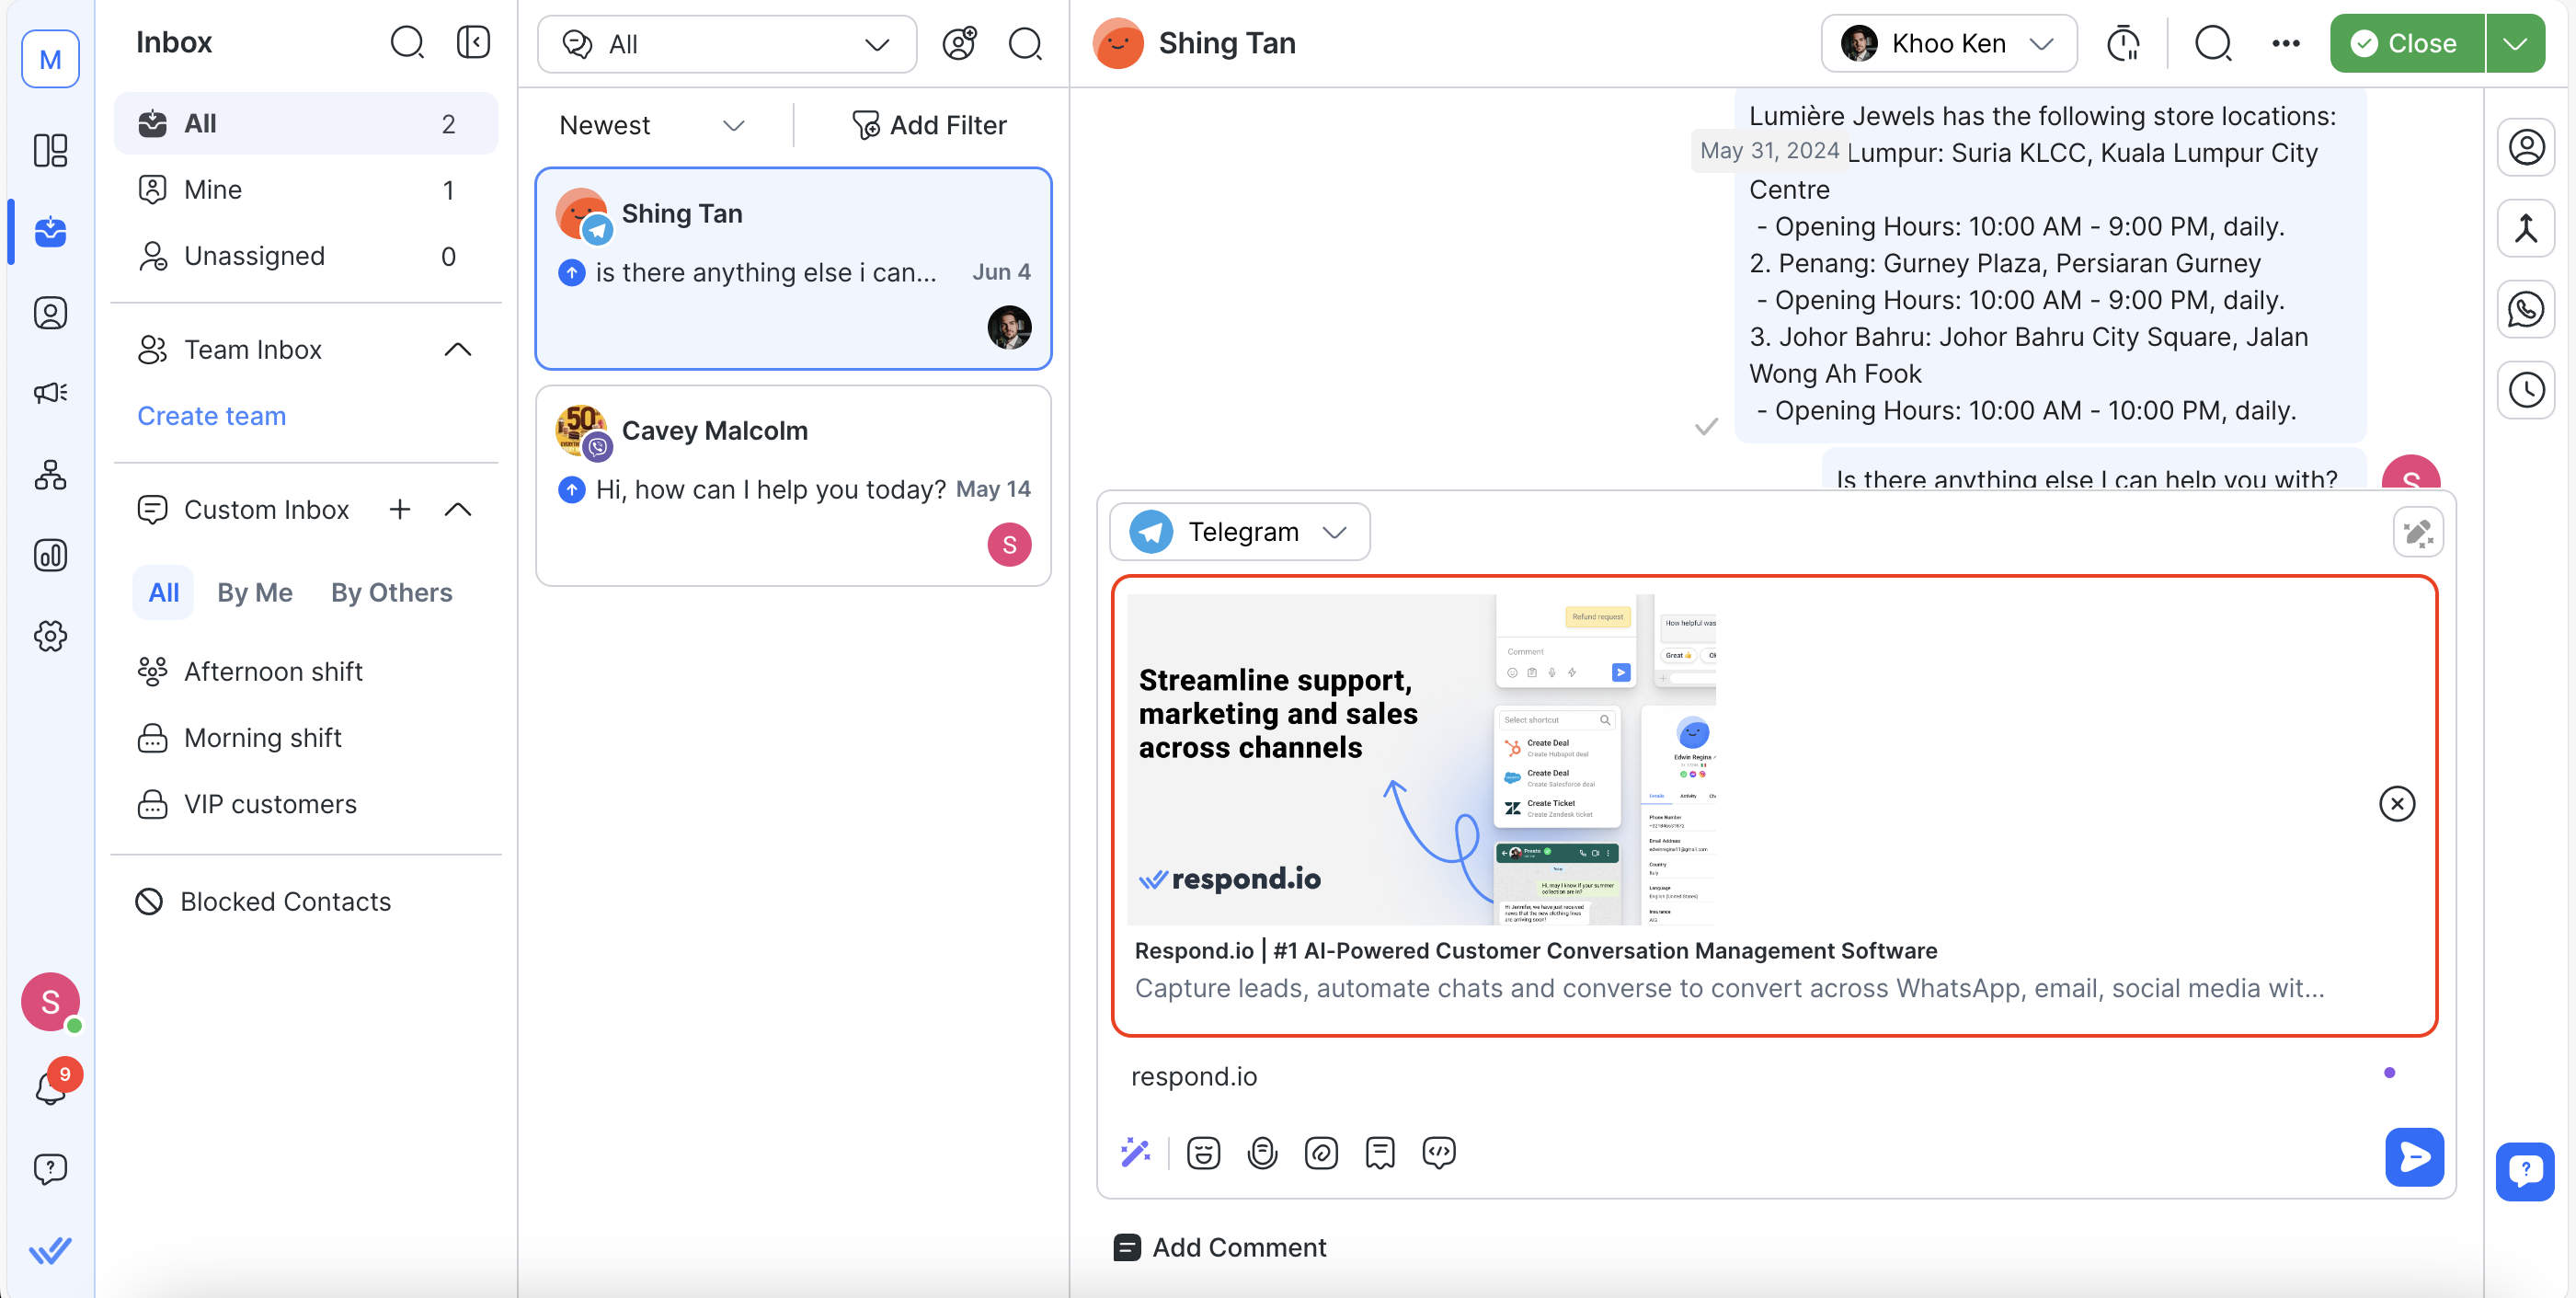
Link Preview Content
The Link Preview content includes image, title, description, and the website link associated with the URL.
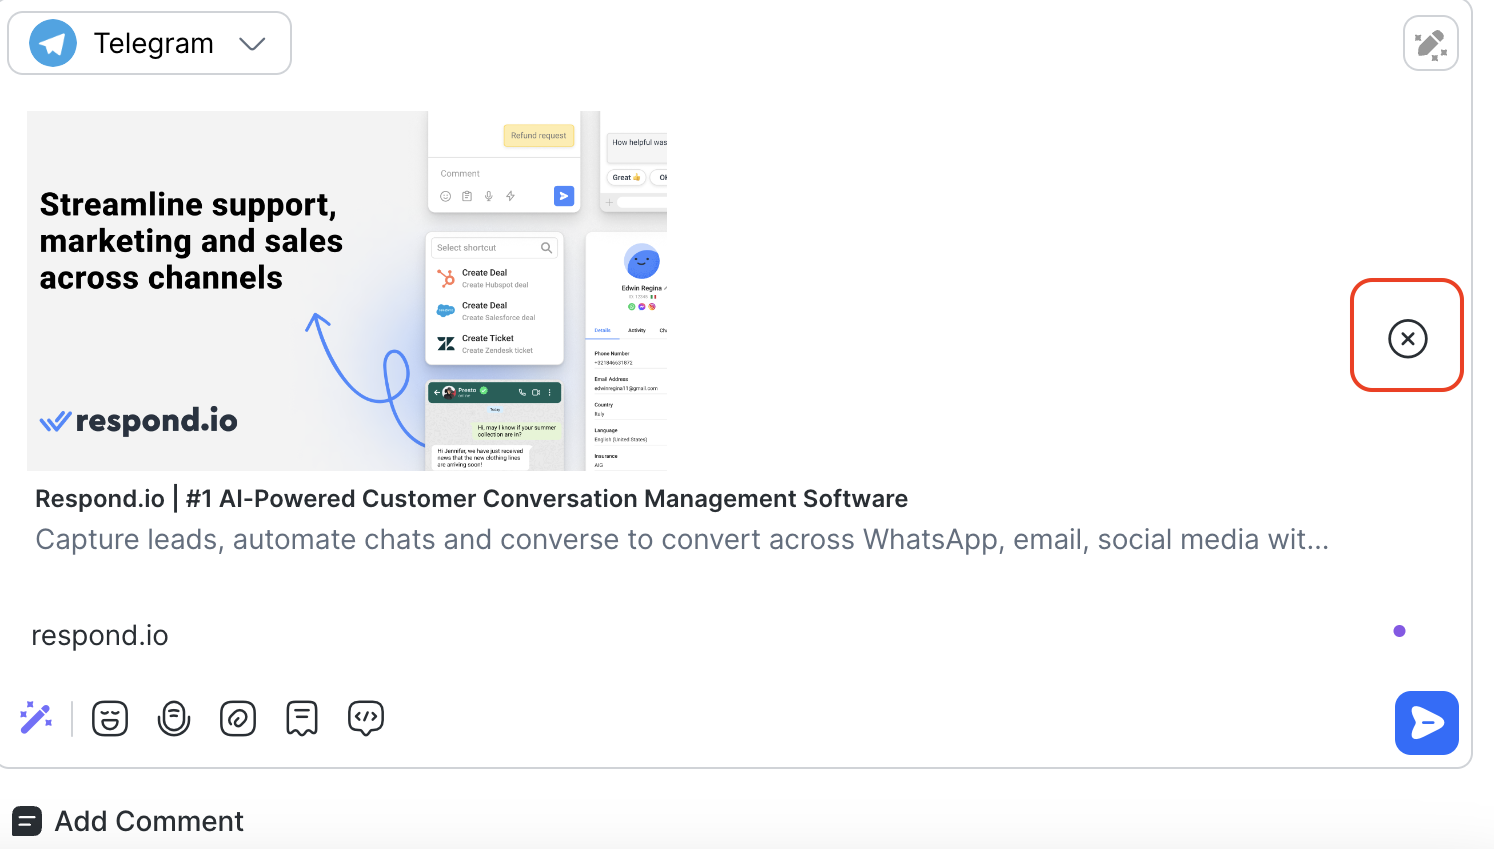
Remove Link Preview in the Messaging Console
You can remove link previews from the messaging console when entering a URL. To remove a link preview, click on the "remove" button.
Link Preview Behavior
Incoming Message
- Link previews will be displayed for incoming messages that contain URLs.
Outgoing Message
- If you sent a message with a link preview, the Contact will receive the message along with the link preview, provided the Channel supports it.
- If you have removed the link preview, it should not be displayed in the messaging console.
- The Contact will receive the message without the preview if it was removed by the sender.
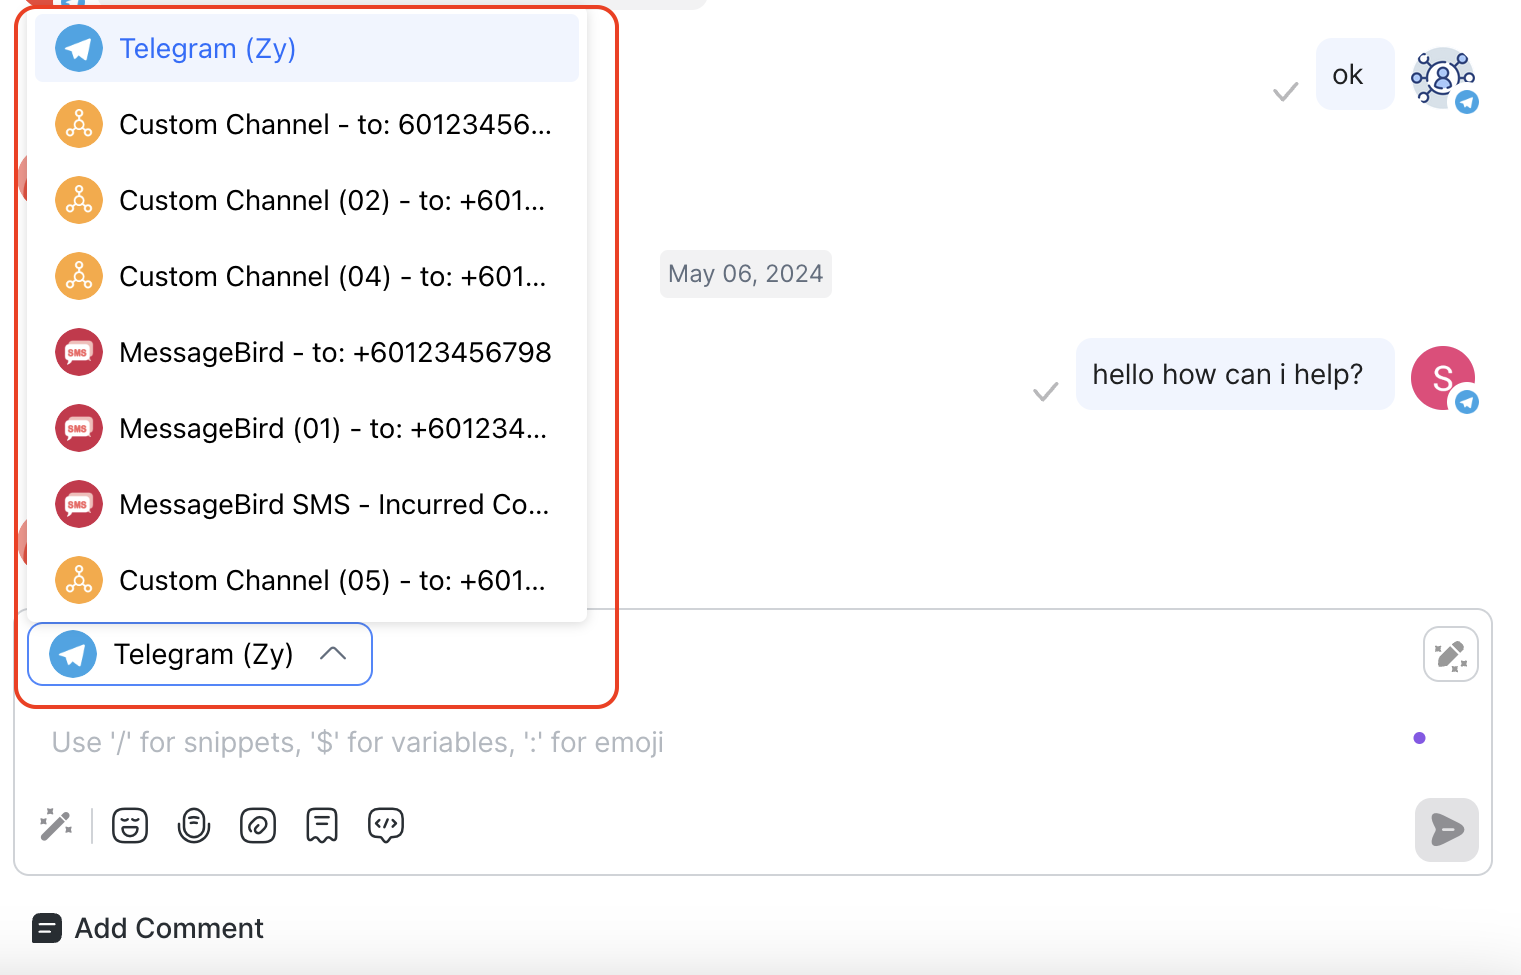
Channel Switcher
Connect with Contacts across multiple Channels. Use the Channel switcher in the messaging console to switch between Channels to maintain your interactions with Contacts.
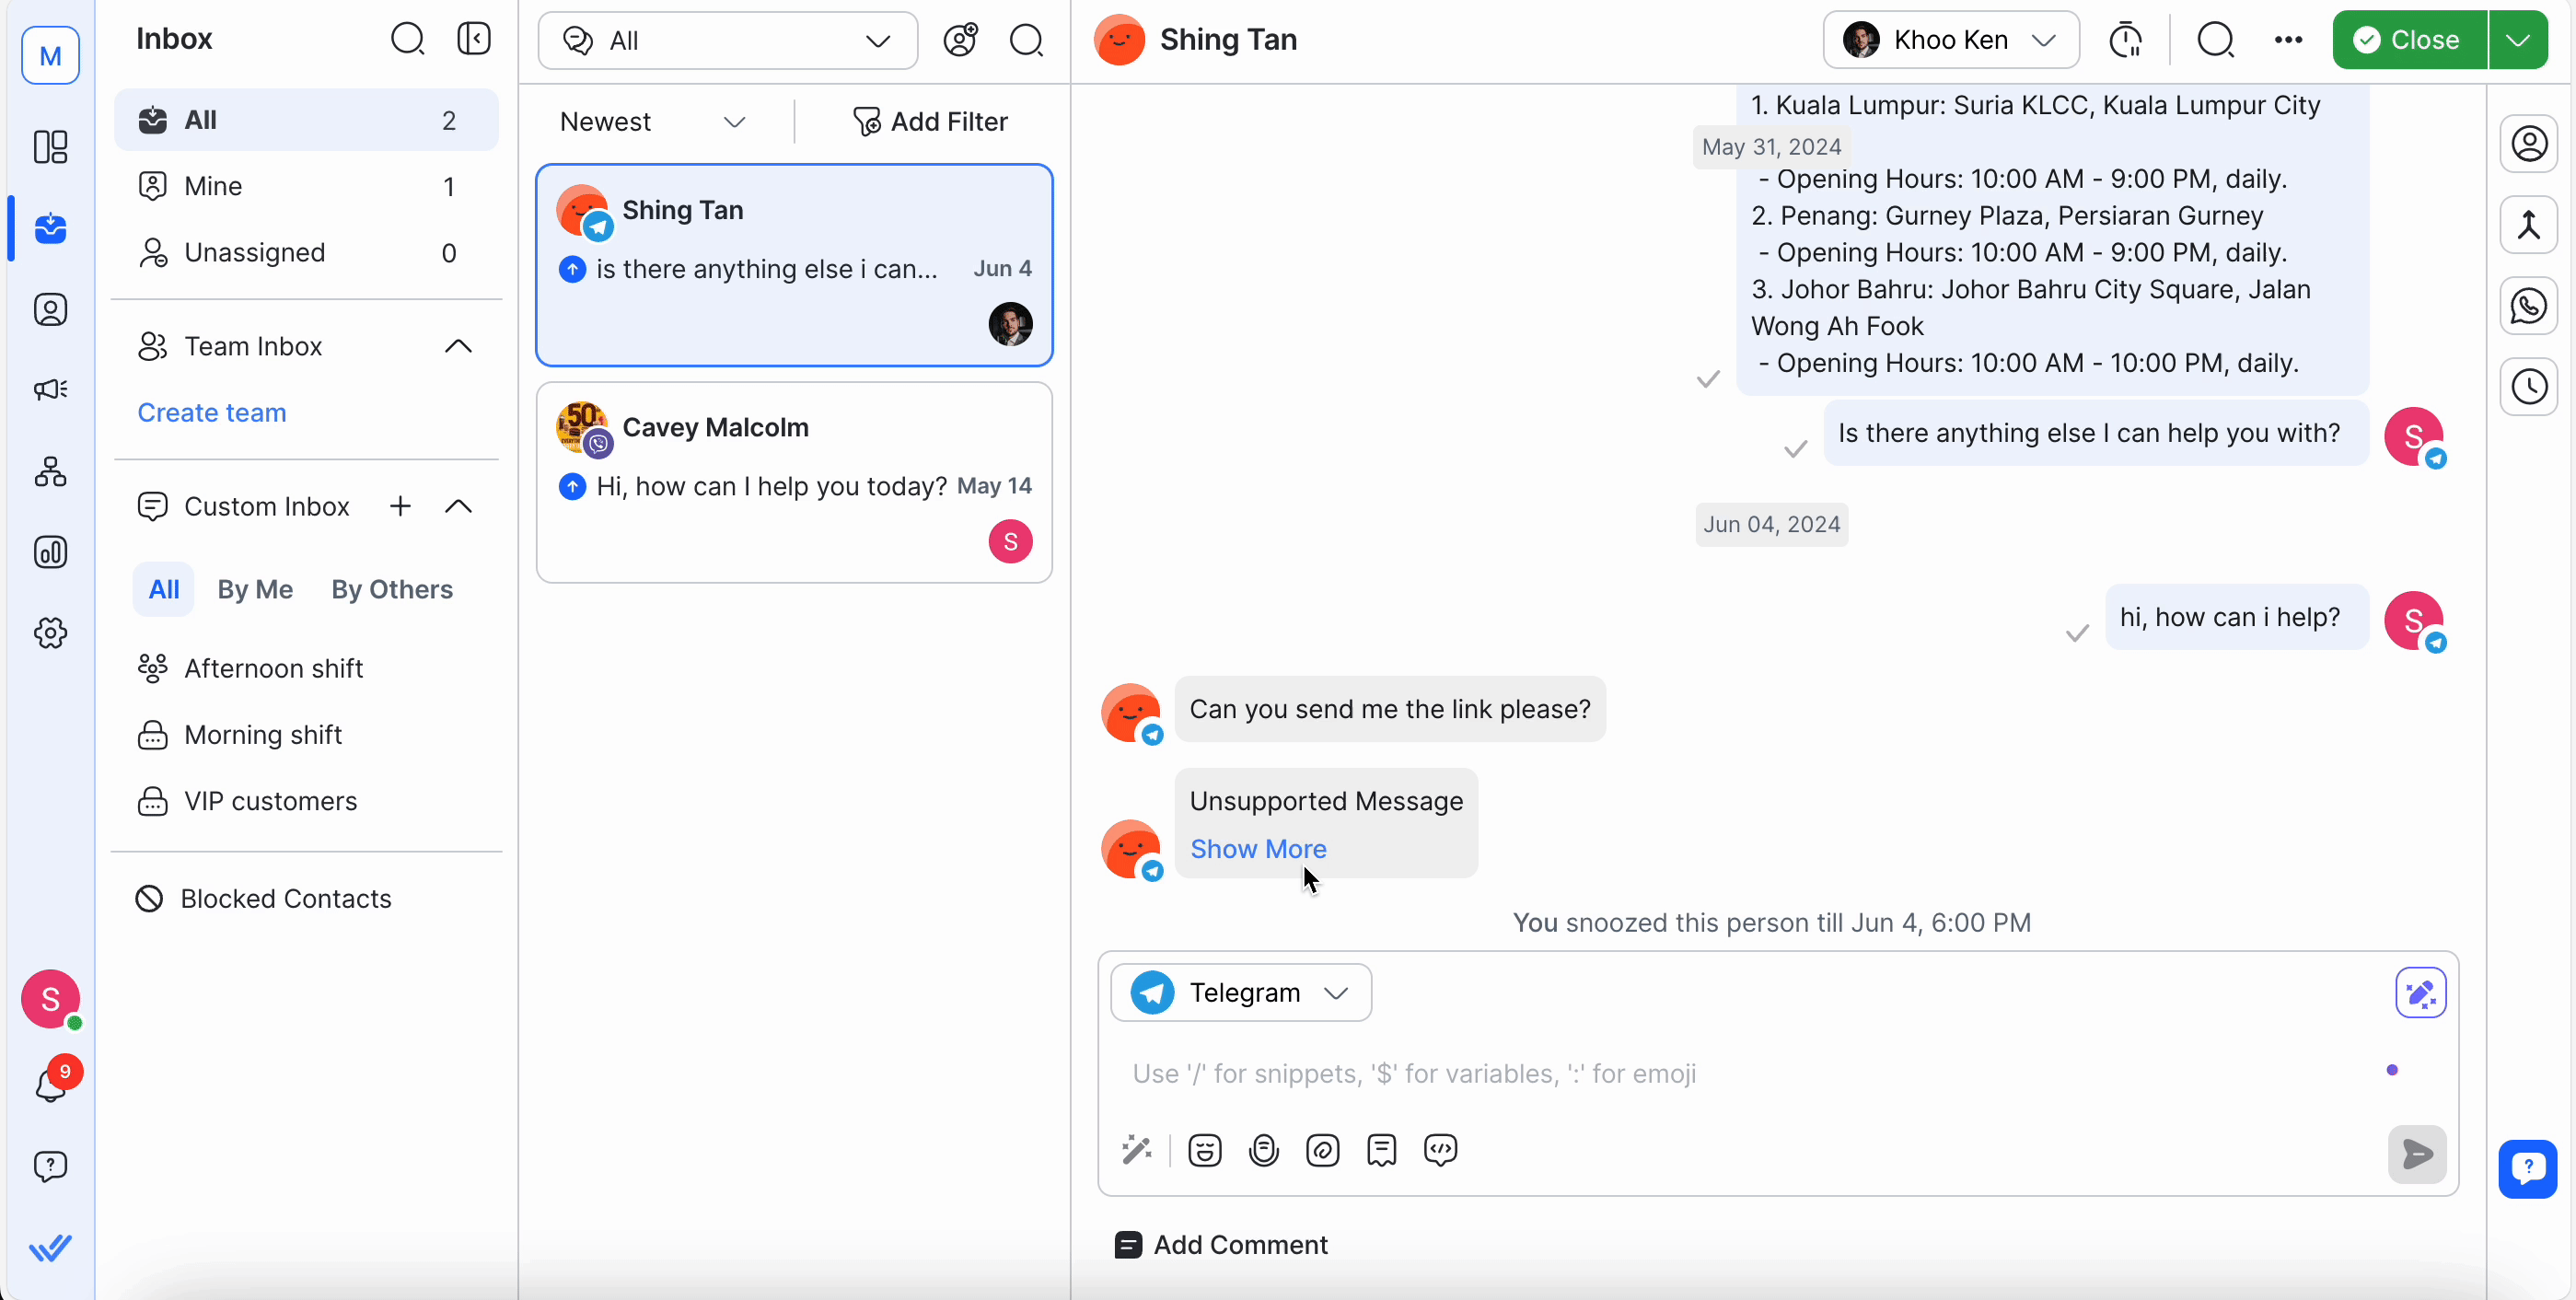
Unsupported Messages & Custom Payload
Messages that are not supported will have a fallback display with Unsupported Message or Custom Payload text and Type (if available). Click Show More to view the JSON payload of this message.
Examples of Unsupported Messages are:
- Contacts
- Ads Events
- Line Flex Message
- Instagram Profile
- Instagram Avatar
- Telegram Poll
Email Channel Composer
For email channels, we provide additional functionalities in the message console to assist you in properly formatting and sending messages to your Contacts. These include:
- Rich Text Editor: You can utilize the rich text editor in the messaging console to format your message by making text bold, underlining it, embedding links, adjusting alignment, changing color, and more.
- Subject: In the message console, you can view the subject of each email you send via email channels. Additionally, when composing a new outgoing email in the messaging console, you have the ability to specify the subject. Please note that a subject is required for new outgoing emails, but you can receive and reply to emails from your contacts that do not contain a subject.
- CC and BCC: Similar to regular email functionality, you can add additional email addresses to the CC and BCC fields when composing your outgoing email in the messaging console. Note that if the emails that are copied are contacts on the platform, it will not start a new conversation for them.
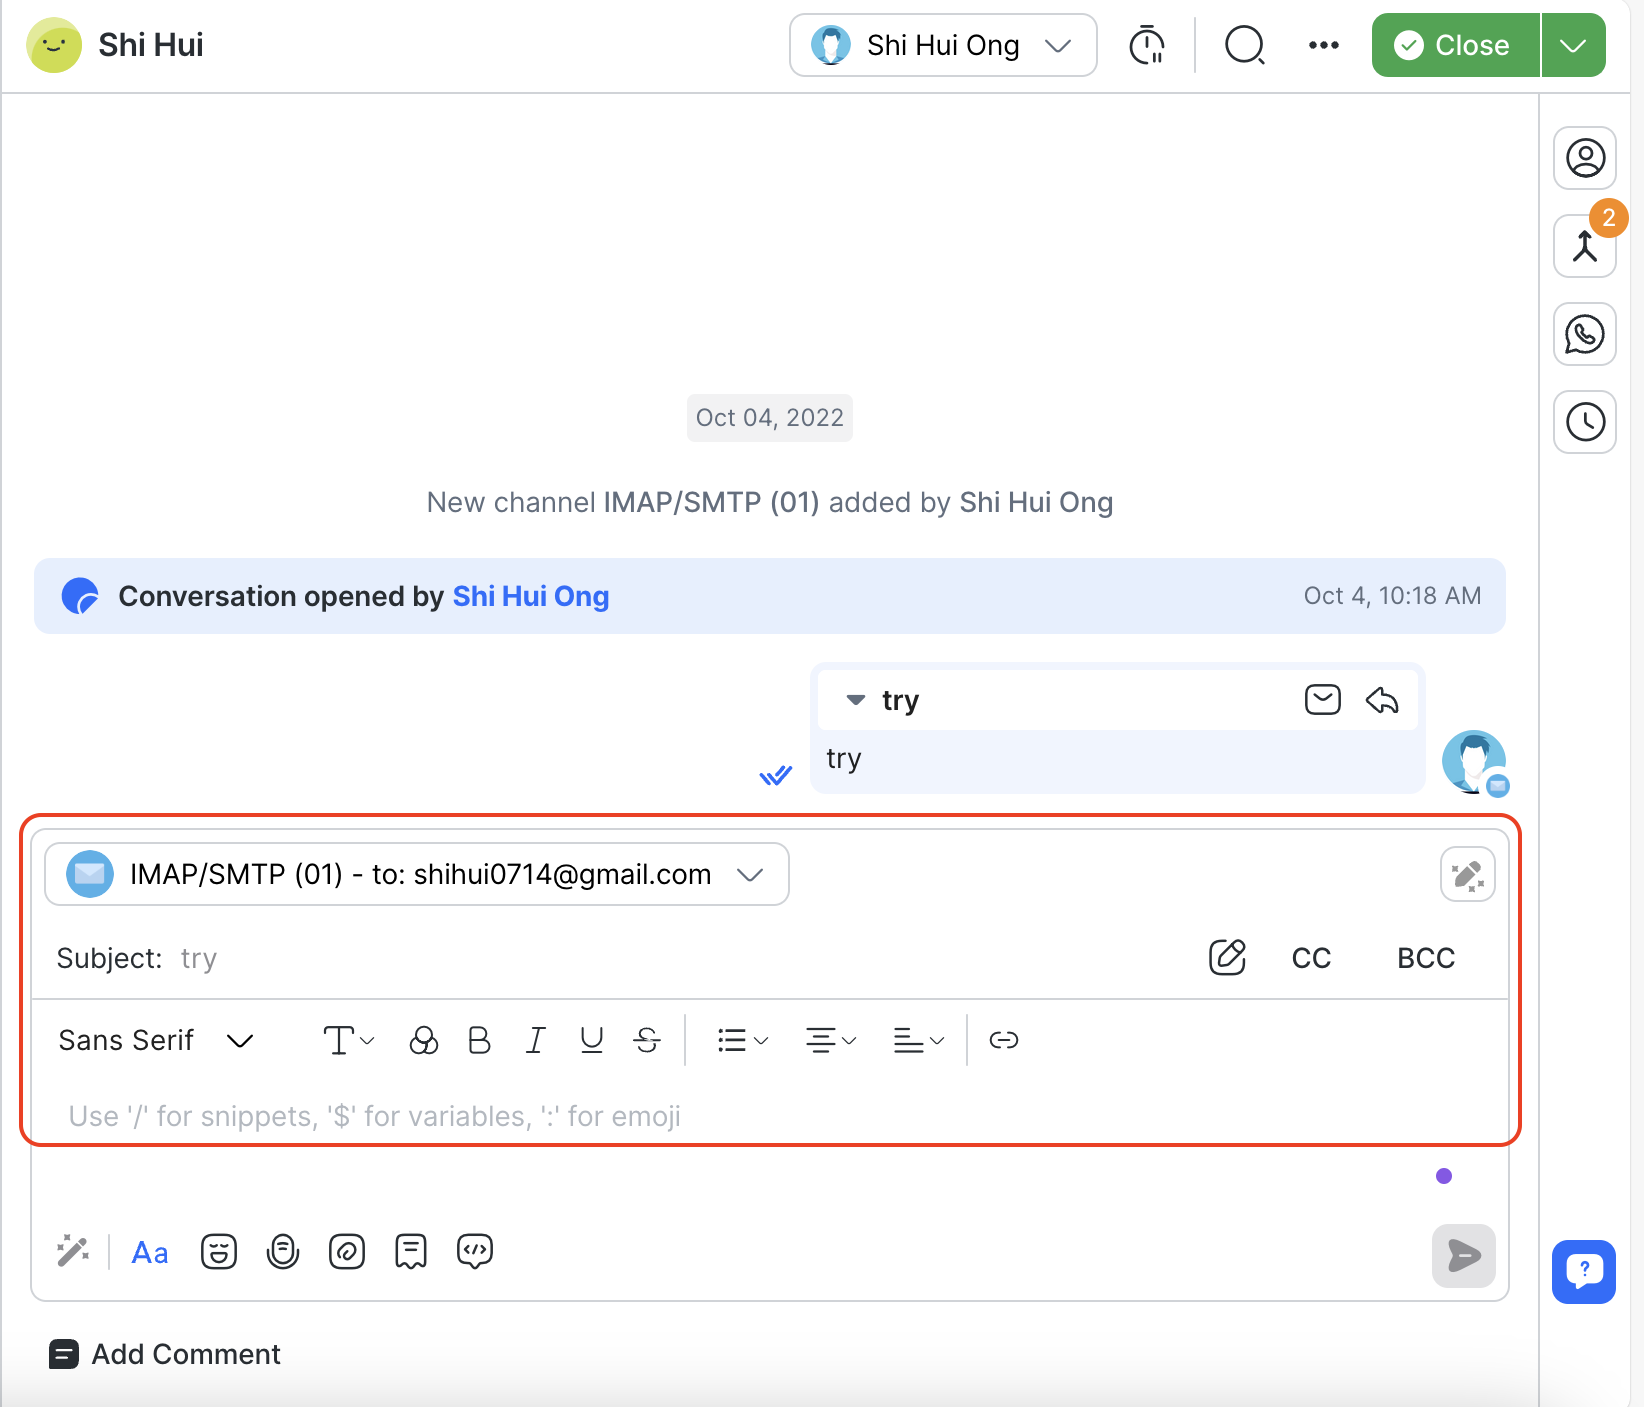
- Reply: In addition, you have the ability to reply to specific emails that you have previously sent out. To do this, navigate to the specific message in the messaging console and click on the reply icon to initiate your reply to the email.
- Conversation History: Customers can see their conversation history when they click on the email open icon on the message called “Show email content”. Note that the history only shows for emails coming from your Contacts.
Conversation Actions
Contact Assignment and Closing a Conversation
Assigning a Contact and closing a conversation work in tandem to help your team stay organized when dealing with an influx of conversations. Assign Contacts to specific agents and archive resolved conversations by closing them.
Contact Assignment and Closing a Conversation are designed to work together to reduce the workload of the agent and manager. There are a few key actions that happen automatically to achieve this:
- Anytime the platform receives a new message from a Contact with no open conversation, a new conversation will be opened for this Contact.
- Any Agent who responds to an unassigned Contact will automatically assign the Contact to themselves.
- The Agent will remain assigned to the Contact after the conversation is closed.
Refer here for more information.
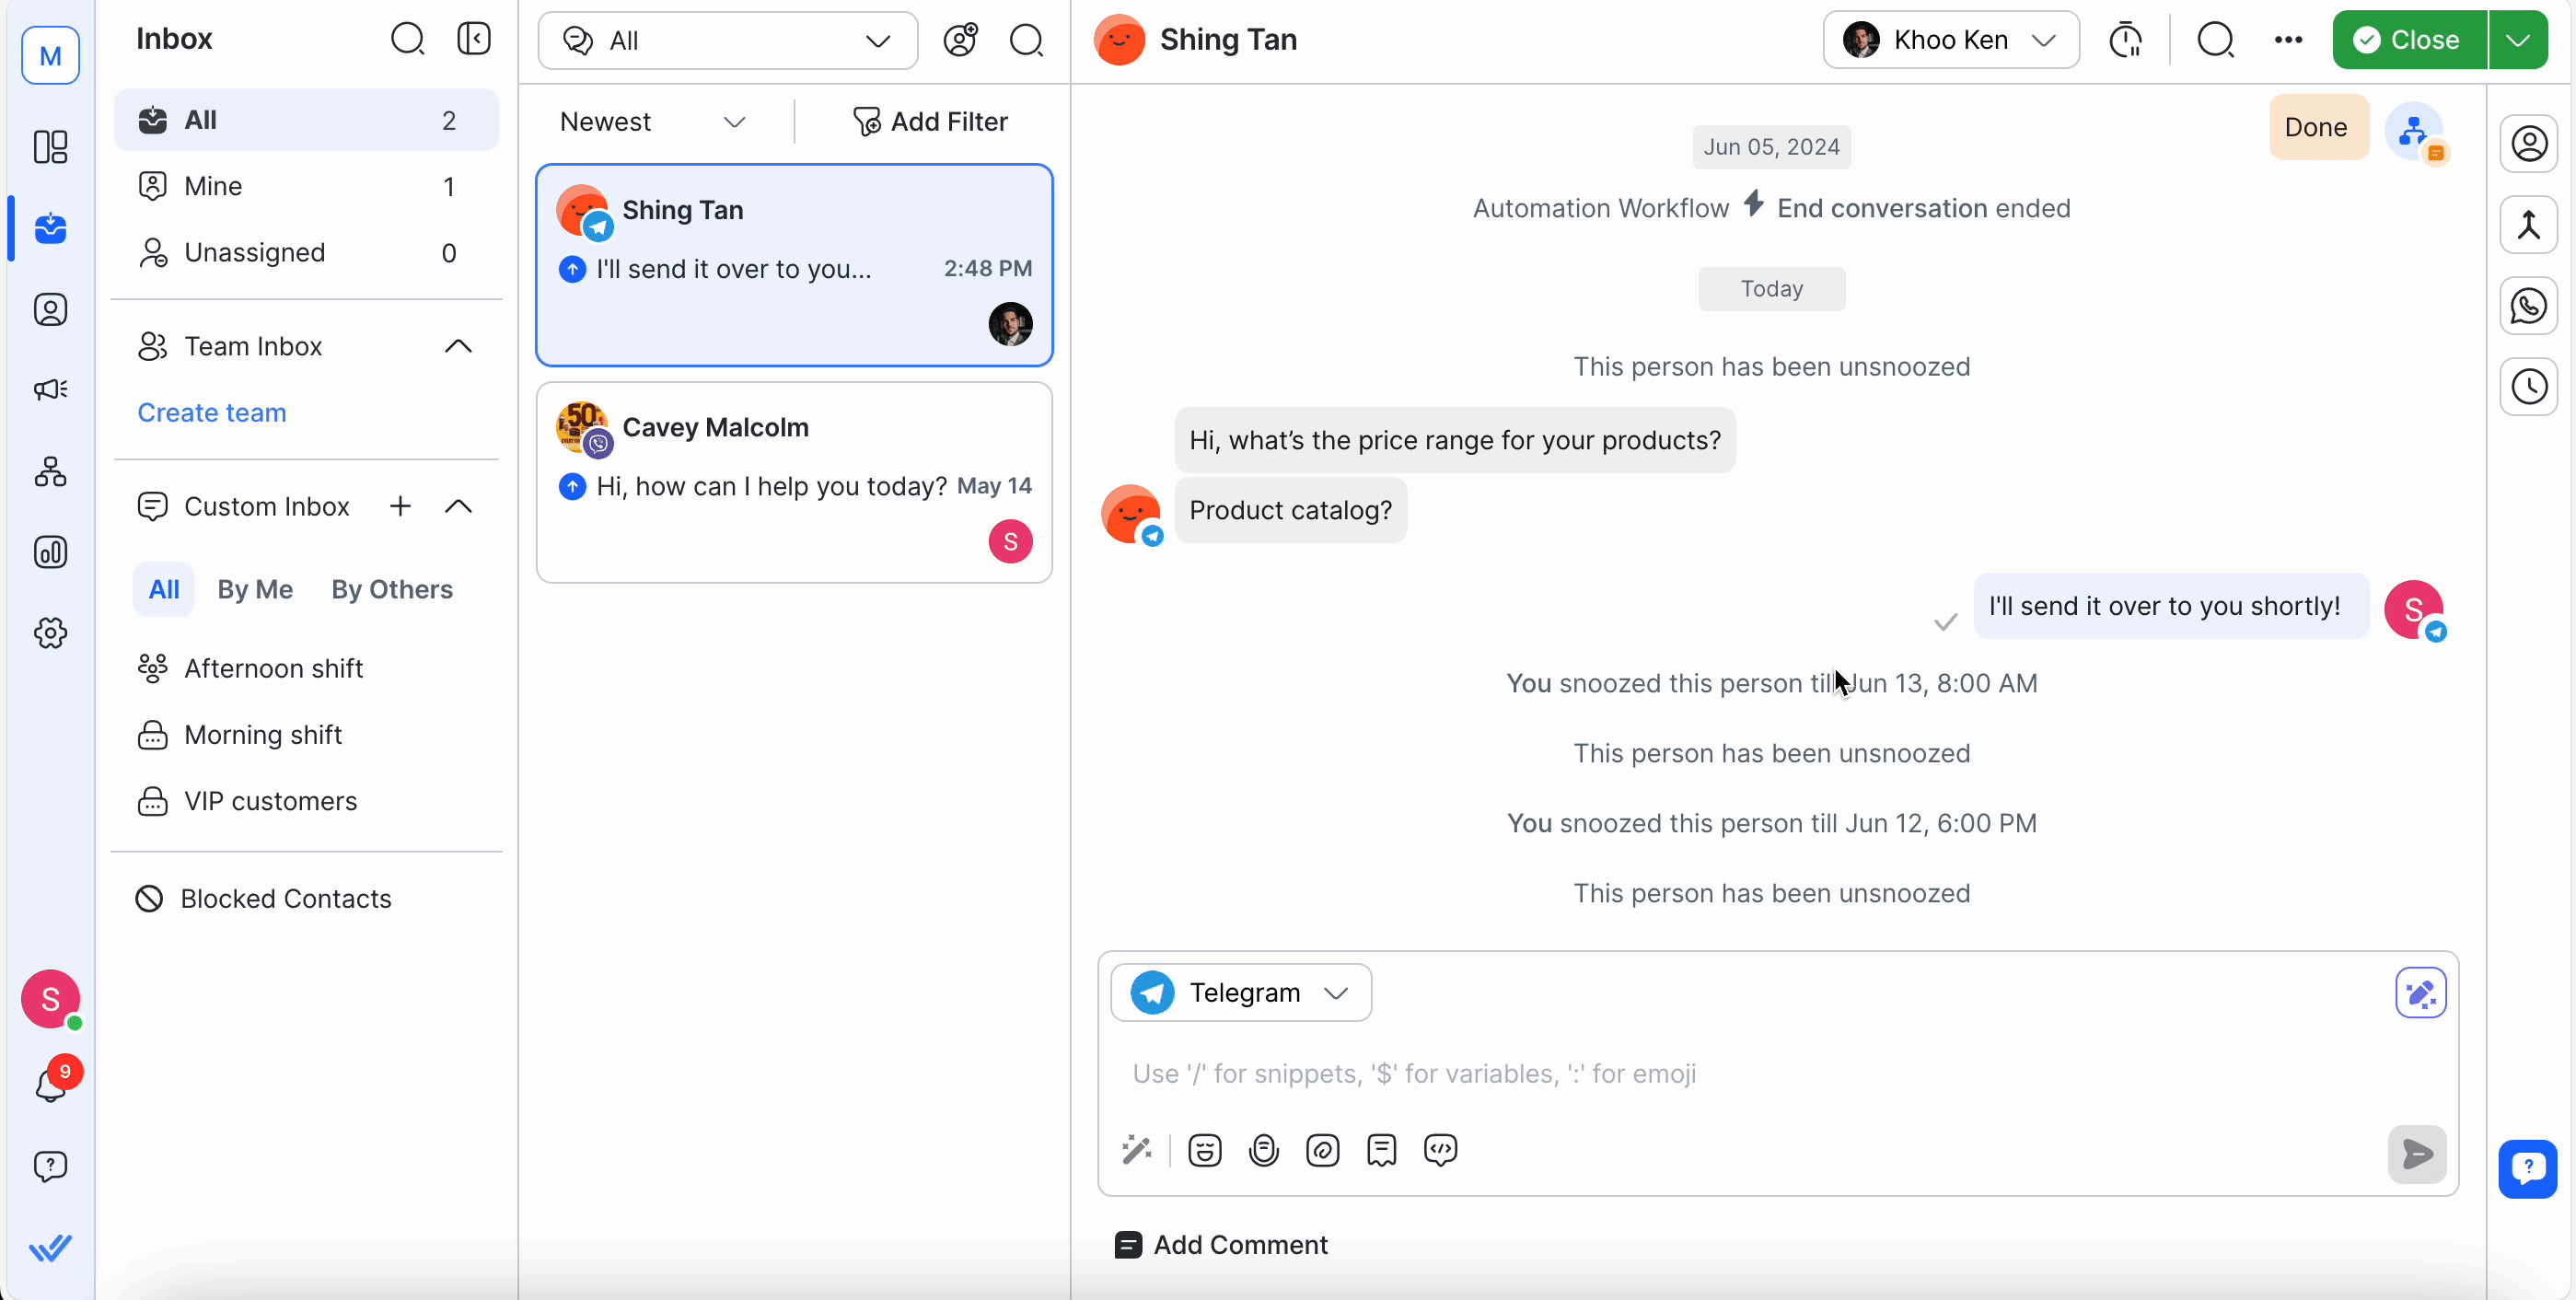
Snoozing a Contact
A Contact can be snoozed to temporarily exclude them from the Contact List until a specified time, at which point they automatically reappear. This helps you set quick reminders for follow-ups.
- Select the Contact in the Conversation List.
- Select the Snooze icon or use the quick actions menu.
- Choose a Snooze duration from the dropdown.
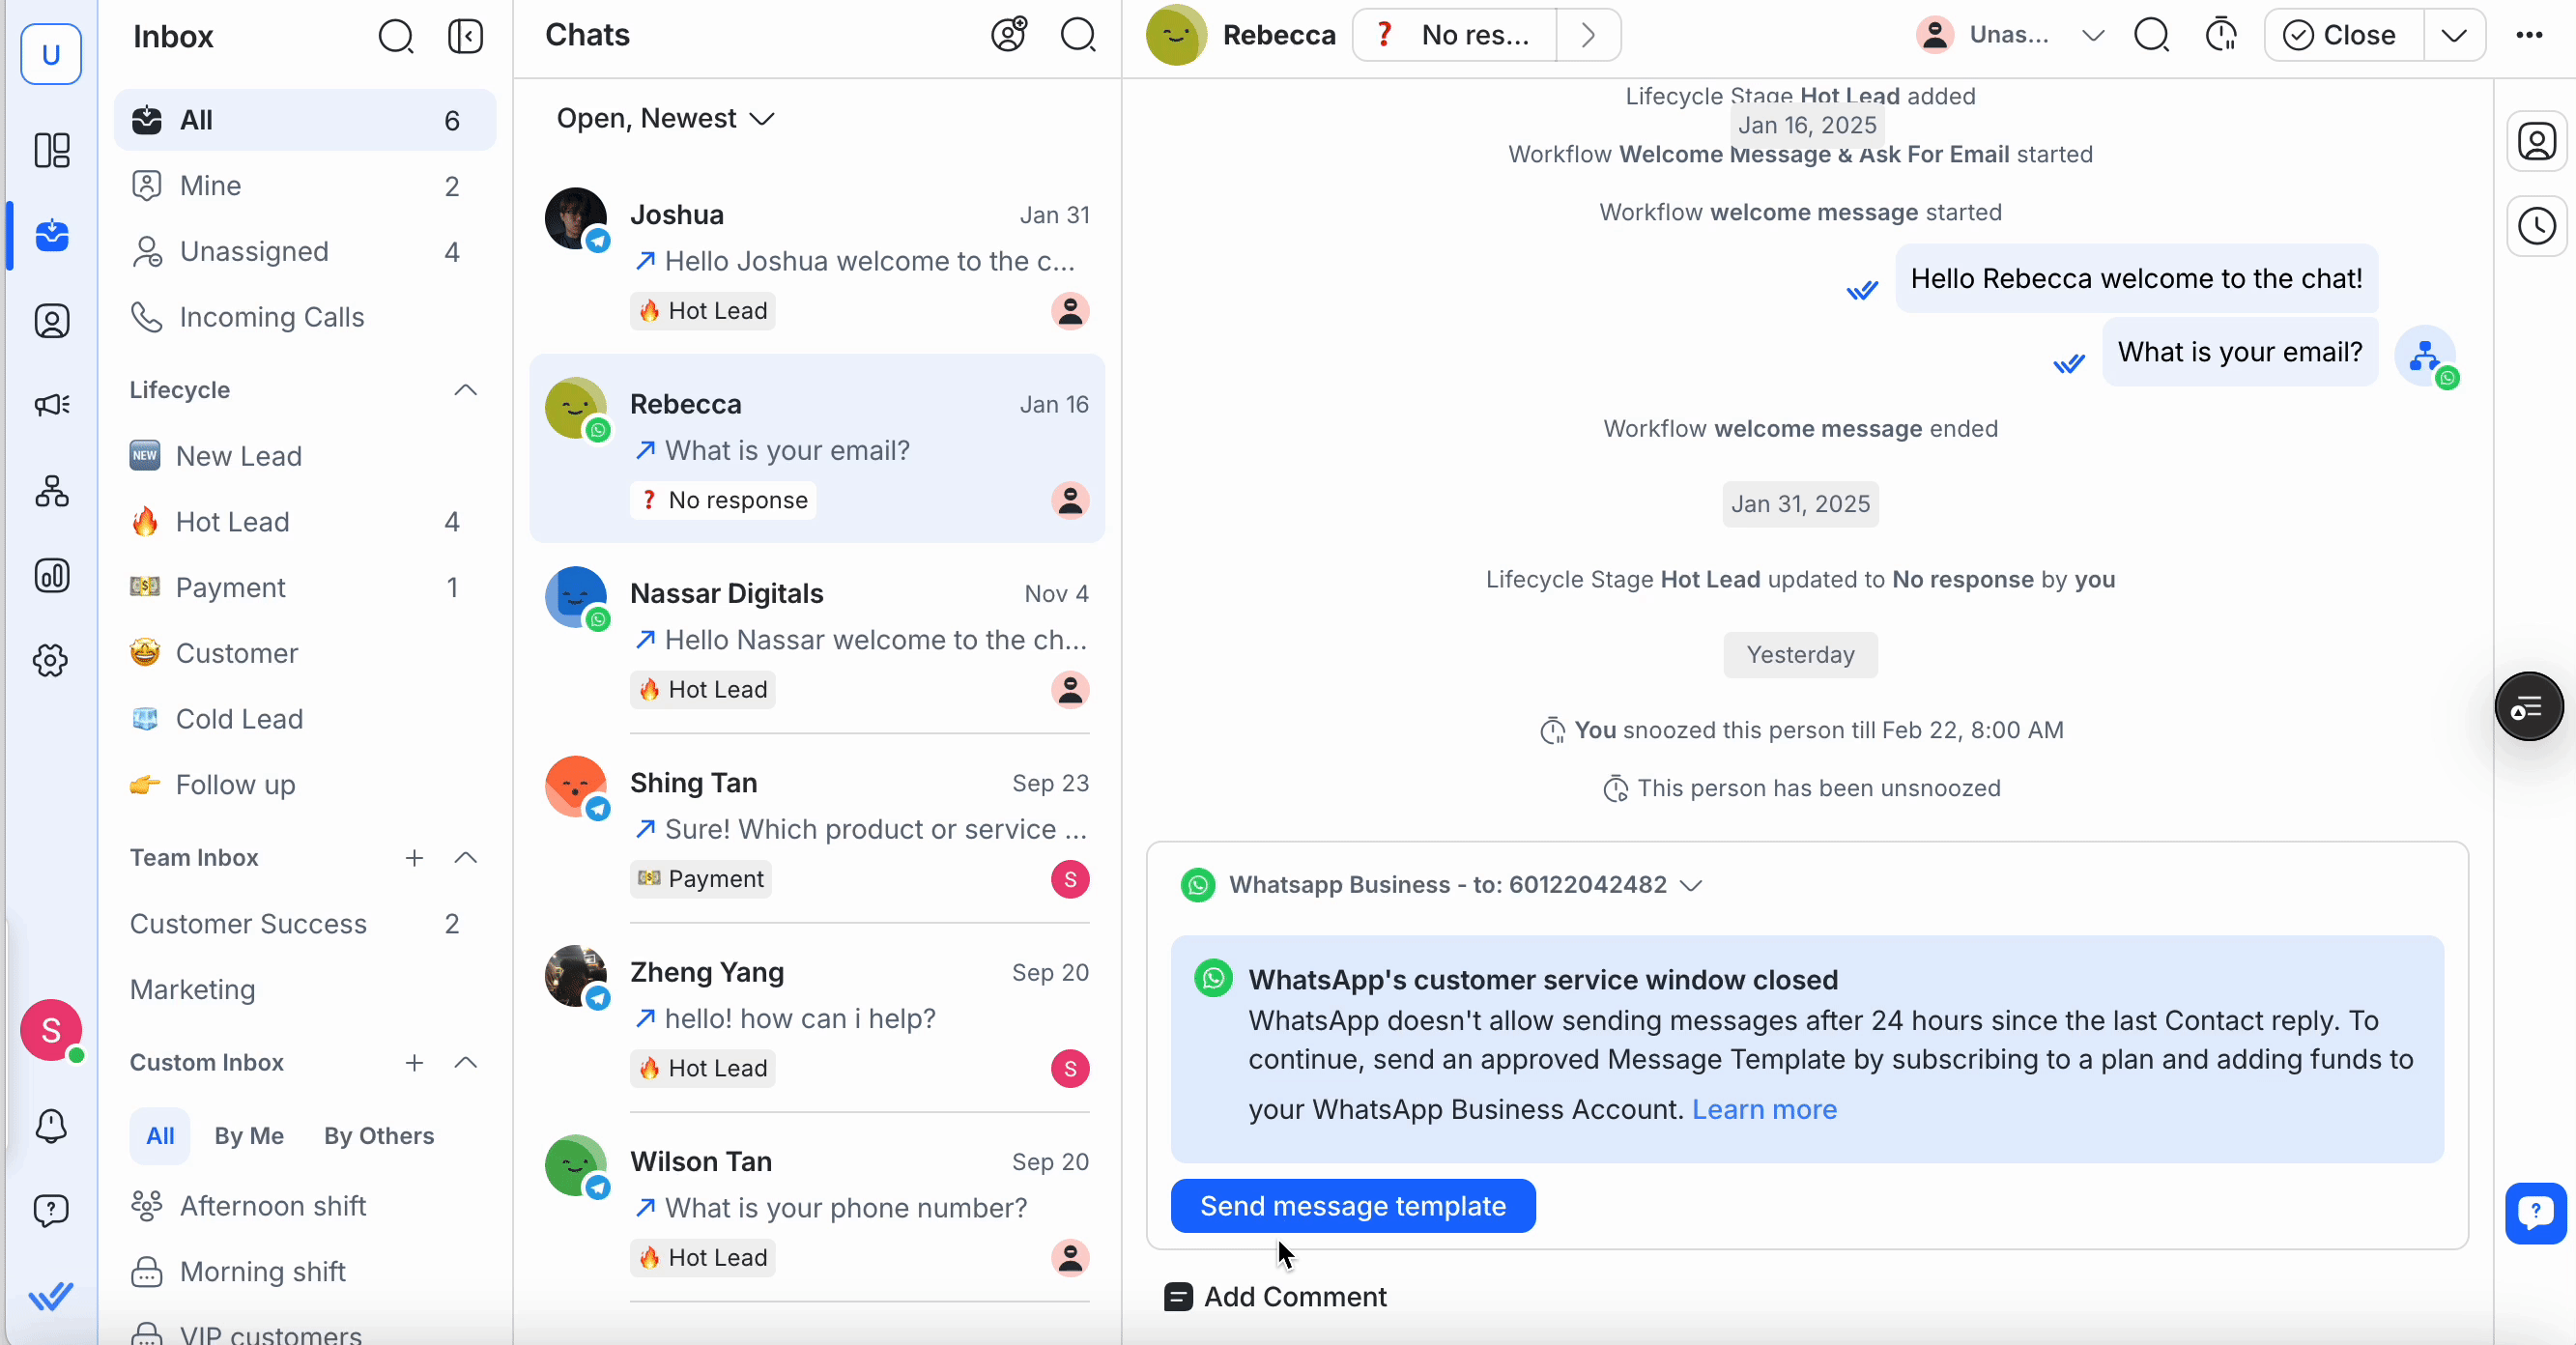
Once the selected Snooze time ends, the Contact will reappear in your conversation list with the status changed back to its previous state. You cannot snooze Contacts that have been blocked; the Snooze icon is unavailable in those cases.
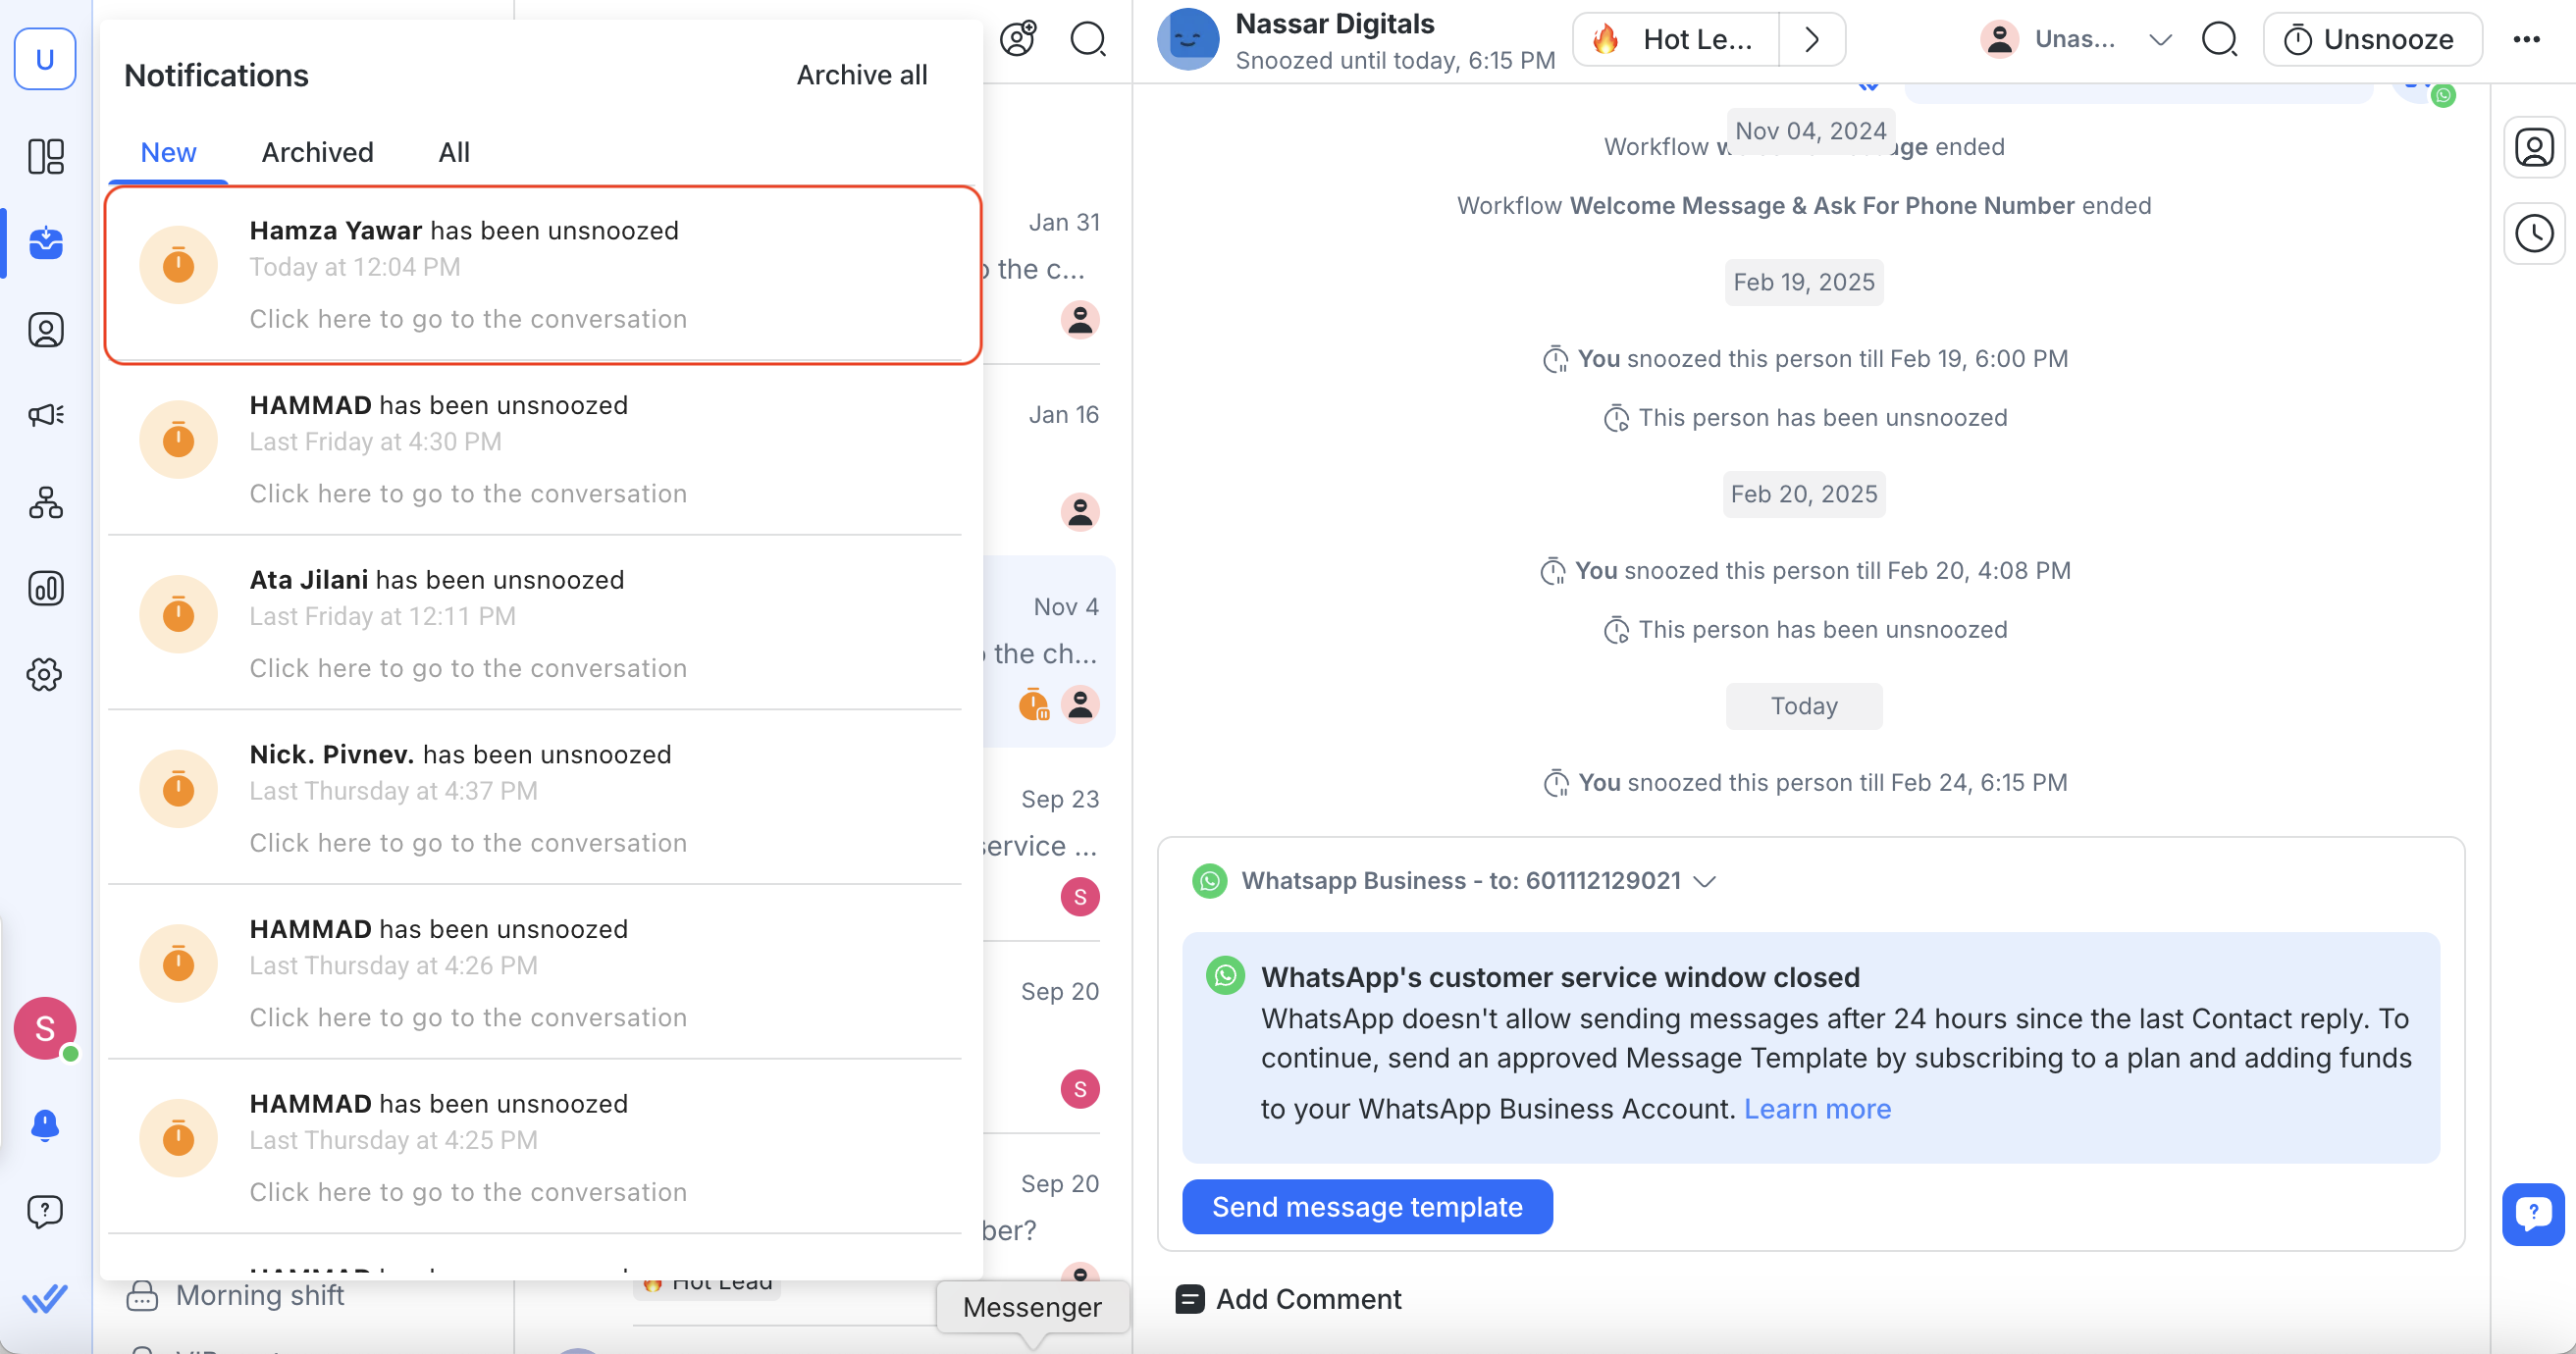
Unsnoozing a Contact
To unsnooze a Contact early, click the Unsnooze icon or select “Unsnooze” from quick actions. The Contact immediately reappears in your Mine (or appropriate) list. Their conversation status reverts to what it was before snoozing.
You will also be notified when the Contact is unsnoozed. Here’s how:
- Reminder Line Item: When a Contact is snoozed, a line displays at the top of the messaging console. It disappears once the contact is unsnoozed.

- Hover Callout: Hover over the Snooze icon to see the exact unsnooze timestamp.

- Push Notification: When the Snooze ends, a push notification is sent to the assigned agent(s) according to the workspace notification settings.

- Notification Center: A corresponding entry appears in the notification center with the ⏰ icon and text prompting you to open the conversation.
Blocking a Contact
If your Contact is sending you spam messages, you can block the Contact by clicking the action menu icon at the top right of the Inbox module > Block Contact > Block.
After blocking a Contact, you will no longer receive messages from them, nor will you be able to send messages to them.
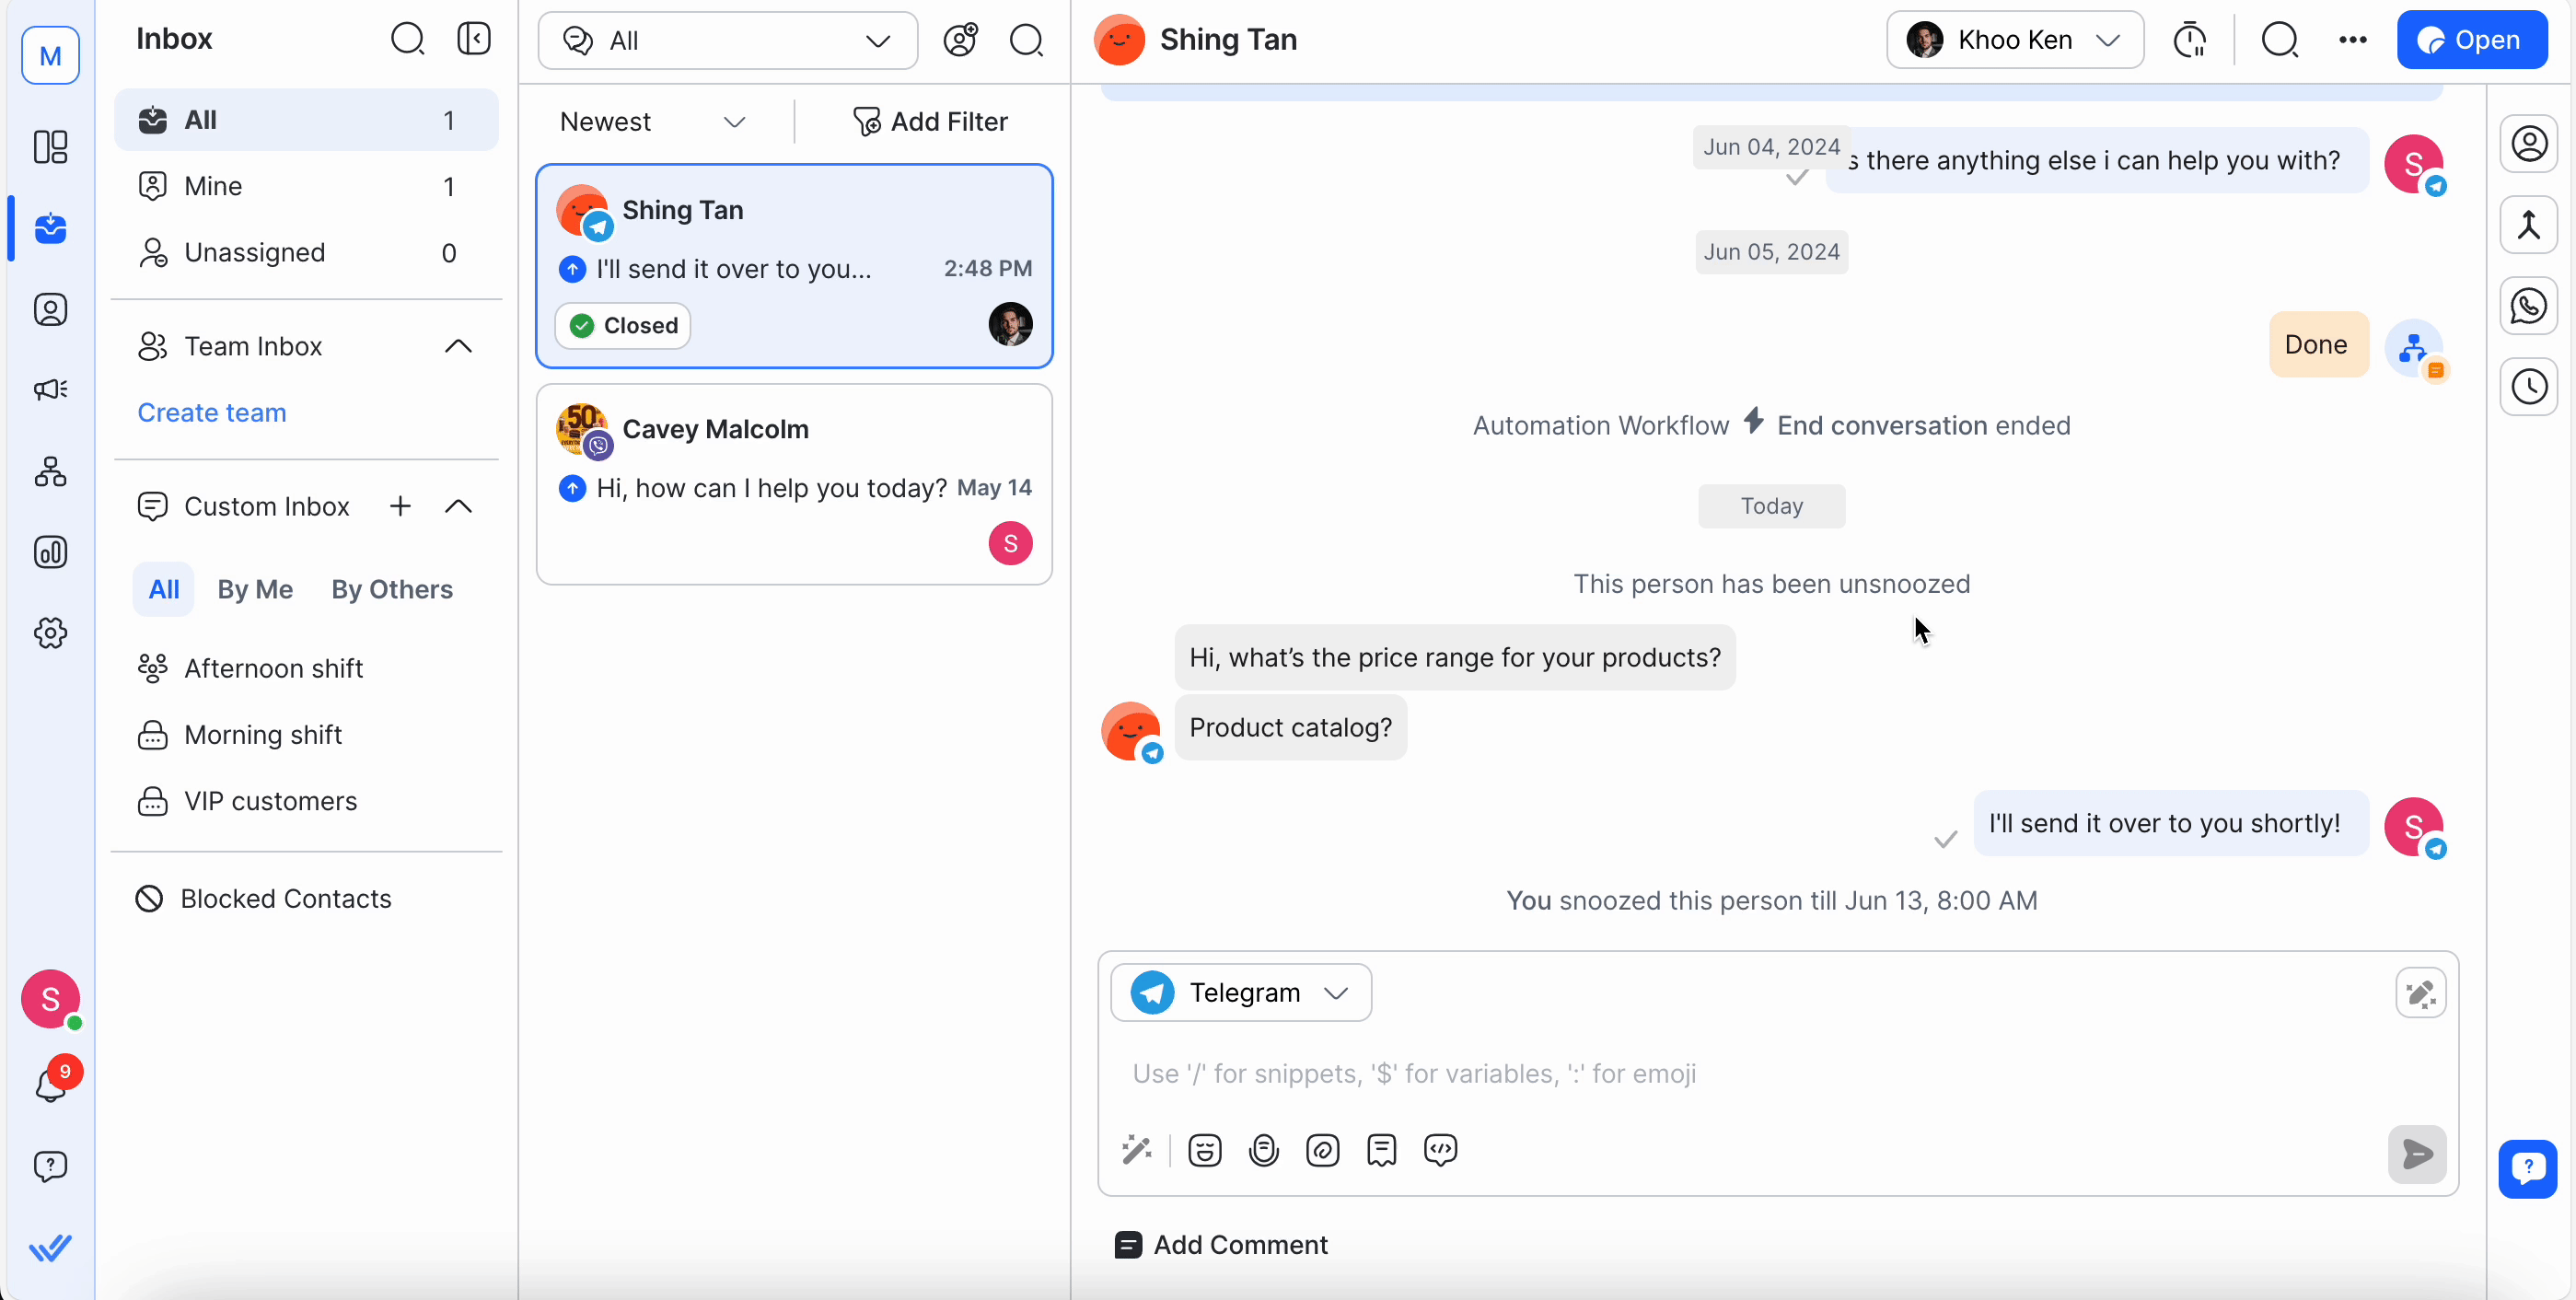
Unblocking a Contact
If a Contact has been mistakenly blocked, you can reverse the action via the same action menu icon.
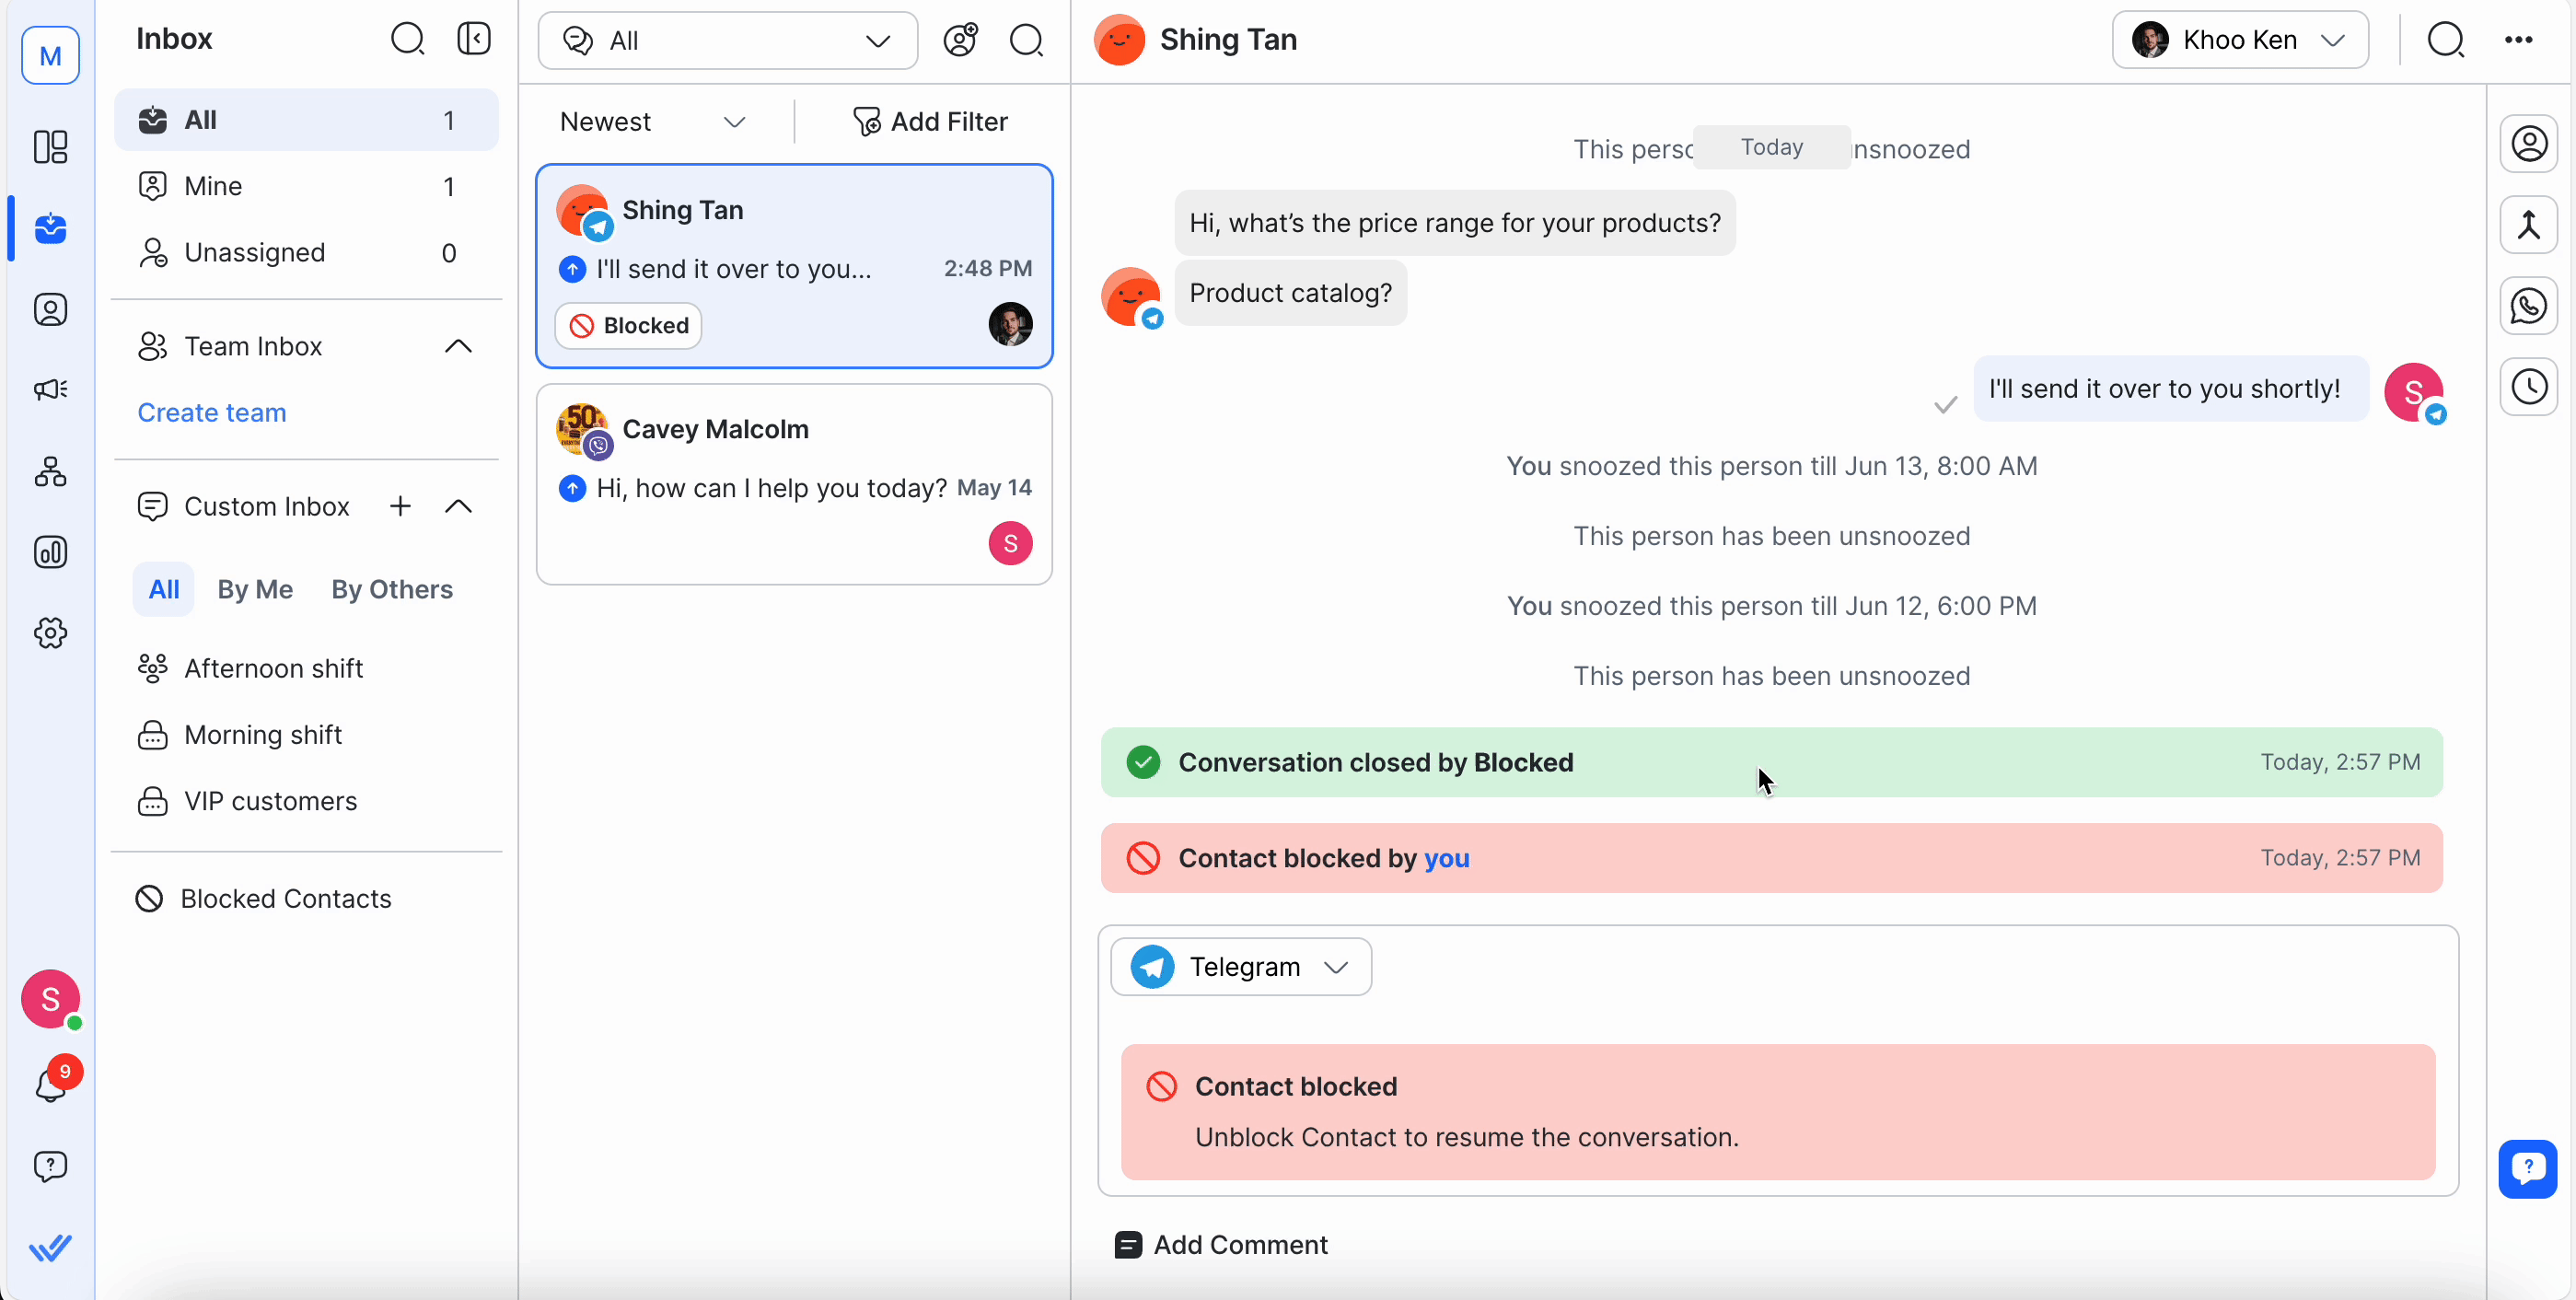
Once a blocked Contact is unblocked:
- the conversation is moved back to the All or other inboxes depending on the conversation filters applied.
- the conversation will remain closed.
- the messaging console will be enabled and you may start sending and receiving messages from the Contact.
- the Contact is moved to All or other Segments depending on the filters.
Shortcuts
Use the Shortcut icon to trigger workflows for a Contact.
- View and search the available shortcuts for the Contact
- You can trigger the shortcuts to start the Workflow for the Contact
Ongoing Workflows
View and select Workflows with the ongoing Workflows icon.
- View and search the ongoing Workflows for the Contact
- Choose and stop a Workflow for the Contact
- Stop all workflows for the Contact

Contact Overview
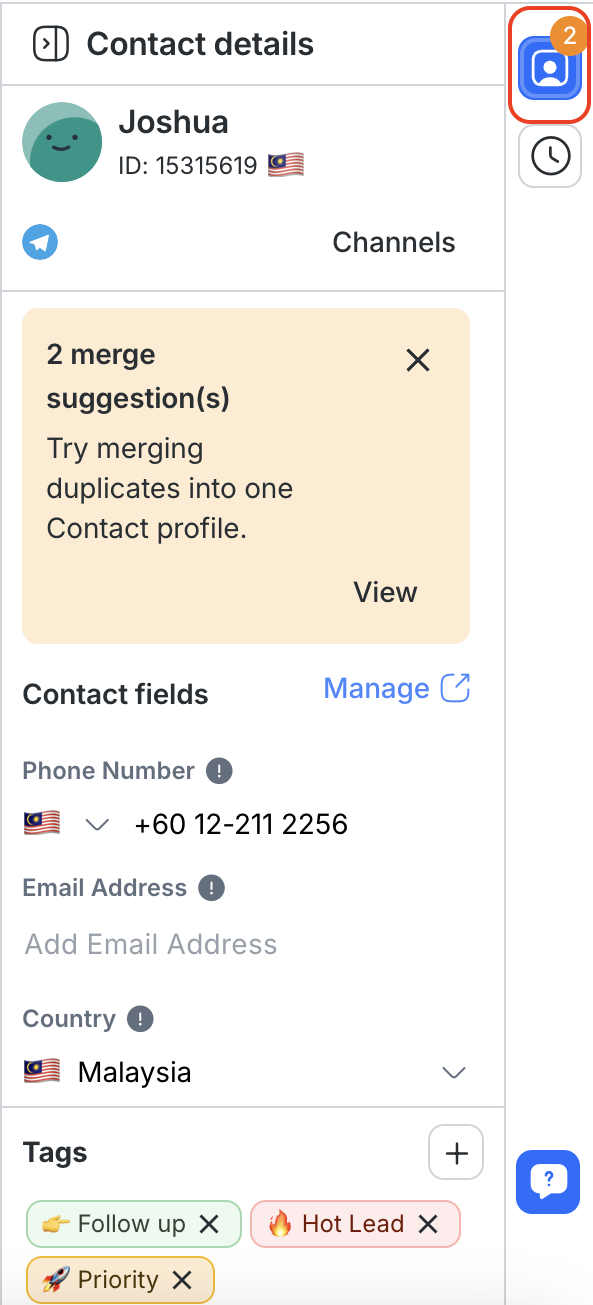
In the rightmost column of the Inbox module, you can access the Contact Drawer of a selected Contact.
The Contact overview has 4 tabs:
- Contact Details
- Activities
- HubSpot Properties
- Salesforce Fields
Contact Details
In this tab, you can access key information about the selected Contact such as their phone number, email, country and language. This information can be updated when necessary.
You can also view any merge suggestions if duplicate Contact information is found, along with the list of Channels connected to the Workspace.
Read more about Contact Details here.
Merge Suggestions
The merge suggestions card displays when potential duplicate Contacts are detected, listing all Contacts with the same phone number or email address as the selected Contact.
Read more about Merge Suggestions here.
Channels
In this tab, you can find a list of channels connected to the Workspace with different indications.
Read more about Channels here.
Activities
In this tab, you can find all the internal comments and conversation events related to the selected Contact.
Read more about Activities here.
HubSpot Properties
If the HubSpot integration is connected, this section shows the Contact’s synced properties from HubSpot.
Read more about our HubSpot integration here.
Salesforce Fields
If the Salesforce integration is connected, this section shows the Contact’s synced fields from Salesforce.
Read more about our Salesforce integration here.
FAQ and Troubleshooting
How do I delete sent messages?
You cannot delete sent messages because there is a limitation from Channels (Facebook, WhatsApp, Instagram, etc.); they do not allow you to delete sent messages.
How do I turn off the Dialogflow Bot?
You can turn off the Dialogflow Bot manually from the Inbox module with the Dialogflow Bot toggle at the conversation action bar for each Contact.
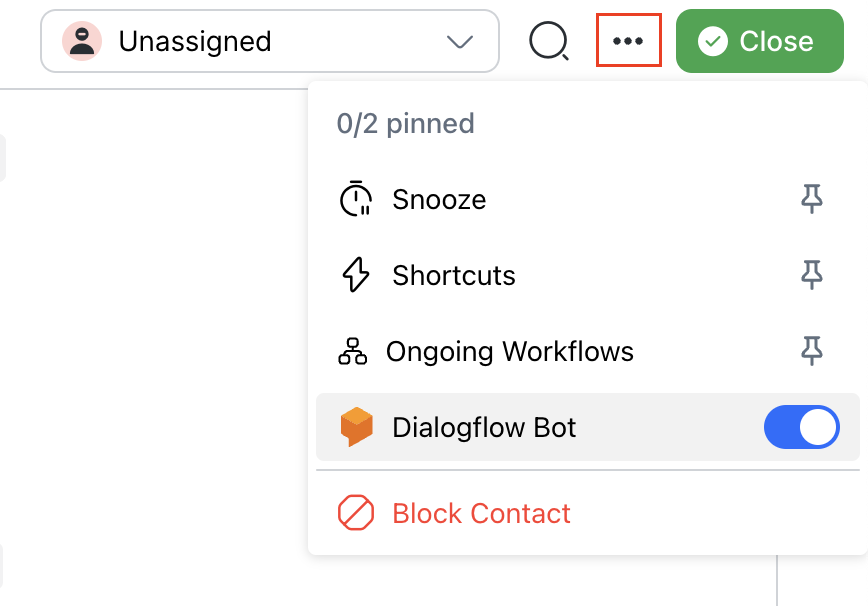
Choose this method to turn off your Dialogflow Bot in any of the following cases:
- If you want to talk to a Contact directly
- If your automated conversation is not going in the correct direction or
- Your automated conversation has gone wrong
Why is the downloaded file name different from the original?
When a file is uploaded, a random Universally Unique Identifier (UUID) is added to the beginning of its name to ensure it is unique. When you download the file, the Uniform Resource Locator (URL) is used as the file name because the file's URL domain is different from the app's domain. This results in the downloaded file name being different from the original.
Why do captions not appear with files in the conversation?
When sending a file along with a message via WhatsApp, only the file is visible in the conversation, but the associated text message does not appear.
Currently, our platform supports displaying files sent through WhatsApp, but due to limitations with WhatsApp's API, captions or text messages sent along with files are not displayed in the conversation. This is a known restriction of the WhatsApp Business API.
- For more details on file messaging limitations, you can visit the Meta documentation for WhatsApp Cloud API.
- For error references, see the Meta documentation on WhatsApp On-Premises errors.
Why is there a mismatch between Contact names in the conversation?
You might notice that the Contact name shown in a conversation doesn’t match the name displayed in other areas like Contact Details or the Contact Drawer. This inconsistency is often caused by browser translation plugins, such as the Google Translate plugin.
Here's what you can do:
1. Disable the Google Translate Plugin:
- Click on the Google Translate plugin icon in your browser toolbar.
- Turn off the translation feature for the platform or disable the plugin entirely.
2. Set Your Preferred Language on the Platform:
- Go to Settings > Profile > Language
- Choose your preferred language and save your changes.
If the inconsistency persists after disabling the plugin and setting your preferred language, please contact our support team for further assistance.
If you’d like additional language options on the platform, consider submitting a feature request on our Canny page.