Quick Start
What is respond.io?
Setting Up an Account
Connecting Channels
Inviting Your Teammates
Getting Contacts to Message You
Automated Welcome and Away Messages
Responding to Messages
Glossary of Terms
Channels
WhatsApp Business Platform (API) Quick Start
Getting Ready for Inbound Conversations
Getting Ready for Promotional Messaging
WhatsApp Official Business Account (Green Tick)
Grow your WhatsApp Audience by Maximizing Entry Points
Get WhatsApp API Account for Government Agencies
Meta Business Verification
WhatsApp Message Templates
WhatsApp Pricing
WhatsApp Business Platform (API) Channel Configuration
WhatsApp Messaging Limits
Meta Product Catalog
Change Your WhatsApp Business Display Name
Migrating from WhatsApp Personal or WhatsApp Business App
Phone Number Migration to respond.io WhatsApp Business Platform (API)
Turn-off WhatsApp Number Two-Step Verification
WhatsApp Cloud API
360dialog WhatsApp
Twilio WhatsApp
MessageBird WhatsApp
Vonage WhatsApp
Phone Number Migration to WhatsApp Cloud API
Facebook Messenger
Facebook Messenger Overview
Facebook Messenger Quick Start
Facebook Chat Plugin
Facebook Private Replies
Facebook Message Tag
LINE
Viber
Telegram
Google Business Messages
Website Chat Widget
Website Chat Widget Overview
Website Chat Widget Quick Start
Install Website Chat Widget on WordPress
Install Website Chat Widget on Shopify
Install Website Chat Widget on Wix
Install Website Chat Widget on Joomla
Install Website Chat Widget on Squarespace
SMS
Custom Channel
Product
Dashboard & Reporting
Dashboard
Reports Overview
Reports: Conversations
Reports: Responses
Reports: Resolutions
Reports: Messages
Reports: Contacts
Reports: Assignments
Reports: Leaderboard
Reports: Users
Reports: Broadcasts
Messages
Messages Overview
Assignment and Closing a Conversation
Custom Inboxes
Interacting with Respond AI Prompts
Using AI Assist
Contacts
Contacts Overview
Contact Details
Merge Suggestions
Contact Activity
Contact Channels
Contact Import
Segments
Broadcasts Module
Workflows
Workflows Overview
Workflow Triggers
Workflow Steps Overview
Step: AI Agent
Step: Send a Message
Step: Ask a Question
Step: Assign To
Step: Branch
Step: Update Contact Tag
Step: Update Contact Field
Step: Open Conversation
Step: Close Conversation
Step: Add Comment
Step: Jump To
Step: Date & Time
Step: Wait
Step: Trigger Another Workflow
Step: HTTP Request
Step: Add Google Sheets Row
Dynamic Variables
Workspace Settings
Managing a Workspace
Workspace Settings: General
Workspace Settings: Users
Workspace Settings: Teams
Workspace Settings: Channels
Workspace Settings: Growth Widgets
Workspace Settings: Contact Fields
Workspace Settings: Integrations
Workspace Setting: Respond AI
Workspace Settings: Closing Notes
Workspace Settings: Snippets
Workspace Settings: Files
Workspace Settings: Data Export
Workspace Settings: Data Import
Organization Settings
Organization Overview
Organization Settings: General
Organization Settings: Users
Organization Settings: Workspaces
Organization Settings: WhatsApp Fees
Organization Settings: Billing & Usage
Organization Settings: Security
User Account
Mobile App
Installing respond.io Mobile App
Messaging From Your Mobile
Managing Notifications On Your Mobile
Configuring Mobile App Settings
Help Menu
Conversation Led Growth
Capture Conversations
How to Streamline Meeting Scheduling via CTC Ads
How to Route Contacts from CTC Ads to Agents
How to Automate Product Info Sharing in Conversations Initiated via CTC Ads
How to Send Outbound Sales Messages
How to Send Outbound Support Messages
How to Track Conversation Source from Multiple Websites
Automate Conversations
How to Maximize Customer Service Potential with AI Agent
How to Automate Contact Information Collection with AI
How to Automatically Qualify Contacts Based on Budget Using AI Agent
How to Block Contacts and Manage Spam
How to Create Automated Welcome and Away Messages
How to Create Automated Chat Menus
How to Route Contacts to Preferred AI Agent
How to Route Contacts by their Preferred Language
How to Route New and Returning Contacts
How to Route Contacts by Team Functions
How to Route Contacts by Shifts
How to Enrich Customer Data from a CRM or other Business Software
Assignment Strategy: How to Automate Contact Distribution & Load Balancing
Assignment Strategy: How to Unassign Agents after Conversations Closed
How to Collect Contacts’ Emails and Phone Numbers
How to Get Contacts’ Consent for Personal Data Collection
How to Route VIP Contacts
How to Promptly Transfer Conversation Between Agents
How to Guide Customers from Exploration to Purchase with Engaging Menus
How to Optimize Customer Onboarding with Automated & Customized Welcome Messages
How to Send CSAT to Customer and Save Data in Google Sheets or CRMs
Converse with Customers
How to Get a Complete View of the Customers
How to Simplify Customer Escalation with Automation
How to Transfer Contacts to the Next Shift Automatically
How to Optimize Agents’ Productivity in the Messages Module
How to Align AI Conversations with Your Brand Voice
How to Draft Customer Replies with AI
How to Convert Image to Text Using AI
How to Automate Calculations Using AI
Reporting and Analytics
Broadcasts Use Cases
How to Send a Simple Broadcast
How to Start a Workflow Based on Broadcast Response
How to Import to Broadcast via WhatsApp
How to Troubleshoot a Failed Broadcast
Integrations
Dialogflow
Dialogflow Overview
Dialogflow: Connecting to Dialogflow
Dialogflow: Creating a Chatbot
Dialogflow: Managing Intents
Dialogflow: Parameters
Dialogflow: Events
Dialogflow: Response Templates
Dialogflow: Custom Payloads
Dialogflow: Fulfillment Webhook Request
E-Commerce & CRM Integrations
E-Commerce Integration: Shopify
E-Commerce Integration: BigCommerce
E-Commerce Integration: WooCommerce
E-Commerce Integration: Magento
CRM Integration: HubSpot
CRM Integration: Salesforce
CRM Integration: Pipedrive
CRM Integration: ActiveCampaign
Zapier
Make
Developer API
Webhooks
Table of Contents
- Home
- Conversation Led Growth
- Automate Conversations
- How to Route VIP Contacts
How to Route VIP Contacts
Updated
by Joshua Lim
Benefits of Routing VIP Contacts
- Treating VIP Contacts differently ensures a more personalized and expedited service. This can lead to enhanced customer satisfaction and loyalty.
- Having a different route for VIP contacts allows businesses to efficiently allocate resources, ensuring that highly skilled agents cater to VIP customers’ unique needs.
Workflow Setup
Learn how to use the Workflow Template to identify and route VIP Contacts.
- Check Contact for an existing email
- If Contact has an Email: Get Contact Data and Route VIP Contact
- If Contact has no Email: Ask for Email and Route Contact
Check Contact for an Existing Email
In the Workflows module, click + Add Workflow > Click Routing: VIP Contacts > Click Use Template.

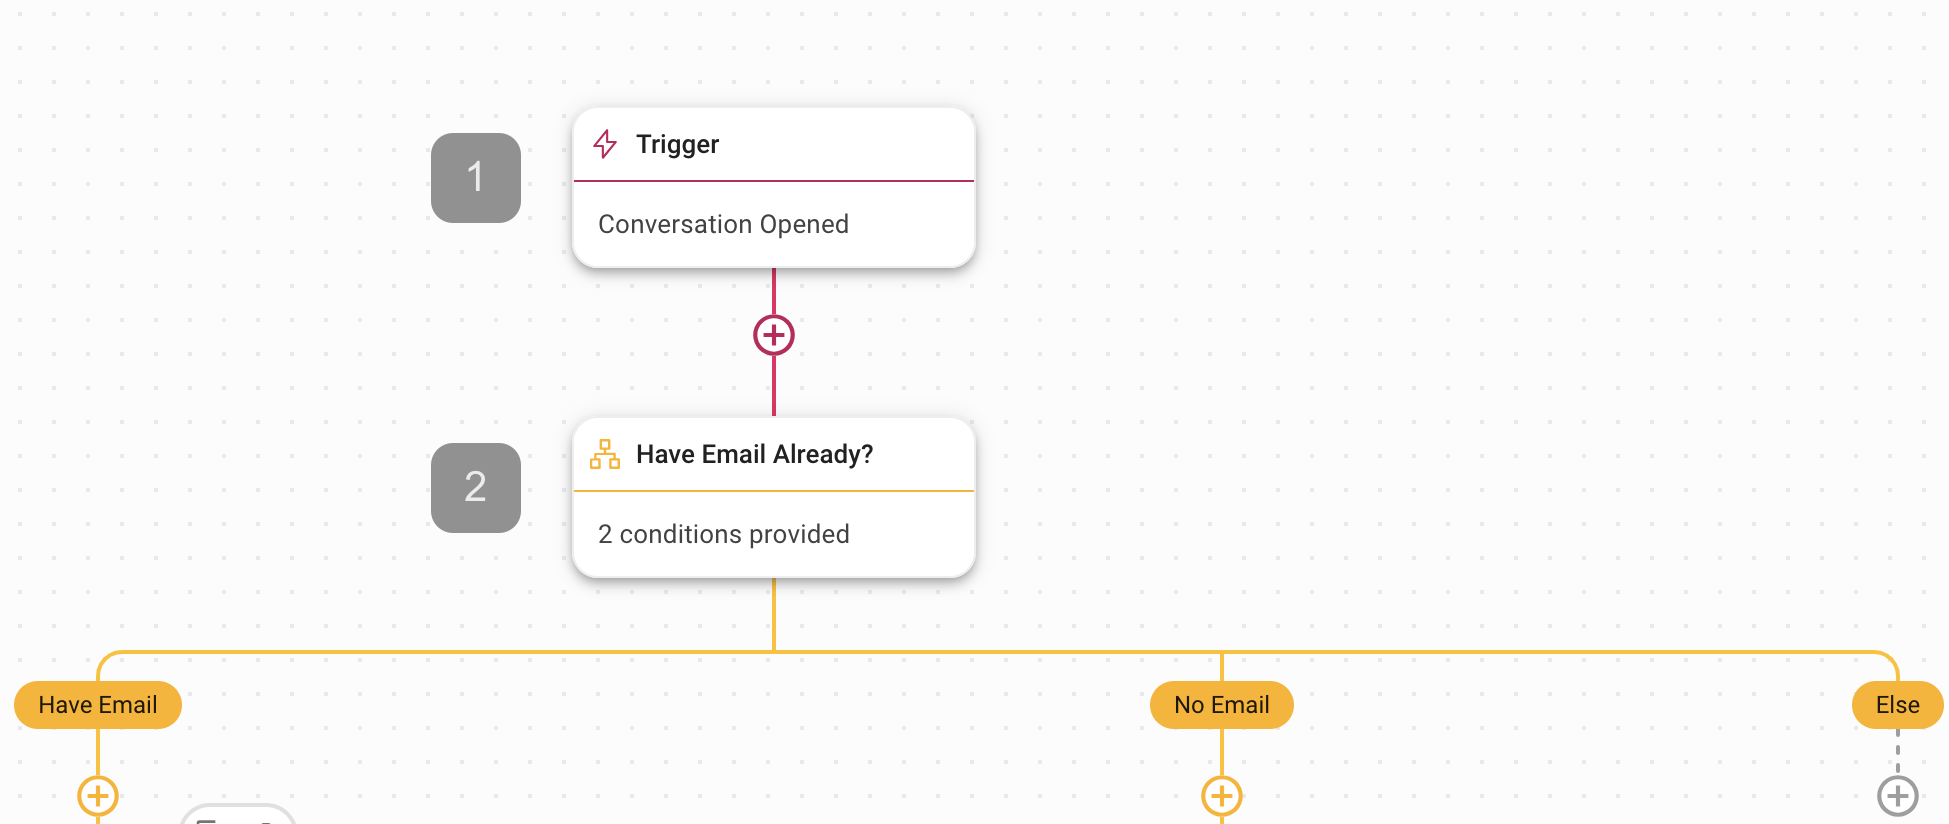
1. Trigger: The Workflow starts when a conversation is opened by a Contact.
2. Have Email Already?: This Branch step checks if the Contact has an email or not in the Contact’s Email Address field.
If Contact has an Email: Get Contact Data and Route VIP Contact

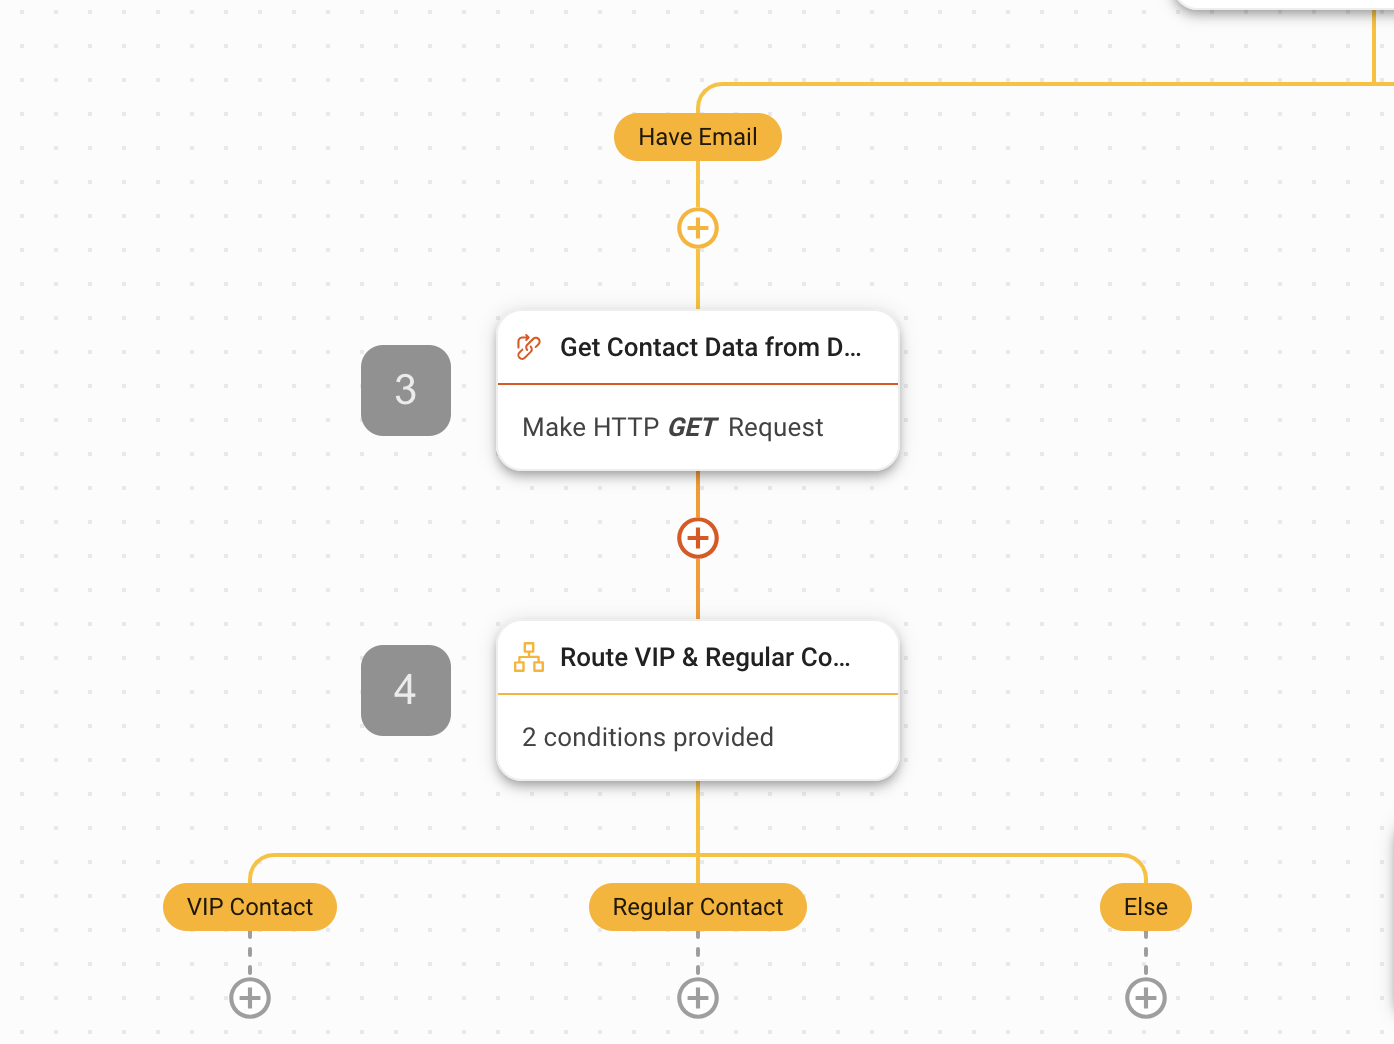
If the Contact has an Email in the Contact’s Email Address field, the Contact will be routed to the Have Email branch. In this branch, the Contact’s data will be retrieved from an external CRM or data warehouse via a HTTP request step to identify if the Contact is a VIP. If the Contact is a VIP, the Contact will be routed to the VIP Contact branch.
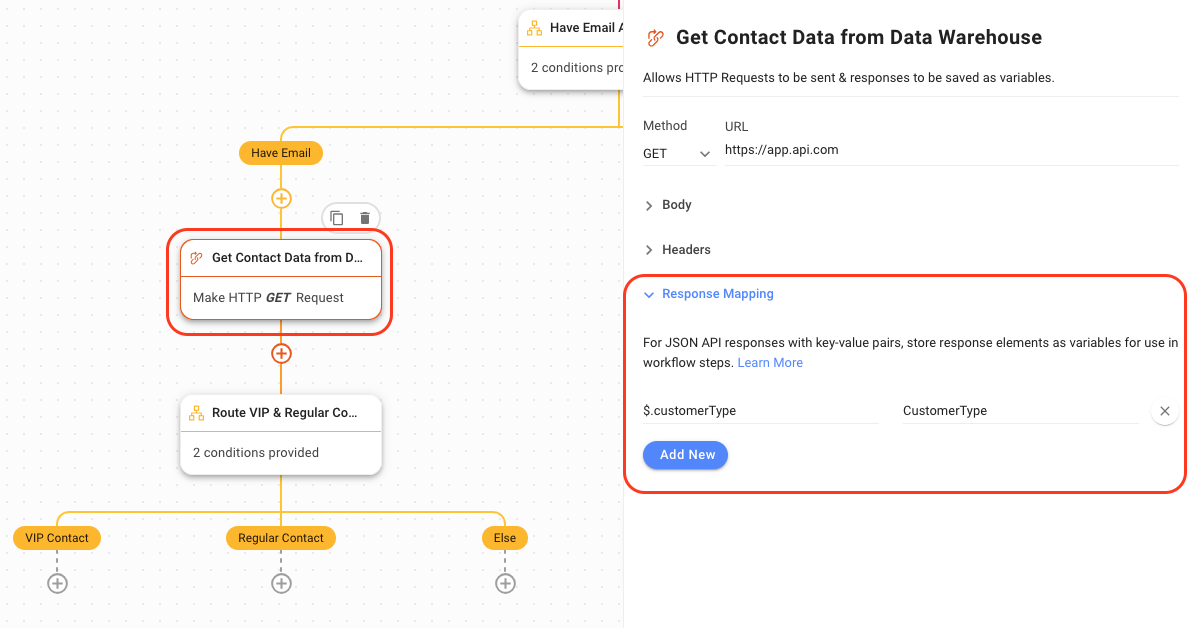
3. Get Contact Data from CRM or Data Warehouse: This is an HTTP request step that will retrieve the Contact’s details from a data warehouse such as a CRM. Click on the Workflow step to configure the Method, URL, and Header to retrieve the Contact’s data.
In the Response Mapping section, map the $.customerType(name of key from the response based on your CRM or Data Warehouse) key to store its value as a variable named CustomerType. Learn how to configure HTTP request step here or get a developer to assist with this configuration.

4. Route VIP & Regular Contact: In this Branch step, the Contact will be routed based on the CustomerType variable. If the CustomerType is VIP, it will be routed to the VIP Contact branch. If the CustomerType is not VIP, it will be routed to the Regular Contact branch.
Next Steps after Routing Contacts
Here are steps to consider after Routing VIP and Regular Contacts:
- VIP Contact: Add an Assign To step to assign to a specific user or dedicated agent to attend to the VIP Contact.
- Regular Contact: Add an Assign to step to assign to a user in a team or Workspace with an assignment logic that fits your business needs. Learn more about Assignment Strategy: Contact Distribution & Load Balancing.
If Contact has no Email: Ask For Email and Route Contact

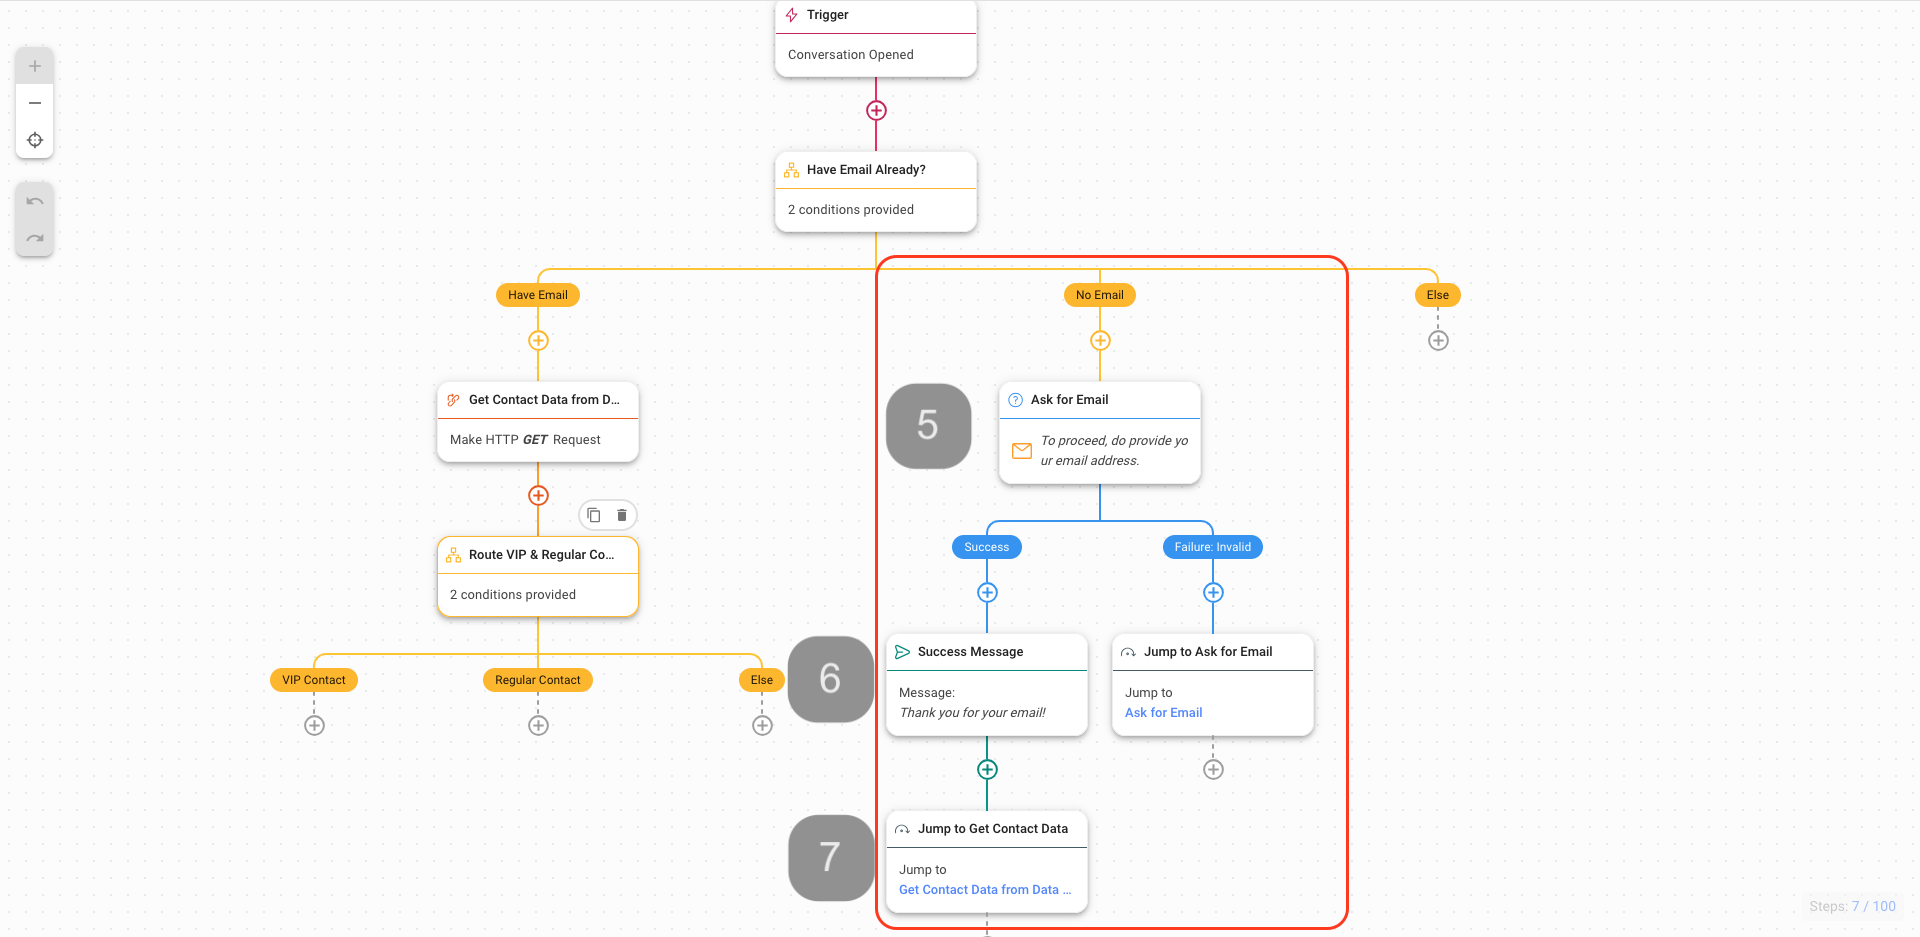
If the Contact does not have an Email in the Contact’s Email Address field, the Contact will be routed to the No Email branch. In this branch, the Contact will be prompted with a question to ask for their email. Once you have received the Contact’s email, a Success Message will be automatically sent and the Workflow will Jump to Get Contact Data where the Contact’s data will be retrieved from an external CRM or data warehouse via a HTTP request step to identify if the Contact is a VIP. If the Contact is a VIP, the Contact will be routed to the VIP Contact branch.
5. Ask for Email: Ask for the Contact’s email with the Ask a Question step.
6. The Ask for Email step can have a Success or Failure outcome:
- Success Message (Success): Once you have received the Contact’s email, the automation will send a Success Message to the Contact.
- Jump to Ask for Email (Failure: Invalid): If the Contact sent an invalid response to the Ask for Email question, the automation will jump back to the Ask for Email step up to 3 times. By the 4th time, if the response is still invalid, you may consider routing to an agent or a manager to manage this Contact.
7. Jump to Get Contact Data: After sending a Success Message, the Workflow will continue by getting Contact’s data and identifying if the Contact is a VIP using a Jump to step.
Feeling stuck? Do not fear.
Need assistance? Contact us for support. Help is here!This is the text block that will appear when the button is clicked.
How to Get Contacts’ Consent for Personal Data Collection
How to Promptly Transfer Conversation Between Agents
Related Articles
How to Route Contacts by Shifts
Automatically route customers by shifts or business hours.
How to Route Contacts by Team Functions
Automatically route customers based on the team the customers want to speak to or customers’ contact data.
How to Route New and Returning Contacts
Learn how to identify new & returning customers to route & manage them separately using Workflows.
