Quick Start
What is respond.io?
Setting Up an Account
Connecting Channels
Inviting Your Teammates
Getting Contacts to Message You
Automated Welcome and Away Messages
Responding to Messages
Glossary of Terms
Channels
WhatsApp Business Platform (API) Quick Start
Getting Ready for Inbound Conversations
Getting Ready for Promotional Messaging
WhatsApp Official Business Account (Green Tick)
Grow your WhatsApp Audience by Maximizing Entry Points
Get WhatsApp API Account for Government Agencies
Meta Business Verification
WhatsApp Message Templates
WhatsApp Pricing
WhatsApp Business Platform (API) Channel Configuration
WhatsApp Messaging Limits
Meta Product Catalog
Change Your WhatsApp Business Display Name
Migrating from WhatsApp Personal or WhatsApp Business App
Phone Number Migration to respond.io WhatsApp Business Platform (API)
Turn-off WhatsApp Number Two-Step Verification
WhatsApp Cloud API
360dialog WhatsApp
Twilio WhatsApp
MessageBird WhatsApp
Vonage WhatsApp
Phone Number Migration to WhatsApp Cloud API
Facebook Messenger
Facebook Messenger Overview
Facebook Messenger Quick Start
Facebook Chat Plugin
Facebook Private Replies
Facebook Message Tag
LINE
Viber
Telegram
Google Business Messages
Website Chat Widget
Website Chat Widget Overview
Website Chat Widget Quick Start
Install Website Chat Widget on WordPress
Install Website Chat Widget on Shopify
Install Website Chat Widget on Wix
Install Website Chat Widget on Joomla
Install Website Chat Widget on Squarespace
SMS
Custom Channel
Product
Dashboard & Reporting
Dashboard
Reports Overview
Reports: Conversations
Reports: Responses
Reports: Resolutions
Reports: Messages
Reports: Contacts
Reports: Assignments
Reports: Leaderboard
Reports: Users
Reports: Broadcasts
Messages
Messages Overview
Assignment and Closing a Conversation
Custom Inboxes
Interacting with Respond AI Prompts
Using AI Assist
Contacts
Contacts Overview
Contact Details
Merge Suggestions
Contact Activity
Contact Channels
Contact Import
Segments
Broadcasts Module
Workflows
Workflows Overview
Workflow Triggers
Workflow Steps Overview
Step: AI Agent
Step: Send a Message
Step: Ask a Question
Step: Assign To
Step: Branch
Step: Update Contact Tag
Step: Update Contact Field
Step: Open Conversation
Step: Close Conversation
Step: Add Comment
Step: Jump To
Step: Date & Time
Step: Wait
Step: Trigger Another Workflow
Step: HTTP Request
Step: Add Google Sheets Row
Dynamic Variables
Workspace Settings
Managing a Workspace
Workspace Settings: General
Workspace Settings: Users
Workspace Settings: Teams
Workspace Settings: Channels
Workspace Settings: Growth Widgets
Workspace Settings: Contact Fields
Workspace Settings: Integrations
Workspace Setting: Respond AI
Workspace Settings: Closing Notes
Workspace Settings: Snippets
Workspace Settings: Files
Workspace Settings: Data Export
Workspace Settings: Data Import
Organization Settings
Organization Overview
Organization Settings: General
Organization Settings: Users
Organization Settings: Workspaces
Organization Settings: WhatsApp Fees
Organization Settings: Billing & Usage
Organization Settings: Security
User Account
Mobile App
Installing respond.io Mobile App
Messaging From Your Mobile
Managing Notifications On Your Mobile
Configuring Mobile App Settings
Help Menu
Conversation Led Growth
Capture Conversations
How to Streamline Meeting Scheduling via CTC Ads
How to Route Contacts from CTC Ads to Agents
How to Automate Product Info Sharing in Conversations Initiated via CTC Ads
How to Send Outbound Sales Messages
How to Send Outbound Support Messages
How to Track Conversation Source from Multiple Websites
Automate Conversations
How to Maximize Customer Service Potential with AI Agent
How to Automate Contact Information Collection with AI
How to Automatically Qualify Contacts Based on Budget Using AI Agent
How to Block Contacts and Manage Spam
How to Create Automated Welcome and Away Messages
How to Create Automated Chat Menus
How to Route Contacts to Preferred AI Agent
How to Route Contacts by their Preferred Language
How to Route New and Returning Contacts
How to Route Contacts by Team Functions
How to Route Contacts by Shifts
How to Enrich Customer Data from a CRM or other Business Software
Assignment Strategy: How to Automate Contact Distribution & Load Balancing
Assignment Strategy: How to Unassign Agents after Conversations Closed
How to Collect Contacts’ Emails and Phone Numbers
How to Get Contacts’ Consent for Personal Data Collection
How to Route VIP Contacts
How to Promptly Transfer Conversation Between Agents
How to Guide Customers from Exploration to Purchase with Engaging Menus
How to Optimize Customer Onboarding with Automated & Customized Welcome Messages
How to Send CSAT to Customer and Save Data in Google Sheets or CRMs
Converse with Customers
How to Get a Complete View of the Customers
How to Simplify Customer Escalation with Automation
How to Transfer Contacts to the Next Shift Automatically
How to Optimize Agents’ Productivity in the Messages Module
How to Align AI Conversations with Your Brand Voice
How to Draft Customer Replies with AI
How to Convert Image to Text Using AI
How to Automate Calculations Using AI
Reporting and Analytics
Broadcasts Use Cases
How to Send a Simple Broadcast
How to Start a Workflow Based on Broadcast Response
How to Import to Broadcast via WhatsApp
How to Troubleshoot a Failed Broadcast
Integrations
Dialogflow
Dialogflow Overview
Dialogflow: Connecting to Dialogflow
Dialogflow: Creating a Chatbot
Dialogflow: Managing Intents
Dialogflow: Parameters
Dialogflow: Events
Dialogflow: Response Templates
Dialogflow: Custom Payloads
Dialogflow: Fulfillment Webhook Request
E-Commerce & CRM Integrations
E-Commerce Integration: Shopify
E-Commerce Integration: BigCommerce
E-Commerce Integration: WooCommerce
E-Commerce Integration: Magento
CRM Integration: HubSpot
CRM Integration: Salesforce
CRM Integration: Pipedrive
CRM Integration: ActiveCampaign
Zapier
Make
Developer API
Webhooks
Table of Contents
- Home
- Product
- Workflows
- Step: HTTP Request
Step: HTTP Request
 Updated
by Shing-Yi Tan
Updated
by Shing-Yi Tan
This Step enables sending HTTP Requests and saving their responses as Variables.
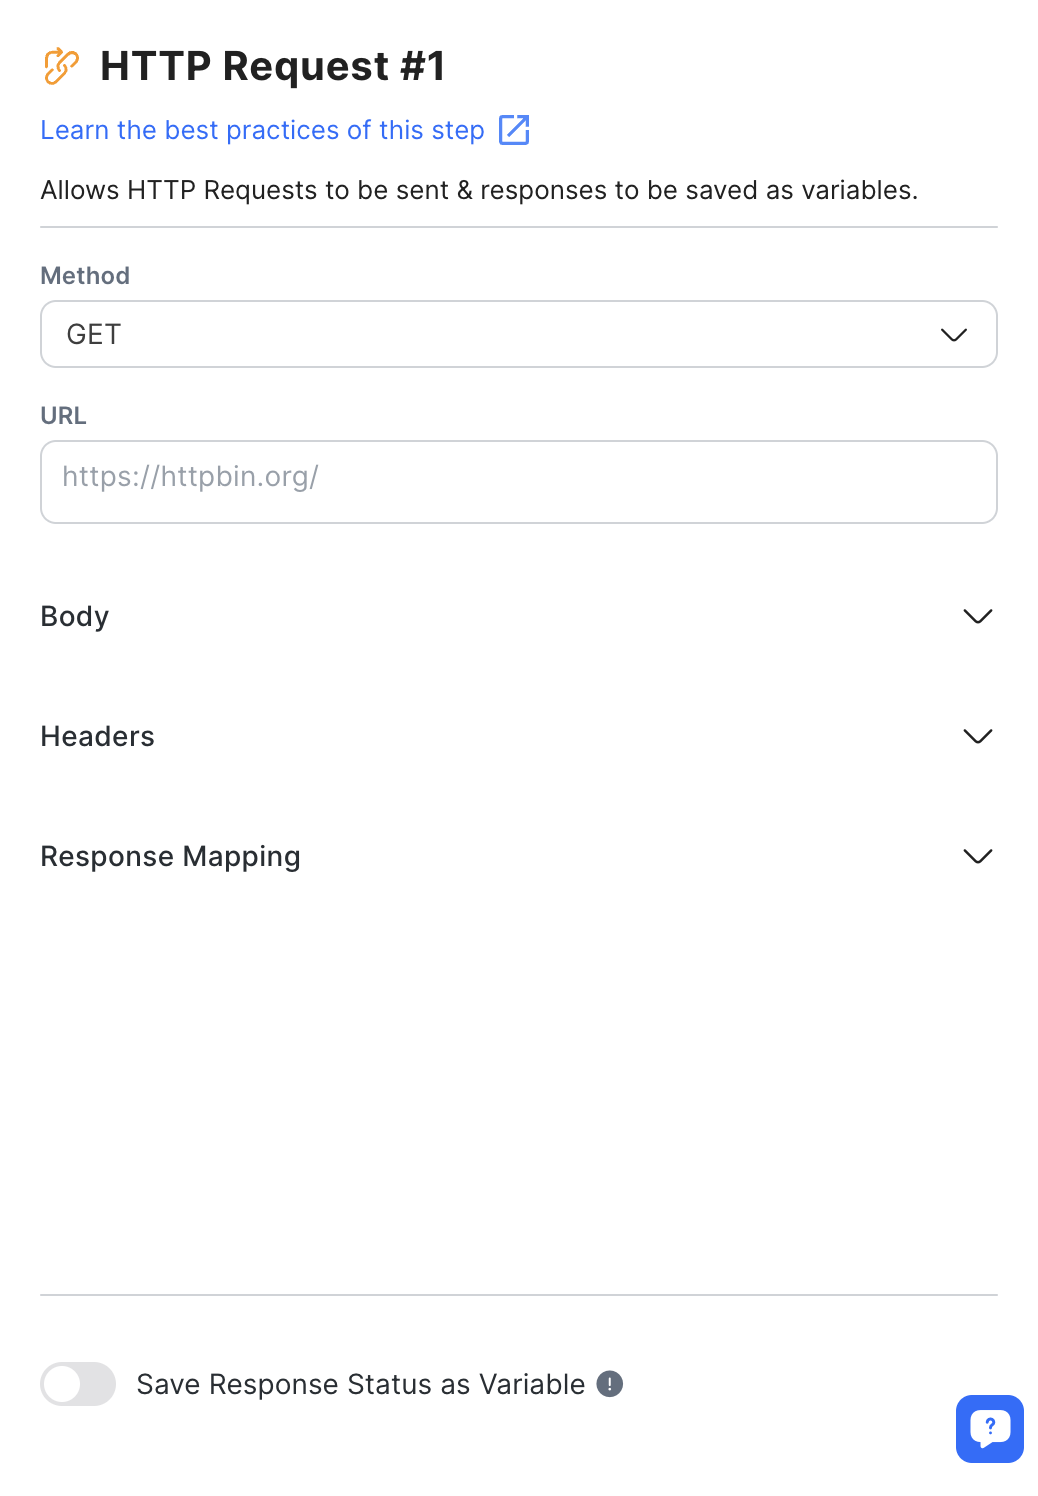
Configuration
There are two key configurations in the HTTP Request Step:
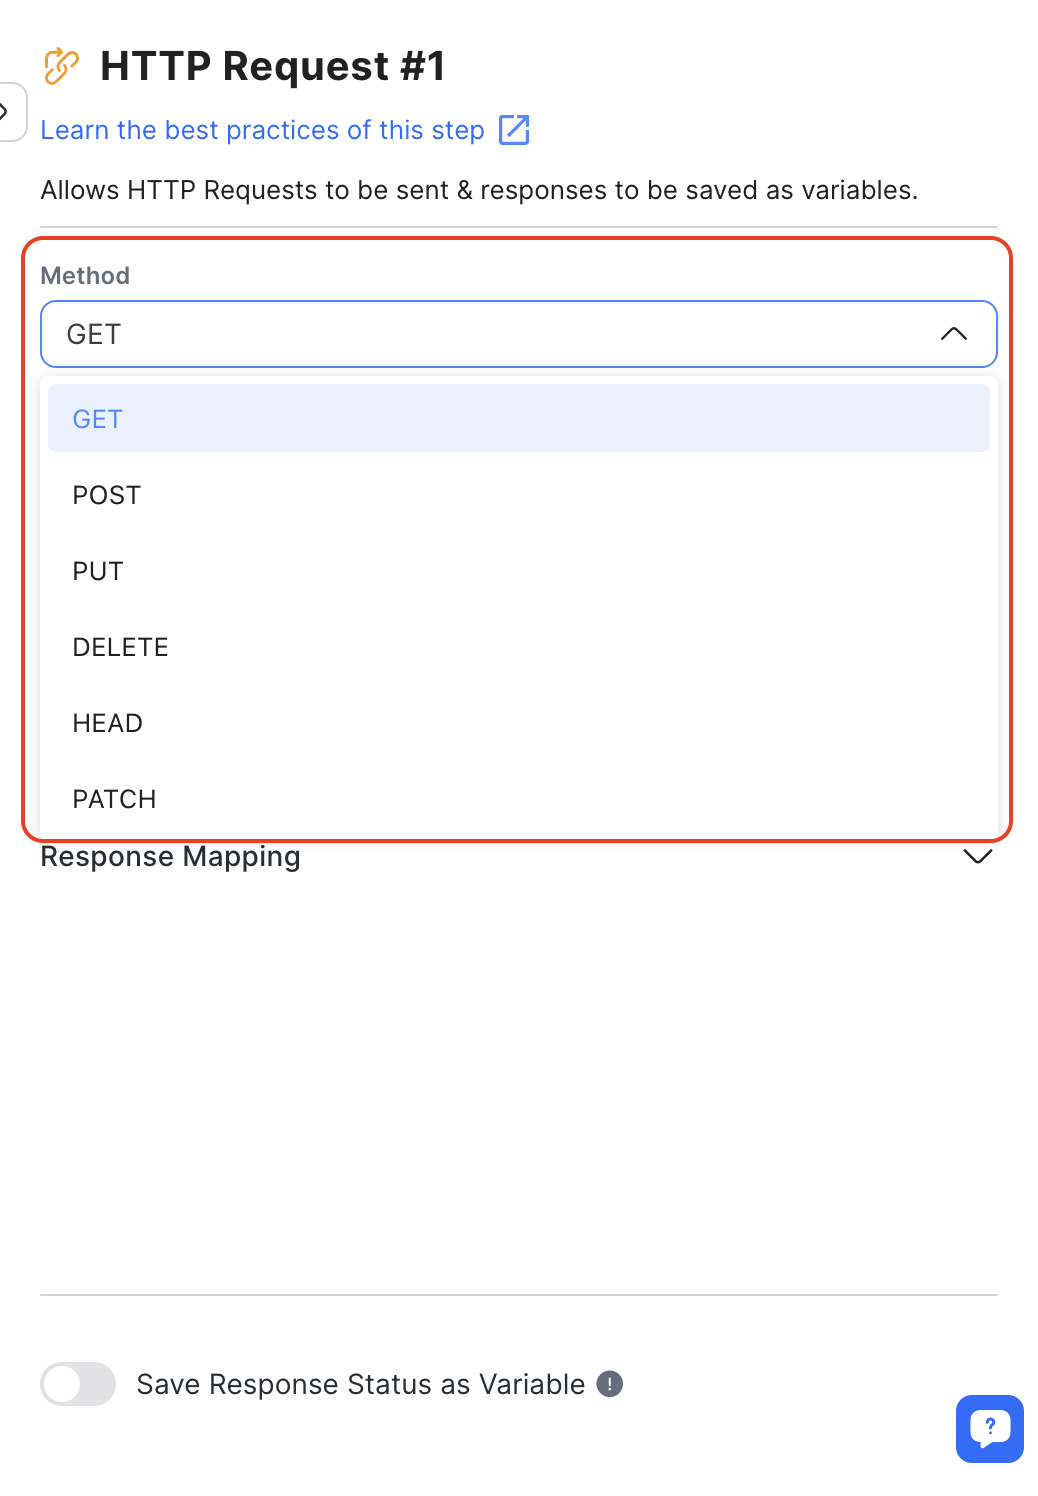
HTTP Request Method
The specific method required for the request. Choose the appropriate method from the dropdown list.
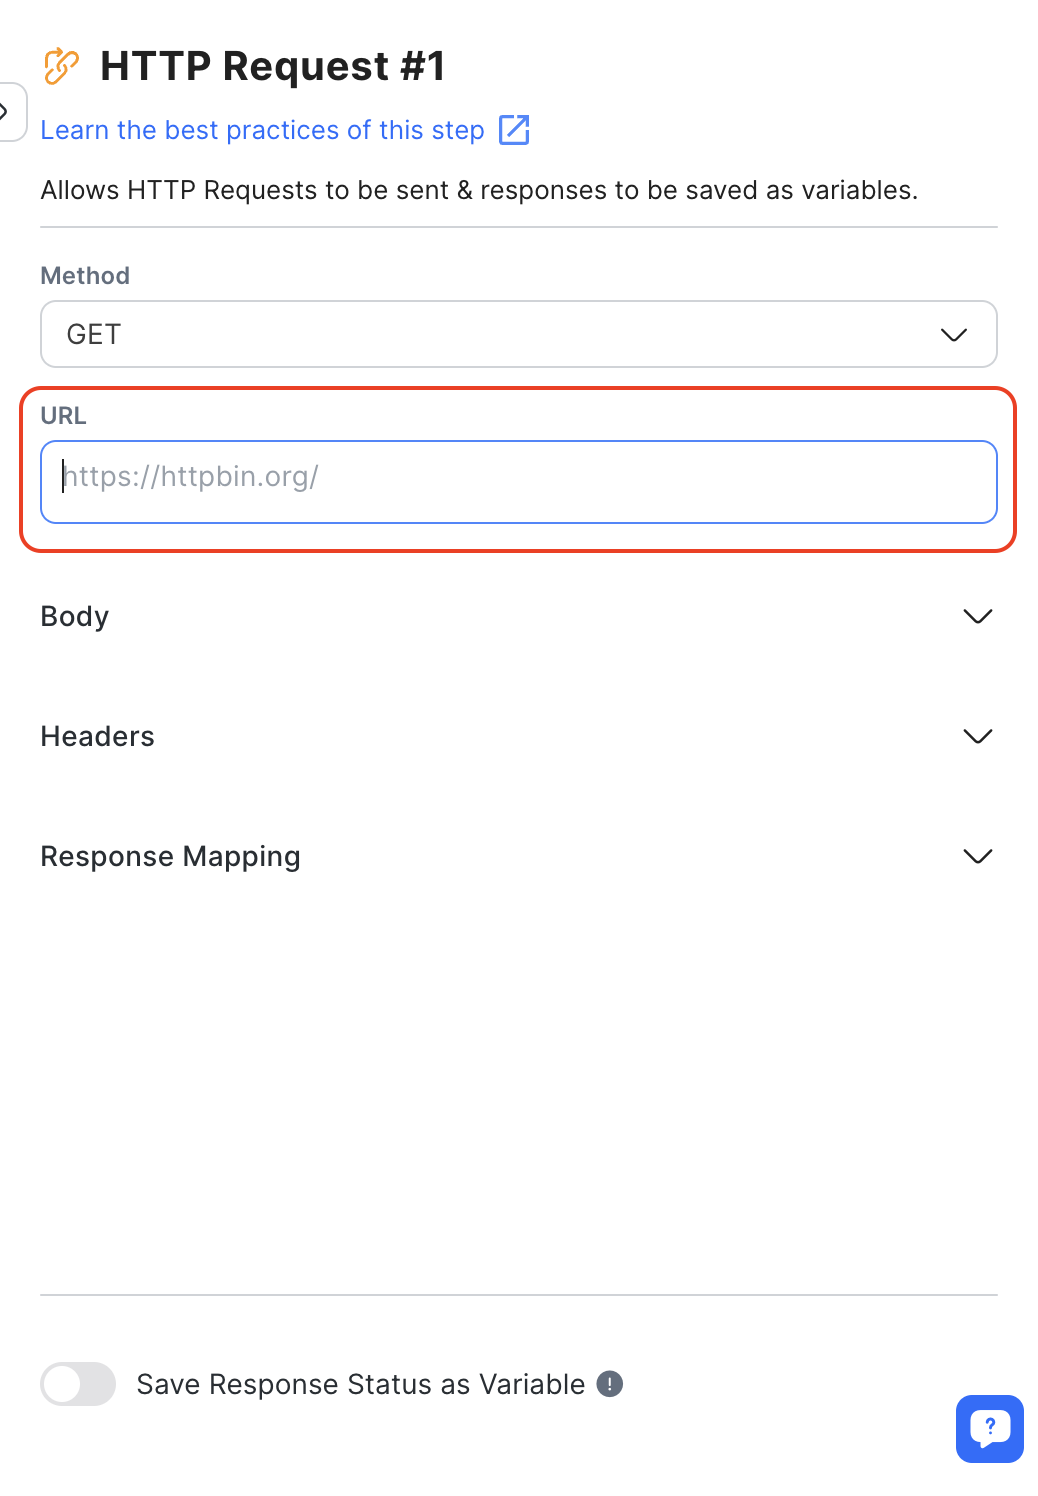
URL
In the URL field, enter the URL endpoint of the external API to retrieve data. To include Variables, use the "$" prefix to support the interpolation of static text and Variables.
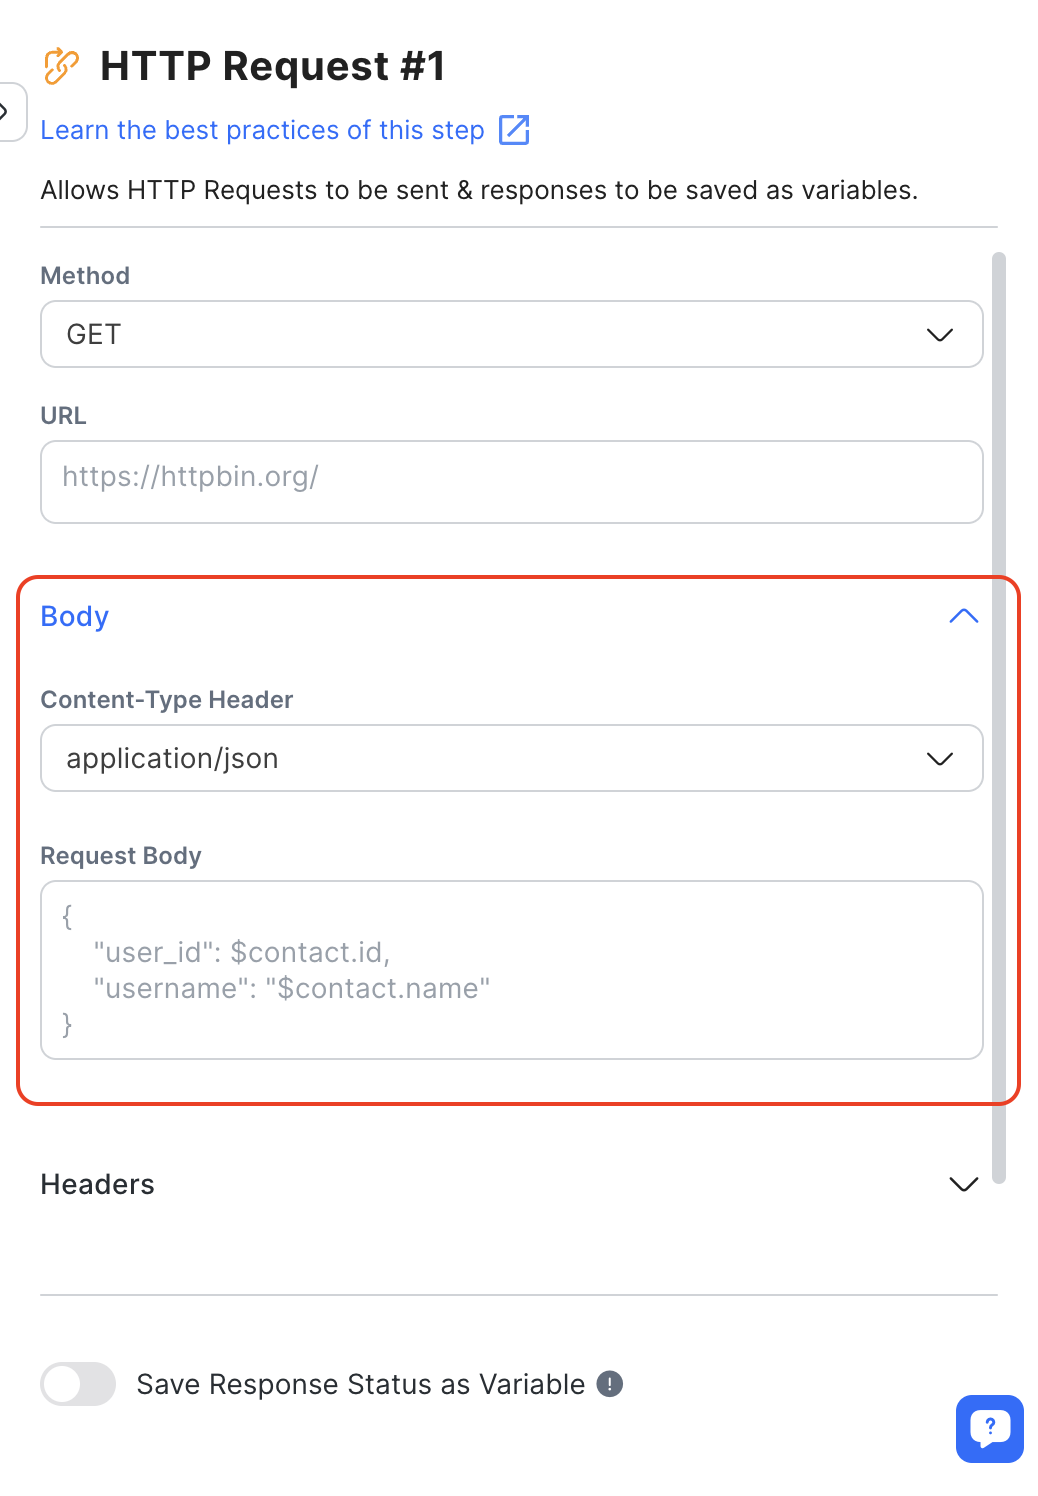
Body
To ensure correct decoding by the request recipient, expand the Body section and include a body along with the Content-Type Header.
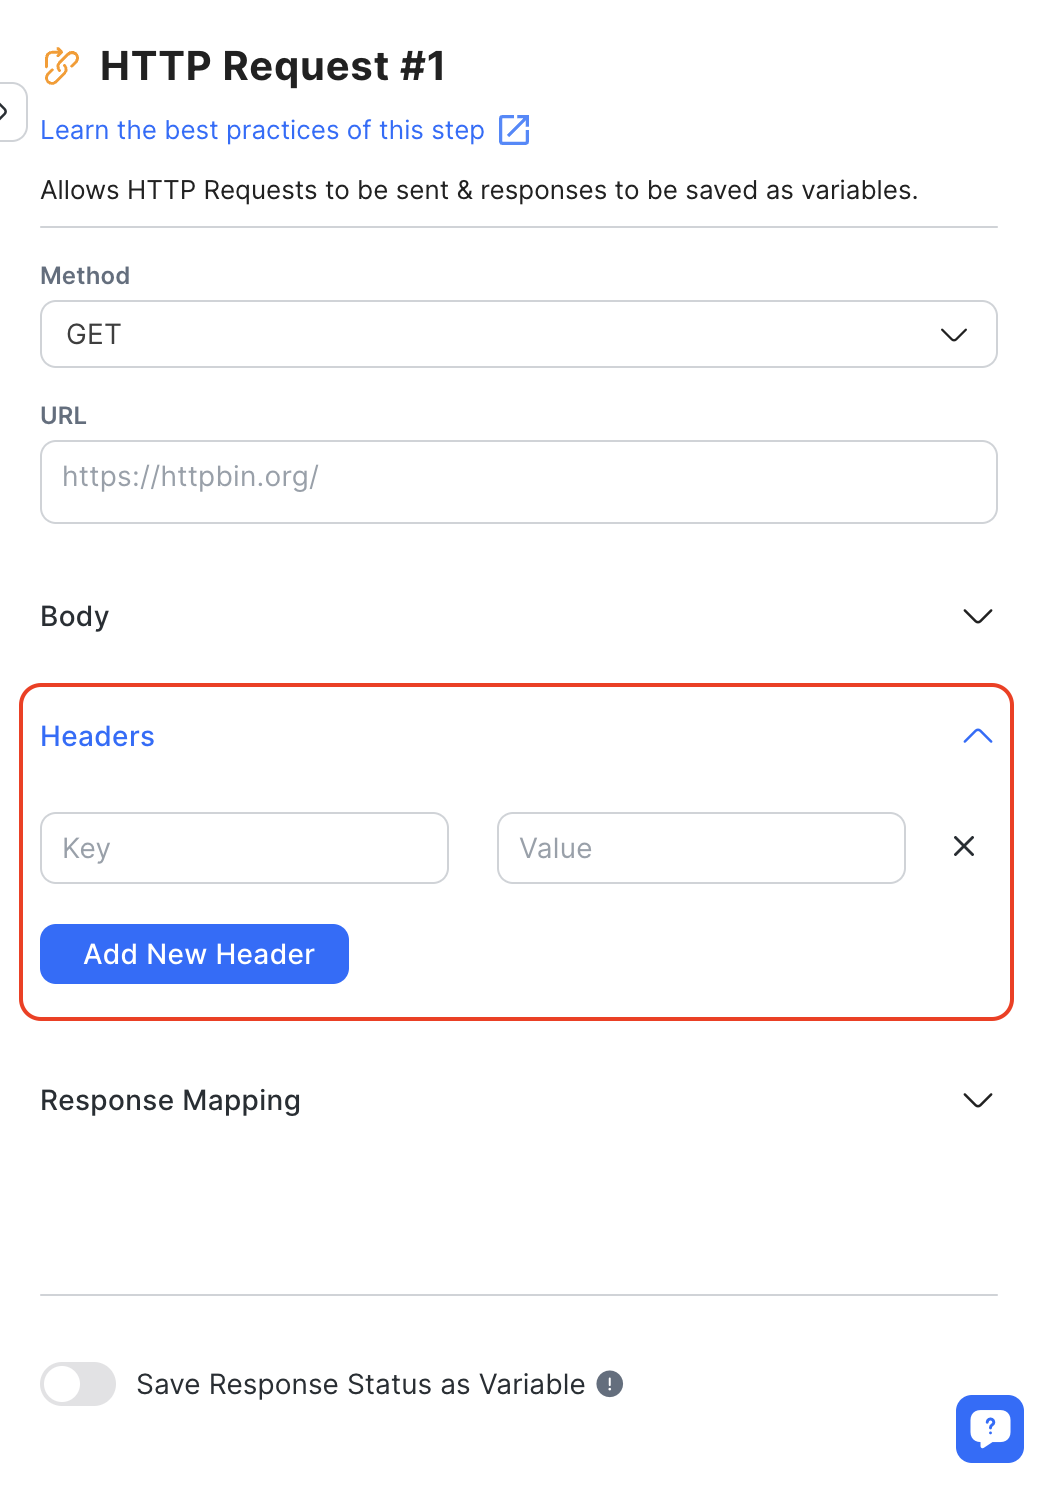
Headers
In the Header section, you can add headers to the HTTP request in pairs. The key represents the header name, and the value represents the header value. You can use Variables as headers by adding the prefix "$". However, remember that only up to 10 headers are allowed.
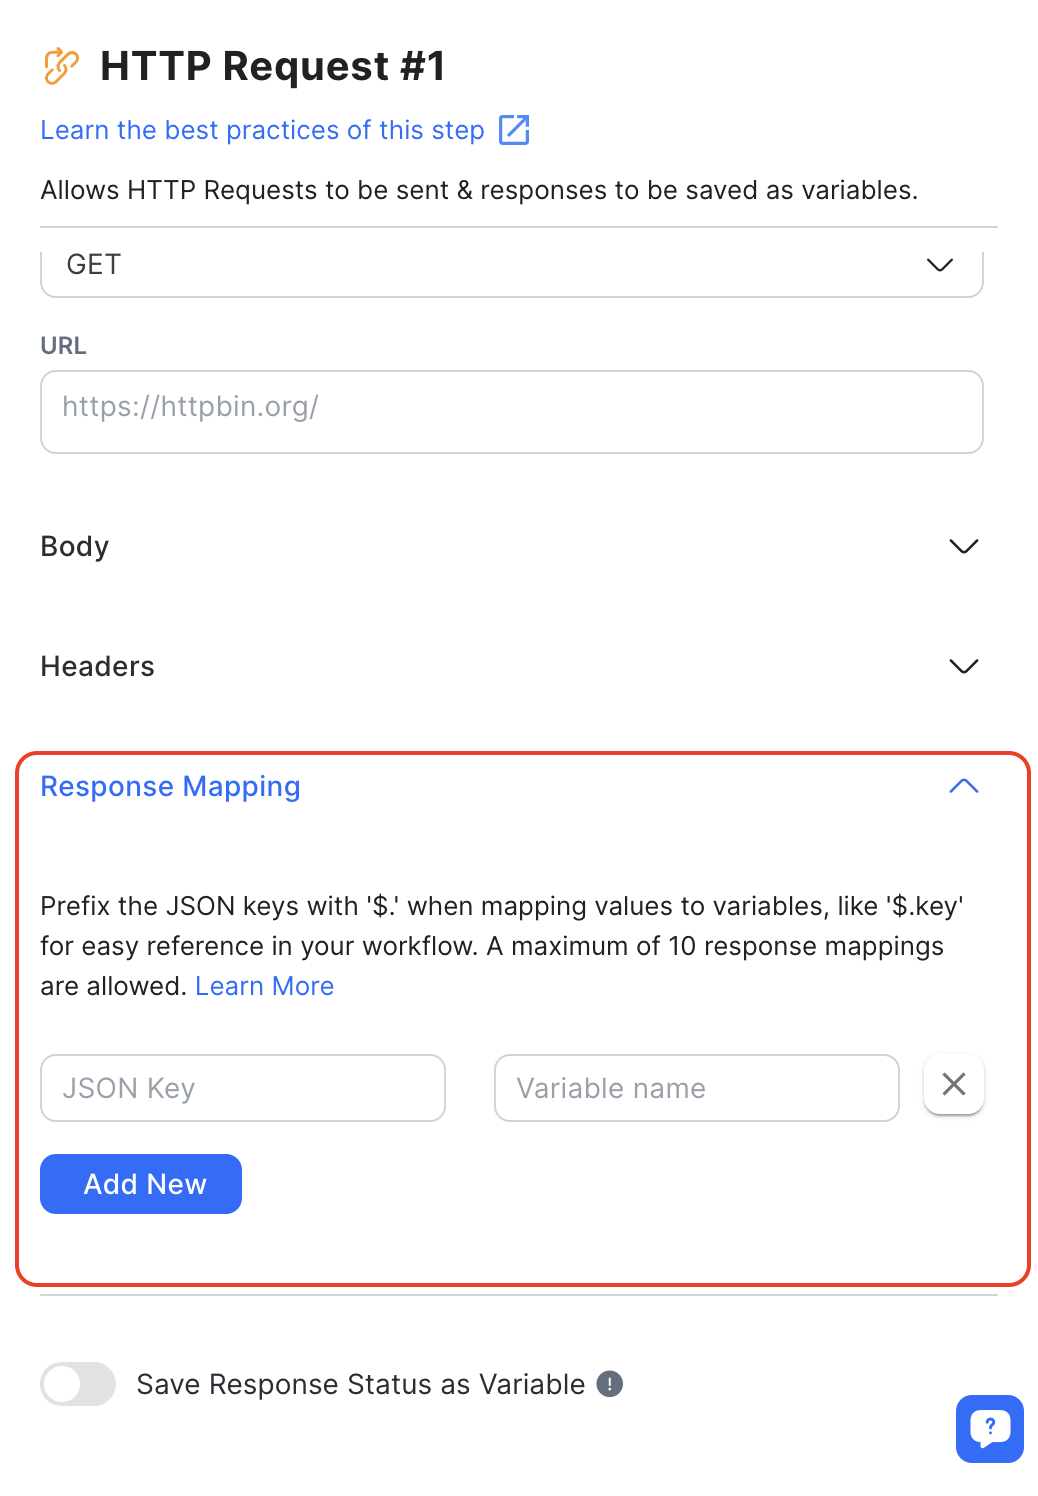
Response Mapping
For JSON API responses with key-value pairs, you can save specific response elements as Variables. In the Response Mapping section, input the key of the JSON object on the left and assign a name to the variable on the right. Keep in mind that only JSON responses can be saved, and you can have a maximum of 10 response mapping settings.
Examples:
To save a response in different formats, fill in the JSON key corresponding to the data you want to save.
{
    "name": "Jason",
    "zip_codes": "12345",
    "phone": "123123"
}
To save the phone number from the above response, use $.phone as the JSON key.
{
    "custom_fields": {
        "firstName": "John",
        "lastName": "Doe",
        "locale": "en_GB",
        "timezone": "5",
        "gender": "male",
        "phone": "123123",
        "email": "zy@respond.io",
        "customerid": "1"
    },
    "created_at": 1575618542
}
To save the phone number from the above response, use $.custom_fields.phone
     {
        "data": {
            "id":"1776025372480910",
            "contacts" : [
                {
                    "firstName":"John",
                    "lastName":"Doe",
		    "locale": "en_GB"
                },
                {
                    "firstName":"Jane",
                    "lastName":"Doe",
		    "locale": "en_GB"
                }
	    ]
        }
    }
To save the first name 'Jane' from the above response, use $.data.contacts[1].firstName.
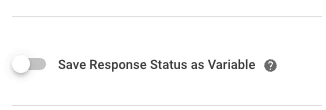
Save Response Status as Variable
To save the response status from the HTTP request as a Variable, turn ON the Save Response Status as Variable toggle. Then, name the Variable in the field provided.
How It Works
When activated, this step will send an HTTP request to the specified URL, using the defined body and header.
You can guide the Workflow based on the response status. For instance, you can create a Branch for "status code is equal to 200". If any other response status code is received, a Jump Step could return Contacts to the HTTP Request Step. Alternatively, the Contact could be directed to the Failure Branch if the branch conditions are not met. If there are no steps set up under the Failure Branch, the Workflow will conclude.
Potential Failure
To avoid potential failures in executing HTTP requests, ensure the following conditions are met:
- Use the correct HTTP method and Content-Type Header.
- Ensure to include the required protocol
http://orhttps://in your URL based on what your system supports to avoid request failure. - Ensure the Content-Type is valid.
- Exclude the port number from the URL.
- Avoid using a self-signed certificate in the URL.
- Verify that the authorization is valid.
- Ensure our IP addresses (52.74.35.155, 18.138.31.163, 54.169.155.20) are not blocked.
If any of the above conditions are not met, the Contact will skip this step and proceed with the remaining journey.
Best Practices
Here are some best practices for this step you can follow to optimize your workflow:
When the HTTP Request is Successful
- Save Response Status as a Variable:
- Ensure the first step is to save Response Status as Variable for further actions.
- Branch Step:
- Add a Branch Step to evaluate the HTTP request status.
- If the status is
200, the request is successful. - If not, configure an alert to notify the manager about the unsuccessful request.
- Google Sheet for Monitoring:
- Record the Response Status in a Google Sheet for a clear visibility on the success or failure of requests.
- Comment:
- Add a comment in your workflow to document the Response Status. This will help you track and review errors more efficiently.
When the HTTP Request Fails
- Save Response Status as a Variable:
- Similar to the successful request, save Response Status as Variable for error handling.
- Use Wait or Jump Step for Retries:
- Implement the Wait Step to pause before retrying an unsuccessful request.
- Alternatively, use the Jump Step to go back to the HTTP Request Step and attempt the request again.
- Comment:
- Document the error by creating a comment to record the HTTP Request error
- Include Contact details and tag the person in charge.
- Google Sheet for Monitoring:
- Utilize the Google Sheet Step to log the Contact information and error details for monitoring and review.
- Task Assignment:
- Assign the task to a specific user to initiate another process within the workflow and try again.
Suggested Use Cases
Here are some ways you can use the HTTP Request Step:
- Route VIP Contacts: Utilize the HTTP Request Step to fetch Contact details from a data warehouse like a CRM. This enables you to identify VIP Contacts, allowing for a personalized customer experience and distinguishing them from non-VIP Contacts.
Feeling stuck? Do not fear.
Need assistance? Contact us for support. Help is here!This is the text block that will appear when the button is clicked.
Step: Trigger Another Workflow
Step: Add Google Sheets Row
Related Articles
How to Route VIP Contacts
Learn how to identify VIP Customers to route and manage them differently from other Customers using Workflows.
How to Use Dynamic Variables
Learn about the four places to use dynamic variables: in the Messages Module, in Snippets, in Workflows and in Dialogflow.
Workflow Steps Overview
Learn about the fundamental configurations of a Workflow Step and discover all the available Steps in a Workflow.